Kontrolišite AC sijalicu pomoću bilo kojeg infracrvenog daljinskog upravljača koristeći Arduino i relej
U ovom tutorijalu naučit ćemo kako koristiti infracrveni daljinski upravljač za upravljanje AC sijalicom putem Arduina i relejnog modula. Ovaj projekat uključuje dekodiranje signala s daljinskog upravljača i njihovo korištenje za upravljanje relejem, koji će zauzvrat uključivati i isključivati AC sijalicu. Do kraja ovog tutorijala, moći ćete koristiti bilo koji infracrveni daljinski upravljač za upravljanje vašim rasvjetnim tijelom.
Koristit ćemo infracrveni prijemnik za hvatanje signala s daljinskog upravljača, a Arduino će interpretirati te signale kako bi izvršio određene radnje. Priloženi kod omogućit će vam odabir tipa daljinskog upravljača (crni ili bijeli) te odabir koristite li PCB ili goli modul za prijemnik. Obavezno pogledajte povezani video za dodatne detalje i pojašnjenja (u videu na 0:00).
Objašnjenje hardvera
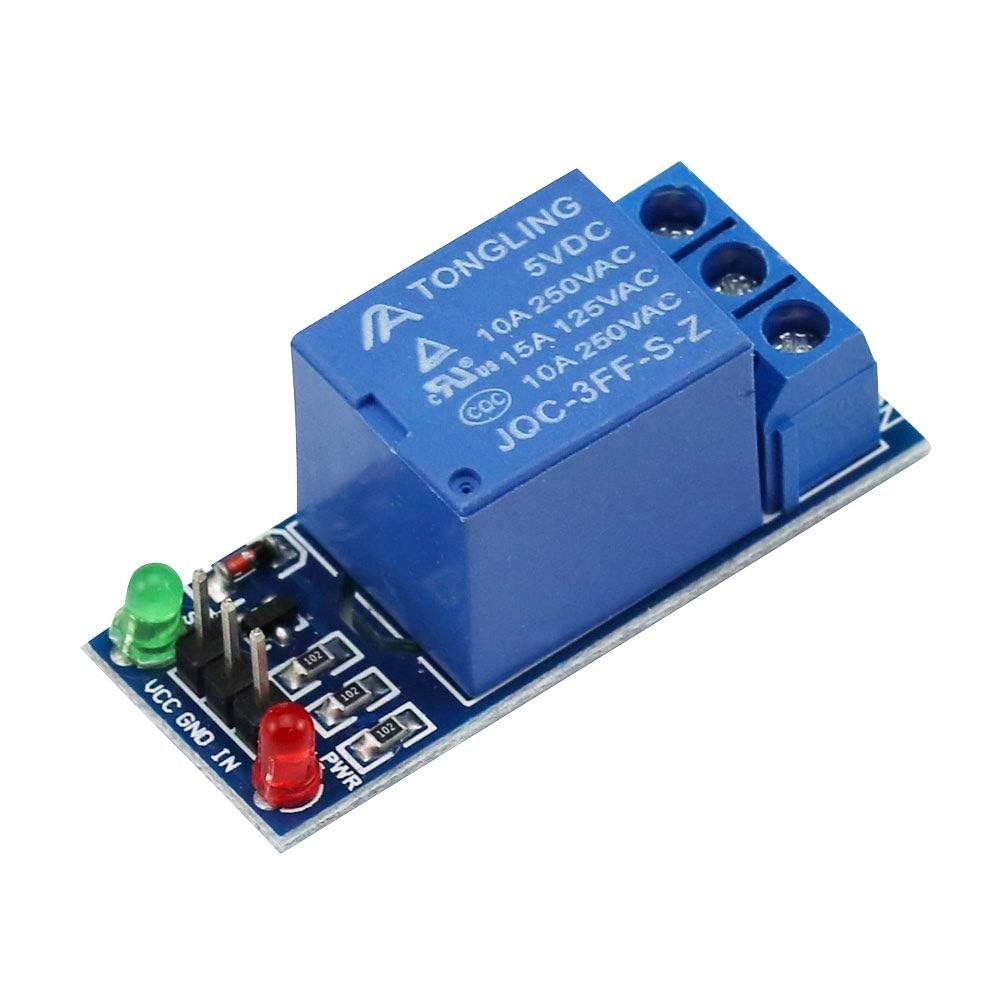
Za ovaj projekat, glavne komponente uključuju Arduino ploču, infracrveni prijemnik i relejni modul. Infracrveni prijemnik odgovoran je za hvatanje signala s daljinskog upravljača i slanje na Arduino. Relejni modul djeluje kao prekidač za upravljanje AC sijalicom, omogućavajući njeno uključivanje i isključivanje na osnovu primljenih signala.

Infracrveni prijemnik obično radi na frekvenciji od 38 kHz i može detektirati signale s udaljenosti od približno 10 do 15 metara. Kada Arduino primi signal, dekodira ga i koristi relej za upravljanje napajanjem sijalice.
Upute za povezivanje
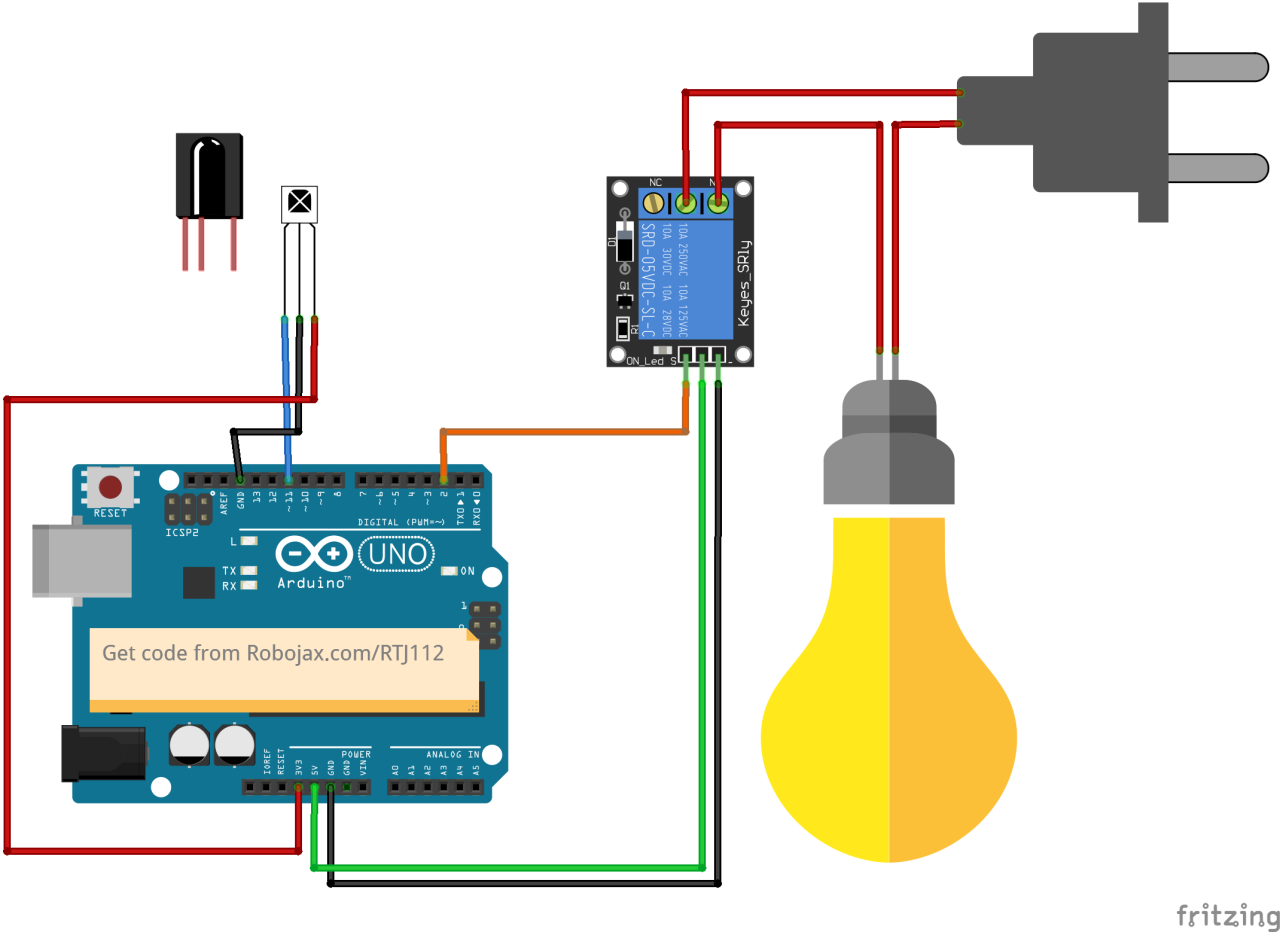
Započnite povezivanje spajanjem infracrvenog prijemnika na Arduino. VCC pin prijemnika spaja se na 5V pin na Arduinu, a ground pin spaja se na GND pin. Signalni pin s infracrvenog prijemnika treba spojiti na digitalni pin 11 na Arduinu.
Zatim spojite relejni modul. Kontrolni pin releja treba spojiti na digitalni pin 2 na Arduinu. Također, spojite VCC i GND pinove releja na 5V i GND na Arduinu. Na kraju, spojite AC sijalicu na relej prema specifikacijama releja kako biste osigurali siguran rad.
Primjeri koda i objašnjenje
U setup fazi programa, inicijaliziramo serijsku komunikaciju i postavljamo pin releja. Identifikator RECV_PIN postavljen je na 11, gdje je spojen signalni pin infracrvenog prijemnika. To nam omogućava primanje podataka s daljinskog upravljača.
void setup() {
  Serial.begin(9600);
  irrecv.enableIRIn(); // Pokreni prijemnik
  pinMode(RELAY_PIN, OUTPUT); // definiraj pin za relej kao OUTPUT
  digitalWrite(RELAY_PIN, HIGH); // postavi relej na OFF na početku
}
U loop funkciji, kontinuirano provjeravamo dolazne signale s daljinskog upravljača. Kada se signal detektira, vrijednost se dekodira i poduzima se odgovarajuća radnja na osnovu pritisnute tipke.
void loop() {
  if (irrecv.decode(&results)) {
    Serial.println(results.value, HEX); // Ispiši primljenu vrijednost
    robojaxValidateCode(results.value); // Validiraj kod
    irrecv.resume(); // Primaj sljedeću vrijednost
  }
  delay(100);
}
Funkcija robojaxValidateCode provjerava primljeni kod u odnosu na poznate vrijednosti za daljinski upravljač. Ovisno o tome koja je tipka pritisnuta, izvršit će odgovarajuću radnju koristeći relej.
void robojaxValidateCode(int cd) {
  if (type == 'W' && !PCB) {
    // Provjeri kodove bijelog daljinskog upravljača
    for (int i = 0; i < sizeof(whiteRemote) / sizeof(int); i++) {
      if (whiteRemote[i] == cd) {
        Serial.print("Pritisnuta tipka: ");
        Serial.println(whiteRemoteKey[i]);
        relayAction(whiteRemoteKey[i]); // Poduzmi radnju
      }
    }
  }
}
U ovoj funkciji, kod provjerava odgovara li pritisnuta tipka definiranim vrijednostima niza. Ako se pronađe podudaranje, poziva funkciju relayAction kako bi uključila ili isključila relej, ovisno o pritisnutoj tipki.
Demonstracija / Šta očekivati
Nakon što završite povezivanje i uploadate kod, možete koristiti svoj infracrveni daljinski upravljač za upravljanje AC sijalicom. Pritisnite određene tipke na daljinskom upravljaču i relej bi trebao aktivirati ili deaktivirati sijalicu u skladu s tim. Obavezno testirajte svaku tipku kako biste vidjeli njen odgovor (u videu na 5:00).
Vremenske oznake videa
- 00:00 Početak
- 00:49 Uvod
- 02:00 Povezivanje i spajanje
- 05:27 Objašnjenje Arduino koda
- 09:51 Demonstracija upravljanja AC sijalicom s različitim daljinskim upravljačem
- 13:13 Korištenje TV daljinskog upravljača za upravljanje AC sijalicom
Slike

/*
 * Original library from - http://arcfn.com
 *
 * This Arduino code decodes any remote code and then you can control an AC load using a relay
 * sold on eBay for Arduino.
 * You have to select the type of your remote as Black or White in the code below
 * and also select your receiver 1838 as either a PCB or bare module. See video for details
 *
 * You have to watch this video: https://youtu.be/muAkBQb24NI
 * before proceeding with this code.
 *
 * Modified/Written by Ahmad Shamshiri
 * on July 31, 2018 at 20:33 in Ajax, Ontario, Canada
 * for Robojax.com
 * Watch video instructions for this code: https://youtu.be/j5kb0WBpD30
 * Get other Arduino codes from Robojax.com
 *
 */

#include <IRremote.h>

int RECV_PIN = 11;
const char type ='W';// W for white, B for black. Must keep single quotes like 'B' or 'W'
const boolean PCB = 1;// if receiver is PCB set to 1, if not set to 0. See video for details
boolean displayCode = true;// to display remote code. if not, set to false

//***** Relay settings begins
const int RELAY_PIN = 2;//
const String ON="3";// turn relay ON with + key on remote
const String OFF="1";// turn relay OFF with - key on remote
//**** Relay settings ends

IRrecv irrecv(RECV_PIN);


// this is array holding codes for White Remote when used with PCB version of receiver
unsigned int whiteRemotePCB[] ={
            0xE318261B, // CH-
            0x511DBB,   // CH
            0xEE886D7F,  // CH+

            0x52A3D41F, // |<<
            0xD7E84B1B, // >>|
            0x20FE4DBB, // >||

            0xF076C13B, // -
            0xA3C8EDDB, // +
            0x12CEA6E6, // EQ

            0xC101E57B, // 0
            0x97483BFB, // 100+
            0xF0C41643, // 200+

            0x9716BE3F, // 1
            0x3D9AE3F7, // 2
            0x6182021B, // 3

            0x8C22657B, // 4
            0x488F3CBB, // 5
            0x449E79F,  // 6

            0x32C6FDF7, // 7
            0x1BC0157B, // 8
            0x3EC3FC1B  // 9
            };

// this is array holding codes for White Remote when used with non-PCB version of receiver
unsigned int whiteRemote[] ={
            0xFFA25D, // CH-
            0xFF629D,   // CH
            0xFFE21D,  // CH+

            0xFF22DD, // |<<
            0xFF02FD, // >>|
            0xFFC23D, // >||

            0xFFE01F, // -
            0xFFA857, // +
            0xFF906F, // EQ

            0xFF6897, // 0
            0xFF9867, // 100+
            0xFFB04F, // 200+

            0xFF30CF, // 1
            0xFF18E7, // 2
            0xFF7A85, // 3

            0xFF10EF, // 4
            0xFF38C7, // 5
            0xFF5AA5,  // 6

            0xFF42BD, // 7
            0xFF4AB5, // 8
            0xFF52AD  // 9
            };
// key lables of white remote
 String whiteRemoteKey[] ={
            "CH-",
            "CH",
            "CH+",

            "|<<",
            ">>|",
            ">||",

            "-",
            "+",
            "EQ",

            "0",
            "100+",
            "200+",

            "1",
            "2",
            "3",

            "4",
            "5",
            "6",

            "7",
            "8",
            "9"
            };

// this is array holding codes for Black Remote when used with non-PCB version of receiver
 unsigned int blackRemote[] ={
            0xFF629D, // ^
            0xFF22DD,   // <
            0xFF02FD,  // OK
            0xFFC23D, // >
            0xFFA857, // v

            0xFF6897, // 1
            0xFF9867, // 2
            0xF0C41643, // 3

            0xFF30CF, // 4
            0xFF18E7, // 5
            0xFF7A85,  // 6

            0xFF10EF, // 7
            0xFF38C7, // 8
            0xFF5AA5,  // 9

            0xFF42BD, // *
            0xFF4AB5, // 0
            0xFF52AD  // #
            };

// this is array holding codes for Black Remote when used with PCB version of receiver
 unsigned int blackRemotePCB[] ={
            0x511DBB, // ^
            0x52A3D41F,   // <
            0xD7E84B1B,  // OK
            0x20FE4DBB, // >
            0xA3C8EDDB, // v


            0xC101E57B, // 1
            0x97483BFB, // 2
            0xF0C41643, // 3

            0x9716BE3F, // 4
            0x3D9AE3F7, // 5
            0x6182021B,  // 6

            0x8C22657B, // 7
            0x488F3CBB, // 8
            0x449E79F,  // 9

            0x32C6FDF7, // *
            0x1BC0157B, // 0
            0x3EC3FC1B  // #
            };

// Black remote key names
 String blackRemoteKey[] ={
            "^",
            "<",
            "OK",
            ">",
            "v",

            "1",
            "2",
            "3",

            "4",
            "5",
            "6",

            "7",
            "8",
            "9",

            "*",
            "0",
            "#"
            };

decode_results results;


void setup()
{
  Serial.begin(9600);
  // In case the interrupt driver crashes on setup, give a clue
  // to the user what's going on.
  Serial.println("Robojax IR Decode");
  Serial.println("Control Relay with Remote");
  irrecv.enableIRIn(); // Start the receiver

  pinMode(RELAY_PIN,OUTPUT);// define a pin for relay as OUTPUT
  digitalWrite(RELAY_PIN, HIGH);// set relay to OFF at the begining
}

void loop() {

  if (irrecv.decode(&results)) {
    if(displayCode)Serial.println(results.value, HEX);
    robojaxValidateCode(results.value);// used the "robojaxValidateCode" bellow
    irrecv.resume(); // Receive the next value
  }
  delay(100);
}

/*
 * function: robojaxValidateCode
 * validates the remote code and prints the correct key name
 * cd is code passed from the loop
 * Written by A. S. for Robojax
 */
void robojaxValidateCode(int cd)
{

  // Robojax IR Remote decoder
  int found=0;

 if(type =='W' && !PCB)
 {
    // Robojax IR White Remote decoder
    // if type is set to 'W' (white remote) and PCB=0 then check White remote code
      for(int i=0; i< sizeof(whiteRemote)/sizeof(int); i++)
      {
        if(whiteRemote[i] ==cd)
        {

          Serial.print("Key pressed:");
          Serial.println(whiteRemoteKey[i]);
          relayAction(whiteRemoteKey[i]);// take action
          found=1;
        }// if matched
      }// for
 }else if(type =='W' && PCB){
    // Robojax IR White Remote decoder
    // if type is set to 'W' (white remote) and PCB=1 then check White remote code
      for(int i=0; i< sizeof(whiteRemotePCB)/sizeof(int); i++)
      {
        if(whiteRemotePCB[i] ==cd)
        {

          Serial.print("Key pressed:");
          Serial.println(whiteRemoteKey[i]);
          relayAction(whiteRemoteKey[i]);// take action
          found=1;
        }// if matched
      }// for
 }else if(type =='B' && PCB){
    // Robojax IR Black Remote decoder
       // if type is set to 'B' (black remote) and PCB=1 then check Black remote code
       for(int i=0; i< sizeof(blackRemotePCB)/sizeof(int); i++)
      {
        // Robojax IR black Remote decoder
        if(blackRemotePCB[i] ==cd)
        {

          Serial.print("Key pressed:");
          Serial.println(blackRemoteKey[i]);
         relayAction(blackRemoteKey[i]);// take action
          found=1;
        }// if matched
      }// for
 }else{

      // if type is set to 'B' (black remote) and PCB =0 then check Black remote code
       for(int i=0; i< sizeof(blackRemote)/sizeof(int); i++)
      {
        // Robojax IR black Remote decoder
        if(blackRemote[i] ==cd)
        {

          Serial.print("Key pressed:");
          Serial.println(blackRemoteKey[i]);
          relayAction(blackRemoteKey[i]);// take action

          found=1;
        }// if matched
      }// for
 }// else
  if(!found){
    if(cd !=0xFFFFFFFF)
      {
    Serial.println("Key unknown");
      }
  }// found
}// robojaxValidateCode end

/*
 *
 * relayAction()
 * receives string "value" as input and based on the settings,
 * turns relay pin HIGH or LOW
 */
void relayAction(String value)
{
  // Robojax IR Relay control
   if(value == ON)
   {
    digitalWrite(RELAY_PIN, LOW);// Turn relay ON
    Serial.println("Relay Turned ON");
   }

   if(value == OFF)
   {
    digitalWrite(RELAY_PIN, HIGH);// Turn relay OFF
    Serial.println("Relay Turned OFF");
   }
}//relayAction end
Stvari koje bi vam mogle zatrebati
-
Amazon
-
eBay
Resursi i reference
Još nema resursa.
Datoteke📁
Fritzing datoteka
-
VS1838B Infrared receiver
VS1838B_part.fzpz