ถอดรหัสรีโมทขาวดำด้วย Arduino
ในบทช่วยสอนนี้ เราจะเรียนรู้วิธีการถอดรหัสปุ่มจากรีโมทอินฟราเรดขาวดำโดยใช้ Arduino และตัวรับสัญญาณอินฟราเรด เมื่อสิ้นสุดโปรเจกต์นี้ คุณจะสามารถระบุได้ว่าปุ่มใดถูกกดบนรีโมทและแสดงข้อมูลนั้นบนซีเรียลมอนิเตอร์ สิ่งนี้มีประโยชน์สำหรับการควบคุมอุปกรณ์ด้วยรีโมทใดๆ ที่คุณอาจมี เช่น ทีวีหรือเครื่องใช้ไฟฟ้าอื่นๆ (ในวิดีโอที่ 01:00)

เราจะใช้การตั้งค่าที่เรียบง่ายซึ่งประกอบด้วย Arduino โมดูลตัวรับสัญญาณอินฟราเรด และโค้ดที่จำเป็นในการถอดรหัสสัญญาณ ตัวรับสัญญาณอินฟราเรดจะจับสัญญาณจากรีโมท และ Arduino จะแปลความหมายสัญญาณเหล่านั้นเพื่อระบุว่าปุ่มใดถูกกด โปรเจกต์นี้ตรงไปตรงมาและสามารถปรับใช้กับรีโมทคอนโทรลต่างๆ ได้

อธิบายฮาร์ดแวร์
ส่วนประกอบหลักสำหรับโปรเจกต์นี้ประกอบด้วยบอร์ด Arduino และโมดูลตัวรับสัญญาณอินฟราเรด ซึ่งโดยทั่วไปกำหนดเป็น VS1838B Arduino จะทำหน้าที่เป็นตัวควบคุมหลัก ดำเนินการโค้ดที่ประมวลผลสัญญาณที่ได้รับจากรีโมท ตัวรับสัญญาณอินฟราเรดจะจับสัญญาณอินฟราเรดที่ปล่อยออกมาจากรีโมทคอนโทรลและแปลงเป็นรูปแบบที่ Arduino สามารถเข้าใจได้
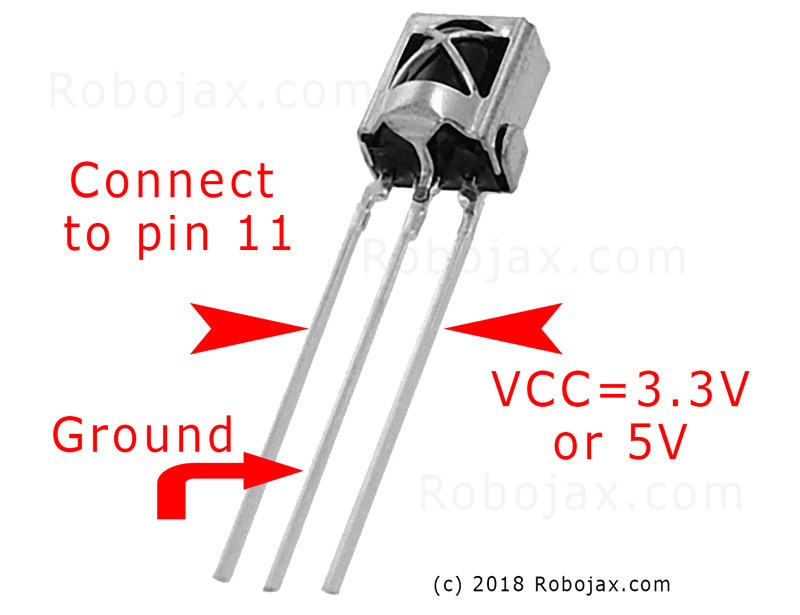
VS1838B ทำงานที่ช่วงแรงดันไฟฟ้า 2.7V ถึง 5.5V ทำให้เข้ากันได้กับบอร์ด Arduino ส่วนใหญ่ สามารถตรวจจับสัญญาณได้จากระยะ 10 ถึง 15 เมตร ขึ้นอยู่กับสภาพแวดล้อม ตัวรับสัญญาณอินฟราเรดจะส่งสัญญาณดิจิทัลที่บ่งบอกว่าปุ่มใดบนรีโมทถูกกด ทำให้ Arduino สามารถตอบสนองได้อย่างเหมาะสม
รายละเอียดดาต้าชีต
| ผู้ผลิต | VS1838B |
|---|---|
| หมายเลขชิ้นส่วน | VS1838B |
| แรงดันไฟฟ้าลอจิก/IO | 2.7–5.5 V |
| แรงดันไฟฟ้าจ่าย | 5 V |
| กระแสเอาต์พุต (ต่อช่อง) | 1.5 mA |
| ระยะรับสัญญาณ | 10–15 ม. |
| ความถี่อินพุต | 38 kHz |
| กระแสไฟฟ้าขณะนิ่ง | 0.8 mA (โดยทั่วไป) |
| มุมการทำงาน | 70 องศา |
| แพ็คเกจ | TO-220 |
- ตรวจสอบให้แน่ใจว่าแรงดันไฟฟ้าจ่ายถูกต้องเพื่อหลีกเลี่ยงความเสียหายต่อตัวรับสัญญาณอินฟราเรด
- เก็บโมดูลตัวรับสัญญาณให้ห่างจากแสงแดดโดยตรงหรือแหล่งอินฟราเรดที่แรง
- ใช้ตัวต้านทานพูลอัพหากจำเป็นเพื่อทำให้การอ่านสัญญาณมีเสถียรภาพ
- การเชื่อมต่อสายไฟควรแน่นหนาเพื่อป้องกันสัญญาณที่ไม่ต่อเนื่อง
- ทดสอบรีโมทต่างๆ เพื่อดูว่าทำงานได้ดีเพียงใดกับการตั้งค่านี้
-
Deconding-IR-remote-main-1
คำแนะนำการเดินสายไฟ
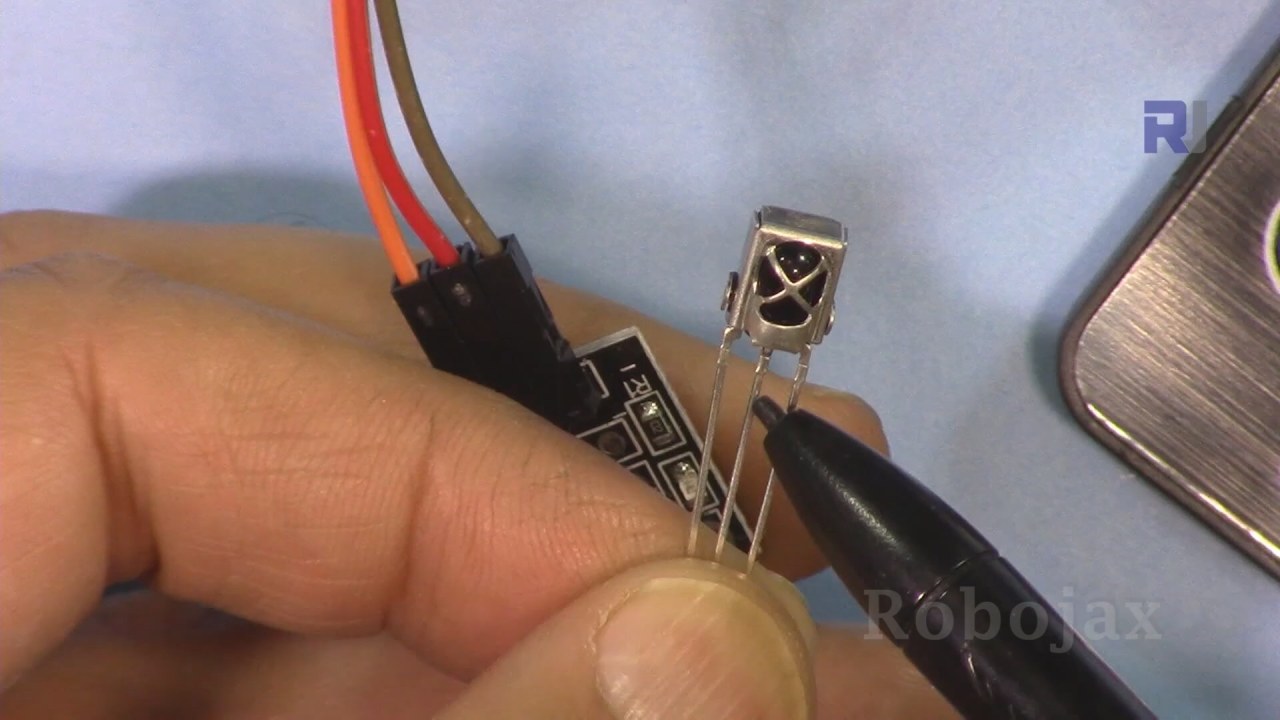
ในการเดินสายไฟตัวรับสัญญาณอินฟราเรดเข้ากับ Arduino ก่อนอื่นให้เชื่อมต่อพิน VCC ของตัวรับสัญญาณอินฟราเรดเข้ากับพิน 5V บน Arduino จากนั้นเชื่อมต่อพิน GND ของตัวรับสัญญาณเข้ากับพิน GND หนึ่งตัวบน Arduino สุดท้าย เชื่อมต่อพินสัญญาณ (มักระบุเป็น SIG หรือ OUT) ของตัวรับสัญญาณอินฟราเรดเข้ากับดิจิทัลพิน 11 บน Arduino
ตรวจสอบให้แน่ใจว่าการเชื่อมต่อแน่นหนา เนื่องจากการเชื่อมต่อที่หลวมอาจทำให้การอ่านค่าไม่สอดคล้องกัน หากคุณใช้ตัวรับสัญญาณอินฟราเรดแบบ PCB หรือโมดูลเปล่า การเดินสายไฟยังคงเหมือนเดิม เพียงตรวจสอบให้แน่ใจว่าคุณระบุพินอย่างถูกต้องตามป้ายกำกับของโมดูล (ในวิดีโอที่ 03:15)
ติดตั้งไลบรารี IRremote
เปิด Arduino IDE (คุณสามารถดาวน์โหลดได้จาก Arduino.cc ฟรี) คลิกที่ไอคอนไลบรารีทางด้านซ้ายและค้นหา IRremote และคลิกที่ "Install" เพื่อติดตั้ง
#include <IRremote.h>ตัวอย่างโค้ดและคำอธิบาย
int RECV_PIN = 11;
const char type ='W'; // W สำหรับรีโมทขาว, B สำหรับรีโมทดำ
const boolean PCB = 0; // 1 สำหรับ PCB, 0 สำหรับโมดูลเปล่า
IRrecv irrecv(RECV_PIN);
ในส่วนนี้ เรากำหนดหมายเลขพินสำหรับตัวรับสัญญาณอินฟราเรดด้วย RECV_PIN ตั้งค่าเป็น 11 เรายังระบุประเภทของรีโมทที่ใช้ด้วยตัวแปร type โดยที่ 'W' หมายถึงรีโมทขาวและ 'B' หมายถึงรีโมทดำ ตัวแปร PCB ใช้แยกความแตกต่างระหว่างการใช้ตัวรับสัญญาณแบบ PCB หรือโมดูลเปล่า
void setup() {
  Serial.begin(9600);
  irrecv.enableIRIn(); // เริ่มตัวรับสัญญาณ
}
ในฟังก์ชัน setup() เราจะเริ่มต้นการสื่อสารซีเรียลที่ 9600 บอดและเริ่มตัวรับสัญญาณอินฟราเรด สิ่งนี้สำคัญสำหรับการตรวจสอบเอาต์พุตบนซีเรียลมอนิเตอร์ ทำให้เราสามารถเห็นว่าปุ่มใดถูกกด
void loop() {
  if (irrecv.decode(&results)) {
    robojaxValidateCode(results.value); // ตรวจสอบโค้ดที่ได้รับ
    irrecv.resume(); // รับค่าถัดไป
  }
  delay(100);
}
ฟังก์ชันหลัก loop() จะตรวจสอบว่าตัวรับสัญญาณอินฟราเรดถอดรหัสสัญญาณได้หรือไม่ หากได้ จะเรียกฟังก์ชัน robojaxValidateCode เพื่อประมวลผลค่าที่ได้รับ จากนั้นจึงกลับมาฟังสัญญาณถัดไป delay(100) ช่วยให้ลูปไม่ทำงานเร็วเกินไป ซึ่งสามารถช่วยในการประมวลผลสัญญาณได้
การสาธิต / สิ่งที่คาดหวัง
เมื่อตั้งค่าทุกอย่างเรียบร้อยและอัปโหลดโค้ดแล้ว ให้เปิดซีเรียลมอนิเตอร์เพื่อดูผลลัพธ์ เมื่อคุณกดปุ่มบนรีโมท คุณควรเห็นชื่อปุ่มที่ตรงกันแสดงบนมอนิเตอร์ หากไม่รู้จักปุ่มนั้น จะแสดงข้อความ "Key unknown." ตรวจสอบให้แน่ใจว่ากดปุ่มอย่างมั่นคง เพราะการเชื่อมต่อที่หลวมอาจทำให้ค่าที่อ่านผิดพลาดได้ (ในวิดีโอที่ 05:40)
หากคุณกดปุ่มค้างไว้ ผลลัพธ์อาจแสดงค่าซ้ำๆ หรือรหัสเลขฐานสิบหก พฤติกรรมนี้เป็นเรื่องปกติ และคุณสามารถแก้ไขโค้ดเพื่อกรองสัญญาณต่อเนื่องเหล่านี้ได้หากต้องการ นอกจากนี้ คุณยังสามารถปรับโค้ดให้ดำเนินการตามการกดปุ่มเฉพาะ เช่น เปิดไฟหรือควบคุมอุปกรณ์อื่นๆ ได้
ไทม์สแตมป์ในวิดีโอ
- 00:00 เริ่มต้น
- 00:56 อธิบายฮาร์ดแวร์
- 04:26 อธิบายการเดินสายไฟ
- 05:20 อธิบายโค้ด
- 12:27 สาธิตการถอดรหัสโค้ด
ภาพ

/*
 * Original code and library from - http://arcfn.com
 *
 * This code decodes keys of Black IR remote and White IR remote
 * sold on eBay for Arduino.
 * You have to select the type of your remote as Black or White in the code below
 * and also select your receiver 1838 either as PCB or bare module. See video for details
 *
 * Modified/Written by Ahmad Shamshiri
 * on July 28, 2018 at 22:48 in Ajax, Ontario, Canada
 * for Robojax.com
 * Watch video instruction for this code:https://youtu.be/muAkBQb24NI
 * Get other Arduino codes from Robojax.com
 *
 */

#include <IRremote.h>

int RECV_PIN = 11;

const char type ='W';// W for white, B for black. Must keep single quotes like 'B' or 'W'
const boolean PCB = 0;// if receiver is PCB set to 1, if not set to 0. See video for details

IRrecv irrecv(RECV_PIN);

// this is array holding codes for White Remote when used with PCB version of receiver
unsigned int whiteRemotePCB[] ={
            0xE318261B, // CH-
            0x511DBB,   // CH
            0xEE886D7F,  // CH+

            0x52A3D41F, // |<<
            0xD7E84B1B, // >>|
            0x20FE4DBB, // >||

            0xF076C13B, // -
            0xA3C8EDDB, // +
            0x12CEA6E6, // EQ

            0xC101E57B, // 0
            0x97483BFB, // 100+
            0xF0C41643, // 200+

            0x9716BE3F, // 1
            0x3D9AE3F7, // 2
            0x6182021B, // 3

            0x8C22657B, // 4
            0x488F3CBB, // 5
            0x449E79F,  // 6

            0x32C6FDF7, // 7
            0x1BC0157B, // 8
            0x3EC3FC1B  // 9
            };

// this is array holding codes for White Remote when used with non-PCB version of receiver
unsigned int whiteRemote[] ={
            0xFFA25D, // CH-
            0xFF629D,   // CH
            0xFFE21D,  // CH+

            0xFF22DD, // |<<
            0xFF02FD, // >>|
            0xFFC23D, // >||

            0xFFE01F, // -
            0xFFA857, // +
            0xFF906F, // EQ

            0xFF6897, // 0
            0xFF9867, // 100+
            0xFFB04F, // 200+

            0xFF30CF, // 1
            0xFF18E7, // 2
            0xFF7A85, // 3

            0xFF10EF, // 4
            0xFF38C7, // 5
            0xFF5AA5,  // 6

            0xFF42BD, // 7
            0xFF4AB5, // 8
            0xFF52AD  // 9
            };
// key labels of white remote
String whiteRemoteKey[] ={
            "CH-",
            "CH",
            "CH+",

            "|<<",
            ">>|",
            ">||",

            "-",
            "+",
            "EQ",

            "0",
            "100+",
            "200+",

            "1",
            "2",
            "3",

            "4",
            "5",
            "6",

            "7",
            "8",
            "9"
            };

// this is array holding codes for Black Remote when used with non-PCB version of receiver
 unsigned int blackRemote[] ={
            0xFF629D, // ^
            0xFF22DD,   // <
            0xFF02FD,  // OK
            0xFFC23D, // >
            0xFFA857, // v

            0xFF6897, // 1
            0xFF9867, // 2
            0xF0C41643, // 3

            0xFF30CF, // 4
            0xFF18E7, // 5
            0xFF7A85,  // 6

            0xFF10EF, // 7
            0xFF38C7, // 8
            0xFF5AA5,  // 9

            0xFF42BD, // *
            0xFF4AB5, // 0
            0xFF52AD  // #
            };

// this is array holding codes for Black Remote when used with PCB version of receiver
 unsigned int blackRemotePCB[] ={
            0x511DBB, // ^
            0x52A3D41F,   // <
            0xD7E84B1B,  // OK
            0x20FE4DBB, // >
            0xA3C8EDDB, // v


            0xC101E57B, // 1
            0x97483BFB, // 2
            0xF0C41643, // 3

            0x9716BE3F, // 4
            0x3D9AE3F7, // 5
            0x6182021B,  // 6

            0x8C22657B, // 7
            0x488F3CBB, // 8
            0x449E79F,  // 9

            0x32C6FDF7, // *
            0x1BC0157B, // 0
            0x3EC3FC1B  // #
            };

// Black remote key names
String blackRemoteKey[] ={
            "^",
            "<",
            "OK",
            ">",
            "v",

            "1",
            "2",
            "3",

            "4",
            "5",
            "6",

            "7",
            "8",
            "9",

            "*",
            "0",
            "#"
            };

decode_results results;


void setup()
{
  Serial.begin(9600);
  // In case the interrupt driver crashes on setup, give a clue
  // to the user what's going on.
  Serial.println("Robojax Remote Decoder");
  irrecv.enableIRIn(); // Start the receiver

}

void loop() {

  if (irrecv.decode(&results)) {
     //Serial.println(results.value, HEX);
    robojaxValidateCode(results.value);// used the "robojaxValidateCode" below
    irrecv.resume(); // Receive the next value
  }
  delay(100);
}

/*
 * function: robojaxValidateCode
 * validates the remote code and prints correct key name
 * cd is code passed from the loop
 * Written by A. S. for Robojax
 */
void robojaxValidateCode(int cd)
{

  // Robojax IR Remote decoder
  int found=0;

 if(type =='W' && !PCB)
 {
    // Robojax IR White Remote decoder
    // if type is set to 'W' (white remote) and PCB=0 then check Black remote code
      for(int i=0; i< sizeof(whiteRemote)/sizeof(int); i++)
      {
        if(whiteRemote[i] ==cd)
        {

          Serial.print("Key pressed:");
          Serial.println(whiteRemoteKey[i]);

          found=1;
        }// if matched
      }// for
 }else if(type =='W' && PCB){
    // Robojax IR White Remote decoder
    // if type is set to 'W' (white remote) and PCB=1 then check Black remote code
      for(int i=0; i< sizeof(whiteRemotePCB)/sizeof(int); i++)
      {
        if(whiteRemotePCB[i] ==cd)
        {

          Serial.print("Key pressed:");
          Serial.println(whiteRemoteKey[i]);

          found=1;
        }// if matched
      }// for
 }else if(type =='B' && PCB){
    // Robojax IR White Remote decoder
       // if type is set to 'B' (black remote) and PCB=1 then check Black remote code
       for(int i=0; i< sizeof(blackRemotePCB)/sizeof(int); i++)
      {
        // Robojax IR black Remote decoder
        if(blackRemotePCB[i] ==cd)
        {

          Serial.print("Key pressed:");
          Serial.println(blackRemoteKey[i]);

          found=1;
        }// if matched
      }// for
 }else{

      // if type is set to 'B' (black remote) and PCB =0 then check Black remote code
       for(int i=0; i< sizeof(blackRemote)/sizeof(int); i++)
      {
        // Robojax IR black Remote decoder
        if(blackRemote[i] ==cd)
        {
          if(blackRemoteKey[i] == "OK"){
            digitalWrite(9,HIGH);
          }
          Serial.print("Key pressed:");
          Serial.println(blackRemoteKey[i]);

          found=1;
        }// if matched
      }// for
 }// else
  if(!found){
    if(cd !=0xFFFFFFFF)
      {
    Serial.println("Key unknown");
      }
  }// found
}
สิ่งที่คุณอาจต้องการ
-
อเมซอน
-
อีเบย์
แหล่งข้อมูลและเอกสารอ้างอิง
ยังไม่มีทรัพยากรเลย
ไฟล์📁
ไม่มีไฟล์ที่พร้อมใช้งาน