使用CJMCU VL53L0X激光测距仪与Arduino
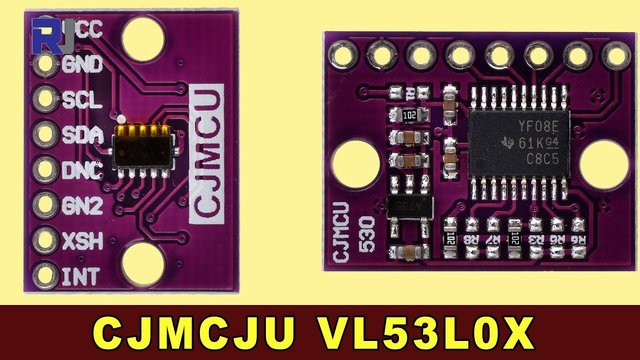
本教程演示如何将CJMCU VL53L0X激光测距仪与Arduino结合使用。该模块配备了德州仪器的VL53L0X飞行时间传感器和TXS0108E双向电平转换器(视频中的00:06),可以实现高达两米的精确测距(视频中的00:52)。它与各种逻辑电平(3.3V、1.8V、5V)的兼容性简化了与不同微控制器的集成(视频中的00:21)。这个项目为广泛的可能性打开了大门。
项目创意:
- 机器人技术:在机器人中实现障碍物避让。
- 自动化:根据接近度控制机械。
- 智能家居:根据距离创建自动照明。
- 安全:开发一个基于距离的报警系统。
硬件/组件
要构建这个项目,您将需要以下组件:
- Arduino 板(任何型号均可使用)
- CJMCU VL53L0X 激光测距传感器模块
- 跳线
接线指南
VL53L0X 模块连接到 Arduino 如下:
将模块的VCC引脚连接到Arduino的5V引脚。模块内部的稳压器处理传感器所需的3.3V。(视频中的时间为01:50)
将模块的GND引脚连接到Arduino的GND引脚。
将模块的SDA引脚连接到Arduino的A4引脚。
将模块的SCL引脚连接到Arduino的A5引脚。
如果不需要使用 XSHUT 引脚进行关机控制,请保持其未连接。(在视频中为 03:50)
代码解释
提供的代码使用了 VL53L0X 库。以下是关键可配置部分的解释:
#include <Wire.h>
#include <VL53L0X.h>

VL53L0X sensor;

void setup()
{
  Serial.begin(9600);
  // ... other setup code ...
  sensor.setTimeout(500); // Set timeout to 500ms (in video at 06:40)
  sensor.startContinuous(); // Start continuous measurement mode (in video at 06:50)
}

void loop()
{
  Serial.print(sensor.readRangeContinuousMillimeters()); // Read distance in mm (in video at 07:01)
  // ... other loop code ...
}
这个sensor.setTimeout(500)该行将距离测量的超时时间设置为500毫秒。如果您的应用程序需要,请根据需要调整此值(视频中见06:40)。sensor.startContinuous()函数启动连续测距,以尽可能快的速度提供距离读数(视频时间06:50)。sensor.readRangeContinuousMillimeters()函数返回以毫米为单位的测量距离(在视频中的时间为07:01)。
实时项目/演示
该视频演示了传感器的操作,显示了当传感器到目标的距离变化时,距离读数是如何变化的。读数在几毫米内是准确的,特别是在超过10毫米的距离(在视频中为08:20)。在非常近的范围内(小于10毫米),准确度会下降(在视频中为09:50)。演示还显示,反射表面可能会影响读数,尤其是在激光与表面不垂直的情况下(在视频中为10:32)。
章节
- [00:00] 介绍和项目概述
- [00:48] VL53L0X传感器详情
- 模块概述和规格
- [02:55] 应用程序和标准
- [03:35] 引脚定义和连接
- [05:29] 代码解释
- [07:45] 接线和连接
- [08:18] 现场演示
This code has not been parsed yet. Please return to the admin panel to parse it.资源与参考
-
外部Pololu 下载(GitHub)github.com
-
外部TXS0108E 数据表ti.com
文件📁
没有可用的文件。