Mpo Ntɔ́ngɔ́lɔ́ na Bɔ́tɔ́ni ya Kopúsa mpé Ba Switch na Arduino
Lithuani oyo elengei esengeli na kosalela résistance na ba push buttons mpe ba switches oyo esengeli na Arduino mpo na fonctionnement ya malamu. Kososola likambo oyo ezali fondemental mpo na projet ya Arduino nyonso oyo esengeli na entrée ya utilisateur. Boyebi oyo epekisaka ba comportements oyo esengeli te mpe esungaka mpo na fonctionnement ya malamu ya ba projets na yo. Tala ba idées ya projet oyo boyebi oyo ezali indispensable:
- Commutateur simple ya allumer/éteindre mpo na LED
- Contrôleur ya jeu interactif
- Télécommande mpo na ba appareils ya ndako
- Système ya sécurité na activation ya push-button
Tokotala mpo na nini esengeli kosalela ba résistances na ba circuits oyo.
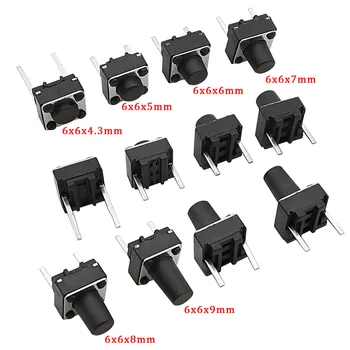

Matériel/Ba Composants
Ba composants ya liboso oyo esengeli mpo na projet oyo ezali mingi te: carte Arduino, commutateur ya push-button, mpe résistance (koleka 300 ohms). Valeur ya résistance ezali na tina te; ba valeurs lokola 1kΩ, 10kΩ, to mpe 100kΩ ekosalaka malamu mingi (na vidéo na 00:41).
Guide ya Câblage
Ezali na ba configurations mibale ya liboso ya câblage (na vidéo na 00:30):
- Configuration 1: Bongisa push button kati na pin ya Arduino mpe +5V. Lopango mosusu ya push button esengeli na terre na nzela ya résistance. Ntango bouton epresaka, pin etangaka HIGH; ntango elongolami, etangaka LOW.
- Configuration 2: Bongisa push button kati na pin ya Arduino mpe terre. Lopango mosusu ya push button esengeli na +5V na nzela ya résistance. Ntango bouton epresaka, pin etangaka LOW; ntango elongolami, etangaka HIGH.

Diagramme ya câblage ya visual ekosalisa mingi awa.
Explication ya Code
Code ya Arduino esalelaka fonction pinMode() mpo na kobongisa pin lokola entrée. Esika ya ntina mingi ezali kosalela INPUT_PULLUP (na vidéo na 04:06, 04:23). Résistance ya pull-up ya intérieur oyo elongolaka posibilité ya kosalela résistance ya libanda na ba configurations mosusu, mpe yango esungaka na câblage. Fonction digitalRead() etangaka état ya pin, mpe statement ya if-else ya pete ekokambaka soki bouton epresami (LOW) to te (HIGH) (na vidéo na 08:34).
pinMode(2, INPUT_PULLUP); // Kobongisa pin 2 lokola entrée na résistance ya pull-up ya intérieur
int pushButton = digitalRead(2); // Kotanga état ya pin 2
if (pushButton == LOW) {
  // Bouton epresami
} else {
  // Bouton epresami te
}
Projet/Démonstration ya Miso
Vidéo emonisaka ba configurations mibale ya câblage mpe ba comportements na yango. Elingisaka ba problèmes oyo ekoki kozala soki résistance elongolami, lokola ba lectures ya mabe mpo na bruit mpe couplage capacitif (na vidéo na 06:18, 06:39, 07:21). Démonstration emonisaka polele fonctionnement ya malamu mpe ya semba oyo ezwami na résistance na esika na yango (na vidéo na 08:08).
Ba Chapitres
- [00:00] Introduction
- [00:30] Ba Configurations ya Câblage
- [04:12] Explication ya Code na kosalela INPUT_PULLUP
- [05:36] Kolongola Résistance: Démonstration ya Pratique
- [08:33] Explication ya Code
Images


/*
 * This is an Arduino Sketch for a tutorial video
 * explaining why a resistor is needed to be used with a push button
 * with Arduino.
 *
 * Written by Ahmad Shamshiri on July 17, 2018 at 23:11 in Ajax, Ontario, Canada
 * For Robojax.com
 * Watch the instruction video for this code: https://youtu.be/TTqoKcpIWkQ
 * This code is "AS IS" without warranty or liability. Free to be used as long as you keep this note intact.
 */

void setup() {
  // Robojax.com push button tutorial
  pinMode(3,INPUT_PULLUP);
  Serial.begin(9600);
  Serial.println("Robojax Push Button Tutorial");


}

void loop() {
  // Robojax.com push button tutorial
  int pushButton = digitalRead(3);
  if(pushButton == LOW)
  {
    Serial.println("Pin 3 LOW");
  }else{
    Serial.println("Pin 3 HIGH");
  }

delay(500);
}/*
* This is an Arduino Sketch for a Tutorial video
* explaining why a resistor is needed to be used with a push button
* with an Arduino to connect the pin to Ground (GND)
*
* Written by Ahmad Shamshiri on July 18, 2018 at 17:36 in Ajax, Ontario, Canada
* For Robojax.com
* Watch the instruction video for this code: https://youtu.be/TTqoKcpIWkQ
* This code is "AS IS" without warranty or liability. Free to be used as long as you keep this note intact.
*/
void setup() {
// Robojax.com push button tutorial
pinMode(2,INPUT_PULLUP);
Serial.begin(9600);
Serial.println("Robojax Push Button Tutorial");
}
void loop() {
// Robojax.com push button tutorial
int pushButton = digitalRead(2);
if(pushButton == LOW)
{
Serial.println("Button is pushed.");
}else{
Serial.println("Button is NOT pushed.");
}
delay(500);
}Nko o na nki.
-
Amazon
Mokili na bisika
Pas encore de ressources.
Fichiers📁
Aucun fichier disponible.