LCD2004显示屏与I2C的库和Arduino代码
在本教程中,我们将探索如何使用I2C通信与LCD2004显示屏。此设置允许您在四行上显示文本,非常适合各种应用。我们将涵盖所需的接线、代码片段以及如何有效地实现该功能。

我们将使用 LiquidCrystal_I2C 库来管理 LCD 显示屏。这个库通过为您处理 I2C 通信,简化了与 LCD 的互动。为了更全面地理解,请确保查看视频以获取视觉指导(视频在 00:00)。
硬件解析
该项目的主要组件是LCD2004显示屏,它具有20列和4行的文本输出。它使用I2C进行通信,相比传统的并行连接,连接数量更少。这使其适用于在Arduino上引脚有限的项目。
I2C接口使用两条线,SDA(数据线)和SCL(时钟线),它们连接到Arduino上的相应引脚。LCD还需要电源和接地连接。在此设置中,我们将显示器连接到5V电源,这可以直接由Arduino提供。
数据表详细信息
| 制造商 | 通用 |
|---|---|
| 零件编号 | LCD2004 |
| 逻辑/IO 电压 | 5伏 |
| 供电电压 | 5 伏 |
| 每个通道的输出电流 | 通常为20 mA |
| 峰值电流(每通道) | 通常为 40 毫安 |
| PWM频率指南 | N/A |
| 输入逻辑阈值 | 0.3 Vcc(低),0.7 Vcc(高) |
| 电压降 / RDS(在)/ 饱和度 | 通常为0.2伏特 |
| 热限制 | 0°C至50°C |
| 包裹 | 标准4x20液晶显示器 |
| 注释 / 变体 | 提供多种背光选项可供选择 |
- 确保供电正常,以避免损坏。
- 如果必要,请在SDA和SCL线上使用上拉电阻。
- 检查 I2C 地址;对于此显示器,通常为 0x27。
- 保持连接简短以减少干扰。
- 在上传代码之前,请确认库已正确安装。
接线说明
将LCD2004显示屏通过I2C连接到Arduino,按照以下连接进行:
- 连接
VCCLCD的引脚到5VArduino上的引脚。 - 连接
GNDLCD的引脚到aGNDArduino上的引脚。 - 连接到
SDALCD的引脚到A4Arduino上的引脚。 - 连接 the
SCLLCD的引脚到A5在Arduino上的引脚。
如果您的Arduino板有不同的I2C引脚,请确保相应地调整连接。视频中还演示了一种替代接线配置(视频时间:01:30)。

代码示例与演练
我们来看一个初始化LCD并显示信息的简单例子。下面的代码片段设置了LCD,并在屏幕上打印“你好,世界!”
lcd.begin(); // Initialize the LCD
lcd.backlight(); // Turn on the backlight
lcd.print("Hello, world!"); // Display message
该代码初始化LCD并激活背光。然后,它在LCD的第一行显示信息。背光在低光照条件下对于可见性至关重要。
接下来,我们将检查一个更复杂的示例,该示例显示动态数据,例如电压读数。
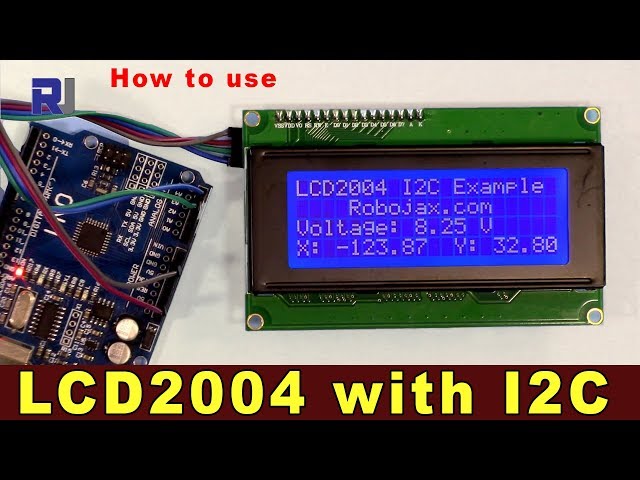
lcd.setCursor(0,0); // Set cursor to the first line
lcd.print("Voltage: "); // Display voltage label
float v = 8.254; // Example voltage value
lcd.print(v); // Print voltage value
在这一段中,我们将光标位置设置到第一行,并打印一个电压标签,后面跟着实际的电压值。这使您可以以用户友好的格式显示实时测量结果。

为了额外的功能,您可以实现串行输入,以允许用户通过串行监视器输入字符并在液晶显示屏上显示它们。
if (Serial.available()) { // Check for serial input
lastChar = Serial.read(); // Read the last character
lcd.write(lastChar); // Display character on LCD
}
此代码检查串口是否有可用数据。如果有,它会读取最后输入的字符并在LCD上显示。该交互通过允许根据用户输入动态显示,增强了用户体验。
完整代码请参考文章下方加载的完整程序。
演示 / 期待什么
运行代码时,您应该能在LCD上看到初始消息,随后是电压读数和通过串行监视器输入的任何字符。确保连接牢固,以避免任何显示问题。如果LCD没有显示任何内容,请再次检查接线和I2C地址(视频中的02:15)。
/*
* Download library: https://github.com/fdebrabander/Arduino-LiquidCrystal-I2C-library
*
* Updated by Ahmad Shamshiri on July 8, 2018 at 19:14 in Ajax, Ontario, Canada
* for Robojax.com
* Get this code from Robojax.com
* Watch video instructions for this code at: https://youtu.be/DKmNSCMPDjE
*
*/
#include <Wire.h>
#include <LiquidCrystal_I2C.h>
// Set the LCD address to 0x27 for a 20 chars and 4 line display
LiquidCrystal_I2C lcd(0x27, 20, 4);
void setup()
{
// initialize the LCD
lcd.begin();
// Turn on the backlight and print a message.
lcd.backlight();
lcd.print("Hello, world!");
}
void loop()
{
// Do nothing here...
}
/*
*
* * Download library: https://github.com/fdebrabander/Arduino-LiquidCrystal-I2C-library
* This code is basic usage of an LCD2004 display with I2C.
* It will display text in 4 lines, each with 20 characters.
* It displays multiple float values and text on the same line.
*
*
*
* Updated by Ahmad Shamshiri on July 08, 2018 at 09:20 in Ajax, Ontario, Canada
* for Robojax.com
* Get this code from Robojax.com
* Watch video instructions for this code at: https://youtu.be/DKmNSCMPDjE
*
*/
#include <Wire.h>
#include <LiquidCrystal_I2C.h>
// Set the LCD address to 0x27 for a 20 chars and 4 line display
LiquidCrystal_I2C lcd(0x27, 20, 4);
void setup() {
// initialize the LCD,
lcd.begin();
// Turn on the backlight and print a message.
lcd.backlight();
lcd.clear();
lcd.setCursor (0,0); //
lcd.print("Robojax LCD2004 Test");
lcd.setCursor (0,1); //
lcd.print("Please Wait - 3");
lcd.setCursor (0,1); //
delay(1000);
lcd.print("Please Wait - 2");
delay(1000);
lcd.setCursor (0,1); //
lcd.print("Please Wait - 1");
delay(1000);
}
void loop() {
// Robojax.com LCD2004 with I2C custom code
lcd.clear();// clear previous values from screen
lcd.setCursor (0,0); //character zero, line 1
lcd.print("LCD2004 I2C Example"); // print text
lcd.setCursor (4,1); //character 4, line 2
lcd.print("Robojax.com"); // print text
lcd.setCursor (0,2); //character 0, line 3
lcd.print("Voltage: "); // print text
float v = 8.254;// define or get voltage
char VoltageStr[5];
dtostrf(v, 5, 3, VoltageStr );
lcd.setCursor (9,2); //character 9, line 3
lcd.print(VoltageStr); // print voltage
lcd.setCursor (14,2); //character 14, line 3
lcd.print("V"); // print V at the end of voltage
lcd.setCursor (0,3); //character 0, line 4
lcd.print("X: "); // print x
float xdeg = -123.87;// define or get x degree (just example)
lcd.setCursor (3,3); //character 8, line 3
lcd.print(xdeg); // print xdeg value
lcd.setCursor (12,3); //character 12, line 4
lcd.print("Y: "); // print Y
float ydeg = 32.8;// define or get y degree (just example)
lcd.setCursor (15,3); //character 15, line 4
lcd.print(ydeg); // print ydeg value
delay(100);
}// loop end
/*
*
* Download library: https://github.com/fdebrabander/Arduino-LiquidCrystal-I2C-library
* This code is basic usage of an LCD2004 display with I2C
* It will display a blinking cursor on the screen
*
* Get this code from Robojax.com
* Watch video instructions for this code at: https://youtu.be/DKmNSCMPDjE
*
*/
#include <Wire.h>
#include <LiquidCrystal_I2C.h>
// Set the LCD address to 0x27 for a 20 chars and 4 line display
LiquidCrystal_I2C lcd(0x27, 20, 4);
void setup()
{
// initialize the LCD
lcd.begin();
}
void loop()
{
bool blinking = true;
lcd.cursor();
while (1) {
if (blinking) {
lcd.clear();
lcd.print("No cursor blink");
lcd.noBlink();
blinking = false;
} else {
lcd.clear();
lcd.setCursor(0,1);
lcd.print("Your name: ");
lcd.blink();
blinking = true;
}
delay(4000);
}
}
/*
*
* Download library: https://github.com/fdebrabander/Arduino-LiquidCrystal-I2C-library
* This code is basic usage of an LCD2004 display with I2C.
* This code will allow you to enter a character on the serial monitor and display it on the screen.
*
* Updated by Ahmad Shamshiri on July 08, 2018 at 09:20 in Ajax, Ontario, Canada
* for Robojax.com
* Get this code from Robojax.com
* Watch video instructions for this code at: https://youtu.be/DKmNSCMPDjE
*
*/
#include <Wire.h>
#include <LiquidCrystal_I2C.h>
// Set the LCD address to 0x27 for a 20 chars and 4 line display
LiquidCrystal_I2C lcd(0x27, 20, 4);
char lastChar ='_';
void setup()
{
lcd.begin();
lcd.backlight();
lcd.print("Robojax.com Test");
// Initialize the serial port at a speed of 9600 baud
Serial.begin(9600);
}
void loop()
{
lcd.clear();
lcd.setCursor(0,1);
lcd.print("Enter Letter: ");
lcd.setCursor(13,1);
// If characters arrived over the serial port...
if (Serial.available()) {
// Wait a bit for the entire message to arrive
delay(100);
// Write all characters received via the serial port to the LCD.
while (Serial.available() > 0) {
lastChar =Serial.read();
Serial.print("Entered: ");
Serial.println(lastChar);
}//while end
}// if end
lcd.write(lastChar);// display last entered character
delay(1000);
}// loop end
资源与参考
-
外部从 GitHub 获取库github.com
-
外部角色生成器(GitHub)maxpromer.github.io
-
外部角色生成器(第二来源)omerk.github.io
文件📁
没有可用的文件。