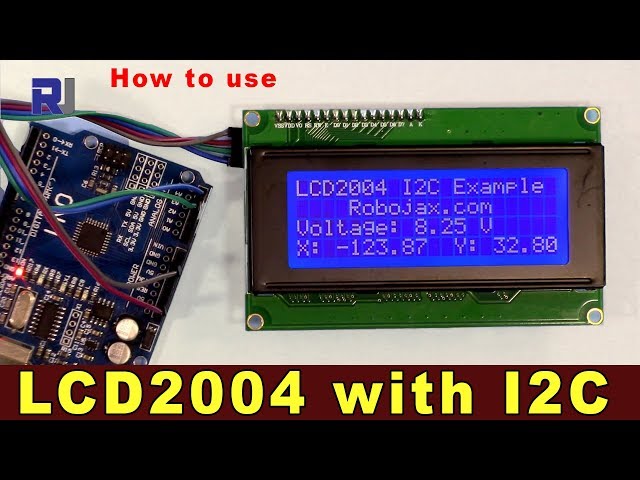
Library and Arduino code for LCD2004 display with I2C
In this tutorial, we will explore how to use the LCD2004 display with I2C communication. This setup allows you to display text across four lines, making it ideal for various applications. We'll cover the required wiring, code snippets, and how to implement the functionality effectively.

We will be using the LiquidCrystal_I2C library to manage the LCD display. This library simplifies the interaction with the LCD by handling the I2C communication for you. For a comprehensive understanding, be sure to check the video for visual guidance (in video at 00:00).
Hardware Explained
The primary component for this project is the LCD2004 display, which features 20 columns and 4 rows for text output. It communicates using I2C, allowing for fewer connections compared to traditional parallel connections. This makes it suitable for projects with limited pin availability on the Arduino.
The I2C interface uses two lines, SDA (data line) and SCL (clock line), which connect to the corresponding pins on the Arduino. The LCD also requires power and ground connections. In this setup, we will connect the display to a 5V power source, which can be provided directly from the Arduino.
Datasheet Details
| Manufacturer | Generic |
|---|---|
| Part number | LCD2004 |
| Logic/IO voltage | 5 V |
| Supply voltage | 5 V |
| Output current (per channel) | Typically 20 mA |
| Peak current (per channel) | Typically 40 mA |
| PWM frequency guidance | N/A |
| Input logic thresholds | 0.3 Vcc (low), 0.7 Vcc (high) |
| Voltage drop / RDS(on) / saturation | Typically 0.2 V |
| Thermal limits | 0°C to 50°C |
| Package | Standard 4x20 LCD |
| Notes / variants | Available with different backlight options |
- Ensure proper power supply to avoid damage.
- Use pull-up resistors on SDA and SCL lines if necessary.
- Check I2C address; commonly 0x27 for this display.
- Keep connections short to minimize interference.
- Confirm that the library is correctly installed before uploading code.
Wiring Instructions
To wire the LCD2004 display with I2C to the Arduino, follow these connections:
- Connect the
VCCpin of the LCD to the5Vpin on the Arduino. - Connect the
GNDpin of the LCD to aGNDpin on the Arduino. - Connect the
SDApin of the LCD to theA4pin on the Arduino. - Connect the
SCLpin of the LCD to theA5pin on the Arduino.
If your Arduino board has different I2C pins, make sure to adjust the connections accordingly. The video also demonstrates an alternative wiring configuration (in video at 01:30).

Code Examples & Walkthrough
Let's look at a simple example of initializing the LCD and displaying a message. The following snippet sets up the LCD and prints "Hello, world!" on the screen.
lcd.begin(); // Initialize the LCD
lcd.backlight(); // Turn on the backlight
lcd.print("Hello, world!"); // Display message
This code initializes the LCD and activates the backlight. Then, it displays the message on the first line of the LCD. The backlight is essential for visibility in low-light conditions.
Next, we will examine a more complex example that displays dynamic data, such as voltage readings.
lcd.setCursor(0,0); // Set cursor to the first line
lcd.print("Voltage: "); // Display voltage label
float v = 8.254; // Example voltage value
lcd.print(v); // Print voltage value
In this excerpt, we set the cursor position to the first line and print a voltage label followed by the actual voltage value. This allows you to display real-time measurements in a user-friendly format.

For additional functionality, you can implement serial input to allow users to enter characters via the serial monitor and display them on the LCD.
if (Serial.available()) { // Check for serial input
  lastChar = Serial.read(); // Read the last character
  lcd.write(lastChar); // Display character on LCD
}
This code checks if there is any data available on the serial port. If so, it reads the last character entered and displays it on the LCD. This interaction enhances the user experience by allowing for dynamic displays based on user input.
For the complete code, please refer to the full program loaded below the article.
Demonstration / What to Expect
When you run the code, you should see the initial message displayed on the LCD, followed by the voltage readings and any characters entered through the serial monitor. Ensure that the connections are secure to avoid any display issues. If the LCD does not show anything, double-check the wiring and the I2C address (in video at 02:15).
Изображения
This code has not been parsed yet. Please return to the admin panel to parse it.This code has not been parsed yet. Please return to the admin panel to parse it.This code has not been parsed yet. Please return to the admin panel to parse it.This code has not been parsed yet. Please return to the admin panel to parse it.Ресурсы и ссылки
-
ВнешнийГенератор персонажей (GitHub)maxpromer.github.io
-
ВнешнийГенератор персонажей (вторичный источник)omerk.github.io
-
ВнешнийПолучить библиотеку с GitHubgithub.com
Файлы📁
Библиотеки Arduino (zip)
-
LCD1602 LCD Arduino library from Robojax
robojax-LCD1602-I2C-library-master.zip0.01 MB