I2C接続のLCD2004ディスプレイ用ライブラリとArduinoコード
このチュートリアルでは、I2C通信を使用したLCD2004ディスプレイの使い方を紹介します。この設定により4行にわたってテキストを表示でき、さまざまな用途に適しています。必要な配線、コード例、および機能を効果的に実装する方法について説明します。

LCDディスプレイの制御にはLiquidCrystal_I2Cライブラリを使用します。このライブラリはI2C通信を扱ってくれるため、LCDとのやり取りを簡素化します。詳しく理解するには、視覚的な解説がある動画(動画内の00:00)を必ずご確認ください。
ハードウェア解説
このプロジェクトの主要コンポーネントはLCD2004ディスプレイで、テキスト表示は20列×4行で行えます。I2Cで通信するため、従来の並列接続と比べて配線が少なくて済み、Arduinoのピンが限られているプロジェクトに適しています。
I2CインターフェースはSDA(データ線)とSCL(クロック線)の2本の線を使用し、Arduinoの対応するピンに接続します。LCDは電源とグランドの接続も必要です。このセットアップでは、ディスプレイを5Vの電源に接続し、その電源はArduinoから直接供給できます。
データシートの詳細
| 製造業者 | 一般的 |
|---|---|
| 部品番号 | LCD2004 |
| ロジック/入出力電圧 | 5ボルト |
| 電源電圧 | 5 V |
| 出力電流(チャンネルあたり) | 通常は20 mA |
| ピーク電流(チャンネルあたり) | 典型的に40 mA |
| PWM周波数に関するガイダンス | 該当なし |
| 入力論理閾値 | 0.3 Vcc(低)、0.7 Vcc(高) |
| 電圧降下 / RDS(オン)/ 彩度 | 典型値 0.2 V |
| 熱限界 | 0°C〜50°C |
| パッケージ | 標準4x20液晶ディスプレイ |
| 備考 / バリエーション | さまざまなバックライトオプションが利用可能です。 |
- 損傷を避けるために、適切な電源を確保してください。
- 必要に応じてSDAおよびSCLラインにプルアップ抵抗を使用してください。
- I2Cアドレスを確認してください。一般的にこのディスプレイは0x27です。
- 干渉を最小限にするため、配線は短く保ってください。
- コードをアップロードする前に、ライブラリが正しくインストールされていることを確認してください。
配線手順
LCD2004ディスプレイをI2CでArduinoに配線するには、以下の接続に従ってください:
- 接続する
VCCLCDのピンを〜へ5VArduinoのピン。 - 接続する
GNDLCDのピンをaにGNDArduinoのピン。 - 接続してください
SDALCDのピンを〜へA4Arduinoのピン。 - 接続してください
SCLLCDのピンを…へA5Arduinoのピン。
もしお使いのArduinoボードでI2Cピンの配置が異なる場合は、それに応じて接続を調整してください。動画では別の配線構成も示されています(動画の01:30で)。

コード例とウォークスルー
LCDの初期化とメッセージ表示の簡単な例を見てみましょう。次のコードスニペットはLCDを設定し、画面に「Hello, world!」と表示します。
lcd.begin(); // Initialize the LCD
lcd.backlight(); // Turn on the backlight
lcd.print("Hello, world!"); // Display message
このコードはLCDを初期化し、バックライトを点灯します。次に、LCDの1行目にメッセージを表示します。バックライトは暗い環境での視認性に不可欠です。
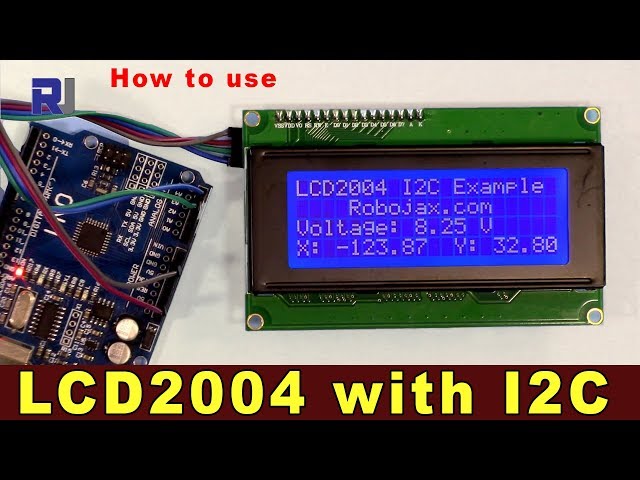
次に、電圧の読み取りなどの動的データを表示する、より複雑な例を見ていきます。
lcd.setCursor(0,0); // Set cursor to the first line
lcd.print("Voltage: "); // Display voltage label
float v = 8.254; // Example voltage value
lcd.print(v); // Print voltage value
この抜粋では、カーソル位置を1行目に設定し、電圧ラベルを表示してから実際の電圧値を続けて表示します。これにより、リアルタイムの測定値をユーザーフレンドリーな形式で表示できます。

追加機能として、シリアル入力を実装すれば、ユーザーがシリアルモニタ経由で文字を入力し、それをLCDに表示できるようになります。
if (Serial.available()) { // Check for serial input
  lastChar = Serial.read(); // Read the last character
  lcd.write(lastChar); // Display character on LCD
}
このコードはシリアルポートにデータが存在するかどうかを確認します。存在する場合は最後に入力された文字を読み取り、LCDに表示します。このやり取りによりユーザー入力に応じて表示を動的に変化させることができ、ユーザー体験が向上します。
完全なコードについては、記事の下に読み込まれているプログラムをご参照ください。
デモンストレーション/期待できること
コードを実行すると、LCDに最初のメッセージが表示され、その後に電圧の読み取り値とシリアルモニタから入力した文字が表示されるはずです。表示に問題が出ないよう、接続が確実に行われていることを確認してください。LCDに何も表示されない場合は、配線とI2Cアドレスを再確認してください(ビデオの02:15を参照)。
画像
/*
 *  Download library: https://github.com/fdebrabander/Arduino-LiquidCrystal-I2C-library
 *
 *  Updated by Ahmad Shamshiri on July 8, 2018 at 19:14 in Ajax, Ontario, Canada
 * for Robojax.com
 * Get this code from Robojax.com
 * Watch video instructions for this code at: https://youtu.be/DKmNSCMPDjE
 *
 */
#include <Wire.h>
#include <LiquidCrystal_I2C.h>

// Set the LCD address to 0x27 for a 20 chars and 4 line display
LiquidCrystal_I2C lcd(0x27, 20, 4);

void setup()
{
	// initialize the LCD
	lcd.begin();

	// Turn on the backlight and print a message.
	lcd.backlight();
	lcd.print("Hello, world!");
}

void loop()
{
	// Do nothing here...
}/*
*
* * Download library: https://github.com/fdebrabander/Arduino-LiquidCrystal-I2C-library
* This code is basic usage of an LCD2004 display with I2C.
* It will display text in 4 lines, each with 20 characters.
* It displays multiple float values and text on the same line.
*
*
*
* Updated by Ahmad Shamshiri on July 08, 2018 at 09:20 in Ajax, Ontario, Canada
* for Robojax.com
* Get this code from Robojax.com
* Watch video instructions for this code at: https://youtu.be/DKmNSCMPDjE
*
*/
#include <Wire.h>
#include <LiquidCrystal_I2C.h>
// Set the LCD address to 0x27 for a 20 chars and 4 line display
LiquidCrystal_I2C lcd(0x27, 20, 4);
void setup() {
// initialize the LCD,
lcd.begin();
// Turn on the backlight and print a message.
lcd.backlight();
lcd.clear();
lcd.setCursor (0,0); //
lcd.print("Robojax LCD2004 Test");
lcd.setCursor (0,1); //
lcd.print("Please Wait - 3");
lcd.setCursor (0,1); //
delay(1000);
lcd.print("Please Wait - 2");
delay(1000);
lcd.setCursor (0,1); //
lcd.print("Please Wait - 1");
delay(1000);
}
void loop() {
// Robojax.com LCD2004 with I2C custom code
lcd.clear();// clear previous values from screen
lcd.setCursor (0,0); //character zero, line 1
lcd.print("LCD2004 I2C Example"); // print text
lcd.setCursor (4,1); //character 4, line 2
lcd.print("Robojax.com"); // print text
lcd.setCursor (0,2); //character 0, line 3
lcd.print("Voltage: "); // print text
float v = 8.254;// define or get voltage
char VoltageStr[5];
dtostrf(v, 5, 3, VoltageStr );
lcd.setCursor (9,2); //character 9, line 3
lcd.print(VoltageStr); // print voltage
lcd.setCursor (14,2); //character 14, line 3
lcd.print("V"); // print V at the end of voltage
lcd.setCursor (0,3); //character 0, line 4
lcd.print("X: "); // print x
float xdeg = -123.87;// define or get x degree (just example)
lcd.setCursor (3,3); //character 8, line 3
lcd.print(xdeg); // print xdeg value
lcd.setCursor (12,3); //character 12, line 4
lcd.print("Y: "); // print Y
float ydeg = 32.8;// define or get y degree (just example)
lcd.setCursor (15,3); //character 15, line 4
lcd.print(ydeg); // print ydeg value
delay(100);
}// loop end/*
*
* Download library: https://github.com/fdebrabander/Arduino-LiquidCrystal-I2C-library
* This code is basic usage of an LCD2004 display with I2C
* It will display a blinking cursor on the screen
*
* Get this code from Robojax.com
* Watch video instructions for this code at: https://youtu.be/DKmNSCMPDjE
*
*/
#include <Wire.h>
#include <LiquidCrystal_I2C.h>
// Set the LCD address to 0x27 for a 20 chars and 4 line display
LiquidCrystal_I2C lcd(0x27, 20, 4);
void setup()
{
// initialize the LCD
lcd.begin();
}
void loop()
{
bool blinking = true;
lcd.cursor();
while (1) {
if (blinking) {
lcd.clear();
lcd.print("No cursor blink");
lcd.noBlink();
blinking = false;
} else {
lcd.clear();
lcd.setCursor(0,1);
lcd.print("Your name: ");
lcd.blink();
blinking = true;
}
delay(4000);
}
}/*
*
* Download library: https://github.com/fdebrabander/Arduino-LiquidCrystal-I2C-library
* This code is basic usage of an LCD2004 display with I2C.
* This code will allow you to enter a character on the serial monitor and display it on the screen.
*
* Updated by Ahmad Shamshiri on July 08, 2018 at 09:20 in Ajax, Ontario, Canada
* for Robojax.com
* Get this code from Robojax.com
* Watch video instructions for this code at: https://youtu.be/DKmNSCMPDjE
*
*/
#include <Wire.h>
#include <LiquidCrystal_I2C.h>
// Set the LCD address to 0x27 for a 20 chars and 4 line display
LiquidCrystal_I2C lcd(0x27, 20, 4);
char lastChar ='_';
void setup()
{
lcd.begin();
lcd.backlight();
lcd.print("Robojax.com Test");
// Initialize the serial port at a speed of 9600 baud
Serial.begin(9600);
}
void loop()
{
lcd.clear();
lcd.setCursor(0,1);
lcd.print("Enter Letter: ");
lcd.setCursor(13,1);
// If characters arrived over the serial port...
if (Serial.available()) {
// Wait a bit for the entire message to arrive
delay(100);
// Write all characters received via the serial port to the LCD.
while (Serial.available() > 0) {
lastChar =Serial.read();
Serial.print("Entered: ");
Serial.println(lastChar);
}//while end
}// if end
lcd.write(lastChar);// display last entered character
delay(1000);
}// loop endリソースと参考文献
-
外部GitHubからライブラリを取得するgithub.com
-
外部キャラクタージェネレーター (GitHub)maxpromer.github.io
-
外部キャラクター生成器(第二のソース)omerk.github.io
ファイル📁
Arduinoライブラリ(zip)
-
RobojaxのLCD1602 LCD Arduinoライブラリ
robojax-LCD1602-I2C-library-master.zip0.01 MB