このチュートリアルはの一部です: WiFi LoRa 32 チュートリアル
Heltec WiFi LoRa 32に関連するすべての動画は、このグループにリンクされています。他の動画へのリンクはこの記事の下にあります。
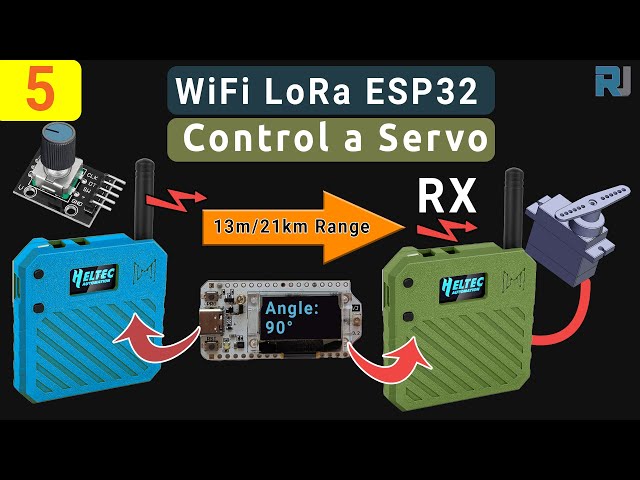
遠くからサーボモーターを制御しよう!Heltec WiFi LoRa 32 V3 Arduino チュートリアル (TX)
このガイドでは、Heltec ESP32 LoRa V3 サーボプロジェクトから正確なスケッチを取り上げ、それらがどのように機能するかを説明します。余分なコードは追加しません。送信機が回転エンコーダーを読み取り、その角度をLoRa経由で安全に送信し、受信機がそれを復号化してマイクロサーボを駆動する方法を学びます。すべての部品とコードのリンクは以下にあり、私たちのアフィリエイトリンクを通じてご注文いただくと、これらのチュートリアルの作成を続ける手助けになります。
Heltec ESP32ボードのインストール
このパスをArduino IDEの設定に追加してください。動画で示したように。https://resource.heltec.cn/download/package_heltec_esp32_index.json
1. 送信機(TX)ハードウェアとセットアップ
TX側で必要なのは:
-
Heltec WiFi LoRa 32 V3ボード(Meshnology N33ケース内、3000mAhパックで電源供給)
-
GPIO 6 (CLK)、GPIO 5 (DT)、GPIO 4 (SW) に接続されたロータリーエンコーダー
-
I²C上のOLEDディスプレイ(SDA= 4、SCL= 15)
スケッチは、すべてを正確に含めて初期化することから始まります。Heltec_ESP32_LoRa_V3_Sevo_TX_AiRotaryEncoder.ino:
cppCopyEdit#include "AiEsp32RotaryEncoder.h"
#include "HT_SSD1306Wire.h"
#include "LoRaWan_APP.h"
#include "mbedtls/aes.h"
// …
static SSD1306Wire display(0x3c, 500000, SDA_OLED, SCL_OLED, GEOMETRY, RST_OLED);
AiEsp32RotaryEncoder rotaryEncoder = AiEsp32RotaryEncoder(
    PIN_A, PIN_B, SW_PIN, ROTARY_ENCODER_VCC_PIN, false, true, true);
const int homePosition = 90;
const int MAX_ANGLE    = 180;
int servoAngel = homePosition;
中でsetup(), コード:
-
ディスプレイの電源を入れ、フォントを設定します。
-
呼び出し
rotaryEncoder.begin(),rotaryEncoder.setup(readEncoderISR),rotaryEncoder.setBoundaries(0, MAX_ANGLE, true)とrotaryEncoder.setAcceleration(20) -
エンコーダをリセットします。
homePosition -
LoRaを初期化します
Mcu.begin(HELTEC_BOARD, SLOW_CLK_TPYE)そして設定しますRadioEvents、チャネル、および提供されたスケッチとまったく同じパラメータ。
2. 角度を安全に送信する
各ループサイクルは実行されます。rotary_loop()、ということは:
-
ISRでエンコーダを読み取ります
-
いつ
servoAngel変更し、それを16バイトのバッファにパッケージ化し、AES-128で暗号化します。encryptAES()スケッチから)、そして呼び出しcppCopyEditRadio.Send(data, sizeof(data)); -
セット
lora_idle = falseまでOnTxDone()火を消し、リセットします。
3. 受信機(RX)ハードウェアとセットアップ
RX側で必要なのは:
-
Heltec WiFi LoRa 32 V3ボード(同じケース/バッテリー)
-
GPIO 6(またはテスト済みのPWMピン)にあるマイクロサーボ(例:SG90)
-
OLEDディスプレイ
スケッチはHeltec_ESP32_LoRa_V3_Sevo_RX.ino始まるのは:
cppCopyEdit#include <ESP32Servo.h>
#include "HT_SSD1306Wire.h"
#include "LoRaWan_APP.h"
#include "mbedtls/aes.h"
// …
const int servoPin       = 6;
const int SERVO_DUTY_MIN = 400;  // us
const int SERVO_DUTY_MAX = 2400; // us
Servo    myservo;
int      servoAngel     = homePosition;
中にsetup(), it:
-
Vextのディスプレイ/LoRaモジュールの電源
VextON()) -
呼び出し
Radio.Init(&RadioEvents)RXを同じLoRaパラメータで構成します。 -
サーボを取り付けます
myservo.attach(servoPin, SERVO_DUTY_MIN, SERVO_DUTY_MAX)それを中心に置いてhomePosition.
4. 受信し、復号化し、サーボを駆動する
コアは、OnRxDone(uint8_t *payload, …)コールバック:
cppCopyEditdecryptAES((uint8_t*)rxpacket, userKey);
if (isNumber(rxpacket)) {
  servoAngel = atoi(rxpacket);
  myservo.write(servoAngel);
  delay(15);
}
Serial.println("Angle: " + String(servoAngel));
lora_idle = true;
それは16バイトのブロックを復号し、整数に変換し、即座にサーボを更新します。
5. PWMピンのサポートとサーボ調整
これらのESP32ピンをPWM出力のためにテストしましたが、すべてのピンがマイクロサーボを駆動するために機能します。
CopyEdit1, 2, 3, 4, 5, 6, 19, 35, 36, 38, 39, 40, 41, 42, 45, 47, 48
標準のSG90用に、私たちのコードはパルス範囲を使用します400マイクロ秒(0°) to2400 µs(180度)は、ジャターのない滑らかで完全なスイープを提供します。
6. 配線図
以下は、TXおよびRX回路図を挿入できるプレースホルダーです:


コードとアフィリエイトリンク
上記のすべてのスケッチは、下の「コードとリソース」セクションからダウンロード可能です。これを自分で作りたい場合は、Heltec LoRa32 V3モジュール、Meshnology N33ケース、ロタリーエンコーダー、SG90サーボを私たちのアフィリエイトリンクから購入することを検討してください。追加のコストはかからず、私たちがこのような無料のチュートリアルを作り続けるのを助けてくれます!
参考のためのビデオチャプター
-
00:00 イントロダクションと概要
-
リモコンの概念
-
00:19 LoRa通信の基礎
-
00:23 ハードウェアプレビュー
-
00:28 ケースとバッテリーのショーケース
-
01:03 モジュールの機能
-
01:42 仕様と接続性
-
02:54 サーボの電源を入れる
-
03:05 配線とピン配置
-
09:35 アンテナ配置
-
11:04 ケースアセンブリ
-
29:26 スケッチをアップロード中
-
35:09 範囲テスト 1.2 km
-
36:38 範囲テスト 1.4 km
-
38:41 パフォーマンスの振り返り
-
43:04 結論とサポート
このチュートリアルはの一部です: WiFi LoRa 32 チュートリアル
- Heltec WiFi LoRa 32 V3を使用して、DHT22で温度を1.4km伝送します。
- 13マイル20km WiFiなしで?LoRaがどのようにしてクレイジーな距離を電圧で送信したのか!(Heltec WiFi LoRa 32 V3)
- 13マイル(21キロメートル)離れた場所からデバイスをオンにする - ウィフィLoRa 32を使った究極のオフグリッドLoRaプロジェクト!
- LoRaによる遠隔ドアアラートシステム - グリッド外で13マイル(21 km)離れた場所から!(Heltec WiFi LoRa 32 V3)
- DIYリモートリレープロジェクト:Wi-Fiなし/SIMなしの13マイルヘルテックLoRa 32モジュール
- How to Use the Heltec LoRa CubeCell Development Board HTCC-AB01
/*
File: Heltec_ESP32_LoRa_V3_Sevo_TX_AiRotaryEncoder.ino
written on 24 Jun, 2025 by Ahmad Shamshiri

 * =====================================================================
 * ARDUINO CODE DESCRIPTION: SECURE LoRa SERVO CONTROL SYSTEM (TX)
 * =====================================================================
 *
 * HARDWARE COMPONENTS:
 * -------------------
 *  - Main Controller: Heltec WiFi LoRa 32 V3
 *  - Enclosure: Meshnology N33 case with 3000mAh battery
 *  - Input: Rotary encoder with push-button
 *  - Feedback: Built-in OLED display
 *  - Output: Servo motor + LoRa wireless transmission
 *
 * SYSTEM FUNCTIONALITY:
 * -------------------
 * [1] ROTARY ENCODER CONTROL:
 *     - Clockwise/Counter-clockwise rotation adjusts target angle (0°-180°)
 *     - Real-time angle display on OLED screen
 *     - Push-button returns servo to Home position (default: 90°)
 *
 * [2] SECURE WIRELESS TRANSMISSION:
 *     - All angle values encrypted before LoRa transmission
 *     - Home position command transmitted as special secure packet
 *     - Uses 433MHz LoRa band for reliable communication
 *
 * [3] POWER MANAGEMENT:
 *     - Optimized for battery operation (3000mAh)
 *     - Low-power modes between transmissions
 *
 * FOR COMPLETE SETUP INSTRUCTIONS:
 * Please watch the tutorial video at: https://youtu.be/EPynuJ7sasY
 * =====================================================================

Watch full video explaination:  https://youtu.be/EPynuJ7sasY
Resources page: https://robojax.com/T635


 * DISCLAIMER:
 * This code is provided "AS IS" without warranty of any kind. The author
 * shall not be held liable for any damages arising from the use of this code.
 *
 * LICENSE:
 * This work is licensed under the GNU General Public License v3.0
 * Permissions beyond the scope of this license may be available at Robojax.com
 *
 * SHARING TERMS:
 * You are free to share, copy and modify this code for non-commercial purposes
 * PROVIDED you:
 * 1. Keep this entire comment block intact with the original code
 * 2. Include the original Robojax.com link
 * 3. Keep the YouTube tutorial link (if applicable)
 * 4. Clearly indicate any modifications made
 *
 * Original tutorial at: https://robojax.com/T635
 * YouTube Video: https://youtu.be/EPynuJ7sasY
 *
 * ********************************************************************
 */

#include <Wire.h>
#include "HT_SSD1306Wire.h"
#include "WiFi.h"
static SSD1306Wire  display(0x3c, 500000, SDA_OLED, SCL_OLED, GEOMETRY_128_64, RST_OLED); // addr , freq , i2c group , resolution , rst


const int TX_POWER = 2;//dBm from 2 to 20. when powered via battery 2 to 14dBm is the best option
const int MAX_ANGLE = 180;//the most common is 180, but you can set it as needed

String labelAngle = "Angle";
const int homePosition = 90; //initial position


//endcoder
const int SW_PIN = 4;//define a pin for rotary encode switch
const int PIN_A  = 6;
const int PIN_B  = 5;//
const int ANGLE_STEP  = 6;//
const bool debug= false;//to print debug data in serial moinitor set it to true, else false

int servoAngel = homePosition;
int oldAngleValue = servoAngel;
#include "mbedtls/aes.h"//for securing data
#include <cstring>  // For memset, memcpy
mbedtls_aes_context aes;
const char *userKey = "hyhT676#h~_1a"; //Security key.


#include "LoRaWan_APP.h"
#include "AiEsp32RotaryEncoder.h"
#include "Arduino.h"
#define ROTARY_ENCODER_VCC_PIN -1

//instead of changing here, rather change numbers above
AiEsp32RotaryEncoder rotaryEncoder = AiEsp32RotaryEncoder(
            PIN_A,
            PIN_B,
            SW_PIN,
            ROTARY_ENCODER_VCC_PIN,
            ANGLE_STEP);


#define RF_FREQUENCY                                915432000 // Hz

#define TX_OUTPUT_POWER                             TX_POWER        // dBm from 2 to 20. when powered via battery 2 to 14dBm

#define LORA_BANDWIDTH                              0         // [0: 125 kHz,
                                                              //  1: 250 kHz,
                                                              //  2: 500 kHz,
                                                              //  3: Reserved]
#define LORA_SPREADING_FACTOR                       7         // [SF7..SF12]
#define LORA_CODINGRATE                             1         // [1: 4/5,
                                                              //  2: 4/6,
                                                              //  3: 4/7,
                                                              //  4: 4/8]
#define LORA_PREAMBLE_LENGTH                        8         // Same for Tx and Rx
#define LORA_SYMBOL_TIMEOUT                         0         // Symbols
#define LORA_FIX_LENGTH_PAYLOAD_ON                  false
#define LORA_IQ_INVERSION_ON                        false


#define RX_TIMEOUT_VALUE                            1000
#define BUFFER_SIZE                                 64 // Define the payload size here

char txpacket[BUFFER_SIZE];
char rxpacket[BUFFER_SIZE];

double txNumber;

bool lora_idle=true;

static RadioEvents_t RadioEvents;
unsigned long lastTxTime = 0;
void OnTxDone( void );
void OnTxTimeout( void );
void decryptAES(uint8_t *data, const char *key);
void encryptAES(uint8_t *data, const char *key);
void processKey(const char *userKey, uint8_t *processedKey, size_t keySize);
void VextON(void);

void rotary_loop();//prototyp function: rotary encoder
void IRAM_ATTR readEncoderISR();//prototyp function: rotary encoder
void rotary_onButtonClick();//prototyp function: rotary encoder

void setup() {
  Serial.begin(115200);
  Serial.println();

  VextON();
  delay(100);

	//we must initialize rotary encoder
	rotaryEncoder.begin();
	rotaryEncoder.setup(readEncoderISR);
	bool circleValues = false;
	rotaryEncoder.setBoundaries(0, MAX_ANGLE, circleValues); //minValue, maxValue, circleValues true|false (when max go to min and vice versa)
	/*Rotary acceleration introduced 25.2.2021.
   * in case range to select is huge, for example - select a value between 0 and 1000 and we want 785
   * without accelerateion you need long time to get to that number
   * Using acceleration, faster you turn, faster will the value raise.
   * For fine tuning slow down.
   */
	//rotaryEncoder.disableAcceleration(); //acceleration is now enabled by default - disable if you dont need it
	rotaryEncoder.setAcceleration(20); //or set the value - larger number = more accelearation; 0 or 1 means disabled acceleration
  rotaryEncoder.reset(homePosition); //set home position

  // Initialising the UI will init the display too.
  display.init();
  display.setFont(ArialMT_Plain_10);
  //LoRa stuff
  Mcu.begin(HELTEC_BOARD,SLOW_CLK_TPYE);

    txNumber=0;

    RadioEvents.TxDone = OnTxDone;
    RadioEvents.TxTimeout = OnTxTimeout;

    Radio.Init( &RadioEvents );
    Radio.SetChannel( RF_FREQUENCY );
    Radio.SetTxConfig( MODEM_LORA, TX_OUTPUT_POWER, 0, LORA_BANDWIDTH,
                                   LORA_SPREADING_FACTOR, LORA_CODINGRATE,
                                   LORA_PREAMBLE_LENGTH, LORA_FIX_LENGTH_PAYLOAD_ON,
                                   true, 0, 0, LORA_IQ_INVERSION_ON, 3000 );

}


void displayAngle() {
    display.clear();  // Clear display before new content

    // Line 1: Text: Angle
    display.setTextAlignment(TEXT_ALIGN_LEFT);

    // Line 2: Temperature value in 24pt font
    display.setFont(ArialMT_Plain_24);

    // Format
    String angleString = String(servoAngel) + "°"; //

    display.setFont(ArialMT_Plain_16);
    display.drawString(0, 0, labelAngle);
    display.setFont(ArialMT_Plain_24);
    display.drawString(0, 15, angleString);

    display.display();  // Update OLED
}


void VextON(void)
{
  pinMode(Vext,OUTPUT);
  digitalWrite(Vext, LOW);
}

void VextOFF(void) //Vext default OFF
{
  pinMode(Vext,OUTPUT);
  digitalWrite(Vext, HIGH);
}

void sendData()
{

  String txData = String(servoAngel) ;

  uint8_t data[BUFFER_SIZE];
  memset(data, 0, sizeof(data));  // Zero-padding
  strncpy((char*)data, txData.c_str(), sizeof(data) - 1); // Copy string safely

  encryptAES(data, userKey);  // Encrypt before sending
  if(lora_idle == true)
    {
      //delay(1000);
      Radio.Send(data,  sizeof(data));
      if(debug){
      Serial.print("Sending: ");
      Serial.println((char *)data);
      }
      lora_idle = false;
      oldAngleValue =servoAngel;//keep record of angle change
    }
    Radio.IrqProcess( );
}


void loop() {
  rotary_loop();
  // clear the display
  display.clear();

  displayAngle(); //

  if(oldAngleValue != servoAngel)
  {
	  sendData();
  }
  //delay(100);

}


void OnTxDone( void )
{
        if(debug){
	        Serial.println("TX done......");
        }
	lora_idle = true;
}

void OnTxTimeout( void )
{
    Radio.Sleep( );
        if(debug){
	        Serial.println("TX Timeout......");
        }
    lora_idle = true;
}


/**
 * Converts a user-provided plaintext key into a fixed-length 16-byte (128-bit)
 * or 32-byte (256-bit) key.
 */
void processKey(const char *userKey, uint8_t *processedKey, size_t keySize) {
    memset(processedKey, 0, keySize); // Fill with zeros
    size_t len = strlen(userKey);
    if (len > keySize) len = keySize; // Truncate if too long
    memcpy(processedKey, userKey, len); // Copy valid key part
}

/**
 * Encrypts a 16-byte (one block) message using AES-128.
 */
void encryptAES(uint8_t *data, const char *key) {
    uint8_t processedKey[16]; // 128-bit key
    processKey(key, processedKey, 16);

    mbedtls_aes_init(&aes);
    mbedtls_aes_setkey_enc(&aes, processedKey, 128);
    mbedtls_aes_crypt_ecb(&aes, MBEDTLS_AES_ENCRYPT, data, data);
    mbedtls_aes_free(&aes);
}

/**
 * Decrypts a 16-byte (one block) message using AES-128.
 */
void decryptAES(uint8_t *data, const char *key) {
    uint8_t processedKey[16]; // 128-bit key
    processKey(key, processedKey, 16);

    mbedtls_aes_init(&aes);
    mbedtls_aes_setkey_dec(&aes, processedKey, 128);
    mbedtls_aes_crypt_ecb(&aes, MBEDTLS_AES_DECRYPT, data, data);
    mbedtls_aes_free(&aes);
}


void rotary_onButtonClick()
{
	static unsigned long lastTimePressed = 0;
	//ignore multiple press in that time milliseconds
	if (millis() - lastTimePressed < 500)
	{
		return;
	}
	lastTimePressed = millis();

	        if(debug){
	          Serial.print("button pressed ");
	          Serial.print(millis());
	          Serial.println(" milliseconds after restart");
          }
}

void rotary_loop()
{
	//dont print anything unless value changed
	if (rotaryEncoder.encoderChanged())
	{
		        if(debug){
	            Serial.print("Value: ");
		          Serial.println(rotaryEncoder.readEncoder());
            }
    servoAngel = rotaryEncoder.readEncoder();

	}
	if (rotaryEncoder.isEncoderButtonClicked())
	{
    rotaryEncoder.reset(homePosition);
    servoAngel = homePosition;
		rotary_onButtonClick();
	}
}

void IRAM_ATTR readEncoderISR()
{
	rotaryEncoder.readEncoder_ISR();
}
Common Course Links
Common Course Files
リソースと参考文献
-
外部Heltec WiFi Kit 32のウェブサイトリンクheltec.org
ファイル📁
ファイルは利用できません。