This tutorial is part of: คู่มือการใช้งาน WiFi LoRa 32
วิดีโอทั้งหมดที่เกี่ยวข้องกับ Heltec WiFi LoRa 32 จะถูกจัดอยู่ในกลุ่มนี้ ลิงก์ไปยังวิดีโออื่นๆ อยู่ด้านล่างบทความนี้
ใช้ Heltec WiFi LoRa 32 V3 เพื่อส่งอุณหภูมิโดยใช้ DHT22 ไปยังระยะ 1.4 กิโลเมตร
ในบทช่วยสอนนี้ เราจะสำรวจวิธีการใช้โมดูล Heltec WiFi LoRa 32 V3 เพื่อส่งข้อมูลอุณหภูมิจากเซนเซอร์ DHT22 ในระยะทางไกล โดยสามารถทำระยะได้ถึง 1.4 กิโลเมตร ความสามารถนี้เกิดขึ้นได้จากการใช้เทคโนโลยี LoRa ซึ่งช่วยให้การสื่อสารใช้พลังงานต่ำและระยะไกล เมื่อจบบทแนะนำนี้ คุณจะมีระบบที่ทำงานได้ซึ่งสามารถส่งค่าอุณหภูมิแบบไร้สาย
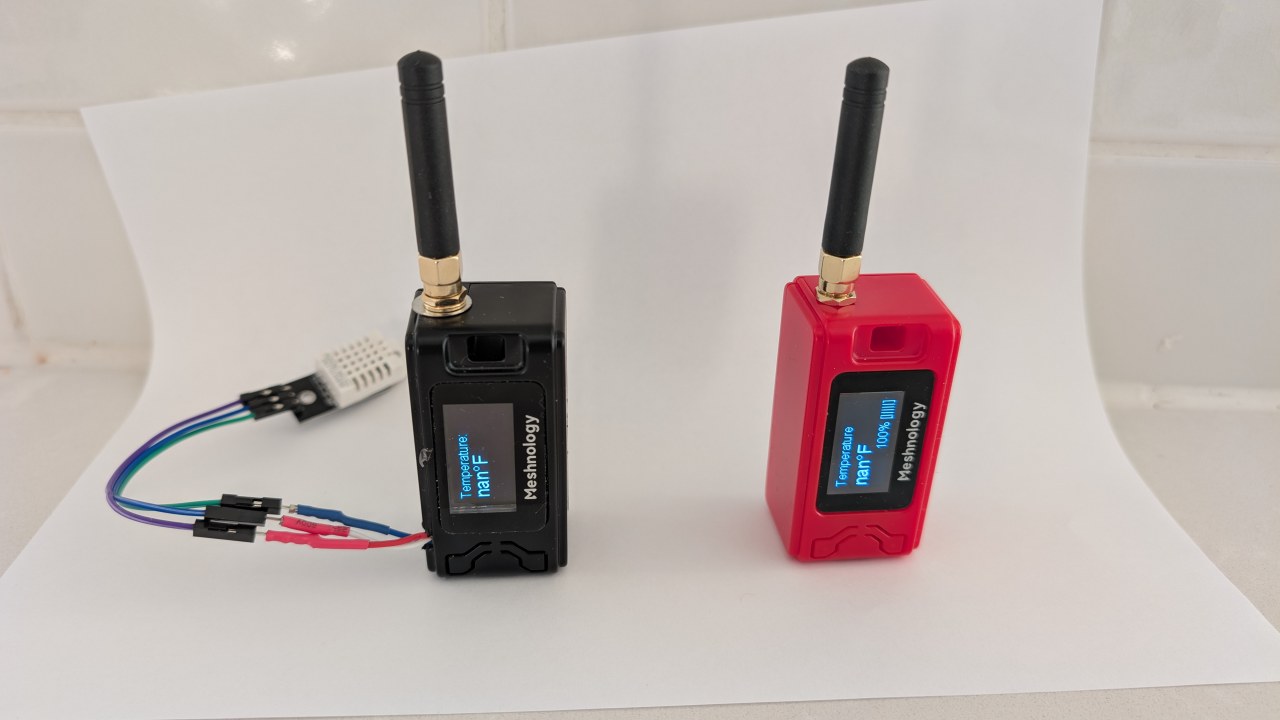
เราจะเริ่มต้นด้วยภาพรวมของส่วนประกอบฮาร์ดแวร์ที่เกี่ยวข้องในโปรเจกต์นี้ รวมถึงโมดูล Heltec WiFi LoRa 32 V3 และเซนเซอร์ DHT22 หลังจากนั้น เราจะดำเนินการตามคำแนะนำการเดินสายไฟ ซึ่งคุณจะได้เรียนรู้วิธีเชื่อมต่อส่วนประกอบเหล่านี้ สุดท้าย เราจะอธิบายโค้ดที่จำเป็นเพื่อทำให้ระบบนี้ทำงานได้ สำหรับคำแนะนำแบบภาพ โปรดดูวิดีโอที่ไทม์สแตมป์ต่างๆ (ในวิดีโอที่ 00:00)
อธิบายฮาร์ดแวร์
ส่วนประกอบหลักสำหรับโปรเจกต์นี้คือโมดูล Heltec WiFi LoRa 32 V3 และเซนเซอร์อุณหภูมิและความชื้น DHT22 โมดูล Heltec มีไมโครคอนโทรลเลอร์ ESP32 ซึ่งให้ความสามารถ Wi-Fi และ Bluetooth ควบคู่กับการสื่อสาร LoRa ซึ่งช่วยให้มีตัวเลือกการส่งข้อมูลที่ยืดหยุ่น
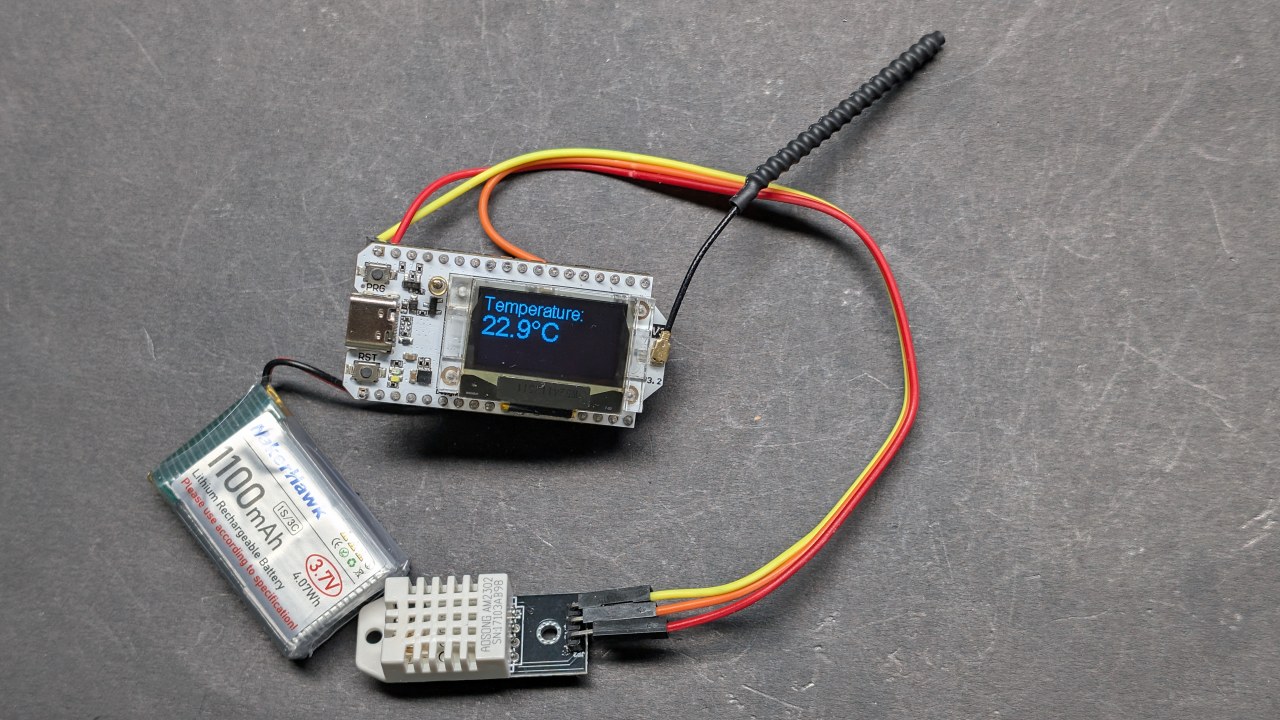
เซนเซอร์ DHT22 เป็นเซนเซอร์ดิจิทัลที่ให้ค่าอุณหภูมิและความชื้นที่แม่นยำ มันสื่อสารกับ ESP32 ผ่านพินเอาต์พุตดิจิทัลเพียงพินเดียว ทำให้ง่ายต่อการเชื่อมต่อและใช้งานในโปรเจกต์ของคุณ เมื่อรวมกันแล้ว ส่วนประกอบเหล่านี้จะสร้างระบบที่แข็งแกร่งสำหรับการตรวจสอบอุณหภูมิแบบไร้สาย
รายละเอียดจาก Datasheet
| ผู้ผลิต | Heltec Automation |
|---|---|
| หมายเลขชิ้นส่วน | WiFi LoRa 32 V3 |
| แรงดันไฟฟ้าลอจิก/IO | 3.3 V |
| แรงดันไฟฟ้าจ่าย | 3.7–4.2 V |
| กระแสเอาต์พุต (ต่อช่อง) | ~1 A |
| กระแสสูงสุด (ต่อช่อง) | ~2 A |
| คำแนะนำความถี่ PWM | 1 kHz (โดยทั่วไป) |
| เกณฑ์ลอจิกอินพุต | 0.7 V (สูง), 0.3 V (ต่ำ) |
| แรงดันตก / RDS(on) / อิ่มตัว | 0.3 V (สูงสุด) |
| ขีดจำกัดความร้อน | 85 °C (สูงสุด) |
| แพ็คเกจ | โมดูล PCB |
| หมายเหตุ / รุ่นต่างๆ | มีตัวเลือกความถี่หลากหลาย (เช่น 433 MHz, 868 MHz, 915 MHz) |
- ตรวจสอบให้แน่ใจว่าได้จ่ายไฟให้ DHT22 ด้วย 3.3V ไม่ใช่ 5V
- ใช้ระดับลอจิกที่เหมาะสมสำหรับการสื่อสารระหว่าง ESP32 และ DHT22
- พิจารณาการระบายความร้อนหากใช้งานที่กระแสสูงเป็นเวลานาน
- ตรวจสอบการเชื่อมต่อเสาอากาศสำหรับ LoRa เพื่อเพิ่มระยะสูงสุด
- คำนึงถึงข้อบังคับความถี่ LoRa ในภูมิภาคของคุณ
คำแนะนำการเดินสายไฟ
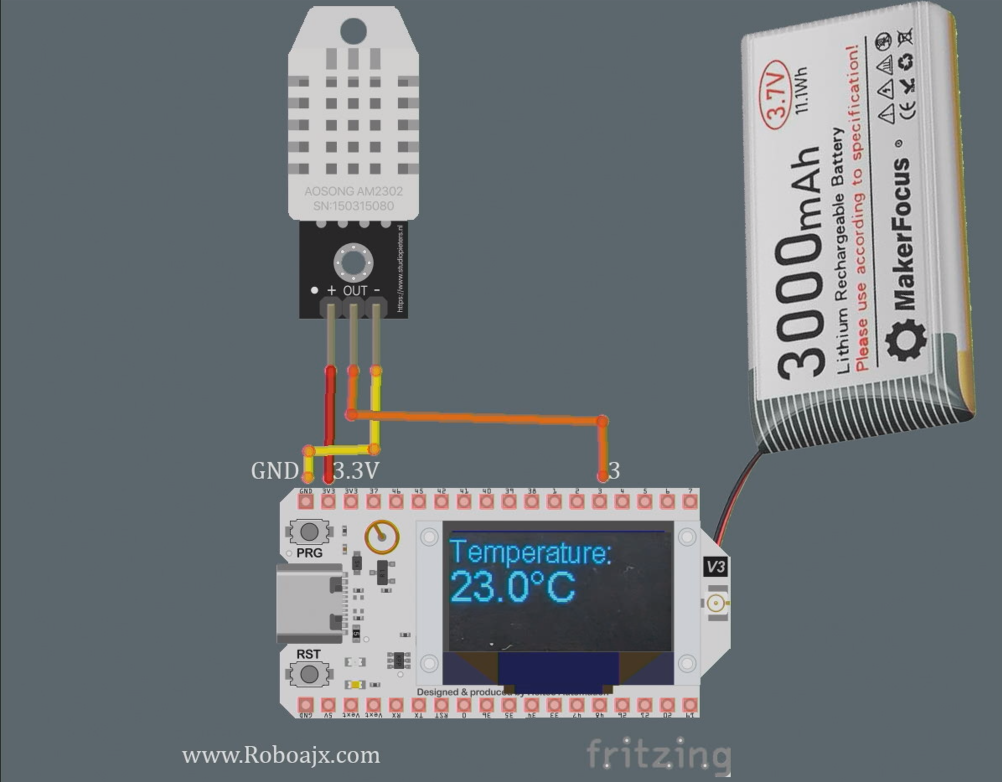
ในการเดินสายไฟ Heltec WiFi LoRa 32 V3 กับเซนเซอร์ DHT22 ให้เริ่มต้นโดยเชื่อมต่อพิน VCC ของเซนเซอร์เข้ากับพิน 3.3V บนโมดูล Heltec จากนั้น เชื่อมต่อพิน GND ของ DHT22 เข้ากับพิน GND หนึ่งตัวบน Heltec พินข้อมูลของ DHT22 ควรเชื่อมต่อกับพิน GPIO 3 บน Heltec
ตรวจสอบให้แน่ใจว่าใช้ตัวต้านทาน pull-up (ประมาณ 10kΩ) ระหว่างพินข้อมูลและ VCC เพื่อการอ่านค่าที่เสถียร นอกจากนี้ ตรวจสอบให้แน่ใจว่าเสาอากาศ LoRa เชื่อมต่ออย่างแน่นหนาเพื่อเพิ่มระยะการส่งสัญญาณ หากคุณใช้แหล่งจ่ายไฟภายนอก ตรวจสอบให้แน่ใจว่าโมดูล Heltec ได้รับการจ่ายไฟอย่างถูกต้องเพื่อหลีกเลี่ยงปัญหาการทำงาน
การติดตั้งบอร์ด Heltec ESP32
เพิ่มเส้นทางนี้ลงในค่ากำหนดของ Arduino IDE ของคุณตามที่แสดงในวิดีโอ:https://resource.heltec.cn/download/package_heltec_esp32_index.json
การติดตั้งไลบรารี Heltec ESP32
เมื่อเปิด Arduino IDE แล้ว กรุณาคลิกที่ไอคอนไลบรารี (1) จากนั้นพิมพ์ "Heltec" ในช่องค้นหา (2) และคลิกติดตั้ง (3) ดูภาพ

ตัวอย่างโค้ดและคำอธิบาย
ตัวอย่างโค้ดต่อไปนี้แสดงวิธีการตั้งค่าโมดูล Heltec เพื่ออ่านข้อมูลอุณหภูมิจากเซนเซอร์ DHT22 และส่งผ่าน LoRa โค้ดจะเริ่มต้นจอแสดงผลและตั้งค่าเซนเซอร์ DHT
#include
#define DHTPIN 3         // พิน GPIO สำหรับ DHT22
#define DHTTYPE DHT22    // กำหนดประเภท DHT
DHT dht(DHTPIN, DHTTYPE);
void setup() {
  Serial.begin(115200);
  dht.begin(); // เริ่มต้นเซนเซอร์ DHT
}
ในตัวอย่างนี้ เรากำหนดพินที่เชื่อมต่อเซนเซอร์ DHT22 และเริ่มต้นในฟังก์ชัน setup() บรรทัด Serial.begin(115200) ใช้สำหรับเอาต์พุตการดีบัก
void loop() {
  float tempC = dht.readTemperature(); // อ่านอุณหภูมิเป็นเซลเซียส
  float tempF = dht.convertCtoF(tempC); // แปลงเป็นฟาเรนไฮต์
  sendData(tempC, tempF); // ฟังก์ชันส่งข้อมูลอุณหภูมิ
}
ส่วนนี้แสดงวิธีการอ่านข้อมูลอุณหภูมิในฟังก์ชัน loop() ฟังก์ชัน sendData() ถูกเรียกเพื่อส่งค่าอุณหภูมิผ่าน LoRa
ที่นี่ เราสร้างสตริงข้อมูลที่มีอุณหภูมิและส่งโดยใช้เมธอด Radio.Send() ซึ่งจะส่งข้อมูลแบบไร้สายไปยังโมดูลรับ
โปรดดูโค้ดเต็มที่โหลดไว้ด้านล่างบทความสำหรับการใช้งานโดยละเอียด
การสาธิต / สิ่งที่คาดหวัง
เมื่อตั้งค่าทุกอย่างเรียบร้อยและอัปโหลดโค้ดไปยังโมดูล Heltec แล้ว คุณควรเห็นค่าอุณหภูมิแสดงบนหน้าจอ OLED ระบบจะส่งข้อมูลอุณหภูมิ ซึ่งสามารถรับได้โดยโมดูล Heltec อีกตัวที่ตั้งค่าให้อ่านข้อมูล คุณสามารถทดสอบระยะได้โดยการย้ายตัวรับให้ห่างจากตัวส่งมากขึ้น เพื่อยืนยันระยะทางสูงสุดที่ทำได้ (ในวิดีโอที่ 1:30)
ควรระวังข้อผิดพลาดทั่วไป เช่น การเดินสายไฟไม่ถูกต้อง แหล่งจ่ายไฟไม่เพียงพอ หรือใช้ความถี่ LoRa ผิด ตรวจสอบให้แน่ใจว่า DHT22 ทำงานอย่างถูกต้องและเชื่อมต่อเสาอากาศเพื่อเพิ่มระยะสูงสุด
ไทม์สแตมป์ในวิดีโอ
- 00:00 เริ่มต้น
- 3:51 ข้อมูลจำเพาะ
- 8:32 หน้าเอกสาร
- 9:52 แพ็คเกจและแบตเตอรี่
- 12:58 เปิดเครื่องครั้งแรก
- 16:37 การติดตั้งไลบรารี
- 18:19 โค้ดพื้นฐานตัวส่ง
- 19:43 โค้ดพื้นฐานตัวรับ
- 20:39 การสาธิตการส่งและรับข้อความ
- 23:02 โค้ดสาธิต OLED
- 24:06 โค้ดข้อความพื้นฐานบนหน้าจอ OLED
- 26:26 การสาธิตข้อความพื้นฐานบน OLED
- 26:58 การอ่านอุณหภูมิด้วย DHT22
- 28:49 ตัวส่ง LoRa อุณหภูมิและการแสดงผล
- 30:07 ตัวรับ LoRa อุณหภูมิและการแสดงผล
- 32:13 การกระตุ้น LED เมื่ออุณหภูมิเพิ่มขึ้น
- 22:26 การทดสอบระยะการส่ง LoRa
- 35:01 dBm และมิลลิวัตต์
ภาพ
This tutorial is part of: คู่มือการใช้งาน WiFi LoRa 32
- 13 ไมล์ 20 กิโลเมตร โดยไม่มี WiFi? LoRa ส่งแรงดันไฟฟ้าข้ามระยะทางสุดโหดได้อย่างไร! (Heltec WiFi LoRa 32 V3)
- เปิดใช้งานอุปกรณ์จากระยะทาง 13 ไมล์ (21 กิโลเมตร) – โปรเจกต์ LoRa นอกระบบสุดยอดพร้อม WiFi LoRa 32!
- ระบบแจ้งเตือนประตูระยะไกลจากระยะทาง 13 ไมล์ (21 กิโลเมตร) ด้วย LoRa – นอกระบบโครงข่าย! (Heltec WiFi LoRa 32 V3)
- ควบคุมมอเตอร์เซอร์โวจากระยะไกล! บทช่วยสอน Heltec WiFi LoRa 32 V3 Arduino (TX)
- โปรเจกต์รีเลย์ระยะไกล DIY: ระยะทาง 13 ไมล์ ไม่ใช้ Wi-Fi/ไม่ใช้ซิม Heltec LoRa 32 โมดูล
- How to Use the Heltec LoRa CubeCell Development Board HTCC-AB01
/*
This is a simple code to display text on the OLED display
WiFi LoRa 32 V3 ESP32 module
Written by Ahmad Shamshiri 02 April 2025
Watch full video explanation https://youtu.be/WkyQMXkQhE8
Resources page https://robojax.com/tutorial_view.php?id=387
*/
#include <Wire.h>
#include "HT_SSD1306Wire.h"


static SSD1306Wire  display(0x3c, 500000, SDA_OLED, SCL_OLED, GEOMETRY_128_64, RST_OLED); // addr , freq , i2c group , resolution , rst


void setup() {
  Serial.begin(115200);
  Serial.println();
  Serial.println();
  VextON();
  delay(100);

  // Initialising the UI will init the display too.
  display.init();

  display.setFont(ArialMT_Plain_10);

}


void displayTemperature(double temperature, int unit) {
    display.clear();  // Clear display before new content

    // Line 1: "Temperature:" in 16pt font
    display.setTextAlignment(TEXT_ALIGN_LEFT);
    display.setFont(ArialMT_Plain_16);
    display.drawString(0, 0, "Temperature:");

    // Line 2: Temperature value in 24pt font
    display.setFont(ArialMT_Plain_24);

    // Format temperature with correct unit symbol
    String tempString = String(temperature, 1); // 1 decimal place
    switch(unit) {
        case 1:  tempString += "�C"; break;  // Celsius
        case 2:  tempString += "�F"; break;  // Fahrenheit
        default: tempString += "�U"; break;  // Unknown unit
    }

    display.drawString(0, 20, tempString);  // Display at Y=20 (below label)
    display.display();  // Update OLED
}


void VextON(void)
{
  pinMode(Vext,OUTPUT);
  digitalWrite(Vext, LOW);
}

void VextOFF(void) //Vext default OFF
{
  pinMode(Vext,OUTPUT);
  digitalWrite(Vext, HIGH);
}


void loop() {
  // clear the display
  display.clear();
  displayTemperature(23.5, 1); // Displays "23.5�C" /1
  delay(2000);

}/*
written on March 27, 2025
written by Ahmad Shamshiri for www.Robojax.com
Transmits Temperature and Humidity over LoRa RF using ESP32 LoRA 32 V3 module.
and displays the information on the screen.
Watch full video explanation https://youtu.be/WkyQMXkQhE8
Resources page: https://robojax.com/tutorial_view.php?id=387
*/
#include <Wire.h>
#include "HT_SSD1306Wire.h"
static SSD1306Wire display(0x3c, 500000, SDA_OLED, SCL_OLED, GEOMETRY_128_64, RST_OLED); // addr , freq , i2c group , resolution , rst
#include <DHT.h>
#define DHTPIN 3 // GPIO21
#define DHTTYPE DHT22 // DHT22 (AM2302)
DHT dht(DHTPIN, DHTTYPE);
float tempC, tempF;
int humidity ;
//1=C
//2=F
//3=C, Humidity //only for display not for transmission
//4=F, Humidity //only for display not for transmission
//5=Humidity only
int dataType = 2;
String labelTemp = "Temperature";
String labelHumidity = "Humidity";
const int TX_POWER = 2;//dBm from 2 to 20. when powered via battery 2 to 14dBm is the best option
#include "mbedtls/aes.h"
#include <cstring> // For memset, memcpy
mbedtls_aes_context aes;
const char *userKey = "hyhT676#h~_876s"; //Security key.
#include "LoRaWan_APP.h"
#include "Arduino.h"
#define RF_FREQUENCY 915000000 // Hz
#define TX_OUTPUT_POWER TX_POWER // dBm from 2 to 20. when powered via battery 2 to 14dBm
#define LORA_BANDWIDTH 0 // [0: 125 kHz,
// 1: 250 kHz,
// 2: 500 kHz,
// 3: Reserved]
#define LORA_SPREADING_FACTOR 7 // [SF7..SF12]
#define LORA_CODINGRATE 1 // [1: 4/5,
// 2: 4/6,
// 3: 4/7,
// 4: 4/8]
#define LORA_PREAMBLE_LENGTH 8 // Same for Tx and Rx
#define LORA_SYMBOL_TIMEOUT 0 // Symbols
#define LORA_FIX_LENGTH_PAYLOAD_ON false
#define LORA_IQ_INVERSION_ON false
#define RX_TIMEOUT_VALUE 1000
#define BUFFER_SIZE 30 // Define the payload size here
char txpacket[BUFFER_SIZE];
char rxpacket[BUFFER_SIZE];
double txNumber;
bool lora_idle=true;
static RadioEvents_t RadioEvents;
unsigned long lastTxTime = 0;
void OnTxDone( void );
void OnTxTimeout( void );
void decryptAES(uint8_t *data, const char *key);
void encryptAES(uint8_t *data, const char *key);
void processKey(const char *userKey, uint8_t *processedKey, size_t keySize);
void setup() {
Serial.begin(115200);
Serial.println();
VextON();
delay(100);
// Initialising the UI will init the display too.
display.init();
display.setFont(ArialMT_Plain_10);
dht.begin();
//LoRa stuff
Mcu.begin(HELTEC_BOARD,SLOW_CLK_TPYE);
txNumber=0;
RadioEvents.TxDone = OnTxDone;
RadioEvents.TxTimeout = OnTxTimeout;
Radio.Init( &RadioEvents );
Radio.SetChannel( RF_FREQUENCY );
Radio.SetTxConfig( MODEM_LORA, TX_OUTPUT_POWER, 0, LORA_BANDWIDTH,
LORA_SPREADING_FACTOR, LORA_CODINGRATE,
LORA_PREAMBLE_LENGTH, LORA_FIX_LENGTH_PAYLOAD_ON,
true, 0, 0, LORA_IQ_INVERSION_ON, 3000 );
}
void displayTemperature(int unit) {
display.clear(); // Clear display before new content
// Line 1: "Temperature:" in 16pt font
display.setTextAlignment(TEXT_ALIGN_LEFT);
// Line 2: Temperature value in 24pt font
display.setFont(ArialMT_Plain_24);
// Format temperature with correct unit symbol
String tempStringC = String(tempC, 1) + "°C"; // 1 decimal place
String tempStringF = String(tempF, 1)+ "°F"; // 1 decimal place
String tempStringHumidity = String(humidity)+ "% RH";
String tempString;
switch(unit) {
case 1:
tempString =tempStringC;
display.setFont(ArialMT_Plain_16);
display.drawString(0, 0, "Temperature:");
display.setFont(ArialMT_Plain_24);
display.drawString(0, 15, tempString);
break; // Celsius
case 2: tempString =tempStringF;
display.setFont(ArialMT_Plain_16);
display.drawString(0, 0, "Temperature:");
display.setFont(ArialMT_Plain_24);
display.drawString(0, 15, tempString);
break; // Fahrenheit
case 3: tempString =tempStringC;
display.setFont(ArialMT_Plain_16);
display.drawString(0, 0, "Temperature:");
display.setFont(ArialMT_Plain_24);
display.drawString(0, 15, tempString);
display.setFont(ArialMT_Plain_16);
display.drawString(0, 40, "Humidity:");
display.drawString(70, 40, tempStringHumidity);
break; // Celsius
case 4: tempString =tempStringF;
display.setFont(ArialMT_Plain_16);
display.drawString(0, 0, "Temperature:");
display.setFont(ArialMT_Plain_24);
display.drawString(0, 15, tempString);
display.setFont(ArialMT_Plain_16);
display.drawString(0, 40, "Humidity:");
display.drawString(70, 40, tempStringHumidity );
break; // Celsius
case 5:
display.setFont(ArialMT_Plain_16);
display.drawString(0, 0, "Humidity:");
display.setFont(ArialMT_Plain_24);
display.drawString(0, 20, tempStringHumidity);
break; // Celsius
default: tempString =tempStringC + "°C"; break;; // default
}
display.display(); // Update OLED
}
void readSensor()
{
tempC = dht.readTemperature();
humidity = dht.readHumidity();
tempF = dht.convertCtoF(tempC);
}
void VextON(void)
{
pinMode(Vext,OUTPUT);
digitalWrite(Vext, LOW);
}
void VextOFF(void) //Vext default OFF
{
pinMode(Vext,OUTPUT);
digitalWrite(Vext, HIGH);
}
void sendData()
{
String tempStringC = String(tempC, 1) + " °C"; // 1 decimal place
String tempStringF = String(tempF, 1)+ " °F"; // 1 decimal place
String tempStringHumidity = String(humidity)+ " % RH";
String txData;
//1=C
//2=F
//3=C, Humidity
//4=F, Humidity
//5=Humidity only
switch(dataType) {
case 1:
txData = labelTemp + " " + tempStringC;
break;
case 2:
txData = labelTemp + " " + tempStringF;
break;
case 3:
txData = labelHumidity + " " + tempStringHumidity;
break;
default:
txData = labelTemp + " " + tempStringC;
break;
}
uint8_t data[32];
memset(data, 0, sizeof(data)); // Zero-padding
strncpy((char*)data, txData.c_str(), sizeof(data) - 1); // Copy string safely
encryptAES(data, userKey); // Encrypt before sending
if(lora_idle == true)
{
delay(1000);
Radio.Send(data, sizeof(data));
Serial.print("Sending: ");
Serial.println((char *)data);
lora_idle = false;
}
Radio.IrqProcess( );
}
void loop() {
readSensor();//read the data
// clear the display
display.clear();
displayTemperature(dataType); //
sendData();
delay(100);
}
void OnTxDone( void )
{
Serial.println("TX done......");
lora_idle = true;
}
void OnTxTimeout( void )
{
Radio.Sleep( );
Serial.println("TX Timeout......");
lora_idle = true;
}
/**
* Converts a user-provided plaintext key into a fixed-length 16-byte (128-bit)
* or 32-byte (256-bit) key.
*/
void processKey(const char *userKey, uint8_t *processedKey, size_t keySize) {
memset(processedKey, 0, keySize); // Fill with zeros
size_t len = strlen(userKey);
if (len > keySize) len = keySize; // Truncate if too long
memcpy(processedKey, userKey, len); // Copy valid key part
}
/**
* Encrypts a 16-byte (one block) message using AES-128.
*/
void encryptAES(uint8_t *data, const char *key) {
uint8_t processedKey[16]; // 128-bit key
processKey(key, processedKey, 16);
mbedtls_aes_init(&aes);
mbedtls_aes_setkey_enc(&aes, processedKey, 128);
mbedtls_aes_crypt_ecb(&aes, MBEDTLS_AES_ENCRYPT, data, data);
mbedtls_aes_free(&aes);
}
/**
* Decrypts a 16-byte (one block) message using AES-128.
*/
void decryptAES(uint8_t *data, const char *key) {
uint8_t processedKey[16]; // 128-bit key
processKey(key, processedKey, 16);
mbedtls_aes_init(&aes);
mbedtls_aes_setkey_dec(&aes, processedKey, 128);
mbedtls_aes_crypt_ecb(&aes, MBEDTLS_AES_DECRYPT, data, data);
mbedtls_aes_free(&aes);
}/*
Written on April 01, 2025
written by Ahmad Shamshiri for www.Robojax.com
this sktech receives the secure temperature or humidity from WiFi LoRa 32 and decrypts it
and displays it on the OLED. There is action feature to triggerd if the temperature is below triggerdValue
Watch full video explaination https://youtu.be/WkyQMXkQhE8
Resources page: https://robojax.com/tutorial_view.php?id=387
*/
#include <Arduino.h>
// Alert configuration
const String triggerdText = "Too High"; // Correct String type
const float triggerdValue = 90.0f; // exclusive (this value is not included)
const int triggerdYpos = 45;
const bool triggerdType = true;//true is > (greter than triggerdValue) and false is < (less than triggerdValue)
const int triggerdOutputPin = 7;//GPIO07 goes HIGH when triggered
const bool triggerdBlink4Me= true;//should blink or not
#include "mbedtls/aes.h"
#include <cstring> // For memset, memcpy
mbedtls_aes_context aes;
const char *userKey = "hyhT676#h~_876s"; //Security key
#define MIN_RSSI -120 // Worst possible signal
#define MAX_RSSI -50 // Best possible signal
// For a connection via I2C using the Arduino Wire include:
#include <Wire.h>
#include "HT_SSD1306Wire.h"
static SSD1306Wire display(0x3c, 500000, SDA_OLED, SCL_OLED, GEOMETRY_128_64, RST_OLED); // addr , freq , i2c group , resolution , rst
#include "LoRaWan_APP.h"
#include "Arduino.h"
#define RF_FREQUENCY 915000000 // Hz
#define TX_OUTPUT_POWER 14 // dBm
#define LORA_BANDWIDTH 0 // [0: 125 kHz,
// 1: 250 kHz,
// 2: 500 kHz,
// 3: Reserved]
#define LORA_SPREADING_FACTOR 7 // [SF7..SF12]
#define LORA_CODINGRATE 1 // [1: 4/5,
// 2: 4/6,
// 3: 4/7,
// 4: 4/8]
#define LORA_PREAMBLE_LENGTH 8 // Same for Tx and Rx
#define LORA_SYMBOL_TIMEOUT 0 // Symbols
#define LORA_FIX_LENGTH_PAYLOAD_ON false
#define LORA_IQ_INVERSION_ON false
#define RX_TIMEOUT_VALUE 1000
#define BUFFER_SIZE 30 // Define the payload size here
char txpacket[BUFFER_SIZE];
char rxpacket[BUFFER_SIZE];
static RadioEvents_t RadioEvents;
int16_t txNumber;
int16_t rssi,rxSize;
bool lora_idle = true;
unsigned long lastRxTime = 0;
const unsigned long SIGNAL_TIMEOUT = 5000; // 5 seconds
void decryptAES(uint8_t *data, const char *key);
void encryptAES(uint8_t *data, const char *key);
void processKey(const char *userKey, uint8_t *processedKey, size_t keySize);
void setup() {
Serial.begin(115200);
Serial.println();
Serial.println();
VextON();
delay(100);
// Initialising the UI will init the display too.
display.init();
display.setFont(ArialMT_Plain_10);
pinMode(triggerdOutputPin, OUTPUT);
//LoRa stuff blow this line
Mcu.begin(HELTEC_BOARD,SLOW_CLK_TPYE);
txNumber=0;
rssi=0;
RadioEvents.RxDone = OnRxDone;
Radio.Init( &RadioEvents );
Radio.SetChannel( RF_FREQUENCY );
Radio.SetRxConfig( MODEM_LORA, LORA_BANDWIDTH, LORA_SPREADING_FACTOR,
LORA_CODINGRATE, 0, LORA_PREAMBLE_LENGTH,
LORA_SYMBOL_TIMEOUT, LORA_FIX_LENGTH_PAYLOAD_ON,
0, true, 0, 0, LORA_IQ_INVERSION_ON, true );
}
void displayTemperature(String data1, String data2) {
display.clear(); // Clear display before new content
// Line 1: "Temperature:" in 16pt font
display.setTextAlignment(TEXT_ALIGN_LEFT);
display.setFont(ArialMT_Plain_16);
display.drawString(0, 0, data1);
// Line 2: Temperature value in 24pt font
display.setFont(ArialMT_Plain_24);
display.drawString(0, 20, data2); //
displaySignalStrength(rssi);
// display.display(); // Update OLED
}
void displayLine(String data, int y) {
// Line 1: "Temperature:" in 16pt font
display.setTextAlignment(TEXT_ALIGN_LEFT);
display.setFont(ArialMT_Plain_10);
if (triggerdBlink4Me) {
// Blink effect: Display text, wait, clear text, wait, then return
display.drawString(0, y, data);
display.display();
delay(500); // Keep text visible for 500ms
display.clear(); // Clear the screen
display.display();
delay(500); // Keep screen blank for 500ms
}
else {
// Normal display without blinking
display.drawString(0, y, data);
display.display();
}
}
void VextON(void)
{
pinMode(Vext,OUTPUT);
digitalWrite(Vext, LOW);
}
void VextOFF(void) //Vext default OFF
{
pinMode(Vext,OUTPUT);
digitalWrite(Vext, HIGH);
}
void loop() {
RaIrqProcessdio( );
if(lora_idle)
{
lora_idle = false;
Serial.println("into RX mode");
Radio.Rx(0);
}
noSignalCheck();
delay(100);
}
void displaySignalStrength(int16_t rssi) {
// Convert RSSI to percentage (0-100%)
int percent = map(constrain(rssi, MIN_RSSI, MAX_RSSI), MIN_RSSI, MAX_RSSI, 0, 100);
// Display at bottom right corner
display.setTextAlignment(TEXT_ALIGN_RIGHT);
display.setFont(ArialMT_Plain_16);
// Create signal strength indicator
String strength = String(percent) + "% [";
for (int i = 0; i < 5; i++) {
strength += (percent > (i * 20)) ? "|" : " ";
}
strength += "]";
display.drawString(128, 45, strength); // Position at bottom-right
}
void noSignalCheck()
{
// Automatic "No Signal" after timeout
if (millis() - lastRxTime > SIGNAL_TIMEOUT) {
display.clear();
display.setTextAlignment(TEXT_ALIGN_CENTER);
display.setFont(ArialMT_Plain_16);
display.drawString(64, 20, "No Signal");
display.display();
}
}
/**
* Triggers an action based on a threshold comparison.
*
* @param type - If true, triggers when floatValue **exceeds** triggerdValue.
* If false, triggers when floatValue **falls below** triggerdValue.
* @param floatValue - The current measured value to compare.
* @param triggerdValue - The threshold value that determines the trigger condition.
*/
void triggerAction(float floatValue)
{
if(triggerdType)
{
if (floatValue > triggerdValue) {
displayLine(triggerdText, triggerdYpos);
Serial.println(triggerdText);
digitalWrite(triggerdOutputPin, HIGH);//turns triggerdOutputPin to HIGH
}else{
digitalWrite(triggerdOutputPin, LOW);
}
}else{
if (floatValue < triggerdValue) {
displayLine(triggerdText, triggerdYpos);
Serial.println(triggerdText);
digitalWrite(triggerdOutputPin, HIGH);//turns triggerdOutputPin to HIGH
} else{
digitalWrite(triggerdOutputPin, LOW);//turns triggerdOutputPin to LOW
}
}
}
void OnRxDone( uint8_t *payload, uint16_t size, int16_t rssi, int8_t snr )
{
lastRxTime = millis(); // Reset timer on new data
rssi=rssi;
rxSize=size;
memcpy(rxpacket, payload, size );
rxpacket[size]='\0';
Radio.Sleep( );
Serial.printf("\r\nreceived packet \"%s\" with rssi %d , length %d\r\n",rxpacket,rssi,rxSize);
// Serial.println("Encrypted Data (Hex):");
// for (int i = 0; i < 16; i++) {
// Serial.printf("%02X ", rxpacket[i]);
// }
// Serial.println();
decryptAES((uint8_t *)rxpacket, userKey);
// Split the received packet into parts
String receivedStr = String((char*)rxpacket);
int firstSpacePos = receivedStr.indexOf(' ');
if (firstSpacePos != -1) {
// First part (before first space)
String part1 = receivedStr.substring(0, firstSpacePos); // "Temperature"
// Find second space (after the number)
int secondSpacePos = receivedStr.indexOf(' ', firstSpacePos + 1);
if (secondSpacePos != -1) {
// Second part (numeric value)
String part2 = receivedStr.substring(firstSpacePos + 1, secondSpacePos); // "34.5"
float floatValue = part2.toFloat(); // Convert to float 34.5
// Third part (unit)
String part3 = receivedStr.substring(secondSpacePos + 1); // "°C"
displayTemperature(part1, part2+part3);
display.display();
Serial.print("part1: " + part1);
Serial.print(" part2: " + part2);
Serial.println(" part3: " + part3);
Serial.println("floatValue " + String(floatValue));
//to trigger an action.
triggerAction(floatValue);
} else {
Serial.println("No second space found for unit");
}
}else {
Serial.println("No space found in packet - can't split");
}
lora_idle = true;
}
/**
* Converts a user-provided plaintext key into a fixed-length 16-byte (128-bit)
* or 32-byte (256-bit) key.
*/
void processKey(const char *userKey, uint8_t *processedKey, size_t keySize) {
memset(processedKey, 0, keySize); // Fill with zeros
size_t len = strlen(userKey);
if (len > keySize) len = keySize; // Truncate if too long
memcpy(processedKey, userKey, len); // Copy valid key part
}
/**
* Encrypts a 16-byte (one block) message using AES-128.
*/
void encryptAES(uint8_t *data, const char *key) {
uint8_t processedKey[16]; // 128-bit key
processKey(key, processedKey, 16);
mbedtls_aes_init(&aes);
mbedtls_aes_setkey_enc(&aes, processedKey, 128);
mbedtls_aes_crypt_ecb(&aes, MBEDTLS_AES_ENCRYPT, data, data);
mbedtls_aes_free(&aes);
}
/**
* Decrypts a 16-byte (one block) message using AES-128.
*/
void decryptAES(uint8_t *data, const char *key) {
uint8_t processedKey[16]; // 128-bit key
processKey(key, processedKey, 16);
mbedtls_aes_init(&aes);
mbedtls_aes_setkey_dec(&aes, processedKey, 128);
mbedtls_aes_crypt_ecb(&aes, MBEDTLS_AES_DECRYPT, data, data);
mbedtls_aes_free(&aes);
}Common Course Links
Common Course Files
แหล่งข้อมูลและเอกสารอ้างอิง
-
ภายนอก
-
ภายนอก
-
ภายนอก
-
ภายนอก
-
ภายนอกPurchase a WiFi LoRa 32 V3 from AliExpresss.click.aliexpress.com
-
ภายนอกPurchase a WiFi LoRa 32 V3 from AliExpress-2s.click.aliexpress.com
-
ภายนอก
-
ภายนอกPurchase Wi-Fi LoRa 32 from Meshnologymeshnology.com
ไฟล์📁
ไลบรารี Arduino (zip)
-
Heltec ESP32 libraries 2.1.5Libraries for all Heltec ESP32 boards. This is version 2.1.5.
Heltec_ESP32-master.zip3.86 MB
ไฟล์อื่น ๆ
-
Heltec WiFi LoRa 32 V3 Schematic Diagram (V3.1)
Heltec_WiFiLoRAV3_Schematic_Diagram.pdf0.18 MB