This tutorial is part of: WiFi LoRa 32 Tutorials
All videos related to Heltec WiFi LoRa 32 are related using this group. Links to other videos are below this article.

Using Heltec WiFi LoRa 32 V3 to transmit temperature using DHT22 to 1.4km
In this tutorial, we will explore how to use the Heltec WiFi LoRa 32 V3 module to transmit temperature data from a DHT22 sensor over long distances, achieving ranges up to 1.4 kilometers. This capability is made possible through the use of LoRa technology, which allows for low-power, long-range communication. By the end of this guide, you will have a working system that can send temperature readings wirelessly.
We will begin with an overview of the hardware components involved in this project, including the Heltec WiFi LoRa 32 V3 module and the DHT22 sensor. After that, we will proceed to the wiring instructions, where you will learn how to connect these components. Lastly, we will walk through the code required to make this system operational. For visual guidance, please refer to the video at various timestamps (in video at 00:00).
Hardware Explained
The main components for this project are the Heltec WiFi LoRa 32 V3 module and the DHT22 temperature and humidity sensor. The Heltec module features an ESP32 microcontroller, which provides Wi-Fi and Bluetooth capabilities alongside LoRa communication. This allows for flexible data transmission options.
The DHT22 sensor is a digital sensor that provides accurate temperature and humidity readings. It communicates with the ESP32 through a single digital output pin, making it easy to connect and use in your projects. Together, these components form a robust system for wireless temperature monitoring.
Datasheet Details
| Manufacturer | Heltec Automation |
|---|---|
| Part number | WiFi LoRa 32 V3 |
| Logic/IO voltage | 3.3 V |
| Supply voltage | 3.7–4.2 V |
| Output current (per channel) | ~1 A |
| Peak current (per channel) | ~2 A |
| PWM frequency guidance | 1 kHz (typ.) |
| Input logic thresholds | 0.7 V (high), 0.3 V (low) |
| Voltage drop / RDS(on) / saturation | 0.3 V (max) |
| Thermal limits | 85 °C (max) |
| Package | PCB module |
| Notes / variants | Various frequency options available (e.g., 433 MHz, 868 MHz, 915 MHz) |
- Ensure to power the DHT22 with 3.3V, not 5V.
- Use appropriate logic levels for communication between the ESP32 and DHT22.
- Consider heat-sinking if running at high currents for extended periods.
- Check the antenna connection for LoRa to maximize range.
- Be mindful of the LoRa frequency regulations in your region.
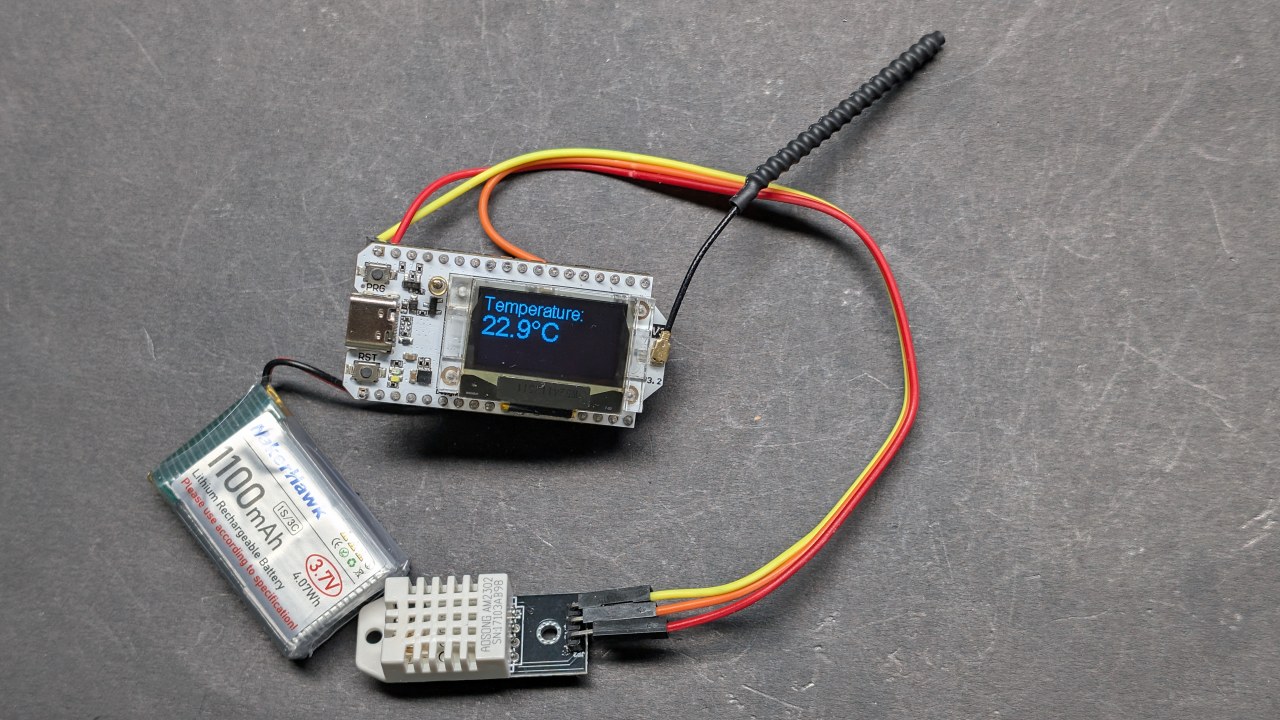
Wiring Instructions

To wire the Heltec WiFi LoRa 32 V3 with the DHT22 sensor, start by connecting the sensor's VCC pin to the 3.3V pin on the Heltec module. Next, connect the GND pin of the DHT22 to one of the GND pins on the Heltec. The data pin of the DHT22 should be connected to GPIO pin 3 on the Heltec.
Make sure to use a pull-up resistor (around 10kΩ) between the data pin and VCC for stable readings. Additionally, ensure that the LoRa antenna is securely connected to enhance transmission range. If you're using external power, ensure the Heltec module is powered correctly to avoid any operational issues.
Installing Heltec ESP32 Boards
Add this path into preferences of your Arduino IDE as shown in the video:https://resource.heltec.cn/download/package_heltec_esp32_index.json
Code Examples & Walkthrough
The following code snippets illustrate how to set up the Heltec module to read temperature data from the DHT22 sensor and transmit it via LoRa. The code initializes the display and sets up the DHT sensor.
#include
#define DHTPIN 3         // GPIO pin for DHT22
#define DHTTYPE DHT22    // Define DHT type
DHT dht(DHTPIN, DHTTYPE);
void setup() {
  Serial.begin(115200);
  dht.begin(); // Initialize DHT sensor
}
In this snippet, we define the pin the DHT22 sensor is connected to and initialize it in the setup() function. The Serial.begin(115200) line is for debugging output.
void loop() {
  float tempC = dht.readTemperature(); // Read temperature in Celsius
  float tempF = dht.convertCtoF(tempC); // Convert to Fahrenheit
  sendData(tempC, tempF); // Function to send temperature data
}
This excerpt shows how to read temperature data in the loop() function. The sendData() function is called to transmit the temperature readings over LoRa.
void sendData(float tempC, float tempF) {
  String data = "Temperature: " + String(tempC) + "°C"; // Create data string
  Radio.Send(data.c_str(), data.length()); // Send data
}
Here, we create the data string containing the temperature and send it using the Radio.Send() method. This will transmit the data wirelessly to the receiving module.
Please refer to the full code loaded below the article for detailed implementation.
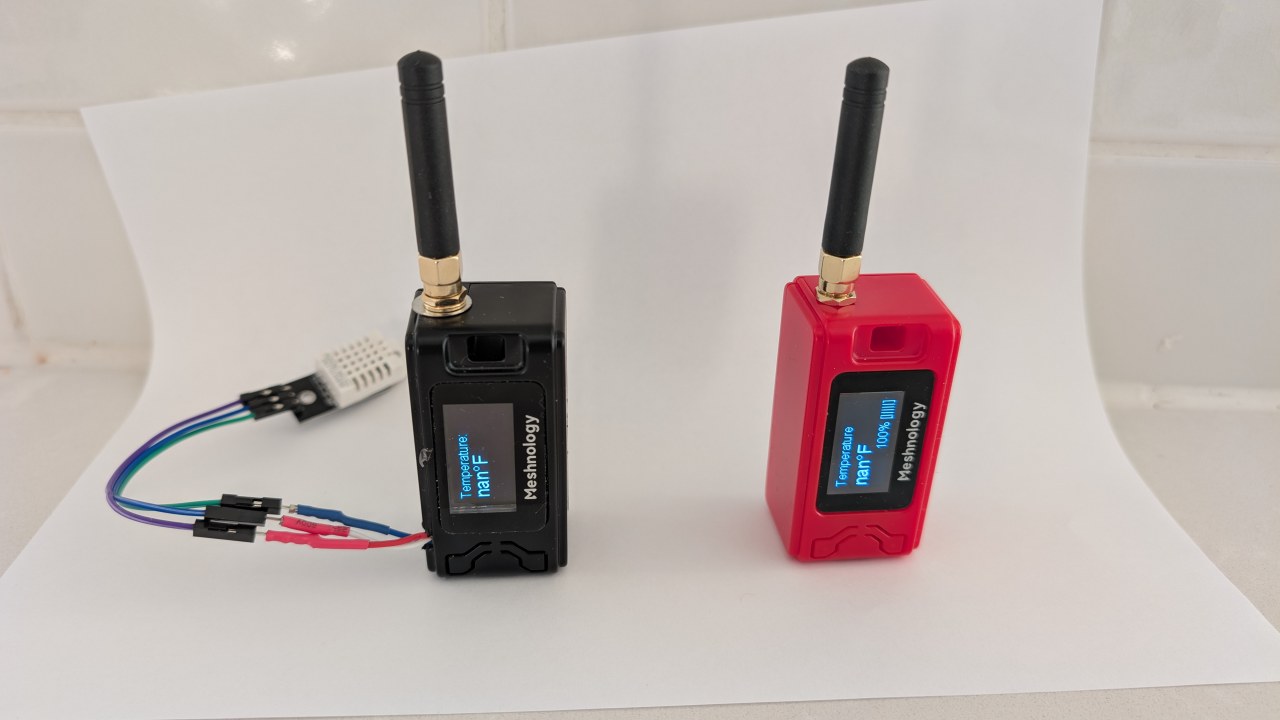
Demonstration / What to Expect
Once everything is set up and the code is uploaded to the Heltec module, you should see the temperature readings displayed on the OLED screen. The system will transmit the temperature data, which can be received by another Heltec module configured to read the data. You can test the range by moving the receiver further away from the transmitter, confirming the maximum distance achieved (in video at 1:30).
Be cautious of common pitfalls such as incorrect wiring, insufficient power supply, or using the wrong LoRa frequency. Ensure the DHT22 is functioning properly and that the antenna is connected to maximize the range.
Video Timestamps
- 00:00 Start
- 3:51 Specs
- 8:32 Documentation page
- 9:52 Package and battery
- 12:58 Powering it up for the first time
- 16:37 Installing Library
- 18:19 Transmitter Basic code
- 19:43 Receiver Basic Code
- 20:39 Demonstration of sending receiving text
- 23:02 OLED demo code
- 24:06 Basic Text on OLED display code
- 26:26 Basic Text on OLED demo
- 26:58 Reading temperature with DHT22
- 28:49 LoRa Transmitter Temperature and Display
- 30:07 LoRa Receiver Temperature and Display
- 32:13 Triggering LED when temperature increases
- 22:26 LoRa Transmission Range Test
- 35:01 dBm and Milli Watt
Images
This tutorial is part of: WiFi LoRa 32 Tutorials
- 13 Miles 20km with NO WiFi? How LoRa Sent Voltage Across Crazy Distances! (Heltec WiFi LoRa 32 V3)
- Turn On a Device from 13 mile 21km Away – The Ultimate Off-Grid LoRa Project with WiFi LoRa 32!
- Remote Door Alert System from 13 mile 21 km Away With LoRa – Off the Grid! (Heltec WiFi LoRa 32 V3)
- Control a Servo motor from Miles Away! Heltec WiFi LoRa 32 V3 Arduino Tutorial (TX)
- DIY Remote Relay Project: 13 Mile No-Wi-Fi/No-SIM Heltec LoRa 32 Module
- How to Use the Heltec LoRa CubeCell Development Board HTCC-AB01
/*
This is a simple code to display text on the OLED display
WiFi LoRa 32 V3 ESP32 module
Written by Ahmad Shamshiri 02 April 2025
Watch full video explanation https://youtu.be/WkyQMXkQhE8
Resources page https://robojax.com/tutorial_view.php?id=387
*/
#include <Wire.h>
#include "HT_SSD1306Wire.h"


static SSD1306Wire  display(0x3c, 500000, SDA_OLED, SCL_OLED, GEOMETRY_128_64, RST_OLED); // addr , freq , i2c group , resolution , rst


void setup() {
  Serial.begin(115200);
  Serial.println();
  Serial.println();
  VextON();
  delay(100);

  // Initialising the UI will init the display too.
  display.init();

  display.setFont(ArialMT_Plain_10);

}


void displayTemperature(double temperature, int unit) {
    display.clear();  // Clear display before new content

    // Line 1: "Temperature:" in 16pt font
    display.setTextAlignment(TEXT_ALIGN_LEFT);
    display.setFont(ArialMT_Plain_16);
    display.drawString(0, 0, "Temperature:");

    // Line 2: Temperature value in 24pt font
    display.setFont(ArialMT_Plain_24);

    // Format temperature with correct unit symbol
    String tempString = String(temperature, 1); // 1 decimal place
    switch(unit) {
        case 1:  tempString += "�C"; break;  // Celsius
        case 2:  tempString += "�F"; break;  // Fahrenheit
        default: tempString += "�U"; break;  // Unknown unit
    }

    display.drawString(0, 20, tempString);  // Display at Y=20 (below label)
    display.display();  // Update OLED
}


void VextON(void)
{
  pinMode(Vext,OUTPUT);
  digitalWrite(Vext, LOW);
}

void VextOFF(void) //Vext default OFF
{
  pinMode(Vext,OUTPUT);
  digitalWrite(Vext, HIGH);
}


void loop() {
  // clear the display
  display.clear();
  displayTemperature(23.5, 1); // Displays "23.5�C" /1
  delay(2000);

}/*
written on March 27, 2025
written by Ahmad Shamshiri for www.Robojax.com
Transmits Temperature and Humidity over LoRa RF using ESP32 LoRA 32 V3 module.
and displays the information on the screen.
Watch full video explanation https://youtu.be/WkyQMXkQhE8
Resources page: https://robojax.com/tutorial_view.php?id=387
*/
#include <Wire.h>
#include "HT_SSD1306Wire.h"
static SSD1306Wire display(0x3c, 500000, SDA_OLED, SCL_OLED, GEOMETRY_128_64, RST_OLED); // addr , freq , i2c group , resolution , rst
#include <DHT.h>
#define DHTPIN 3 // GPIO21
#define DHTTYPE DHT22 // DHT22 (AM2302)
DHT dht(DHTPIN, DHTTYPE);
float tempC, tempF;
int humidity ;
//1=C
//2=F
//3=C, Humidity //only for display not for transmission
//4=F, Humidity //only for display not for transmission
//5=Humidity only
int dataType = 2;
String labelTemp = "Temperature";
String labelHumidity = "Humidity";
const int TX_POWER = 2;//dBm from 2 to 20. when powered via battery 2 to 14dBm is the best option
#include "mbedtls/aes.h"
#include <cstring> // For memset, memcpy
mbedtls_aes_context aes;
const char *userKey = "hyhT676#h~_876s"; //Security key.
#include "LoRaWan_APP.h"
#include "Arduino.h"
#define RF_FREQUENCY 915000000 // Hz
#define TX_OUTPUT_POWER TX_POWER // dBm from 2 to 20. when powered via battery 2 to 14dBm
#define LORA_BANDWIDTH 0 // [0: 125 kHz,
// 1: 250 kHz,
// 2: 500 kHz,
// 3: Reserved]
#define LORA_SPREADING_FACTOR 7 // [SF7..SF12]
#define LORA_CODINGRATE 1 // [1: 4/5,
// 2: 4/6,
// 3: 4/7,
// 4: 4/8]
#define LORA_PREAMBLE_LENGTH 8 // Same for Tx and Rx
#define LORA_SYMBOL_TIMEOUT 0 // Symbols
#define LORA_FIX_LENGTH_PAYLOAD_ON false
#define LORA_IQ_INVERSION_ON false
#define RX_TIMEOUT_VALUE 1000
#define BUFFER_SIZE 30 // Define the payload size here
char txpacket[BUFFER_SIZE];
char rxpacket[BUFFER_SIZE];
double txNumber;
bool lora_idle=true;
static RadioEvents_t RadioEvents;
unsigned long lastTxTime = 0;
void OnTxDone( void );
void OnTxTimeout( void );
void decryptAES(uint8_t *data, const char *key);
void encryptAES(uint8_t *data, const char *key);
void processKey(const char *userKey, uint8_t *processedKey, size_t keySize);
void setup() {
Serial.begin(115200);
Serial.println();
VextON();
delay(100);
// Initialising the UI will init the display too.
display.init();
display.setFont(ArialMT_Plain_10);
dht.begin();
//LoRa stuff
Mcu.begin(HELTEC_BOARD,SLOW_CLK_TPYE);
txNumber=0;
RadioEvents.TxDone = OnTxDone;
RadioEvents.TxTimeout = OnTxTimeout;
Radio.Init( &RadioEvents );
Radio.SetChannel( RF_FREQUENCY );
Radio.SetTxConfig( MODEM_LORA, TX_OUTPUT_POWER, 0, LORA_BANDWIDTH,
LORA_SPREADING_FACTOR, LORA_CODINGRATE,
LORA_PREAMBLE_LENGTH, LORA_FIX_LENGTH_PAYLOAD_ON,
true, 0, 0, LORA_IQ_INVERSION_ON, 3000 );
}
void displayTemperature(int unit) {
display.clear(); // Clear display before new content
// Line 1: "Temperature:" in 16pt font
display.setTextAlignment(TEXT_ALIGN_LEFT);
// Line 2: Temperature value in 24pt font
display.setFont(ArialMT_Plain_24);
// Format temperature with correct unit symbol
String tempStringC = String(tempC, 1) + "°C"; // 1 decimal place
String tempStringF = String(tempF, 1)+ "°F"; // 1 decimal place
String tempStringHumidity = String(humidity)+ "% RH";
String tempString;
switch(unit) {
case 1:
tempString =tempStringC;
display.setFont(ArialMT_Plain_16);
display.drawString(0, 0, "Temperature:");
display.setFont(ArialMT_Plain_24);
display.drawString(0, 15, tempString);
break; // Celsius
case 2: tempString =tempStringF;
display.setFont(ArialMT_Plain_16);
display.drawString(0, 0, "Temperature:");
display.setFont(ArialMT_Plain_24);
display.drawString(0, 15, tempString);
break; // Fahrenheit
case 3: tempString =tempStringC;
display.setFont(ArialMT_Plain_16);
display.drawString(0, 0, "Temperature:");
display.setFont(ArialMT_Plain_24);
display.drawString(0, 15, tempString);
display.setFont(ArialMT_Plain_16);
display.drawString(0, 40, "Humidity:");
display.drawString(70, 40, tempStringHumidity);
break; // Celsius
case 4: tempString =tempStringF;
display.setFont(ArialMT_Plain_16);
display.drawString(0, 0, "Temperature:");
display.setFont(ArialMT_Plain_24);
display.drawString(0, 15, tempString);
display.setFont(ArialMT_Plain_16);
display.drawString(0, 40, "Humidity:");
display.drawString(70, 40, tempStringHumidity );
break; // Celsius
case 5:
display.setFont(ArialMT_Plain_16);
display.drawString(0, 0, "Humidity:");
display.setFont(ArialMT_Plain_24);
display.drawString(0, 20, tempStringHumidity);
break; // Celsius
default: tempString =tempStringC + "°C"; break;; // default
}
display.display(); // Update OLED
}
void readSensor()
{
tempC = dht.readTemperature();
humidity = dht.readHumidity();
tempF = dht.convertCtoF(tempC);
}
void VextON(void)
{
pinMode(Vext,OUTPUT);
digitalWrite(Vext, LOW);
}
void VextOFF(void) //Vext default OFF
{
pinMode(Vext,OUTPUT);
digitalWrite(Vext, HIGH);
}
void sendData()
{
String tempStringC = String(tempC, 1) + " °C"; // 1 decimal place
String tempStringF = String(tempF, 1)+ " °F"; // 1 decimal place
String tempStringHumidity = String(humidity)+ " % RH";
String txData;
//1=C
//2=F
//3=C, Humidity
//4=F, Humidity
//5=Humidity only
switch(dataType) {
case 1:
txData = labelTemp + " " + tempStringC;
break;
case 2:
txData = labelTemp + " " + tempStringF;
break;
case 3:
txData = labelHumidity + " " + tempStringHumidity;
break;
default:
txData = labelTemp + " " + tempStringC;
break;
}
uint8_t data[32];
memset(data, 0, sizeof(data)); // Zero-padding
strncpy((char*)data, txData.c_str(), sizeof(data) - 1); // Copy string safely
encryptAES(data, userKey); // Encrypt before sending
if(lora_idle == true)
{
delay(1000);
Radio.Send(data, sizeof(data));
Serial.print("Sending: ");
Serial.println((char *)data);
lora_idle = false;
}
Radio.IrqProcess( );
}
void loop() {
readSensor();//read the data
// clear the display
display.clear();
displayTemperature(dataType); //
sendData();
delay(100);
}
void OnTxDone( void )
{
Serial.println("TX done......");
lora_idle = true;
}
void OnTxTimeout( void )
{
Radio.Sleep( );
Serial.println("TX Timeout......");
lora_idle = true;
}
/**
* Converts a user-provided plaintext key into a fixed-length 16-byte (128-bit)
* or 32-byte (256-bit) key.
*/
void processKey(const char *userKey, uint8_t *processedKey, size_t keySize) {
memset(processedKey, 0, keySize); // Fill with zeros
size_t len = strlen(userKey);
if (len > keySize) len = keySize; // Truncate if too long
memcpy(processedKey, userKey, len); // Copy valid key part
}
/**
* Encrypts a 16-byte (one block) message using AES-128.
*/
void encryptAES(uint8_t *data, const char *key) {
uint8_t processedKey[16]; // 128-bit key
processKey(key, processedKey, 16);
mbedtls_aes_init(&aes);
mbedtls_aes_setkey_enc(&aes, processedKey, 128);
mbedtls_aes_crypt_ecb(&aes, MBEDTLS_AES_ENCRYPT, data, data);
mbedtls_aes_free(&aes);
}
/**
* Decrypts a 16-byte (one block) message using AES-128.
*/
void decryptAES(uint8_t *data, const char *key) {
uint8_t processedKey[16]; // 128-bit key
processKey(key, processedKey, 16);
mbedtls_aes_init(&aes);
mbedtls_aes_setkey_dec(&aes, processedKey, 128);
mbedtls_aes_crypt_ecb(&aes, MBEDTLS_AES_DECRYPT, data, data);
mbedtls_aes_free(&aes);
}/*
Written on April 01, 2025
written by Ahmad Shamshiri for www.Robojax.com
this sktech receives the secure temperature or humidity from WiFi LoRa 32 and decrypts it
and displays it on the OLED. There is action feature to triggerd if the temperature is below triggerdValue
Watch full video explaination https://youtu.be/WkyQMXkQhE8
Resources page: https://robojax.com/tutorial_view.php?id=387
*/
#include <Arduino.h>
// Alert configuration
const String triggerdText = "Too High"; // Correct String type
const float triggerdValue = 90.0f; // exclusive (this value is not included)
const int triggerdYpos = 45;
const bool triggerdType = true;//true is > (greter than triggerdValue) and false is < (less than triggerdValue)
const int triggerdOutputPin = 7;//GPIO07 goes HIGH when triggered
const bool triggerdBlink4Me= true;//should blink or not
#include "mbedtls/aes.h"
#include <cstring> // For memset, memcpy
mbedtls_aes_context aes;
const char *userKey = "hyhT676#h~_876s"; //Security key
#define MIN_RSSI -120 // Worst possible signal
#define MAX_RSSI -50 // Best possible signal
// For a connection via I2C using the Arduino Wire include:
#include <Wire.h>
#include "HT_SSD1306Wire.h"
static SSD1306Wire display(0x3c, 500000, SDA_OLED, SCL_OLED, GEOMETRY_128_64, RST_OLED); // addr , freq , i2c group , resolution , rst
#include "LoRaWan_APP.h"
#include "Arduino.h"
#define RF_FREQUENCY 915000000 // Hz
#define TX_OUTPUT_POWER 14 // dBm
#define LORA_BANDWIDTH 0 // [0: 125 kHz,
// 1: 250 kHz,
// 2: 500 kHz,
// 3: Reserved]
#define LORA_SPREADING_FACTOR 7 // [SF7..SF12]
#define LORA_CODINGRATE 1 // [1: 4/5,
// 2: 4/6,
// 3: 4/7,
// 4: 4/8]
#define LORA_PREAMBLE_LENGTH 8 // Same for Tx and Rx
#define LORA_SYMBOL_TIMEOUT 0 // Symbols
#define LORA_FIX_LENGTH_PAYLOAD_ON false
#define LORA_IQ_INVERSION_ON false
#define RX_TIMEOUT_VALUE 1000
#define BUFFER_SIZE 30 // Define the payload size here
char txpacket[BUFFER_SIZE];
char rxpacket[BUFFER_SIZE];
static RadioEvents_t RadioEvents;
int16_t txNumber;
int16_t rssi,rxSize;
bool lora_idle = true;
unsigned long lastRxTime = 0;
const unsigned long SIGNAL_TIMEOUT = 5000; // 5 seconds
void decryptAES(uint8_t *data, const char *key);
void encryptAES(uint8_t *data, const char *key);
void processKey(const char *userKey, uint8_t *processedKey, size_t keySize);
void setup() {
Serial.begin(115200);
Serial.println();
Serial.println();
VextON();
delay(100);
// Initialising the UI will init the display too.
display.init();
display.setFont(ArialMT_Plain_10);
pinMode(triggerdOutputPin, OUTPUT);
//LoRa stuff blow this line
Mcu.begin(HELTEC_BOARD,SLOW_CLK_TPYE);
txNumber=0;
rssi=0;
RadioEvents.RxDone = OnRxDone;
Radio.Init( &RadioEvents );
Radio.SetChannel( RF_FREQUENCY );
Radio.SetRxConfig( MODEM_LORA, LORA_BANDWIDTH, LORA_SPREADING_FACTOR,
LORA_CODINGRATE, 0, LORA_PREAMBLE_LENGTH,
LORA_SYMBOL_TIMEOUT, LORA_FIX_LENGTH_PAYLOAD_ON,
0, true, 0, 0, LORA_IQ_INVERSION_ON, true );
}
void displayTemperature(String data1, String data2) {
display.clear(); // Clear display before new content
// Line 1: "Temperature:" in 16pt font
display.setTextAlignment(TEXT_ALIGN_LEFT);
display.setFont(ArialMT_Plain_16);
display.drawString(0, 0, data1);
// Line 2: Temperature value in 24pt font
display.setFont(ArialMT_Plain_24);
display.drawString(0, 20, data2); //
displaySignalStrength(rssi);
// display.display(); // Update OLED
}
void displayLine(String data, int y) {
// Line 1: "Temperature:" in 16pt font
display.setTextAlignment(TEXT_ALIGN_LEFT);
display.setFont(ArialMT_Plain_10);
if (triggerdBlink4Me) {
// Blink effect: Display text, wait, clear text, wait, then return
display.drawString(0, y, data);
display.display();
delay(500); // Keep text visible for 500ms
display.clear(); // Clear the screen
display.display();
delay(500); // Keep screen blank for 500ms
}
else {
// Normal display without blinking
display.drawString(0, y, data);
display.display();
}
}
void VextON(void)
{
pinMode(Vext,OUTPUT);
digitalWrite(Vext, LOW);
}
void VextOFF(void) //Vext default OFF
{
pinMode(Vext,OUTPUT);
digitalWrite(Vext, HIGH);
}
void loop() {
RaIrqProcessdio( );
if(lora_idle)
{
lora_idle = false;
Serial.println("into RX mode");
Radio.Rx(0);
}
noSignalCheck();
delay(100);
}
void displaySignalStrength(int16_t rssi) {
// Convert RSSI to percentage (0-100%)
int percent = map(constrain(rssi, MIN_RSSI, MAX_RSSI), MIN_RSSI, MAX_RSSI, 0, 100);
// Display at bottom right corner
display.setTextAlignment(TEXT_ALIGN_RIGHT);
display.setFont(ArialMT_Plain_16);
// Create signal strength indicator
String strength = String(percent) + "% [";
for (int i = 0; i < 5; i++) {
strength += (percent > (i * 20)) ? "|" : " ";
}
strength += "]";
display.drawString(128, 45, strength); // Position at bottom-right
}
void noSignalCheck()
{
// Automatic "No Signal" after timeout
if (millis() - lastRxTime > SIGNAL_TIMEOUT) {
display.clear();
display.setTextAlignment(TEXT_ALIGN_CENTER);
display.setFont(ArialMT_Plain_16);
display.drawString(64, 20, "No Signal");
display.display();
}
}
/**
* Triggers an action based on a threshold comparison.
*
* @param type - If true, triggers when floatValue **exceeds** triggerdValue.
* If false, triggers when floatValue **falls below** triggerdValue.
* @param floatValue - The current measured value to compare.
* @param triggerdValue - The threshold value that determines the trigger condition.
*/
void triggerAction(float floatValue)
{
if(triggerdType)
{
if (floatValue > triggerdValue) {
displayLine(triggerdText, triggerdYpos);
Serial.println(triggerdText);
digitalWrite(triggerdOutputPin, HIGH);//turns triggerdOutputPin to HIGH
}else{
digitalWrite(triggerdOutputPin, LOW);
}
}else{
if (floatValue < triggerdValue) {
displayLine(triggerdText, triggerdYpos);
Serial.println(triggerdText);
digitalWrite(triggerdOutputPin, HIGH);//turns triggerdOutputPin to HIGH
} else{
digitalWrite(triggerdOutputPin, LOW);//turns triggerdOutputPin to LOW
}
}
}
void OnRxDone( uint8_t *payload, uint16_t size, int16_t rssi, int8_t snr )
{
lastRxTime = millis(); // Reset timer on new data
rssi=rssi;
rxSize=size;
memcpy(rxpacket, payload, size );
rxpacket[size]='\0';
Radio.Sleep( );
Serial.printf("\r\nreceived packet \"%s\" with rssi %d , length %d\r\n",rxpacket,rssi,rxSize);
// Serial.println("Encrypted Data (Hex):");
// for (int i = 0; i < 16; i++) {
// Serial.printf("%02X ", rxpacket[i]);
// }
// Serial.println();
decryptAES((uint8_t *)rxpacket, userKey);
// Split the received packet into parts
String receivedStr = String((char*)rxpacket);
int firstSpacePos = receivedStr.indexOf(' ');
if (firstSpacePos != -1) {
// First part (before first space)
String part1 = receivedStr.substring(0, firstSpacePos); // "Temperature"
// Find second space (after the number)
int secondSpacePos = receivedStr.indexOf(' ', firstSpacePos + 1);
if (secondSpacePos != -1) {
// Second part (numeric value)
String part2 = receivedStr.substring(firstSpacePos + 1, secondSpacePos); // "34.5"
float floatValue = part2.toFloat(); // Convert to float 34.5
// Third part (unit)
String part3 = receivedStr.substring(secondSpacePos + 1); // "°C"
displayTemperature(part1, part2+part3);
display.display();
Serial.print("part1: " + part1);
Serial.print(" part2: " + part2);
Serial.println(" part3: " + part3);
Serial.println("floatValue " + String(floatValue));
//to trigger an action.
triggerAction(floatValue);
} else {
Serial.println("No second space found for unit");
}
}else {
Serial.println("No space found in packet - can't split");
}
lora_idle = true;
}
/**
* Converts a user-provided plaintext key into a fixed-length 16-byte (128-bit)
* or 32-byte (256-bit) key.
*/
void processKey(const char *userKey, uint8_t *processedKey, size_t keySize) {
memset(processedKey, 0, keySize); // Fill with zeros
size_t len = strlen(userKey);
if (len > keySize) len = keySize; // Truncate if too long
memcpy(processedKey, userKey, len); // Copy valid key part
}
/**
* Encrypts a 16-byte (one block) message using AES-128.
*/
void encryptAES(uint8_t *data, const char *key) {
uint8_t processedKey[16]; // 128-bit key
processKey(key, processedKey, 16);
mbedtls_aes_init(&aes);
mbedtls_aes_setkey_enc(&aes, processedKey, 128);
mbedtls_aes_crypt_ecb(&aes, MBEDTLS_AES_ENCRYPT, data, data);
mbedtls_aes_free(&aes);
}
/**
* Decrypts a 16-byte (one block) message using AES-128.
*/
void decryptAES(uint8_t *data, const char *key) {
uint8_t processedKey[16]; // 128-bit key
processKey(key, processedKey, 16);
mbedtls_aes_init(&aes);
mbedtls_aes_setkey_dec(&aes, processedKey, 128);
mbedtls_aes_crypt_ecb(&aes, MBEDTLS_AES_DECRYPT, data, data);
mbedtls_aes_free(&aes);
}Common Course Links
Common Course Files
Resources & references
-
External
-
External
-
External
-
External
-
ExternalPurchase Wi-Fi LoRa 32 from Meshnologymeshnology.com
Files📁
Other files
-
Heltec WiFi LoRa 32 V3 Schematic Diagram (V3.1)
Heltec_WiFiLoRAV3_Schematic_Diagram.pdf0.18 MB