This tutorial is part of: WiFi LoRa 32 tutorijali
Svi videozapisi vezani za Heltec WiFi LoRa 32 povezani su s ovom grupom. Linkovi do drugih videozapisa nalaze se ispod ovog članka.
Korištenje Heltec WiFi LoRa 32 V3 za prijenos temperature pomoću DHT22 na 1,4 km
U ovom tutorijalu ćemo istražiti kako koristiti Heltec WiFi LoRa 32 V3 modul za slanje podataka o temperaturi sa DHT22 senzora na velike udaljenosti, postižući domete do 1,4 kilometra. Ova mogućnost je omogućena korištenjem LoRa tehnologije, koja omogućava komunikaciju male snage i velikog dometa. Do kraja ovog vodiča, imat ćete funkcionalan sistem koji može bežično slati očitanja temperature.
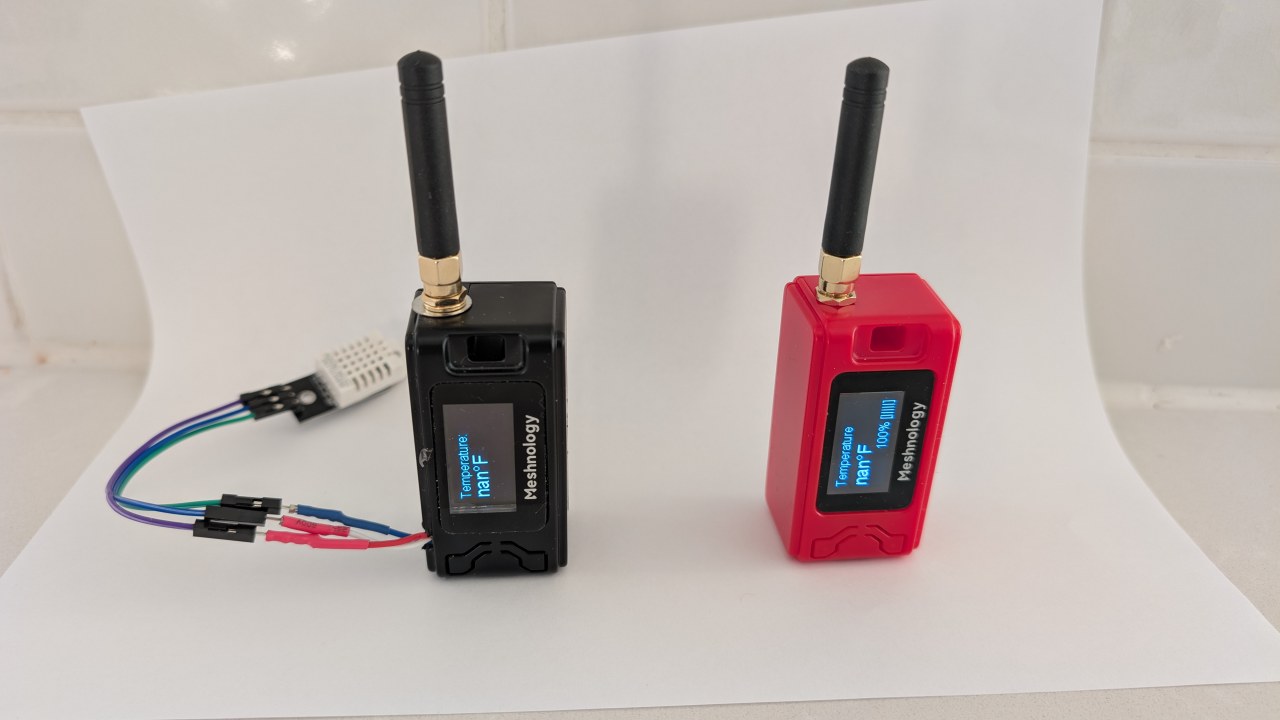
Počet ćemo s pregledom hardverskih komponenti uključenih u ovaj projekat, uključujući Heltec WiFi LoRa 32 V3 modul i DHT22 senzor. Nakon toga, preći ćemo na upute za povezivanje, gdje ćete naučiti kako spojiti ove komponente. Na kraju, proći ćemo kroz kod potreban da ovaj sistem postane operativan. Za vizuelno uputstvo, molimo pogledajte video na različitim vremenskim oznakama (u videu na 00:00).
Objašnjenje hardvera
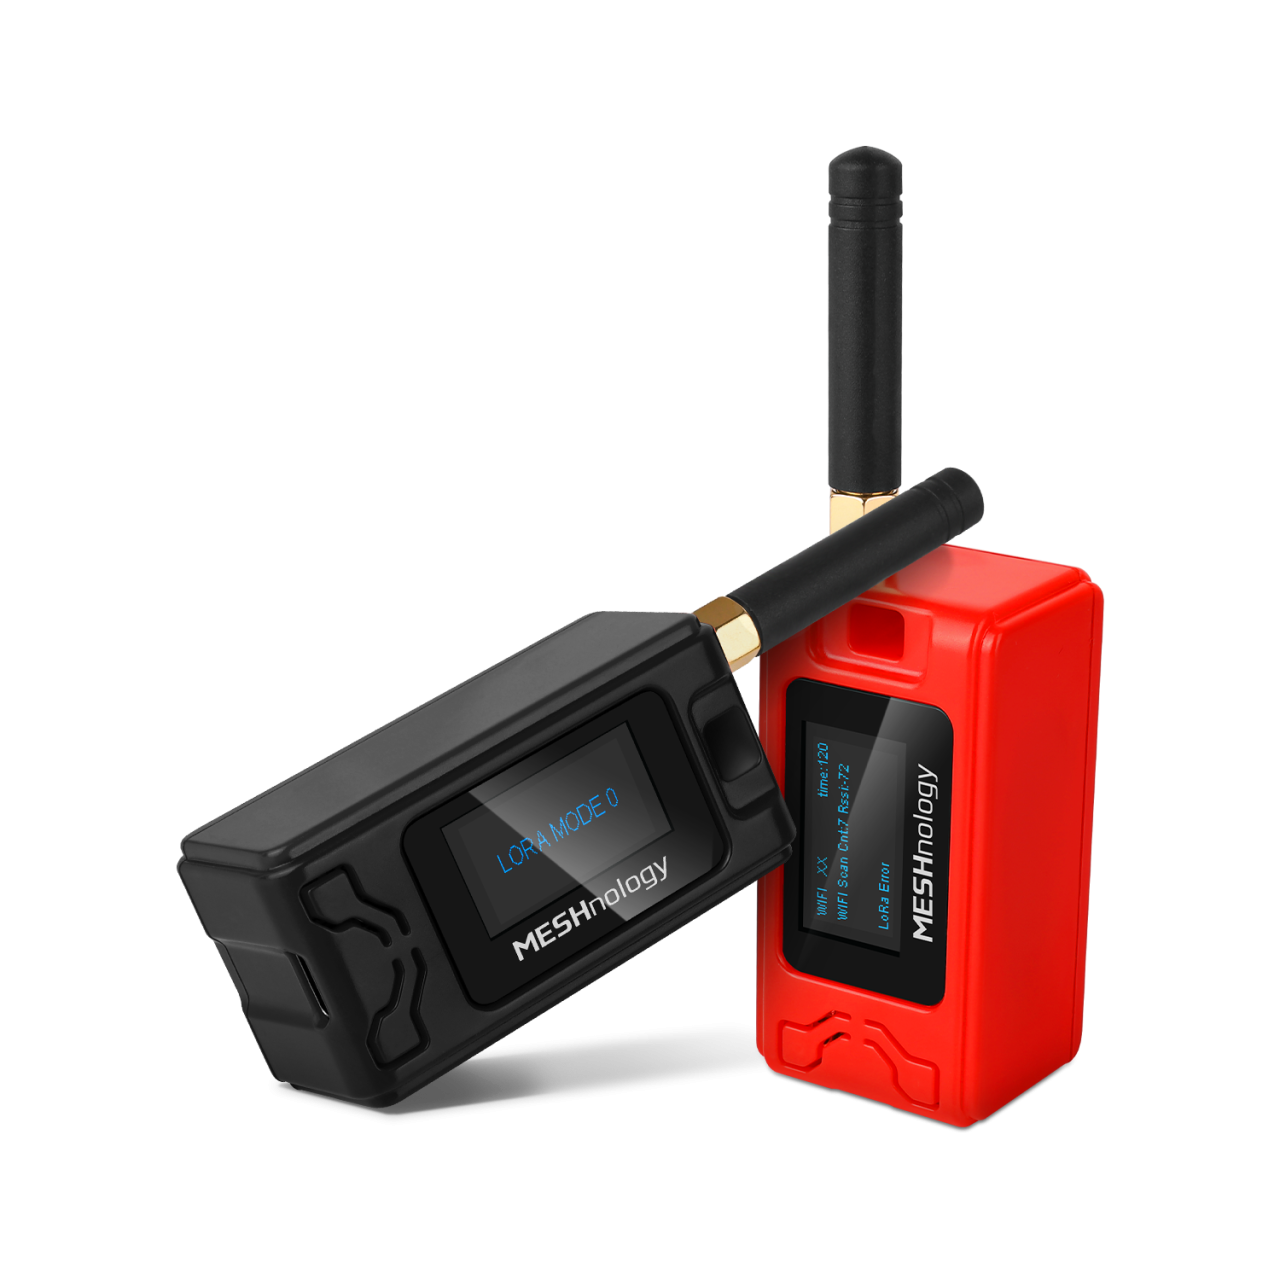
Glavne komponente za ovaj projekat su Heltec WiFi LoRa 32 V3 modul i DHT22 senzor temperature i vlažnosti. Heltec modul ima ESP32 mikrokontroler, koji pruža Wi-Fi i Bluetooth mogućnosti uz LoRa komunikaciju. Ovo omogućava fleksibilne opcije za prijenos podataka.
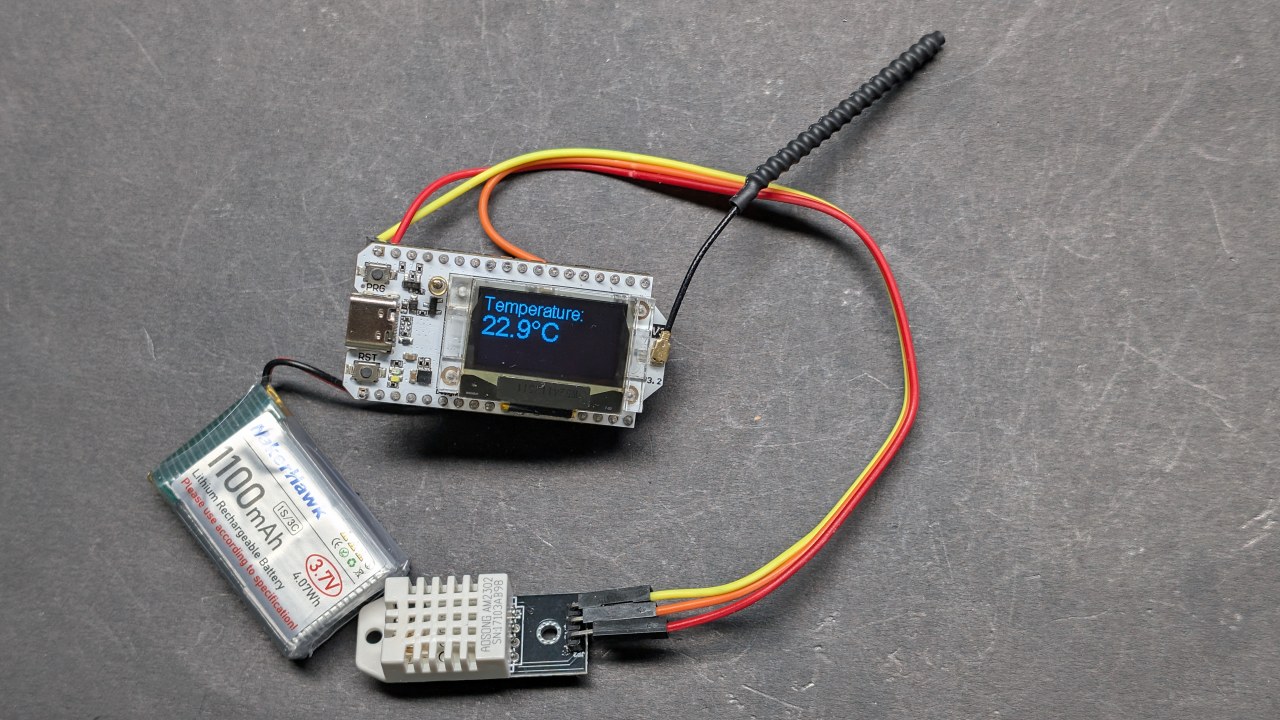
DHT22 senzor je digitalni senzor koji pruža tačna očitanja temperature i vlažnosti. Komunicira s ESP32 preko jednog digitalnog izlaznog pina, što ga čini lakim za povezivanje i korištenje u vašim projektima. Zajedno, ove komponente čine robustan sistem za bežično praćenje temperature.
Detalji iz tehničke specifikacije
| Proizvođač | Heltec Automation |
|---|---|
| Broj dijela | WiFi LoRa 32 V3 |
| Logički/IO napon | 3,3 V |
| Napon napajanja | 3,7–4,2 V |
| Izlazna struja (po kanalu) | ~1 A |
| Maksimalna struja (po kanalu) | ~2 A |
| Smjernice za PWM frekvenciju | 1 kHz (tip.) |
| Ulazni logički pragovi | 0,7 V (visok), 0,3 V (nizak) |
| Pad napona / RDS(on) / zasićenje | 0,3 V (maks.) |
| Termička ograničenja | 85 °C (maks.) |
| Paket | PCB modul |
| Napomene / varijante | Dostupne različite frekvencijske opcije (npr. 433 MHz, 868 MHz, 915 MHz) |
- Pobrinite se da DHT22 napajate s 3,3V, a ne 5V.
- Koristite odgovarajuće logičke nivoe za komunikaciju između ESP32 i DHT22.
- Razmotrite hlađenje ako radite s visokim strujama duže vrijeme.
- Provjerite vezu antene za LoRa kako biste maksimizirali domet.
- Budite svjesni propisa o LoRa frekvencijama u vašoj regiji.
Upute za povezivanje
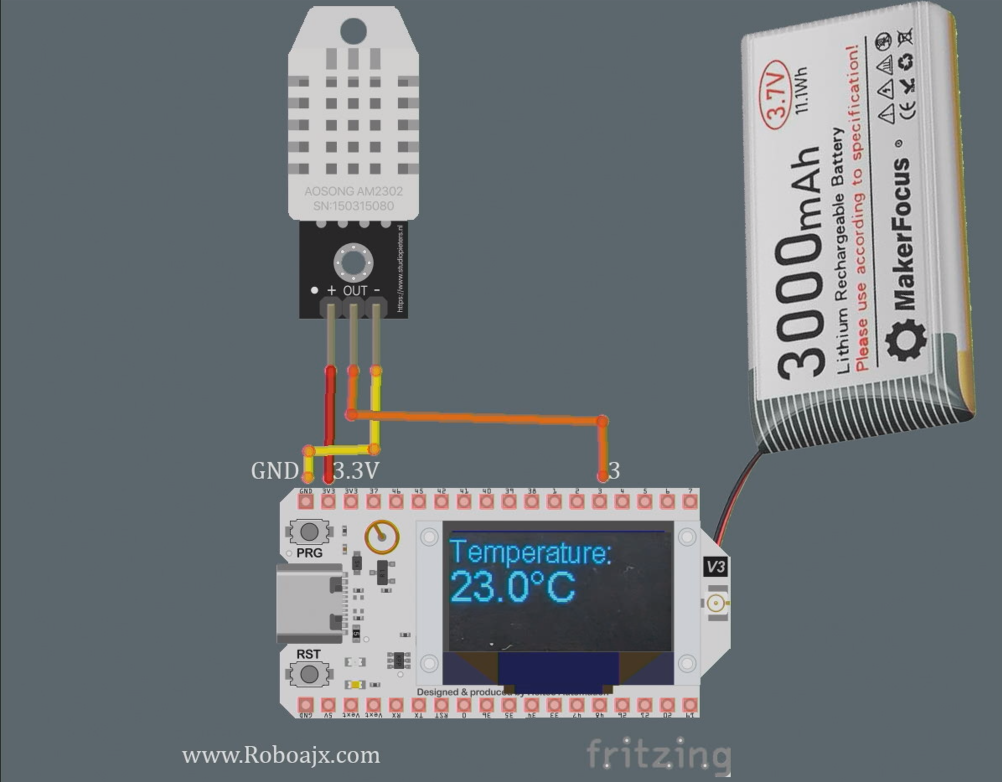
Da biste povezali Heltec WiFi LoRa 32 V3 s DHT22 senzorom, počnite spajanjem VCC pina senzora na 3.3V pin na Heltec modulu. Zatim spojite GND pin DHT22 na jedan od GND pinova na Heltec-u. Data pin DHT22 treba spojiti na GPIO pin 3 na Heltec-u.
Obavezno koristite pull-up otpornik (oko 10kΩ) između data pina i VCC za stabilna očitanja. Također, osigurajte da je LoRa antena sigurno spojena kako biste poboljšali domet prijenosa. Ako koristite vanjsko napajanje, osigurajte da je Heltec modul pravilno napajan kako biste izbjegli bilo kakve operativne probleme.
Instalacija Heltec ESP32 ploča
Dodajte ovu putanju u postavke vašeg Arduino IDE-a kao što je prikazano u videu:https://resource.heltec.cn/download/package_heltec_esp32_index.json
Instalacija Heltec ESP32 biblioteka
U Arduino IDE-u, kada se otvori, kliknite na ikonu Biblioteka (1), zatim upišite "Heltec" u pretragu (2) i kliknite Instaliraj (3) pogledajte sliku.

Primjeri koda i objašnjenje
Sljedeći isječci koda ilustriraju kako postaviti Heltec modul za čitanje podataka o temperaturi s DHT22 senzora i slanje putem LoRa. Kod inicijalizira ekran i postavlja DHT senzor.
#include
#define DHTPIN 3         // GPIO pin za DHT22
#define DHTTYPE DHT22    // Definiši DHT tip
DHT dht(DHTPIN, DHTTYPE);
void setup() {
  Serial.begin(115200);
  dht.begin(); // Inicijaliziraj DHT senzor
}
U ovom isječku, definiramo pin na koji je DHT22 senzor spojen i inicijaliziramo ga u setup() funkciji. Linija Serial.begin(115200) je za izlaz za debugging.
void loop() {
  float tempC = dht.readTemperature(); // Čitaj temperaturu u Celzijusima
  float tempF = dht.convertCtoF(tempC); // Pretvori u Farenheite
  sendData(tempC, tempF); // Funkcija za slanje podataka o temperaturi
}
Ovaj izvod pokazuje kako čitati podatke o temperaturi u loop() funkciji. Funkcija sendData() se poziva za slanje očitanja temperature putem LoRa.
void sendData(float tempC, float tempF) {
  String data = "Temperatura: " + String(tempC) + "°C"; // Kreiraj string podataka
  Radio.Send(data.c_str(), data.length()); // Pošalji podatke
}
Ovdje kreiramo string podataka koji sadrži temperaturu i šaljemo ga koristeći Radio.Send() metodu. Ovo će bežično prenijeti podatke do prijemnog modula.
Molimo pogledajte puni kod učitan ispod članka za detaljnu implementaciju.
Demonstracija / Šta očekivati
Kada je sve podešeno i kod je učitan na Heltec modul, trebali biste vidjeti očitanja temperature prikazana na OLED ekranu. Sistem će prenositi podatke o temperaturi, koje može primiti drugi Heltec modul konfigurisan za čitanje podataka. Možete testirati domet pomjeranjem prijemnika dalje od predajnika, potvrđujući maksimalnu postignutu udaljenost (u videu na 1:30).
Budite oprezni sa uobičajenim zamkama kao što su pogrešno povezivanje, nedovoljno napajanje ili korištenje pogrešne LoRa frekvencije. Osigurajte da DHT22 radi ispravno i da je antena povezana kako biste maksimizirali domet.
Vremenske oznake videa
- 00:00 Početak
- 3:51 Specifikacije
- 8:32 Stranica dokumentacije
- 9:52 Paket i baterija
- 12:58 Prvo uključivanje
- 16:37 Instalacija biblioteke
- 18:19 Osnovni kod predajnika
- 19:43 Osnovni kod prijemnika
- 20:39 Demonstracija slanja i primanja teksta
- 23:02 OLED demo kod
- 24:06 Osnovni tekst na OLED ekranu - kod
- 26:26 Osnovni tekst na OLED ekranu - demonstracija
- 26:58 Čitanje temperature sa DHT22
- 28:49 LoRa predajnik - temperatura i prikaz
- 30:07 LoRa prijemnik - temperatura i prikaz
- 32:13 Aktiviranje LED diode kada temperatura poraste
- 22:26 Test dometa LoRa prenosa
- 35:01 dBm i milivat
Images
This tutorial is part of: WiFi LoRa 32 tutorijali
- 13 Milja 20km bez WiFi? Kako je LoRa poslao napon preko ludih udaljenosti! (Heltec WiFi LoRa 32 V3)
- Uključite uređaj sa udaljenosti od 13 milja (21 km) – Ultimativni off-grid LoRa projekat sa WiFi LoRa 32!
- Sistem daljinskog upozorenja za vrata sa udaljenosti od 13 milja (21 km) uz LoRa – van mreže! (Heltec WiFi LoRa 32 V3)
- Kontrolišite servo motor sa kilometara udaljenosti! Heltec WiFi LoRa 32 V3 Arduino tutorijal (TX)
- DIY Remote Relay projekat: 13 milja bez Wi-Fi/SIM Heltec LoRa 32 modul
- How to Use the Heltec LoRa CubeCell Development Board HTCC-AB01
/*
This is a simple code to display text on the OLED display
WiFi LoRa 32 V3 ESP32 module
Written by Ahmad Shamshiri 02 April 2025
Watch full video explanation https://youtu.be/WkyQMXkQhE8
Resources page https://robojax.com/tutorial_view.php?id=387
*/
#include <Wire.h>
#include "HT_SSD1306Wire.h"


static SSD1306Wire  display(0x3c, 500000, SDA_OLED, SCL_OLED, GEOMETRY_128_64, RST_OLED); // addr , freq , i2c group , resolution , rst


void setup() {
  Serial.begin(115200);
  Serial.println();
  Serial.println();
  VextON();
  delay(100);

  // Initialising the UI will init the display too.
  display.init();

  display.setFont(ArialMT_Plain_10);

}


void displayTemperature(double temperature, int unit) {
    display.clear();  // Clear display before new content

    // Line 1: "Temperature:" in 16pt font
    display.setTextAlignment(TEXT_ALIGN_LEFT);
    display.setFont(ArialMT_Plain_16);
    display.drawString(0, 0, "Temperature:");

    // Line 2: Temperature value in 24pt font
    display.setFont(ArialMT_Plain_24);

    // Format temperature with correct unit symbol
    String tempString = String(temperature, 1); // 1 decimal place
    switch(unit) {
        case 1:  tempString += "�C"; break;  // Celsius
        case 2:  tempString += "�F"; break;  // Fahrenheit
        default: tempString += "�U"; break;  // Unknown unit
    }

    display.drawString(0, 20, tempString);  // Display at Y=20 (below label)
    display.display();  // Update OLED
}


void VextON(void)
{
  pinMode(Vext,OUTPUT);
  digitalWrite(Vext, LOW);
}

void VextOFF(void) //Vext default OFF
{
  pinMode(Vext,OUTPUT);
  digitalWrite(Vext, HIGH);
}


void loop() {
  // clear the display
  display.clear();
  displayTemperature(23.5, 1); // Displays "23.5�C" /1
  delay(2000);

}/*
written on March 27, 2025
written by Ahmad Shamshiri for www.Robojax.com
Transmits Temperature and Humidity over LoRa RF using ESP32 LoRA 32 V3 module.
and displays the information on the screen.
Watch full video explanation https://youtu.be/WkyQMXkQhE8
Resources page: https://robojax.com/tutorial_view.php?id=387
*/
#include <Wire.h>
#include "HT_SSD1306Wire.h"
static SSD1306Wire display(0x3c, 500000, SDA_OLED, SCL_OLED, GEOMETRY_128_64, RST_OLED); // addr , freq , i2c group , resolution , rst
#include <DHT.h>
#define DHTPIN 3 // GPIO21
#define DHTTYPE DHT22 // DHT22 (AM2302)
DHT dht(DHTPIN, DHTTYPE);
float tempC, tempF;
int humidity ;
//1=C
//2=F
//3=C, Humidity //only for display not for transmission
//4=F, Humidity //only for display not for transmission
//5=Humidity only
int dataType = 2;
String labelTemp = "Temperature";
String labelHumidity = "Humidity";
const int TX_POWER = 2;//dBm from 2 to 20. when powered via battery 2 to 14dBm is the best option
#include "mbedtls/aes.h"
#include <cstring> // For memset, memcpy
mbedtls_aes_context aes;
const char *userKey = "hyhT676#h~_876s"; //Security key.
#include "LoRaWan_APP.h"
#include "Arduino.h"
#define RF_FREQUENCY 915000000 // Hz
#define TX_OUTPUT_POWER TX_POWER // dBm from 2 to 20. when powered via battery 2 to 14dBm
#define LORA_BANDWIDTH 0 // [0: 125 kHz,
// 1: 250 kHz,
// 2: 500 kHz,
// 3: Reserved]
#define LORA_SPREADING_FACTOR 7 // [SF7..SF12]
#define LORA_CODINGRATE 1 // [1: 4/5,
// 2: 4/6,
// 3: 4/7,
// 4: 4/8]
#define LORA_PREAMBLE_LENGTH 8 // Same for Tx and Rx
#define LORA_SYMBOL_TIMEOUT 0 // Symbols
#define LORA_FIX_LENGTH_PAYLOAD_ON false
#define LORA_IQ_INVERSION_ON false
#define RX_TIMEOUT_VALUE 1000
#define BUFFER_SIZE 30 // Define the payload size here
char txpacket[BUFFER_SIZE];
char rxpacket[BUFFER_SIZE];
double txNumber;
bool lora_idle=true;
static RadioEvents_t RadioEvents;
unsigned long lastTxTime = 0;
void OnTxDone( void );
void OnTxTimeout( void );
void decryptAES(uint8_t *data, const char *key);
void encryptAES(uint8_t *data, const char *key);
void processKey(const char *userKey, uint8_t *processedKey, size_t keySize);
void setup() {
Serial.begin(115200);
Serial.println();
VextON();
delay(100);
// Initialising the UI will init the display too.
display.init();
display.setFont(ArialMT_Plain_10);
dht.begin();
//LoRa stuff
Mcu.begin(HELTEC_BOARD,SLOW_CLK_TPYE);
txNumber=0;
RadioEvents.TxDone = OnTxDone;
RadioEvents.TxTimeout = OnTxTimeout;
Radio.Init( &RadioEvents );
Radio.SetChannel( RF_FREQUENCY );
Radio.SetTxConfig( MODEM_LORA, TX_OUTPUT_POWER, 0, LORA_BANDWIDTH,
LORA_SPREADING_FACTOR, LORA_CODINGRATE,
LORA_PREAMBLE_LENGTH, LORA_FIX_LENGTH_PAYLOAD_ON,
true, 0, 0, LORA_IQ_INVERSION_ON, 3000 );
}
void displayTemperature(int unit) {
display.clear(); // Clear display before new content
// Line 1: "Temperature:" in 16pt font
display.setTextAlignment(TEXT_ALIGN_LEFT);
// Line 2: Temperature value in 24pt font
display.setFont(ArialMT_Plain_24);
// Format temperature with correct unit symbol
String tempStringC = String(tempC, 1) + "°C"; // 1 decimal place
String tempStringF = String(tempF, 1)+ "°F"; // 1 decimal place
String tempStringHumidity = String(humidity)+ "% RH";
String tempString;
switch(unit) {
case 1:
tempString =tempStringC;
display.setFont(ArialMT_Plain_16);
display.drawString(0, 0, "Temperature:");
display.setFont(ArialMT_Plain_24);
display.drawString(0, 15, tempString);
break; // Celsius
case 2: tempString =tempStringF;
display.setFont(ArialMT_Plain_16);
display.drawString(0, 0, "Temperature:");
display.setFont(ArialMT_Plain_24);
display.drawString(0, 15, tempString);
break; // Fahrenheit
case 3: tempString =tempStringC;
display.setFont(ArialMT_Plain_16);
display.drawString(0, 0, "Temperature:");
display.setFont(ArialMT_Plain_24);
display.drawString(0, 15, tempString);
display.setFont(ArialMT_Plain_16);
display.drawString(0, 40, "Humidity:");
display.drawString(70, 40, tempStringHumidity);
break; // Celsius
case 4: tempString =tempStringF;
display.setFont(ArialMT_Plain_16);
display.drawString(0, 0, "Temperature:");
display.setFont(ArialMT_Plain_24);
display.drawString(0, 15, tempString);
display.setFont(ArialMT_Plain_16);
display.drawString(0, 40, "Humidity:");
display.drawString(70, 40, tempStringHumidity );
break; // Celsius
case 5:
display.setFont(ArialMT_Plain_16);
display.drawString(0, 0, "Humidity:");
display.setFont(ArialMT_Plain_24);
display.drawString(0, 20, tempStringHumidity);
break; // Celsius
default: tempString =tempStringC + "°C"; break;; // default
}
display.display(); // Update OLED
}
void readSensor()
{
tempC = dht.readTemperature();
humidity = dht.readHumidity();
tempF = dht.convertCtoF(tempC);
}
void VextON(void)
{
pinMode(Vext,OUTPUT);
digitalWrite(Vext, LOW);
}
void VextOFF(void) //Vext default OFF
{
pinMode(Vext,OUTPUT);
digitalWrite(Vext, HIGH);
}
void sendData()
{
String tempStringC = String(tempC, 1) + " °C"; // 1 decimal place
String tempStringF = String(tempF, 1)+ " °F"; // 1 decimal place
String tempStringHumidity = String(humidity)+ " % RH";
String txData;
//1=C
//2=F
//3=C, Humidity
//4=F, Humidity
//5=Humidity only
switch(dataType) {
case 1:
txData = labelTemp + " " + tempStringC;
break;
case 2:
txData = labelTemp + " " + tempStringF;
break;
case 3:
txData = labelHumidity + " " + tempStringHumidity;
break;
default:
txData = labelTemp + " " + tempStringC;
break;
}
uint8_t data[32];
memset(data, 0, sizeof(data)); // Zero-padding
strncpy((char*)data, txData.c_str(), sizeof(data) - 1); // Copy string safely
encryptAES(data, userKey); // Encrypt before sending
if(lora_idle == true)
{
delay(1000);
Radio.Send(data, sizeof(data));
Serial.print("Sending: ");
Serial.println((char *)data);
lora_idle = false;
}
Radio.IrqProcess( );
}
void loop() {
readSensor();//read the data
// clear the display
display.clear();
displayTemperature(dataType); //
sendData();
delay(100);
}
void OnTxDone( void )
{
Serial.println("TX done......");
lora_idle = true;
}
void OnTxTimeout( void )
{
Radio.Sleep( );
Serial.println("TX Timeout......");
lora_idle = true;
}
/**
* Converts a user-provided plaintext key into a fixed-length 16-byte (128-bit)
* or 32-byte (256-bit) key.
*/
void processKey(const char *userKey, uint8_t *processedKey, size_t keySize) {
memset(processedKey, 0, keySize); // Fill with zeros
size_t len = strlen(userKey);
if (len > keySize) len = keySize; // Truncate if too long
memcpy(processedKey, userKey, len); // Copy valid key part
}
/**
* Encrypts a 16-byte (one block) message using AES-128.
*/
void encryptAES(uint8_t *data, const char *key) {
uint8_t processedKey[16]; // 128-bit key
processKey(key, processedKey, 16);
mbedtls_aes_init(&aes);
mbedtls_aes_setkey_enc(&aes, processedKey, 128);
mbedtls_aes_crypt_ecb(&aes, MBEDTLS_AES_ENCRYPT, data, data);
mbedtls_aes_free(&aes);
}
/**
* Decrypts a 16-byte (one block) message using AES-128.
*/
void decryptAES(uint8_t *data, const char *key) {
uint8_t processedKey[16]; // 128-bit key
processKey(key, processedKey, 16);
mbedtls_aes_init(&aes);
mbedtls_aes_setkey_dec(&aes, processedKey, 128);
mbedtls_aes_crypt_ecb(&aes, MBEDTLS_AES_DECRYPT, data, data);
mbedtls_aes_free(&aes);
}/*
Written on April 01, 2025
written by Ahmad Shamshiri for www.Robojax.com
this sktech receives the secure temperature or humidity from WiFi LoRa 32 and decrypts it
and displays it on the OLED. There is action feature to triggerd if the temperature is below triggerdValue
Watch full video explaination https://youtu.be/WkyQMXkQhE8
Resources page: https://robojax.com/tutorial_view.php?id=387
*/
#include <Arduino.h>
// Alert configuration
const String triggerdText = "Too High"; // Correct String type
const float triggerdValue = 90.0f; // exclusive (this value is not included)
const int triggerdYpos = 45;
const bool triggerdType = true;//true is > (greter than triggerdValue) and false is < (less than triggerdValue)
const int triggerdOutputPin = 7;//GPIO07 goes HIGH when triggered
const bool triggerdBlink4Me= true;//should blink or not
#include "mbedtls/aes.h"
#include <cstring> // For memset, memcpy
mbedtls_aes_context aes;
const char *userKey = "hyhT676#h~_876s"; //Security key
#define MIN_RSSI -120 // Worst possible signal
#define MAX_RSSI -50 // Best possible signal
// For a connection via I2C using the Arduino Wire include:
#include <Wire.h>
#include "HT_SSD1306Wire.h"
static SSD1306Wire display(0x3c, 500000, SDA_OLED, SCL_OLED, GEOMETRY_128_64, RST_OLED); // addr , freq , i2c group , resolution , rst
#include "LoRaWan_APP.h"
#include "Arduino.h"
#define RF_FREQUENCY 915000000 // Hz
#define TX_OUTPUT_POWER 14 // dBm
#define LORA_BANDWIDTH 0 // [0: 125 kHz,
// 1: 250 kHz,
// 2: 500 kHz,
// 3: Reserved]
#define LORA_SPREADING_FACTOR 7 // [SF7..SF12]
#define LORA_CODINGRATE 1 // [1: 4/5,
// 2: 4/6,
// 3: 4/7,
// 4: 4/8]
#define LORA_PREAMBLE_LENGTH 8 // Same for Tx and Rx
#define LORA_SYMBOL_TIMEOUT 0 // Symbols
#define LORA_FIX_LENGTH_PAYLOAD_ON false
#define LORA_IQ_INVERSION_ON false
#define RX_TIMEOUT_VALUE 1000
#define BUFFER_SIZE 30 // Define the payload size here
char txpacket[BUFFER_SIZE];
char rxpacket[BUFFER_SIZE];
static RadioEvents_t RadioEvents;
int16_t txNumber;
int16_t rssi,rxSize;
bool lora_idle = true;
unsigned long lastRxTime = 0;
const unsigned long SIGNAL_TIMEOUT = 5000; // 5 seconds
void decryptAES(uint8_t *data, const char *key);
void encryptAES(uint8_t *data, const char *key);
void processKey(const char *userKey, uint8_t *processedKey, size_t keySize);
void setup() {
Serial.begin(115200);
Serial.println();
Serial.println();
VextON();
delay(100);
// Initialising the UI will init the display too.
display.init();
display.setFont(ArialMT_Plain_10);
pinMode(triggerdOutputPin, OUTPUT);
//LoRa stuff blow this line
Mcu.begin(HELTEC_BOARD,SLOW_CLK_TPYE);
txNumber=0;
rssi=0;
RadioEvents.RxDone = OnRxDone;
Radio.Init( &RadioEvents );
Radio.SetChannel( RF_FREQUENCY );
Radio.SetRxConfig( MODEM_LORA, LORA_BANDWIDTH, LORA_SPREADING_FACTOR,
LORA_CODINGRATE, 0, LORA_PREAMBLE_LENGTH,
LORA_SYMBOL_TIMEOUT, LORA_FIX_LENGTH_PAYLOAD_ON,
0, true, 0, 0, LORA_IQ_INVERSION_ON, true );
}
void displayTemperature(String data1, String data2) {
display.clear(); // Clear display before new content
// Line 1: "Temperature:" in 16pt font
display.setTextAlignment(TEXT_ALIGN_LEFT);
display.setFont(ArialMT_Plain_16);
display.drawString(0, 0, data1);
// Line 2: Temperature value in 24pt font
display.setFont(ArialMT_Plain_24);
display.drawString(0, 20, data2); //
displaySignalStrength(rssi);
// display.display(); // Update OLED
}
void displayLine(String data, int y) {
// Line 1: "Temperature:" in 16pt font
display.setTextAlignment(TEXT_ALIGN_LEFT);
display.setFont(ArialMT_Plain_10);
if (triggerdBlink4Me) {
// Blink effect: Display text, wait, clear text, wait, then return
display.drawString(0, y, data);
display.display();
delay(500); // Keep text visible for 500ms
display.clear(); // Clear the screen
display.display();
delay(500); // Keep screen blank for 500ms
}
else {
// Normal display without blinking
display.drawString(0, y, data);
display.display();
}
}
void VextON(void)
{
pinMode(Vext,OUTPUT);
digitalWrite(Vext, LOW);
}
void VextOFF(void) //Vext default OFF
{
pinMode(Vext,OUTPUT);
digitalWrite(Vext, HIGH);
}
void loop() {
RaIrqProcessdio( );
if(lora_idle)
{
lora_idle = false;
Serial.println("into RX mode");
Radio.Rx(0);
}
noSignalCheck();
delay(100);
}
void displaySignalStrength(int16_t rssi) {
// Convert RSSI to percentage (0-100%)
int percent = map(constrain(rssi, MIN_RSSI, MAX_RSSI), MIN_RSSI, MAX_RSSI, 0, 100);
// Display at bottom right corner
display.setTextAlignment(TEXT_ALIGN_RIGHT);
display.setFont(ArialMT_Plain_16);
// Create signal strength indicator
String strength = String(percent) + "% [";
for (int i = 0; i < 5; i++) {
strength += (percent > (i * 20)) ? "|" : " ";
}
strength += "]";
display.drawString(128, 45, strength); // Position at bottom-right
}
void noSignalCheck()
{
// Automatic "No Signal" after timeout
if (millis() - lastRxTime > SIGNAL_TIMEOUT) {
display.clear();
display.setTextAlignment(TEXT_ALIGN_CENTER);
display.setFont(ArialMT_Plain_16);
display.drawString(64, 20, "No Signal");
display.display();
}
}
/**
* Triggers an action based on a threshold comparison.
*
* @param type - If true, triggers when floatValue **exceeds** triggerdValue.
* If false, triggers when floatValue **falls below** triggerdValue.
* @param floatValue - The current measured value to compare.
* @param triggerdValue - The threshold value that determines the trigger condition.
*/
void triggerAction(float floatValue)
{
if(triggerdType)
{
if (floatValue > triggerdValue) {
displayLine(triggerdText, triggerdYpos);
Serial.println(triggerdText);
digitalWrite(triggerdOutputPin, HIGH);//turns triggerdOutputPin to HIGH
}else{
digitalWrite(triggerdOutputPin, LOW);
}
}else{
if (floatValue < triggerdValue) {
displayLine(triggerdText, triggerdYpos);
Serial.println(triggerdText);
digitalWrite(triggerdOutputPin, HIGH);//turns triggerdOutputPin to HIGH
} else{
digitalWrite(triggerdOutputPin, LOW);//turns triggerdOutputPin to LOW
}
}
}
void OnRxDone( uint8_t *payload, uint16_t size, int16_t rssi, int8_t snr )
{
lastRxTime = millis(); // Reset timer on new data
rssi=rssi;
rxSize=size;
memcpy(rxpacket, payload, size );
rxpacket[size]='\0';
Radio.Sleep( );
Serial.printf("\r\nreceived packet \"%s\" with rssi %d , length %d\r\n",rxpacket,rssi,rxSize);
// Serial.println("Encrypted Data (Hex):");
// for (int i = 0; i < 16; i++) {
// Serial.printf("%02X ", rxpacket[i]);
// }
// Serial.println();
decryptAES((uint8_t *)rxpacket, userKey);
// Split the received packet into parts
String receivedStr = String((char*)rxpacket);
int firstSpacePos = receivedStr.indexOf(' ');
if (firstSpacePos != -1) {
// First part (before first space)
String part1 = receivedStr.substring(0, firstSpacePos); // "Temperature"
// Find second space (after the number)
int secondSpacePos = receivedStr.indexOf(' ', firstSpacePos + 1);
if (secondSpacePos != -1) {
// Second part (numeric value)
String part2 = receivedStr.substring(firstSpacePos + 1, secondSpacePos); // "34.5"
float floatValue = part2.toFloat(); // Convert to float 34.5
// Third part (unit)
String part3 = receivedStr.substring(secondSpacePos + 1); // "°C"
displayTemperature(part1, part2+part3);
display.display();
Serial.print("part1: " + part1);
Serial.print(" part2: " + part2);
Serial.println(" part3: " + part3);
Serial.println("floatValue " + String(floatValue));
//to trigger an action.
triggerAction(floatValue);
} else {
Serial.println("No second space found for unit");
}
}else {
Serial.println("No space found in packet - can't split");
}
lora_idle = true;
}
/**
* Converts a user-provided plaintext key into a fixed-length 16-byte (128-bit)
* or 32-byte (256-bit) key.
*/
void processKey(const char *userKey, uint8_t *processedKey, size_t keySize) {
memset(processedKey, 0, keySize); // Fill with zeros
size_t len = strlen(userKey);
if (len > keySize) len = keySize; // Truncate if too long
memcpy(processedKey, userKey, len); // Copy valid key part
}
/**
* Encrypts a 16-byte (one block) message using AES-128.
*/
void encryptAES(uint8_t *data, const char *key) {
uint8_t processedKey[16]; // 128-bit key
processKey(key, processedKey, 16);
mbedtls_aes_init(&aes);
mbedtls_aes_setkey_enc(&aes, processedKey, 128);
mbedtls_aes_crypt_ecb(&aes, MBEDTLS_AES_ENCRYPT, data, data);
mbedtls_aes_free(&aes);
}
/**
* Decrypts a 16-byte (one block) message using AES-128.
*/
void decryptAES(uint8_t *data, const char *key) {
uint8_t processedKey[16]; // 128-bit key
processKey(key, processedKey, 16);
mbedtls_aes_init(&aes);
mbedtls_aes_setkey_dec(&aes, processedKey, 128);
mbedtls_aes_crypt_ecb(&aes, MBEDTLS_AES_DECRYPT, data, data);
mbedtls_aes_free(&aes);
}Common Course Links
Common Course Files
Resources & references
-
External
-
External
-
External
-
External
-
ExternalPurchase a WiFi LoRa 32 V3 from AliExpresss.click.aliexpress.com
-
ExternalPurchase a WiFi LoRa 32 V3 from AliExpress-2s.click.aliexpress.com
-
External
-
ExternalPurchase Wi-Fi LoRa 32 from Meshnologymeshnology.com
Files📁
Arduino Libraries (zip)
-
Heltec ESP32 libraries 2.1.5Libraries for all Heltec ESP32 boards. This is version 2.1.5.
Heltec_ESP32-master.zip3.86 MB
Other files
-
Heltec WiFi LoRa 32 V3 Schematic Diagram (V3.1)
Heltec_WiFiLoRAV3_Schematic_Diagram.pdf0.18 MB