ESP32 பயிற்சி 38/55 - உங்கள் மொபைல் போனிலிருந்து RGB LED ஐ கட்டுப்படுத்துதல் | SunFounder இன் ESP32 IoT கற்றல் கிட்
இந்த டுடோரியலில், SunFounder ESP32 கற்றல் கிட்-இல் இருந்து ESP32 தொகுதியைப் பயன்படுத்தி RGB LED-ஐ எவ்வாறு கட்டுப்படுத்துவது என்பதை ஆராய்வோம். உங்கள் மொபைல் சாதனத்திலிருந்து கட்டளைகளை அனுப்புவதன் மூலம், LED நிறத்தை மாற்றலாம் அல்லது முழுவதுமாக அணைக்கலாம். இந்த திட்டம் ESP32-இன் திறன்களைப் பயன்படுத்தி, உள்ளமைக்கப்பட்ட Wi-Fi மற்றும் Bluetooth அம்சங்களை தடையற்ற இணைப்பு மற்றும் கட்டுப்பாட்டிற்காக பயன்படுத்துகிறது.
RGB LED ஆனது மூன்று தனித்தனி LED-களைக் கொண்டுள்ளது: சிவப்பு, பச்சை மற்றும் நீலம், இவை பல்வேறு நிறங்களை உருவாக்க கலக்கப்படலாம். இந்த திட்டத்தில், RGB LED-ஐ சரியாக இணைப்பது மற்றும் Bluetooth கட்டளைகளுக்கு பதிலளிக்க ESP32-ஐ நிரலாக்குவது எப்படி என்பதை நீங்கள் கற்றுக்கொள்வீர்கள். இந்த செயல்பாட்டை அடைய தேவையான குறியீட்டு கூறுகள் மூலமாகவும் டுடோரியல் உங்களை வழிநடத்தும் (வீடியோவில் 02:15 இல்).
வன்பொருள் விளக்கம்
இந்த திட்டத்திற்கான முதன்மை கூறுகளில் ESP32 மைக்ரோகண்ட்ரோலர் மற்றும் RGB LED ஆகியவை அடங்கும். ESP32 என்பது உள்ளமைக்கப்பட்ட Wi-Fi மற்றும் Bluetooth கொண்ட ஒரு சக்திவாய்ந்த தொகுதி ஆகும், இது IoT பயன்பாடுகளுக்கு ஏற்றதாக உள்ளது. இந்த திட்டத்தில், இது மொபைல் சாதனத்திலிருந்து கட்டளைகளைப் பெறவும், அதற்கேற்ப RGB LED-ஐ கட்டுப்படுத்தவும் ஒரு சேவையகமாக செயல்படும்.
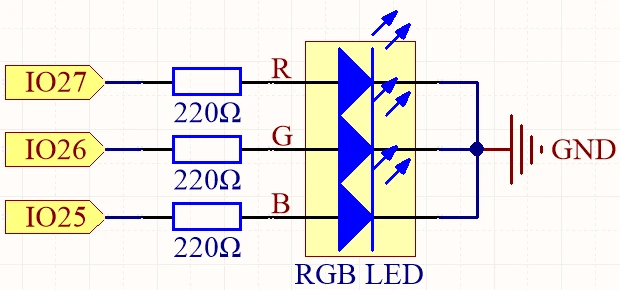
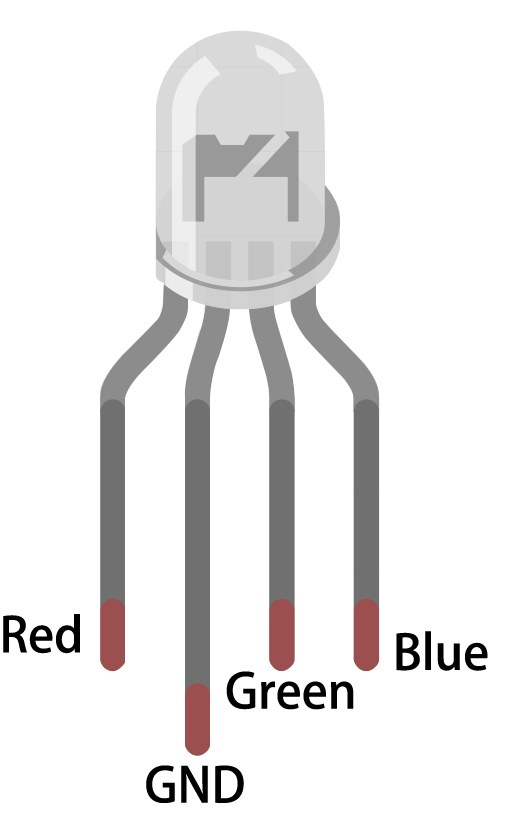
RGB LED நான்கு பின்களைக் கொண்டுள்ளது: ஒரு பொதுவான பின் (anode அல்லது cathode) மற்றும் தனித்தனி நிறங்களுக்கான மூன்று பின்கள். பொதுவான பின் மின்சக்தி மூலத்துடன் அல்லது தரையுடன் இணைக்கப்படுகிறது, மற்ற மூன்று பின்கள் மின்னோட்டத்தை கட்டுப்படுத்தவும் LED-களை பாதுகாக்கவும் மின்தடையங்கள் வழியாக ESP32-இன் GPIO பின்களுடன் இணைக்கப்படுகின்றன. இந்த அமைப்பு ஒவ்வொரு நிறத்தின் பிரகாசத்தையும் துல்லியமாக கட்டுப்படுத்த அனுமதிக்கிறது, பரந்த அளவிலான நிறங்களை உருவாக்குகிறது.
டேட்டாஷீட் விவரங்கள்
| உற்பத்தியாளர் | SunFounder |
|---|---|
| பகுதி எண் | RGB LED |
| பொதுவான பின் வகை | பொதுவான anode / பொதுவான cathode |
| முன்னோக்கி மின்னழுத்தம் (V) | 2.0 - 3.2 V |
| அதிகபட்ச முன்னோக்கி மின்னோட்டம் (A) | 20 mA |
| வழக்கமான மின்னோட்டம் (A) | 15 mA |
| நிற தெளிவுத்திறன் | 8 பிட் (0-255) |
| பேக்கேஜ் | துளை வழியாக / SMD |
- ஒவ்வொரு LED சேனல் வழியாக மின்னோட்டத்தை கட்டுப்படுத்த சரியான மின்தடை மதிப்புகளை (பொதுவாக 220 ஓம்) உறுதி செய்யவும்.
- இணைப்பதற்கு முன் பொதுவான பின் உள்ளமைவை (anode அல்லது cathode) சரிபார்க்கவும்.
- ஒவ்வொரு LED-க்கும் அனுப்பப்படும் சிக்னலை சரிசெய்வதன் மூலம் மங்கலாக்க மற்றும் நிற கலப்பிற்கு PWM ஐப் பயன்படுத்தவும்.
- குறுக்கீடுகளைத் தவிர்க்க வயரிங் செய்யும்போது கவனமாக இருங்கள்; ஒரு நேரத்தில் ஒரு பின்னை இணைக்கவும்.
- சரியான வயரிங் உறுதிப்படுத்த அமைத்த பிறகு ஒவ்வொரு நிறத்தையும் தனித்தனியாக சோதிக்கவும்.
வயரிங் வழிமுறைகள்

RGB LED-ஐ ESP32-உடன் இணைக்க, முதலில் RGB LED-ஐ பிரெட்போர்டில் வைக்கவும். நீண்ட பின் பொதுவான பின் ஆகும், இதை நேர்மறை மின்னழுத்தத்துடன் (பொதுவான anode க்கு) அல்லது தரையுடன் (பொதுவான cathode க்கு) இணைப்பீர்கள். நீங்கள் பொதுவான anode ஐப் பயன்படுத்தினால், நீண்ட பின்னை ESP32-இன் 3.3V பின்னுடன் இணைக்கவும். பொதுவான cathode க்கு, அதை GND பின்னுடன் இணைக்கவும்.
அடுத்து, மூன்று 220 ஓம் மின்தடையங்களை எடுத்து, ஒவ்வொரு மின்தடையத்தின் ஒரு முனையையும் LED-இன் தொடர்புடைய RGB பின்களுடன் இணைக்கவும். மின்தடையங்களின் மற்ற முனைகளை ESP32 GPIO பின்களுடன் இணைக்கவும்: LED-இன் சிவப்பு பின்னை GPIO 27 உடன், பச்சை பின்னை GPIO 26 உடன், மற்றும் நீல பின்னை GPIO 25 உடன் இணைக்கவும். இறுதியாக, உங்கள் உள்ளமைவின் அடிப்படையில் (anode அல்லது cathode) பொதுவான பின் சரியாக இணைக்கப்பட்டுள்ளதை உறுதி செய்யவும்.
குறியீடு எடுத்துக்காட்டுகள் & விளக்கம்
இந்த திட்டத்திற்கான குறியீடு RGB LED-உடன் இணைக்கப்பட்ட பின்களை வரையறுப்பதன் மூலம் தொடங்குகிறது. பின்கள் எவ்வாறு அறிவிக்கப்படுகின்றன என்பதை பின்வரும் பகுதி காட்டுகிறது:
const int redPin = 27;
const int greenPin = 26;
const int bluePin = 25;
இங்கே, redPin, greenPin, மற்றும் bluePin ஆகியவை RGB LED-இன் ஒவ்வொரு நிற சேனலுக்கும் ESP32-இல் குறிப்பிட்ட GPIO எண்களுக்கு ஒதுக்கப்படுகின்றன.
அமைவு செயல்பாட்டில், Bluetooth துவக்கப்படுகிறது, மேலும் PWM அமைப்புகள் பயன்படுத்தப்படுகின்றன. இந்த பகுதி இந்த துவக்கத்தை நிரூபிக்கிறது:
void setup() {
  Serial.begin(115200);      // சீரியல் போர்ட்டை துவக்கவும்
  setupBLE();                // Bluetooth BLE ஐ துவக்கவும்

  ledcAttach(redPin, freq, resolution);
  ledcAttach(greenPin, freq, resolution);
  ledcAttach(bluePin, freq, resolution);
}
இந்த குறியீடு சீரியல் தொடர்பை துவக்குகிறது மற்றும் Bluetooth செயல்பாட்டை அமைக்கிறது, அதே நேரத்தில் RGB LED பின்களை கட்டுப்பாட்டிற்காக PWM சேனல்களுடன் இணைக்கிறது.
இறுதியாக, லூப் செயல்பாடு பெறப்பட்ட Bluetooth செய்திகளை சரிபார்த்து அதற்கேற்ப LED நிறத்தை சரிசெய்கிறது:
if (value == "red") {
  setColor(255, 0, 0); // சிவப்பு
  Serial.println("red");
}
இந்த பகுதியில், பெறப்பட்ட மதிப்பு "red" ஆக இருந்தால், setColor செயல்பாட்டைப் பயன்படுத்தி LED முழு சிவப்பு பிரகாசத்திற்கு அமைக்கப்படும்.
குறியீட்டை முழுமையாக புரிந்துகொள்ள, கட்டுரையின் கீழ் முழு குறியீடு ஏற்றப்பட்டுள்ள வீடியோ டுடோரியலைப் பார்க்க பரிந்துரைக்கப்படுகிறது.
நிரூபணம் / என்ன எதிர்பார்க்கலாம்
எல்லாம் இணைக்கப்பட்டு குறியீடு பதிவேற்றப்பட்டவுடன், உங்கள் மொபைல் சாதனத்திலிருந்து Bluetooth வழியாக RGB LED-ஐ கட்டுப்படுத்த முடியும். "red", "green", "blue" போன்ற கட்டளைகளை அனுப்புவதன் மூலம், LED அதற்கேற்ப நிறங்களை மாற்றுவதைக் காண்பீர்கள். "LED_off" அனுப்பினால், RGB LED அணைந்துவிடும். கட்டளைகள் சரியாகப் பெறப்படுகின்றனவா என்பதை உறுதிப்படுத்த ஏதேனும் பிழைத்திருத்த செய்திகளுக்கு சீரியல் மானிட்டரை சரிபார்க்கவும் (வீடியோவில் 10:45 இல்).
வீடியோ நேர முத்திரைகள்
- 00:00 தொடக்கம்
- 1:59 RGB LED என்றால் என்ன?
- 6:01 RGB வண்ணம் விளக்கப்பட்டுள்ளது
- 10:01 ஆவணப் பக்கம்
- 11:19 வயரிங் விளக்கம்
- 13:34 Arduino IDE இல் ESP32 போர்டு மற்றும் COM போர்ட்டைத் தேர்ந்தெடுத்தல்
- 15:15 Arduino குறியீடு
- 18:02 உங்கள் தொலைபேசியைப் பயன்படுத்தி RGB LED ஐக் கட்டுப்படுத்தும் செயல்விளக்கம்
படங்கள்
#include "BLEDevice.h"
#include "BLEServer.h"
#include "BLEUtils.h"
#include "BLE2902.h"

// Define RGB LED pins
const int redPin = 27;
const int greenPin = 26;
const int bluePin = 25;

// Define PWM frequency and resolution
const int freq = 5000;
const int resolution = 8;

// Define the Bluetooth device name
const char *bleName = "ESP32_Bluetooth";

// Define the received text and the time of the last message
String receivedText = "";
unsigned long lastMessageTime = 0;

// Define the UUIDs of the service and characteristics
#define SERVICE_UUID "8785d8b3-9d23-473b-aee5-3fabe2ba9583"
#define CHARACTERISTIC_UUID_RX "b2bcd13b-aab6-4660-92ae-40abf6941fce"
#define CHARACTERISTIC_UUID_TX "4219d86a-d701-4fd2-bd84-04db50f70fe2"

// Define the Bluetooth characteristic
BLECharacteristic *pCharacteristic;

void setup() {
  Serial.begin(115200);      // Initialize the serial port
  setupBLE();                // Initialize the Bluetooth BLE

  ledcAttach(redPin, freq, resolution);
  ledcAttach(greenPin, freq, resolution);
  ledcAttach(bluePin, freq, resolution);
}

void loop() {
  // When the received text is not empty and the time since the last message is over 1 second
  // Send a notification and print the received text
  if (receivedText.length() > 0 && millis() - lastMessageTime > 1000) {
    Serial.print("Received message: ");
    Serial.println(receivedText);
    pCharacteristic->setValue(receivedText.c_str());
    pCharacteristic->notify();
    receivedText = "";
  }

  // Read data from the serial port and send it to BLE characteristic
  if (Serial.available() > 0) {
    String str = Serial.readStringUntil('\n');
    const char *newValue = str.c_str();
    pCharacteristic->setValue(newValue);
    pCharacteristic->notify();
  }
}

// Define the BLE server callbacks
class MyServerCallbacks : public BLEServerCallbacks {
  // Print the connection message when a client is connected
  void onConnect(BLEServer *pServer) {
    Serial.println("Connected");
  }
  // Print the disconnection message when a client is disconnected
  void onDisconnect(BLEServer *pServer) {
    Serial.println("Disconnected");
  }
};

// Define the BLE characteristic callbacks
class MyCharacteristicCallbacks : public BLECharacteristicCallbacks {
  void onWrite(BLECharacteristic *pCharacteristic) {
    std::string value = std::string(pCharacteristic->getValue().c_str());
    if (value == "led_off") {
      setColor(0, 0, 0); // turn the RGB LED off
      Serial.println("RGB LED turned off");
    } else if (value == "red") {
      setColor(255, 0, 0); // Red
      Serial.println("red");
    }
    else if (value == "green") {
      setColor(0, 255, 0); // green
      Serial.println("green");
    }
    else if (value == "blue") {
      setColor(0, 0, 255); // blue
      Serial.println("blue");
    }
    else if (value == "yellow") {
      setColor(255, 150, 0); // yellow
      Serial.println("yellow");
    }
    else if (value == "purple") {
      setColor(80, 0, 80); // purple
      Serial.println("purple");
    }
  }
};

// Initialize the Bluetooth BLE
void setupBLE() {
  BLEDevice::init(bleName);                        // Initialize the BLE device
  BLEServer *pServer = BLEDevice::createServer();  // Create the BLE server
  // Print the error message if the BLE server creation fails
  if (pServer == nullptr) {
    Serial.println("Error creating BLE server");
    return;
  }
  pServer->setCallbacks(new MyServerCallbacks());  // Set the BLE server callbacks

  // Create the BLE service
  BLEService *pService = pServer->createService(SERVICE_UUID);
  // Print the error message if the BLE service creation fails
  if (pService == nullptr) {
    Serial.println("Error creating BLE service");
    return;
  }
  // Create the BLE characteristic for sending notifications
  pCharacteristic = pService->createCharacteristic(CHARACTERISTIC_UUID_TX, BLECharacteristic::PROPERTY_NOTIFY);
  pCharacteristic->addDescriptor(new BLE2902());  // Add the descriptor
  // Create the BLE characteristic for receiving data
  BLECharacteristic *pCharacteristicRX = pService->createCharacteristic(CHARACTERISTIC_UUID_RX, BLECharacteristic::PROPERTY_WRITE);
  pCharacteristicRX->setCallbacks(new MyCharacteristicCallbacks());  // Set the BLE characteristic callbacks
  pService->start();                                                 // Start the BLE service
  pServer->getAdvertising()->start();                                // Start advertising
  Serial.println("Waiting for a client connection...");              // Wait for a client connection
}

void setColor(int red, int green, int blue) {
  // For common-anode RGB LEDs, use 255 minus the color value
  ledcWrite(redPin, red);
  ledcWrite(greenPin, green);
  ledcWrite(bluePin, blue);
}
Common Course Links
Common Course Files
வளங்கள் மற்றும் மேற்கோள்கள்
-
ஆவணங்கள்ESP32 Tutorial 38/55 - SunFounder doc page for Bluetooth RGB LEDdocs.sunfounder.com
கோப்புகள்📁
கோப்புகள் கிடைக்கவில்லை.