ESP32 튜토리얼 38/55 - 휴대폰에서 RGB LED 제어하기 | SunFounder의 ESP32 IoT 학습 키트
이 튜토리얼에서는 SunFounder ESP32 학습 키트의 ESP32 모듈을 사용하여 RGB LED를 제어하는 방법을 살펴보겠습니다. 모바일 기기에서 명령을 보내면 LED 색상을 변경하거나 완전히 끌 수 있습니다. 이 프로젝트는 ESP32의 기능을 활용하여 내장된 Wi-Fi 및 Bluetooth 기능을 이용해 원활한 연결과 제어를 구현합니다.
RGB LED는 빨간색, 녹색, 파란색의 세 가지 개별 LED로 구성되어 있으며, 이를 혼합하여 다양한 색상을 만들 수 있습니다. 이 프로젝트에서는 RGB LED를 올바르게 배선하고 ESP32가 Bluetooth 명령에 응답하도록 프로그래밍하는 방법을 배우게 됩니다. 튜토리얼은 또한 이 기능을 구현하는 데 필요한 코드 구성 요소를 안내합니다(비디오 02:15 지점).
하드웨어 설명
이 프로젝트의 주요 구성 요소는 ESP32 마이크로컨트롤러와 RGB LED입니다. ESP32는 내장 Wi-Fi와 Bluetooth를 갖춘 강력한 모듈로, IoT 애플리케이션에 이상적입니다. 이 프로젝트에서는 모바일 기기에서 명령을 수신하고 RGB LED를 그에 따라 제어하는 서버 역할을 합니다.
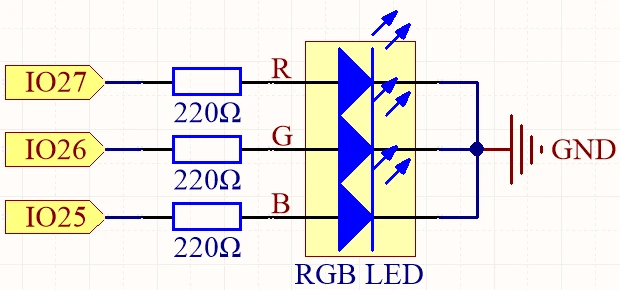
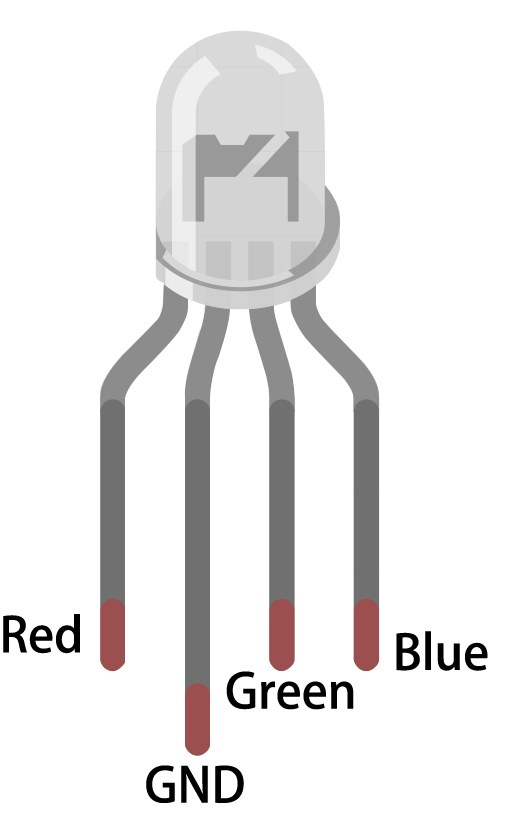
RGB LED에는 공통 핀 하나(애노드 또는 캐소드)와 개별 색상용 핀 세 개, 총 네 개의 핀이 있습니다. 공통 핀은 전원 또는 접지에 연결되고, 나머지 세 핀은 전류를 제한하고 LED를 보호하기 위해 저항을 통해 ESP32의 GPIO 핀에 연결됩니다. 이 설정을 통해 각 색상의 밝기를 정밀하게 제어하여 다양한 색상을 만들 수 있습니다.
데이터시트 세부 정보
| 제조업체 | SunFounder |
|---|---|
| 부품 번호 | RGB LED |
| 공통 핀 유형 | 공통 애노드 / 공통 캐소드 |
| 순방향 전압 (V) | 2.0 - 3.2 V |
| 최대 순방향 전류 (A) | 20 mA |
| 일반 전류 (A) | 15 mA |
| 색상 해상도 | 8비트 (0-255) |
| 패키지 | 스루홀 / SMD |
- 각 LED 채널을 통과하는 전류를 제한하려면 적절한 저항 값(일반적으로 220옴)을 사용하세요.
- 배선 전에 공통 핀 구성(애노드 또는 캐소드)을 확인하세요.
- 각 LED로 보내는 신호를 조정하여 디밍 및 색상 혼합에 PWM을 사용하세요.
- 단락을 방지하기 위해 배선에 주의하고 핀을 하나씩 연결하세요.
- 설정 후 각 색상을 개별적으로 테스트하여 배선이 올바른지 확인하세요.
배선 지침

RGB LED를 ESP32에 배선하려면 먼저 RGB LED를 브레드보드에 배치하세요. 더 긴 핀이 공통 핀이며, 이를 양전압(공통 애노드의 경우) 또는 접지(공통 캐소드의 경우)에 연결합니다. 공통 애노드를 사용하는 경우 긴 핀을 ESP32의 3.3V 핀에 연결하세요. 공통 캐소드의 경우 GND 핀에 연결하세요.
다음으로 220옴 저항 세 개를 가져와 각 저항의 한쪽 끝을 LED의 해당 RGB 핀에 연결하세요. 저항의 다른 쪽 끝을 ESP32 GPIO 핀에 연결합니다: LED의 빨간색 핀을 GPIO 27에, 녹색 핀을 GPIO 26에, 파란색 핀을 GPIO 25에 연결하세요. 마지막으로 구성(애노드 또는 캐소드)에 따라 공통 핀이 적절히 연결되었는지 확인하세요.
코드 예제 및 설명
이 프로젝트의 코드는 RGB LED에 연결된 핀을 정의하는 것으로 시작합니다. 다음 발췌문은 핀이 어떻게 선언되는지 보여줍니다:
const int redPin = 27;
const int greenPin = 26;
const int bluePin = 25;
여기서 redPin, greenPin, bluePin은 RGB LED의 각 색상 채널에 대해 ESP32의 특정 GPIO 번호에 할당됩니다.
setup 함수에서 Bluetooth가 초기화되고 PWM 설정이 적용됩니다. 이 발췌문은 이 초기화를 보여줍니다:
void setup() {
  Serial.begin(115200);      // 시리얼 포트 초기화
  setupBLE();                // Bluetooth BLE 초기화

  ledcAttach(redPin, freq, resolution);
  ledcAttach(greenPin, freq, resolution);
  ledcAttach(bluePin, freq, resolution);
}
이 코드는 시리얼 통신을 초기화하고 Bluetooth 기능을 설정하면서 RGB LED 핀을 제어용 PWM 채널에 연결합니다.
마지막으로 loop 함수는 수신된 Bluetooth 메시지를 확인하고 그에 따라 LED 색상을 조정합니다:
if (value == "red") {
  setColor(255, 0, 0); // 빨간색
  Serial.println("red");
}
이 섹션에서 수신된 값이 "red"이면 setColor 함수를 사용하여 LED가 최대 빨간색 밝기로 설정됩니다.
코드를 완전히 이해하려면 기사 아래에 전체 코드가 로드된 비디오 튜토리얼을 시청하는 것이 좋습니다.
시연 / 기대 효과
모든 것이 배선되고 코드가 업로드되면 Bluetooth를 통해 모바일 기기에서 RGB LED를 제어할 수 있어야 합니다. "red", "green", "blue" 등의 명령을 보내면 LED가 그에 따라 색상을 변경하는 것을 볼 수 있습니다. "LED_off"를 보내면 RGB LED가 꺼집니다. 명령이 올바르게 수신되고 있는지 확인하려면 시리얼 모니터에서 디버깅 메시지를 확인하세요(비디오 10:45 지점).
비디오 타임스탬프
- 00:00 시작
- 1:59 RGB LED란 무엇인가?
- 6:01 RGB 색상 설명
- 10:01 문서 페이지
- 11:19 배선 설명
- 13:34 Arduino IDE에서 ESP32 보드 및 COM 포트 선택
- 15:15 Arduino 코드
- 18:02 휴대폰으로 RGB LED 제어 시연
이미지
#include "BLEDevice.h"
#include "BLEServer.h"
#include "BLEUtils.h"
#include "BLE2902.h"

// Define RGB LED pins
const int redPin = 27;
const int greenPin = 26;
const int bluePin = 25;

// Define PWM frequency and resolution
const int freq = 5000;
const int resolution = 8;

// Define the Bluetooth device name
const char *bleName = "ESP32_Bluetooth";

// Define the received text and the time of the last message
String receivedText = "";
unsigned long lastMessageTime = 0;

// Define the UUIDs of the service and characteristics
#define SERVICE_UUID "8785d8b3-9d23-473b-aee5-3fabe2ba9583"
#define CHARACTERISTIC_UUID_RX "b2bcd13b-aab6-4660-92ae-40abf6941fce"
#define CHARACTERISTIC_UUID_TX "4219d86a-d701-4fd2-bd84-04db50f70fe2"

// Define the Bluetooth characteristic
BLECharacteristic *pCharacteristic;

void setup() {
  Serial.begin(115200);      // Initialize the serial port
  setupBLE();                // Initialize the Bluetooth BLE

  ledcAttach(redPin, freq, resolution);
  ledcAttach(greenPin, freq, resolution);
  ledcAttach(bluePin, freq, resolution);
}

void loop() {
  // When the received text is not empty and the time since the last message is over 1 second
  // Send a notification and print the received text
  if (receivedText.length() > 0 && millis() - lastMessageTime > 1000) {
    Serial.print("Received message: ");
    Serial.println(receivedText);
    pCharacteristic->setValue(receivedText.c_str());
    pCharacteristic->notify();
    receivedText = "";
  }

  // Read data from the serial port and send it to BLE characteristic
  if (Serial.available() > 0) {
    String str = Serial.readStringUntil('\n');
    const char *newValue = str.c_str();
    pCharacteristic->setValue(newValue);
    pCharacteristic->notify();
  }
}

// Define the BLE server callbacks
class MyServerCallbacks : public BLEServerCallbacks {
  // Print the connection message when a client is connected
  void onConnect(BLEServer *pServer) {
    Serial.println("Connected");
  }
  // Print the disconnection message when a client is disconnected
  void onDisconnect(BLEServer *pServer) {
    Serial.println("Disconnected");
  }
};

// Define the BLE characteristic callbacks
class MyCharacteristicCallbacks : public BLECharacteristicCallbacks {
  void onWrite(BLECharacteristic *pCharacteristic) {
    std::string value = std::string(pCharacteristic->getValue().c_str());
    if (value == "led_off") {
      setColor(0, 0, 0); // turn the RGB LED off
      Serial.println("RGB LED turned off");
    } else if (value == "red") {
      setColor(255, 0, 0); // Red
      Serial.println("red");
    }
    else if (value == "green") {
      setColor(0, 255, 0); // green
      Serial.println("green");
    }
    else if (value == "blue") {
      setColor(0, 0, 255); // blue
      Serial.println("blue");
    }
    else if (value == "yellow") {
      setColor(255, 150, 0); // yellow
      Serial.println("yellow");
    }
    else if (value == "purple") {
      setColor(80, 0, 80); // purple
      Serial.println("purple");
    }
  }
};

// Initialize the Bluetooth BLE
void setupBLE() {
  BLEDevice::init(bleName);                        // Initialize the BLE device
  BLEServer *pServer = BLEDevice::createServer();  // Create the BLE server
  // Print the error message if the BLE server creation fails
  if (pServer == nullptr) {
    Serial.println("Error creating BLE server");
    return;
  }
  pServer->setCallbacks(new MyServerCallbacks());  // Set the BLE server callbacks

  // Create the BLE service
  BLEService *pService = pServer->createService(SERVICE_UUID);
  // Print the error message if the BLE service creation fails
  if (pService == nullptr) {
    Serial.println("Error creating BLE service");
    return;
  }
  // Create the BLE characteristic for sending notifications
  pCharacteristic = pService->createCharacteristic(CHARACTERISTIC_UUID_TX, BLECharacteristic::PROPERTY_NOTIFY);
  pCharacteristic->addDescriptor(new BLE2902());  // Add the descriptor
  // Create the BLE characteristic for receiving data
  BLECharacteristic *pCharacteristicRX = pService->createCharacteristic(CHARACTERISTIC_UUID_RX, BLECharacteristic::PROPERTY_WRITE);
  pCharacteristicRX->setCallbacks(new MyCharacteristicCallbacks());  // Set the BLE characteristic callbacks
  pService->start();                                                 // Start the BLE service
  pServer->getAdvertising()->start();                                // Start advertising
  Serial.println("Waiting for a client connection...");              // Wait for a client connection
}

void setColor(int red, int green, int blue) {
  // For common-anode RGB LEDs, use 255 minus the color value
  ledcWrite(redPin, red);
  ledcWrite(greenPin, green);
  ledcWrite(bluePin, blue);
}
Common Course Links
Common Course Files
자원 및 참고자료
-
문서화ESP32 Tutorial 38/55- SunFounder doc page for Bluetooth RGB LEDdocs.sunfounder.com
파일📁
파일이 없습니다.