ESP32チュートリアル 38/55 - モバイルフォンからRGB LEDを制御する | SunFounderのESP32 IoT学習キット
このチュートリアルでは、SunFounder ESP32学習キットのESP32モジュールを使用してRGB LEDを制御する方法を探ります。モバイルデバイスからコマンドを送信することで、LEDの色を変更したり、完全にオフにしたりできます。このプロジェクトは、ESP32の機能を活用し、内蔵のWi-FiおよびBluetooth機能を利用してシームレスな接続と制御を実現します。
RGB LEDは、赤、緑、青の3つの個別のLEDで構成されており、これらを混ぜることで様々な色を作り出せます。このプロジェクトでは、RGB LEDを正しく配線する方法と、ESP32をBluetoothコマンドに応答するようにプログラムする方法を学びます。また、チュートリアルでは、この機能を実現するために必要なコードのコンポーネントについても説明します(動画の02:15にて)。
ハードウェアの解説
このプロジェクトの主要なコンポーネントには、ESP32マイクロコントローラーとRGB LEDが含まれます。ESP32は、内蔵Wi-FiとBluetoothを備えた強力なモジュールで、IoTアプリケーションに最適です。このプロジェクトでは、モバイルデバイスからのコマンドを受信し、それに応じてRGB LEDを制御するサーバーとして機能します。
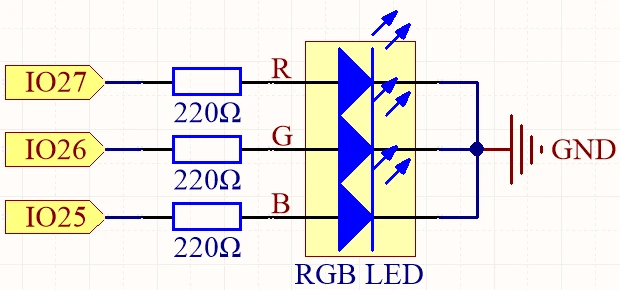
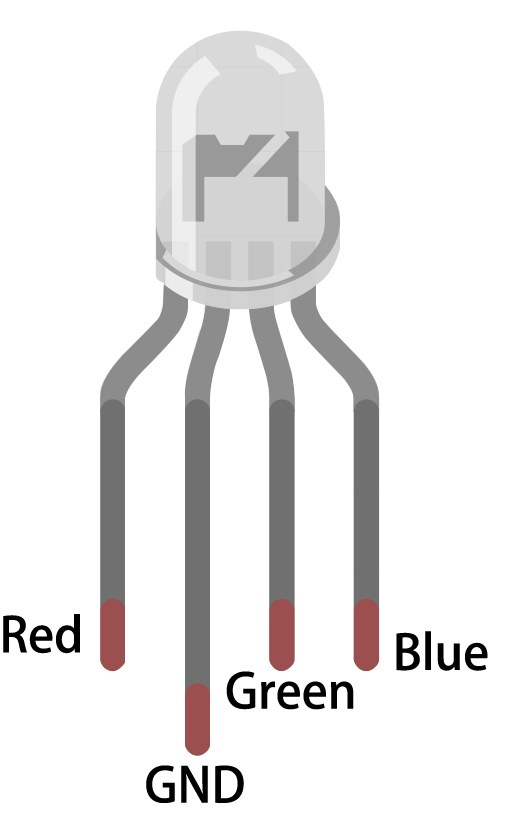
RGB LEDには4つのピンがあります:1つの共通ピン(アノードまたはカソード)と3つの個々のカラー用のピンです。共通ピンは電源または接地に接続され、他の3つのピンは抵抗を介してESP32のGPIOピンに接続され、電流を制限しLEDを保護します。この設定により、各色の明るさを正確に制御でき、広範囲の色を作り出すことができます。
データシートの詳細
| メーカー | サンファウンダー |
|---|---|
| 部品番号 | RGB LED |
| 一般的なピンタイプ | 共通アノード / 共通カソード |
| 順方向電圧 (V) | 2.0 - 3.2 V |
| 最大定格電流 (A) | 20 mA |
| 典型的な電流 (A) | 15 mA |
| 色解像度 | 8ビット(0-255) |
| パッケージ | スルーホール / SMD |
- 各LEDチャンネルを通る電流を制限するために、適切な抵抗値(通常は220オーム)を確保してください。
- 配線する前に、共通のピン構成(アノードまたはカソード)を確認してください。
- PWMを使用して、各LEDに送信される信号を調整することで、調光と色の混合を行います。
- ショート回路を避けるために配線に注意し、一度に1つのピンだけを接続してください。
- セットアップ後、正しい配線を確認するために各色を個別にテストしてください。
配線指示書

RGB LEDをESP32に接続するには、まずブレッドボードにRGB LEDを置きます。長いピンが共通ピンで、これを正の電圧(共通アノードの場合)またはグラウンド(共通カソードの場合)に接続します。共通アノードを使用する場合は、長いピンをESP32の3.3Vピンに接続します。共通カソードの場合は、GNDピンに接続します。
次に、3つの220オームの抵抗器を取り、各抵抗の一端をLEDの対応するRGBピンに接続します。抵抗のもう一方の端をESP32のGPIOピンに接続します:LEDの赤いピンをGPIO 27に、緑のピンをGPIO 26に、青のピンをGPIO 25に接続します。最後に、共通ピンがあなたの構成(アノードまたはカソード)に基づいて適切に接続されていることを確認してください。
コード例と説明
このプロジェクトのコードは、RGB LEDに接続されたピンを定義することから始まります。以下の抜粋は、ピンがどのように宣言されるかを示しています。
const int redPin = 27;
const int greenPin = 26;
const int bluePin = 25;ここでは、redPin,greenPin, とbluePinRGB LEDの各色チャンネルに対して、ESP32上の具体的なGPIO番号が割り当てられています。
セットアップ関数では、Bluetoothが初期化され、PWM設定が適用されます。この抜粋は、この初期化を示しています:
void setup() {
  Serial.begin(115200);      // Initialize the serial port
  setupBLE();                // Initialize the Bluetooth BLE

  ledcAttach(redPin, freq, resolution);
  ledcAttach(greenPin, freq, resolution);
  ledcAttach(bluePin, freq, resolution);
}
このコードはシリアル通信を初期化し、Bluetooth機能を設定するとともに、制御のためにRGB LEDピンをPWMチャネルに接続します。
最後に、ループ関数は受信したBluetoothメッセージをチェックし、それに応じてLEDの色を調整します。
if (value == "red") {
  setColor(255, 0, 0); // Red
  Serial.println("red");
}このセクションでは、受信した値が「赤」の場合、LEDはフル赤の明るさに設定されます。setColor機能
コードを完全に理解するためには、記事の下にフルコードがロードされているビデオチュートリアルを見ることをお勧めします。
デモンストレーション / 期待すること
すべてが配線され、コードがアップロードされると、Bluetoothを介してモバイルデバイスからRGB LEDを制御できるようになります。"red"、"green"、"blue"などのコマンドを送信すると、LEDの色がそれに応じて変わります。"LED_off"を送信すると、RGB LEDはオフになります。コマンドが正しく受信されていることを確認するために、シリアルモニターでデバッグメッセージをチェックしてください(動画の10:45に)。
動画のタイムスタンプ
- 00:00 スタート
- RGB LEDとは何ですか?
- 6:01 RGBカラーの解説
- 10:01 ドキュメンテーションページ
- 11:19 配線の説明
- 13:34 Arduino IDEでESP32ボードとCOMポートを選択中
- 15:15 Arduinoコード
- 18:02 スマートフォンを使ったRGB LEDの制御デモ
画像
#include "BLEDevice.h"
#include "BLEServer.h"
#include "BLEUtils.h"
#include "BLE2902.h"

// Define RGB LED pins
const int redPin = 27;
const int greenPin = 26;
const int bluePin = 25;

// Define PWM frequency and resolution
const int freq = 5000;
const int resolution = 8;

// Define the Bluetooth device name
const char *bleName = "ESP32_Bluetooth";

// Define the received text and the time of the last message
String receivedText = "";
unsigned long lastMessageTime = 0;

// Define the UUIDs of the service and characteristics
#define SERVICE_UUID "8785d8b3-9d23-473b-aee5-3fabe2ba9583"
#define CHARACTERISTIC_UUID_RX "b2bcd13b-aab6-4660-92ae-40abf6941fce"
#define CHARACTERISTIC_UUID_TX "4219d86a-d701-4fd2-bd84-04db50f70fe2"

// Define the Bluetooth characteristic
BLECharacteristic *pCharacteristic;

void setup() {
  Serial.begin(115200);      // Initialize the serial port
  setupBLE();                // Initialize the Bluetooth BLE

  ledcAttach(redPin, freq, resolution);
  ledcAttach(greenPin, freq, resolution);
  ledcAttach(bluePin, freq, resolution);
}

void loop() {
  // When the received text is not empty and the time since the last message is over 1 second
  // Send a notification and print the received text
  if (receivedText.length() > 0 && millis() - lastMessageTime > 1000) {
    Serial.print("Received message: ");
    Serial.println(receivedText);
    pCharacteristic->setValue(receivedText.c_str());
    pCharacteristic->notify();
    receivedText = "";
  }

  // Read data from the serial port and send it to BLE characteristic
  if (Serial.available() > 0) {
    String str = Serial.readStringUntil('\n');
    const char *newValue = str.c_str();
    pCharacteristic->setValue(newValue);
    pCharacteristic->notify();
  }
}

// Define the BLE server callbacks
class MyServerCallbacks : public BLEServerCallbacks {
  // Print the connection message when a client is connected
  void onConnect(BLEServer *pServer) {
    Serial.println("Connected");
  }
  // Print the disconnection message when a client is disconnected
  void onDisconnect(BLEServer *pServer) {
    Serial.println("Disconnected");
  }
};

// Define the BLE characteristic callbacks
class MyCharacteristicCallbacks : public BLECharacteristicCallbacks {
  void onWrite(BLECharacteristic *pCharacteristic) {
    std::string value = std::string(pCharacteristic->getValue().c_str());
    if (value == "led_off") {
      setColor(0, 0, 0); // turn the RGB LED off
      Serial.println("RGB LED turned off");
    } else if (value == "red") {
      setColor(255, 0, 0); // Red
      Serial.println("red");
    }
    else if (value == "green") {
      setColor(0, 255, 0); // green
      Serial.println("green");
    }
    else if (value == "blue") {
      setColor(0, 0, 255); // blue
      Serial.println("blue");
    }
    else if (value == "yellow") {
      setColor(255, 150, 0); // yellow
      Serial.println("yellow");
    }
    else if (value == "purple") {
      setColor(80, 0, 80); // purple
      Serial.println("purple");
    }
  }
};

// Initialize the Bluetooth BLE
void setupBLE() {
  BLEDevice::init(bleName);                        // Initialize the BLE device
  BLEServer *pServer = BLEDevice::createServer();  // Create the BLE server
  // Print the error message if the BLE server creation fails
  if (pServer == nullptr) {
    Serial.println("Error creating BLE server");
    return;
  }
  pServer->setCallbacks(new MyServerCallbacks());  // Set the BLE server callbacks

  // Create the BLE service
  BLEService *pService = pServer->createService(SERVICE_UUID);
  // Print the error message if the BLE service creation fails
  if (pService == nullptr) {
    Serial.println("Error creating BLE service");
    return;
  }
  // Create the BLE characteristic for sending notifications
  pCharacteristic = pService->createCharacteristic(CHARACTERISTIC_UUID_TX, BLECharacteristic::PROPERTY_NOTIFY);
  pCharacteristic->addDescriptor(new BLE2902());  // Add the descriptor
  // Create the BLE characteristic for receiving data
  BLECharacteristic *pCharacteristicRX = pService->createCharacteristic(CHARACTERISTIC_UUID_RX, BLECharacteristic::PROPERTY_WRITE);
  pCharacteristicRX->setCallbacks(new MyCharacteristicCallbacks());  // Set the BLE characteristic callbacks
  pService->start();                                                 // Start the BLE service
  pServer->getAdvertising()->start();                                // Start advertising
  Serial.println("Waiting for a client connection...");              // Wait for a client connection
}

void setColor(int red, int green, int blue) {
  // For common-anode RGB LEDs, use 255 minus the color value
  ledcWrite(redPin, red);
  ledcWrite(greenPin, green);
  ledcWrite(bluePin, blue);
}
Common Course Links
Common Course Files
リソースと参考文献
-
ドキュメンテーションESP32 チュートリアル 38/55 - SunFounder ドキュメントページ for Bluetooth RGB LEDdocs.sunfounder.com
ファイル📁
ファイルは利用できません。