ESP32 บทเรียน 36/55 - เกมทายตัวเลข | ชุดเรียนรู้ IoT ESP32 ของ SunFounder
ในบทช่วยสอนนี้ เราจะสร้างเกมทายตัวเลขที่สนุกสนานโดยใช้ไมโครคอนโทรลเลอร์ ESP32 ร่วมกับรีโมทอินฟราเรดและจอแสดงผล LCD ผู้เล่นจะพยายามทายตัวเลขที่สุ่มขึ้นมาระหว่าง 0 ถึง 99 โดยเกมจะให้คำใบ้ว่าตัวเลขที่ทายสูงเกินไปหรือต่ำเกินไป ผ่านโปรเจกต์นี้ คุณจะได้เรียนรู้วิธีใช้ตัวรับอินฟราเรด แสดงค่าบนจอ LCD และจัดการอินพุตจากรีโมทคอนโทรล คุณสามารถดูวิดีโอเพื่อความเข้าใจเพิ่มเติมได้ (ในวิดีโอที่ 00:00)


อธิบายฮาร์ดแวร์
ส่วนประกอบหลักที่ใช้ในโปรเจกต์นี้ประกอบด้วยไมโครคอนโทรลเลอร์ ESP32 รีโมทอินฟราเรด ตัวรับอินฟราเรด และจอแสดงผล LCD ESP32 ทำหน้าที่เป็นหน่วยประมวลผลหลักและสามารถจัดการการสื่อสารไร้สายได้ ทำให้เป็นตัวเลือกที่หลากหลายสำหรับโปรเจกต์ IoT รีโมทอินฟราเรดช่วยให้ผู้ใช้ป้อนตัวเลขที่ทายได้โดยไม่ต้องสัมผัสกับบอร์ดโดยตรง ในขณะที่จอ LCD แสดงสถานะของเกมและข้อความแจ้งเตือน
ตัวรับอินฟราเรดตรวจจับสัญญาณจากรีโมทคอนโทรลและถอดรหัสเพื่อใช้ในเกม การกดปุ่มแต่ละครั้งบนรีโมทจะสอดคล้องกับค่าที่เฉพาะเจาะจงซึ่ง ESP32 สามารถตีความได้ จอแสดงผล LCD ให้อินเทอร์เฟซภาพสำหรับผู้ใช้ โดยแสดงช่วงตัวเลขที่ทายปัจจุบันและว่าตัวเลขที่ทายถูกต้องหรือไม่
รายละเอียดจาก Datasheet
| ผู้ผลิต | SunFounder |
|---|---|
| หมายเลขชิ้นส่วน | ESP32 |
| แรงดันไฟฟ้าลอจิก/IO | 3.3 V |
| แรงดันไฟฟ้าจ่าย | 5 V (ผ่าน USB) |
| กระแสเอาต์พุต (ต่อช่อง) | 12 mA (สูงสุด) |
| คำแนะนำความถี่ PWM | 1 kHz |
| เกณฑ์แรงดันไฟฟ้าอินพุตลอจิก | 0.3 * Vcc ถึง 0.7 * Vcc |
| แรงดันตก / RDS(on) / อิ่มตัว | 0.2 V |
| ขีดจำกัดความร้อน | อุณหภูมิการทำงาน: -40 ถึง 85 °C |
| แพ็คเกจ | โมดูล WROOM-32 |
| หมายเหตุ / รุ่นต่างๆ | รองรับ Wi-Fi และ Bluetooth |
- ตรวจสอบให้แน่ใจว่าส่วนประกอบทั้งหมดมีพิกัด 3.3 V และ 5 V ตามที่เกี่ยวข้อง
- ใช้ตัวต้านทาน pull-up ที่เหมาะสมสำหรับตัวรับ IR เพื่อหลีกเลี่ยงอินพุตลอย
- พิจารณาใช้ฮีทซิงก์หากใช้งานที่กระแสเอาต์พุตสูงสุดเป็นเวลานาน
- เมื่อใช้ PWM ให้รักษาความถี่ประมาณ 1 kHz เพื่อประสิทธิภาพที่ดีที่สุด
- ระมัดระวังในการเดินสายไฟ ตรวจสอบให้แน่ใจว่าการเชื่อมต่อแน่นหนาเพื่อหลีกเลี่ยงความล้มเหลวเป็นระยะ
คำแนะนำการเดินสายไฟ
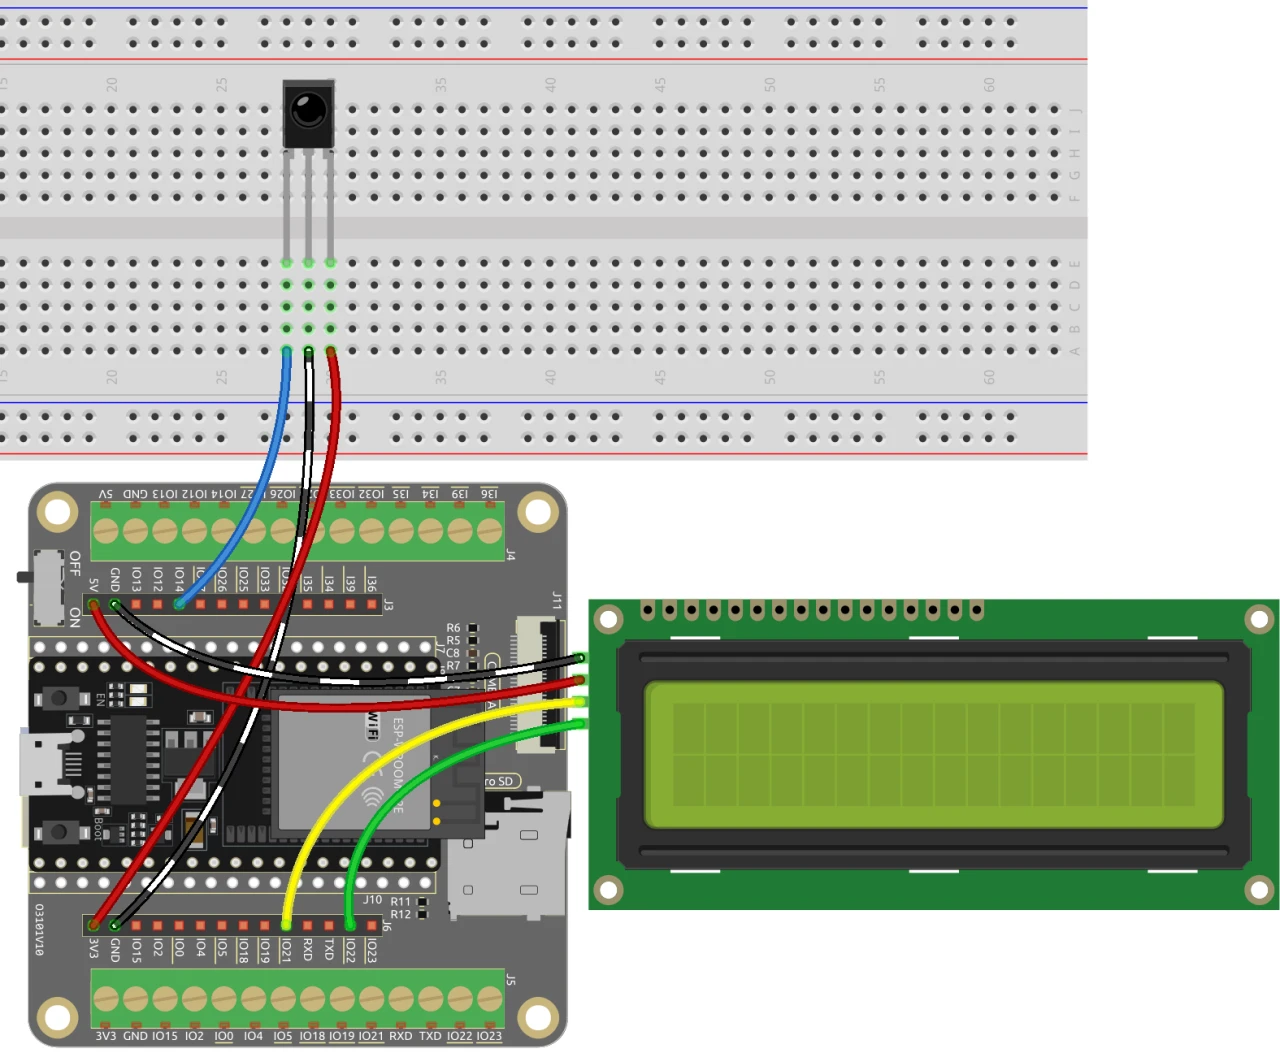
ในการตั้งค่าการเดินสายไฟสำหรับเกมทายตัวเลข ให้เริ่มต้นด้วยการเชื่อมต่อตัวรับอินฟราเรด เชื่อมต่อสายสีแดงจากพินด้านขวาของตัวรับเข้ากับแหล่งจ่ายไฟ 3.3 V บน ESP32 สายสีดำควรต่อกับกราวด์ ในขณะที่พินด้านซ้ายของตัวรับอินฟราเรดเชื่อมต่อกับพิน 14 บน ESP32
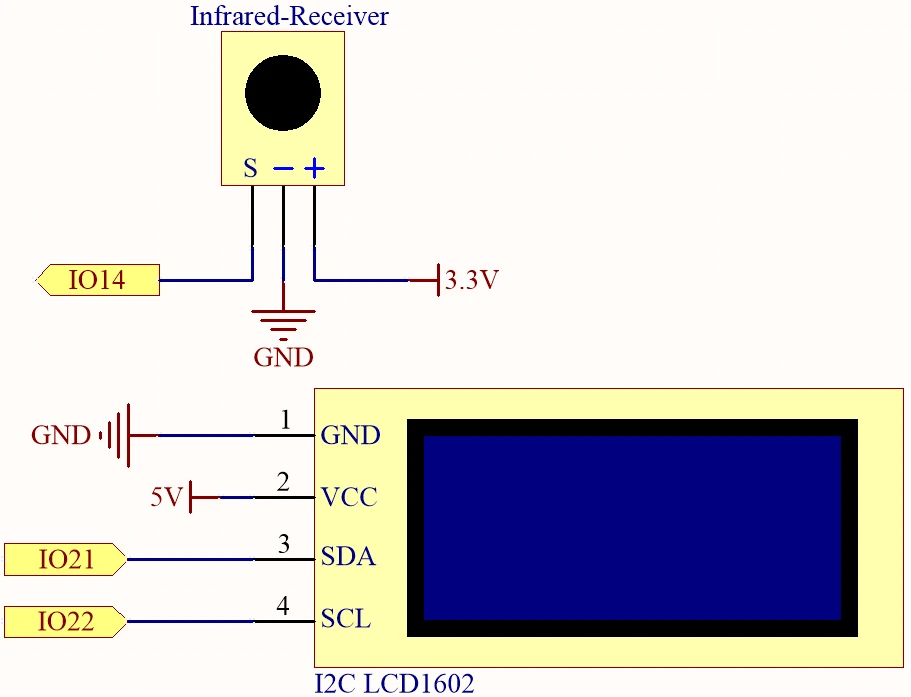
ถัดไป เดินสายไฟจอแสดงผล LCD เชื่อมต่อพิน VCC ของจอ LCD เข้ากับแหล่งจ่าย 5 V บน ESP32 และพินกราวด์เข้ากับกราวด์ พิน SDA และ SCL ของจอ LCD ควรเชื่อมต่อกับพิน 21 และ 22 ตามลำดับ ตรวจสอบให้แน่ใจว่ามีช่องว่างสองช่องระหว่างการเชื่อมต่อ SDA และ SCL เพื่อหลีกเลี่ยงความขัดแย้งของพิน สุดท้าย ตรวจสอบให้แน่ใจว่าได้ถอดฝาพลาสติกออกจากแบตเตอรี่ก่อนจ่ายไฟให้บอร์ด
ตัวอย่างโค้ดและคำอธิบาย
ตัวอย่างโค้ดต่อไปนี้แสดงส่วนสำคัญของโปรแกรมที่ใช้สำหรับเกมทายตัวเลข เราเริ่มต้นด้วยการรวมไลบรารีที่จำเป็นและกำหนดตัวระบุหลัก
#include
#include
#include
#include

const uint16_t IR_RECEIVE_PIN = 14;
IRrecv irrecv(IR_RECEIVE_PIN);
decode_results results;
ในส่วนนี้ เรารวมไลบรารีสำหรับจัดการฟังก์ชันการทำงานของจอ LCD และตัวรับ IR พินสำหรับตัวรับอินฟราเรดถูกกำหนดเป็น 14 และเราสร้างอินสแตนซ์ของออบเจกต์ที่จำเป็นเพื่อจัดการอินพุตและเอาต์พุต
void setup() {
  lcd.init();
  lcd.backlight();
  Serial.begin(9600);
  irrecv.enableIRIn();
  initNewValue();
}
ตัวอย่างนี้แสดงฟังก์ชัน setup ซึ่งเราจะเริ่มต้นจอ LCD เริ่มการสื่อสารแบบอนุกรม และเปิดใช้งานตัวรับ IR ฟังก์ชัน initNewValue() ถูกเรียกเพื่อสร้างตัวเลขสุ่มใหม่ให้ผู้เล่นทาย
bool detectPoint() {
  if (count > pointValue) {
    if (count < upper) upper = count;
  } else if (count < pointValue) {
    if (count > lower) lower = count;
  } else if (count == pointValue) {
    count = 0;
    return 1;
  }
  count = 0;
  return 0;
}
ฟังก์ชันนี้ตรวจสอบตัวเลขที่ผู้เล่นทายกับตัวเลขสุ่มที่สร้างขึ้น โดยปรับขีดจำกัดบนและล่างตามความเหมาะสม หากตัวเลขที่ทายถูกต้อง จะรีเซ็ตค่า count และคืนค่า true
โค้ดเต็มอยู่ด้านล่างบทความสำหรับการอ้างอิงของคุณ
การสาธิต / สิ่งที่คาดหวัง
เมื่อทุกอย่างเชื่อมต่อและอัปโหลดโค้ดเรียบร้อยแล้ว เกมจะแจ้งให้คุณกดตัวเลขใดก็ได้บนรีโมทคอนโทรล จากนั้นเกมจะให้ผลตอบกลับเกี่ยวกับการทายของคุณ โดยปรับช่วงของตัวเลขที่เป็นไปได้จนกว่าคุณจะทายตัวเลขเป้าหมายได้ถูกต้อง หากคุณกดปุ่ม POWER เกมจะรีเซ็ตและเริ่มใหม่ (ในวิดีโอที่ 02:30)
ข้อผิดพลาดทั่วไป ได้แก่ การตรวจสอบให้แน่ใจว่าเครื่องรับอินฟราเรดหันไปในทิศทางที่ถูกต้อง และการเชื่อมต่อทั้งหมดแน่นหนา หากเกมไม่ตอบสนอง ให้ตรวจสอบแหล่งจ่ายไฟและยืนยันว่าเลือกบอร์ดและพอร์ตที่ถูกต้องใน Arduino IDE
ไทม์สแตมป์ในวิดีโอ
- 00:00 เริ่มต้น
- 2:17 แนะนำโปรเจกต์เกม
- 4:37 การเดินสายไฟ
- 6:15 อธิบายโค้ด Arduino
- 12:32 การเลือกบอร์ด ESP32 และพอร์ต COM ใน Arduino IDE
- 16:16 เล่นเกมทายตัวเลข
ภาพ
#include <Wire.h>
#include <LiquidCrystal_I2C.h>
#include <IRremoteESP8266.h>
#include <IRrecv.h>

// Define the IR receiver pin
const uint16_t IR_RECEIVE_PIN = 14;

// Create an IRrecv object
IRrecv irrecv(IR_RECEIVE_PIN);

// Create a decode_results object
decode_results results;

const long interval = 1000;

unsigned long previousMillis = 0;

// Initialize the LCD object
LiquidCrystal_I2C lcd(0x27, 16, 2);

// Initialize the input number value
int count = 0;

// Initialize the random lucky point
int pointValue = 0;

// Initialize the upper and lower limit tips
int upper = 99;
int lower = 0;

void setup() {
  // Initialize the LCD screen
  lcd.init();
  lcd.backlight();

  // Start the serial communication
  Serial.begin(9600);

  // Enable the IR receiver
  irrecv.enableIRIn();

  // Initialize a new lucky point value
  initNewValue();
}

void loop() {
  // If a signal is received from the IR receiver
  if (irrecv.decode(&results)) {
    bool result = 0;
    String num = decodeKeyValue(results.value);

    // If the POWER button is pressed
    if (num == "POWER") {
      initNewValue(); // Initialize a new lucky point value
    }

    // If the CYCLE button is pressed
    else if (num == "CYCLE") {
      result = detectPoint(); // Detect the input number
      lcdShowInput(result); // Show the result on the LCD screen
    }

    // If a number button (0-9) is pressed,
    //add the digit to the input number
    //and detect the number if it is greater than or equal to 10
    else if (num >= "0" && num <= "9") {
      count = count * 10;
      count += num.toInt();
      if (count >= 10) {
        result = detectPoint();
      }
      lcdShowInput(result);
    }
    irrecv.resume();
  }
}

// Function to initialize a new lucky point value
void initNewValue() {
  // Set the random seed based on the analog value from pin A0
  randomSeed(analogRead(A0));

  // Generate a new random lucky point value
  pointValue = random(99);

  // Reset the upper and lower limit tips
  upper = 99;
  lower = 0;

  // Show the welcome message on the LCD screen
  lcd.clear();
  lcd.print("    Welcome!");
  lcd.setCursor(0, 1);
  lcd.print("Press Any Number");

  // Reset the input number value
  count = 0;

  // Print the lucky point value to the serial monitor
  Serial.print("point is ");
  Serial.println(pointValue);
}

// Detect the input number
//and update the upper/lower limit tips accordingly
bool detectPoint() {
  if (count > pointValue) {
    if (count < upper)upper = count;
  }
  else if (count < pointValue) {
    if (count > lower)lower = count;
  }

  // If the input number is equal to the lucky point value,
  else if (count == pointValue) {

    // Reset the input number and return true
    count = 0;
    return 1;
  }
  // Reset the input number and return false
  count = 0;
  return 0;
}

// Show the input number and the upper/lower limit tips
void lcdShowInput(bool result) {
  lcd.clear();

  // If the input number is equal to the lucky point value
  if (result == 1)
  {
    // Show the success message and initialize a new lucky point value
    lcd.setCursor(0, 1);
    lcd.print(" You've got it! ");
    delay(5000);
    initNewValue();
    return;
  }
  lcd.print("Enter number:");
  lcd.print(count);
  lcd.setCursor(0, 1);
  lcd.print(lower);
  lcd.print(" < Point < ");
  lcd.print(upper);
}

// Function to decode the key value from the IR receiver signal
String decodeKeyValue(long result)
{
  switch(result){
    case 0xFF6897:
      return "0";
    case 0xFF30CF:
      return "1";
    case 0xFF18E7:
      return "2";
    case 0xFF7A85:
      return "3";
    case 0xFF10EF:
      return "4";
    case 0xFF38C7:
      return "5";
    case 0xFF5AA5:
     return "6";
    case 0xFF42BD:
      return "7";
    case 0xFF4AB5:
      return "8";
    case 0xFF52AD:
      return "9";
    case 0xFF906F:
      return "+";
    case 0xFFA857:
      return "-";
    case 0xFFE01F:
      return "EQ";
    case 0xFFB04F:
      return "U/SD";
    case 0xFF9867:
      return "CYCLE";
    case 0xFF22DD:
      return "PLAY/PAUSE";
    case 0xFF02FD:
      return "BACKWARD";
    case 0xFFC23D:
      return "FORWARD";
    case 0xFFA25D:
      return "POWER";
    case 0xFFE21D:
      return "MUTE";
    case 0xFF629D:
      return "MODE";
    case 0xFFFFFFFF:
      return "ERROR";
    default :
      return "ERROR";
    }
}
Common Course Links
Common Course Files
แหล่งข้อมูลและเอกสารอ้างอิง
-
เอกสารESP32 Tutorial 36/55 - SunFounder doc page for guessing numberdocs.sunfounder.com
ไฟล์📁
ไม่มีไฟล์ที่พร้อมใช้งาน