ESP32 튜토리얼 36/55 - 숫자 맞추기 게임 | SunFounder의 ESP32 IoT 학습 키트
이 튜토리얼에서는 ESP32 마이크로컨트롤러와 적외선 리모컨, LCD 디스플레이를 사용하여 재미있는 숫자 맞추기 게임을 만들어 보겠습니다. 플레이어는 0에서 99 사이에서 무작위로 생성된 숫자를 맞추려고 시도하며, 게임은 추측이 너무 높은지 너무 낮은지에 대한 힌트를 제공합니다. 이 프로젝트를 통해 적외선 수신기 사용법, LCD에 값 표시하기, 리모컨에서 사용자 입력을 관리하는 방법을 배우게 됩니다. 추가적인 명확성을 위해 비디오를 참조할 수 있습니다(비디오 00:00 지점).


하드웨어 설명
이 프로젝트에 사용된 주요 구성 요소는 ESP32 마이크로컨트롤러, 적외선 리모컨, 적외선 수신기, LCD 디스플레이입니다. ESP32는 주요 처리 장치 역할을 하며 무선 통신을 처리할 수 있어 IoT 프로젝트에 다재다능한 선택입니다. 적외선 리모컨은 사용자가 보드와 물리적으로 상호 작용하지 않고도 추측을 입력할 수 있게 하며, LCD는 게임 상태와 프롬프트를 표시합니다.
적외선 수신기는 리모컨의 신호를 감지하여 게임에서 사용할 수 있도록 디코딩합니다. 리모컨의 각 버튼 누름은 ESP32가 해석할 수 있는 특정 값에 해당합니다. LCD 디스플레이는 사용자에게 현재 추측 범위와 추측이 맞았는지 여부를 보여주는 시각적 인터페이스를 제공합니다.
데이터시트 세부 정보
| 제조업체 | SunFounder |
|---|---|
| 부품 번호 | ESP32 |
| 로직/IO 전압 | 3.3 V |
| 공급 전압 | 5 V (USB 통해) |
| 출력 전류 (채널당) | 12 mA (최대) |
| PWM 주파수 가이드 | 1 kHz |
| 입력 로직 임계값 | 0.3 * Vcc ~ 0.7 * Vcc |
| 전압 강하 / RDS(on) / 포화 | 0.2 V |
| 열 제한 | 작동 온도: -40 ~ 85 °C |
| 패키지 | WROOM-32 모듈 |
| 참고 사항 / 변형 | Wi-Fi 및 Bluetooth 지원 |
- 모든 구성 요소가 해당되는 경우 3.3 V 및 5 V 정격인지 확인하십시오.
- 플로팅 입력을 방지하려면 IR 수신기에 적절한 풀업 저항을 사용하십시오.
- 최대 출력 전류로 장시간 실행하는 경우 방열판 사용을 고려하십시오.
- PWM을 사용할 때 최적의 성능을 위해 약 1 kHz의 주파수를 유지하십시오.
- 배선에 주의하십시오. 간헐적 오류를 방지하기 위해 연결이 안전한지 확인하십시오.
배선 지침
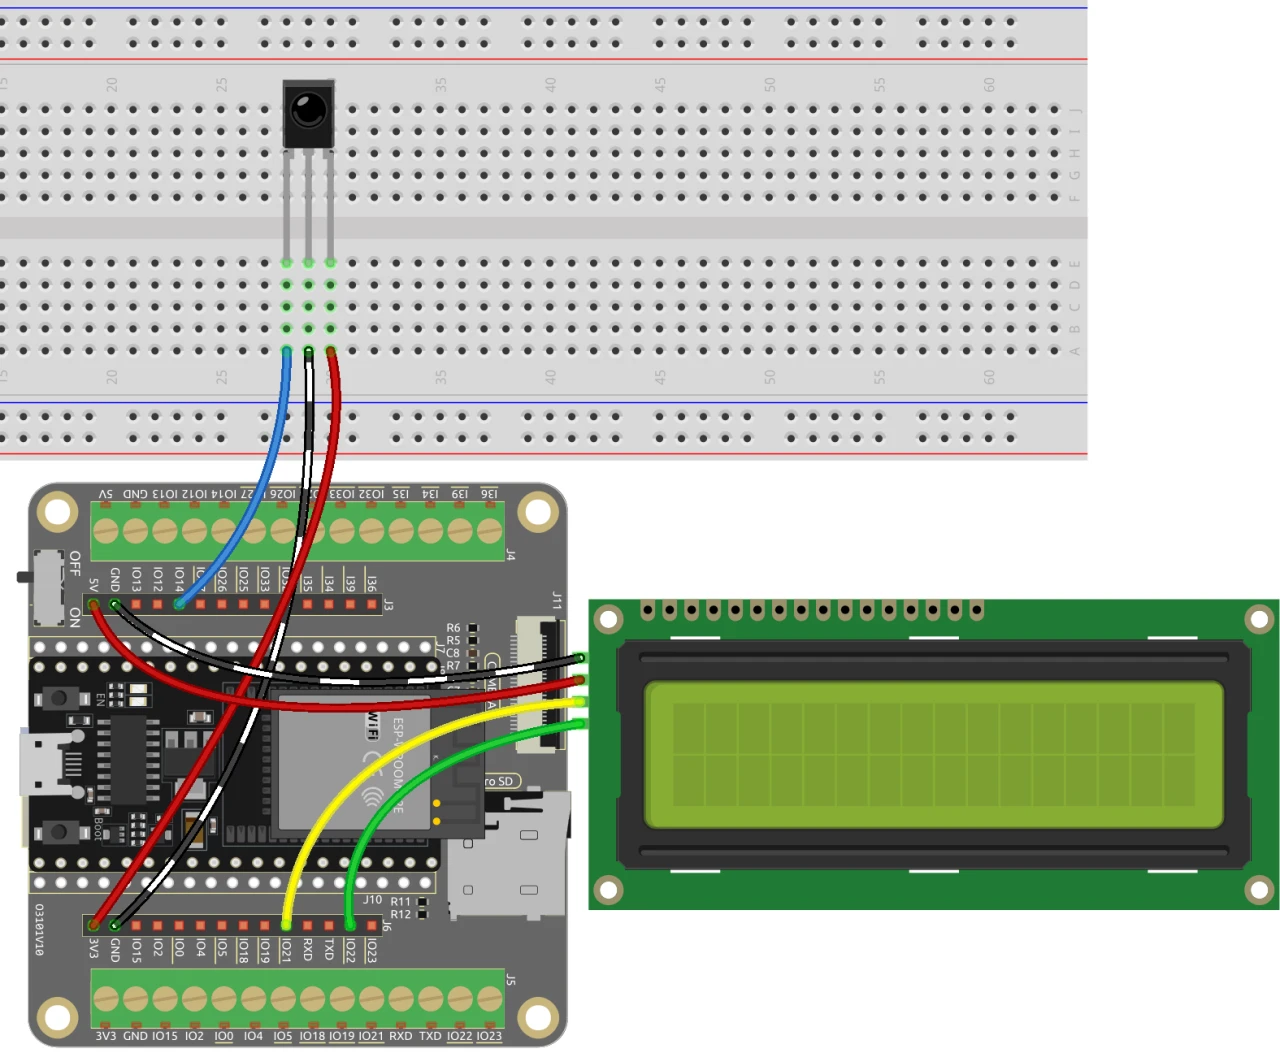
숫자 맞추기 게임의 배선을 설정하려면 적외선 수신기를 연결하는 것부터 시작하십시오. 수신기의 오른쪽 핀에서 빨간색 와이어를 ESP32의 3.3 V 전원 공급 장치에 연결하십시오. 검은색 와이어는 접지에 연결하고, 적외선 수신기의 왼쪽 핀은 ESP32의 핀 14에 연결합니다.
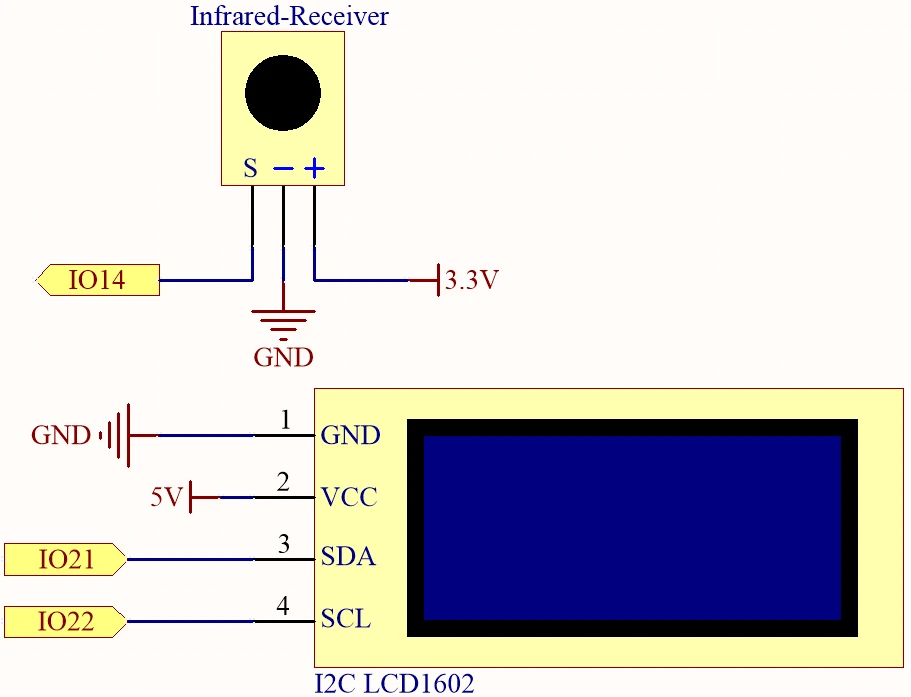
다음으로 LCD 디스플레이를 배선하십시오. LCD의 VCC 핀을 ESP32의 5 V 공급 장치에 연결하고 접지 핀은 접지에 연결합니다. LCD의 SDA 및 SCL 핀은 각각 핀 21 및 22에 연결해야 합니다. 핀 충돌을 피하기 위해 SDA와 SCL 연결 사이에 두 개의 빈 공간이 있는지 확인하십시오. 마지막으로 보드에 전원을 공급하기 전에 배터리에서 플라스틱 덮개를 제거해야 합니다.
코드 예제 및 설명
다음 코드 조각은 숫자 맞추기 게임에 사용되는 프로그램의 필수 부분을 보여줍니다. 필요한 라이브러리를 포함하고 주요 식별자를 정의하는 것으로 시작합니다.
#include
#include
#include
#include

const uint16_t IR_RECEIVE_PIN = 14;
IRrecv irrecv(IR_RECEIVE_PIN);
decode_results results;
이 발췌문에서는 LCD 및 IR 수신기 기능을 처리하기 위한 라이브러리를 포함합니다. 적외선 수신기 핀은 14로 정의되고, 입력 및 출력을 관리하기 위해 필요한 객체의 인스턴스를 생성합니다.
void setup() {
  lcd.init();
  lcd.backlight();
  Serial.begin(9600);
  irrecv.enableIRIn();
  initNewValue();
}
이 조각은 LCD를 초기화하고, 시리얼 통신을 시작하며, IR 수신기를 활성화하는 설정 함수를 보여줍니다. initNewValue() 함수는 플레이어가 맞출 새로운 난수를 생성하기 위해 호출됩니다.
bool detectPoint() {
  if (count > pointValue) {
    if (count < upper) upper = count;
  } else if (count < pointValue) {
    if (count > lower) lower = count;
  } else if (count == pointValue) {
    count = 0;
    return 1;
  }
  count = 0;
  return 0;
}
이 함수는 플레이어의 추측을 무작위로 생성된 숫자와 비교하여 상한 및 하한을 적절히 조정합니다. 추측이 맞으면 카운트를 재설정하고 true를 반환합니다.
전체 코드는 참조를 위해 기사 아래에 로드되어 있습니다.
데모 / 기대 효과
모든 것이 배선되고 코드가 업로드되면, 게임은 리모컨의 아무 숫자나 누르라고 안내합니다. 그런 다음 게임은 추측에 대한 피드백을 제공하며, 목표 숫자를 정확히 맞출 때까지 가능한 숫자의 범위를 업데이트합니다. POWER 버튼을 누르면 게임이 리셋되어 다시 시작됩니다(영상 02:30에서 확인 가능).
흔한 실수로는 적외선 수신기가 올바르게 방향을 잡았는지, 모든 연결이 확실한지 확인하는 것이 있습니다. 게임이 반응하지 않으면 전원 공급을 확인하고 Arduino IDE에서 올바른 보드와 포트가 선택되었는지 확인하세요.
영상 타임스탬프
- 00:00 시작
- 2:17 게임 프로젝트 소개
- 4:37 배선
- 6:15 Arduino 코드 설명
- 12:32 Arduino IDE에서 ESP32 보드 및 COM 포트 선택
- 16:16 숫자 맞추기 게임 플레이
이미지
#include <Wire.h>
#include <LiquidCrystal_I2C.h>
#include <IRremoteESP8266.h>
#include <IRrecv.h>

// Define the IR receiver pin
const uint16_t IR_RECEIVE_PIN = 14;

// Create an IRrecv object
IRrecv irrecv(IR_RECEIVE_PIN);

// Create a decode_results object
decode_results results;

const long interval = 1000;

unsigned long previousMillis = 0;

// Initialize the LCD object
LiquidCrystal_I2C lcd(0x27, 16, 2);

// Initialize the input number value
int count = 0;

// Initialize the random lucky point
int pointValue = 0;

// Initialize the upper and lower limit tips
int upper = 99;
int lower = 0;

void setup() {
  // Initialize the LCD screen
  lcd.init();
  lcd.backlight();

  // Start the serial communication
  Serial.begin(9600);

  // Enable the IR receiver
  irrecv.enableIRIn();

  // Initialize a new lucky point value
  initNewValue();
}

void loop() {
  // If a signal is received from the IR receiver
  if (irrecv.decode(&results)) {
    bool result = 0;
    String num = decodeKeyValue(results.value);

    // If the POWER button is pressed
    if (num == "POWER") {
      initNewValue(); // Initialize a new lucky point value
    }

    // If the CYCLE button is pressed
    else if (num == "CYCLE") {
      result = detectPoint(); // Detect the input number
      lcdShowInput(result); // Show the result on the LCD screen
    }

    // If a number button (0-9) is pressed,
    //add the digit to the input number
    //and detect the number if it is greater than or equal to 10
    else if (num >= "0" && num <= "9") {
      count = count * 10;
      count += num.toInt();
      if (count >= 10) {
        result = detectPoint();
      }
      lcdShowInput(result);
    }
    irrecv.resume();
  }
}

// Function to initialize a new lucky point value
void initNewValue() {
  // Set the random seed based on the analog value from pin A0
  randomSeed(analogRead(A0));

  // Generate a new random lucky point value
  pointValue = random(99);

  // Reset the upper and lower limit tips
  upper = 99;
  lower = 0;

  // Show the welcome message on the LCD screen
  lcd.clear();
  lcd.print("    Welcome!");
  lcd.setCursor(0, 1);
  lcd.print("Press Any Number");

  // Reset the input number value
  count = 0;

  // Print the lucky point value to the serial monitor
  Serial.print("point is ");
  Serial.println(pointValue);
}

// Detect the input number
//and update the upper/lower limit tips accordingly
bool detectPoint() {
  if (count > pointValue) {
    if (count < upper)upper = count;
  }
  else if (count < pointValue) {
    if (count > lower)lower = count;
  }

  // If the input number is equal to the lucky point value,
  else if (count == pointValue) {

    // Reset the input number and return true
    count = 0;
    return 1;
  }
  // Reset the input number and return false
  count = 0;
  return 0;
}

// Show the input number and the upper/lower limit tips
void lcdShowInput(bool result) {
  lcd.clear();

  // If the input number is equal to the lucky point value
  if (result == 1)
  {
    // Show the success message and initialize a new lucky point value
    lcd.setCursor(0, 1);
    lcd.print(" You've got it! ");
    delay(5000);
    initNewValue();
    return;
  }
  lcd.print("Enter number:");
  lcd.print(count);
  lcd.setCursor(0, 1);
  lcd.print(lower);
  lcd.print(" < Point < ");
  lcd.print(upper);
}

// Function to decode the key value from the IR receiver signal
String decodeKeyValue(long result)
{
  switch(result){
    case 0xFF6897:
      return "0";
    case 0xFF30CF:
      return "1";
    case 0xFF18E7:
      return "2";
    case 0xFF7A85:
      return "3";
    case 0xFF10EF:
      return "4";
    case 0xFF38C7:
      return "5";
    case 0xFF5AA5:
     return "6";
    case 0xFF42BD:
      return "7";
    case 0xFF4AB5:
      return "8";
    case 0xFF52AD:
      return "9";
    case 0xFF906F:
      return "+";
    case 0xFFA857:
      return "-";
    case 0xFFE01F:
      return "EQ";
    case 0xFFB04F:
      return "U/SD";
    case 0xFF9867:
      return "CYCLE";
    case 0xFF22DD:
      return "PLAY/PAUSE";
    case 0xFF02FD:
      return "BACKWARD";
    case 0xFFC23D:
      return "FORWARD";
    case 0xFFA25D:
      return "POWER";
    case 0xFFE21D:
      return "MUTE";
    case 0xFF629D:
      return "MODE";
    case 0xFFFFFFFF:
      return "ERROR";
    default :
      return "ERROR";
    }
}
Common Course Links
Common Course Files
자원 및 참고자료
-
문서화ESP32 Tutorial 36/55 - SunFounder doc page for guessing numberdocs.sunfounder.com
파일📁
파일이 없습니다.