ESP32 教學 46/55 - 使用 HiveMQ MQTT 進行遠程溫度監控 | SunFounder 嘅 ESP32 套件
喺呢個教學入面,我哋會用ESP32同MQTT協議整一個遠程溫度監控系統。呢個項目容許我哋將溫度數據發佈到MQTT broker,同埋用網頁介面遠程控制LED。撳一個掣,我哋就可以將溫度讀數送到雲端,而且我哋都可以接收指令去開或者關LED。

ESP32係一個功能強大嘅微控制器,內置Wi-Fi同藍牙,令到佢好適合用喺物聯網(IoT)應用。喺呢個設置入面,我哋會用一個NTC熱敏電阻去量度溫度、一個按鈕去觸發讀數,同埋一個LED去顯示狀態。數據會送到HiveMQ——一個好流行嘅MQTT broker——喺嗰度可以遠程存取(喺影片00:45位置)。
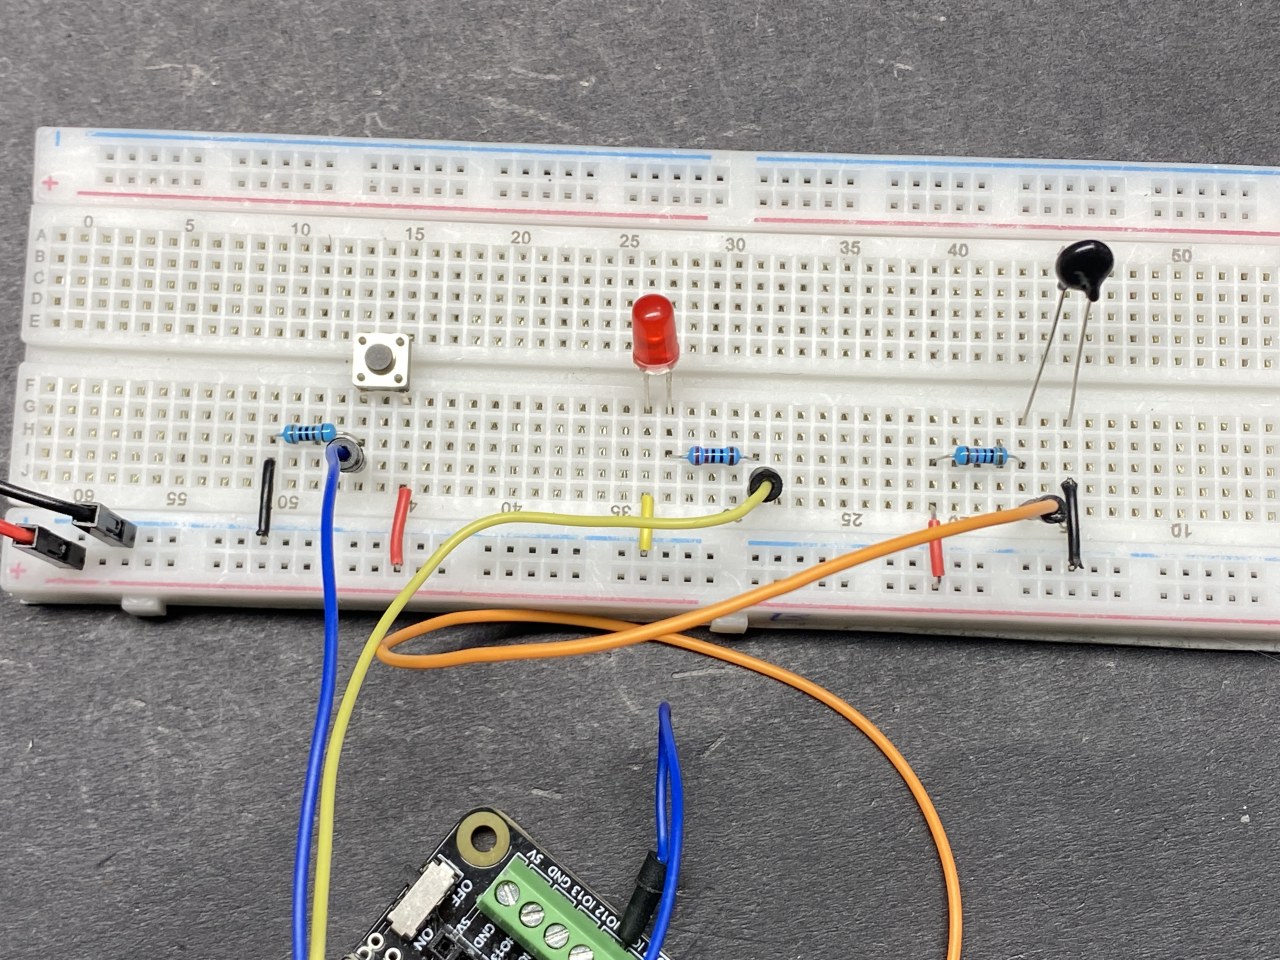
硬件解釋
為咗呢個項目,我哋會用到以下組件:
- ESP32微控制器:呢塊板係中央處理單元,負責處理Wi-Fi連接同MQTT通訊。
- NTC熱敏電阻:呢個溫度感應器會根據溫度改變佢嘅電阻。佢提供一個模擬信號畀ESP32讀取,從而判斷當前溫度。
- LED:呢個發光二極管會用嚟根據經MQTT收到嘅指令顯示狀態。
- 按鈕:呢個掣會觸發ESP32去讀溫度,然後將佢發佈到MQTT broker。
數據表詳情
| 製造商 | SunFounder |
|---|---|
| 零件編號 | ESP32 |
| 邏輯/IO電壓 | 3.3 V |
| 供電電壓 | 5 V(經USB) |
| 輸出電流(每通道) | 最大12 mA |
| PWM頻率指引 | 最高40 kHz |
| 輸入邏輯閾值 | 0.3 V(低),2.4 V(高) |
| 熱限制 | -40至85 °C |
| 封裝 | ESP32-WROOM-32 |
- 確保電壓水平正確,避免損壞。
- 為按鈕使用上拉電阻,確保讀數穩定。
- 去耦電容可以幫助穩定電源供應。
- 小心熱敏電阻嘅接線,避免錯誤讀數。
- 核實你嘅MQTT broker資料,確保連接成功。
接線指示

要接線組件,首先連接NTC熱敏電阻。將熱敏電阻嘅一個引腳連接到ESP32上嘅3.3 V電源。另一個引腳連接到ESP32嘅引腳36,而且佢都應該連接到一個10 kΩ電阻,然後嗰個電阻再連接到地。咁樣就形成一個分壓器,容許ESP32讀取熱敏電阻嘅電阻值。
跟住,連接LED。LED嘅長引腳(陽極)通過一個220 Ω電阻連接到ESP32嘅引腳4,而短引腳(陰極)就連接到地。至於按鈕,將一邊連接到3.3 V,另一邊連接到ESP32嘅引腳14。另外,由按鈕引腳連一個10 kΩ電阻到地,確保當按鈕冇撳嘅時候有一個穩定嘅LOW狀態。
安裝所需程式庫
呢度用咗PubSubClient程式庫,你可以喺程式庫管理員入面安裝佢。

程式碼示例同講解
喺setup入面,我哋初始化串行通訊、設置Wi-Fi連接,同埋配置MQTT伺服器。以下係setup程式碼嘅片段:
void setup() {
  Serial.begin(115200);
  setup_wifi();
  client.setServer(mqtt_server, 1883);
  client.setCallback(callback);
  pinMode(buttonPin, INPUT);
  pinMode(ledPin, OUTPUT);
}
呢部分程式碼建立咗去Wi-Fi網絡嘅連接,同埋設置MQTT伺服器。按鈕同LED嘅引腳模式都喺呢度配置。
Loop函數會持續檢查按鈕狀態,當撳掣嘅時候發佈溫度數據。以下係loop嘅重點摘錄:
void loop() {
  if (!client.connected()) {
    reconnect();
  }
  client.loop();
  if (digitalRead(buttonPin)) {
    long now = millis();
    if (now - lastMsg > 5000) {
      lastMsg = now;
      char tempString[8];
      dtostrf(thermistor(), 1, 2, tempString);
      client.publish("SF/TEMP", tempString);
    }
  }
}
喺呢個loop入面,我哋檢查ESP32係咪連接到MQTT broker。如果按鈕被撳,佢會讀取熱敏電阻嘅溫度,然後每5秒將佢發佈到主題"SF/TEMP"。
示範/預期效果
當項目設定好並運行之後,撳個掣就會將當前溫度發佈到MQTT broker。你可以用任何MQTT客戶端監察呢啲數據。另外,你可以發送訊息去控制LED;發送「on」會令佢著燈,而「off」就會熄燈。留意影片15:30嘅預期行為,嗰度每次撳掣之後都會顯示溫度讀數。
影片時間戳
- 00:00 開始
- 2:05 項目介紹
- 7:06 免費HiveMQ服務
- 7:56 接線講解
- 11:11 Arduino代碼講解
- 18:46 喺Arduino IDE度選擇ESP32板同COM端口
- 20:30 HiveMQ Free broker示範
圖片
/*********
  :ref: https://randomnerdtutorials.com/esp32-mqtt-publish-subscribe-arduino-ide/
  https://docs.sunfounder.com/projects/kepler-kit/en/latest/iotproject/5.mqtt_pub.html
*********/

#include <WiFi.h>
#include <PubSubClient.h>
//#include <Wire.h>

// Replace the next variables with your SSID/Password combination
const char* ssid = "SSID";
const char* password = "PASSWORD";

// Add your MQTT Broker address, example:
const char* mqtt_server = "broker.hivemq.com";
const char* unique_identifier = "sunfounder-client-sdgvsda";

WiFiClient espClient;
PubSubClient client(espClient);
long lastMsg = 0;
int value = 0;


// LED Pin
const int ledPin = 4;
const int buttonPin = 14;

// When you connect to WIFI, only 36 39 34 35 32 33 pins can be used for analog reading.
// Define constants
const int thermistorPin = 36; // Pin connected to the thermistor
const float referenceVoltage = 3.3;
const float referenceResistor = 10000; // Resistance value (10k)
const float beta = 3950; // Beta value (Typical Value)
const float nominalTemperature = 25; // Nominal temperature for calculating the temperature coefficient
const float nominalResistance = 10000; // Resistance value at nominal temperature


void setup() {
  Serial.begin(115200);

  // default settings
  setup_wifi();
  client.setServer(mqtt_server, 1883);
  client.setCallback(callback);

  pinMode(buttonPin, INPUT);
  pinMode(ledPin, OUTPUT);
}

void setup_wifi() {
  delay(10);
  // We start by connecting to a WiFi network
  Serial.println();
  Serial.print("Connecting to ");
  Serial.println(ssid);

  WiFi.begin(ssid, password);

  while (WiFi.status() != WL_CONNECTED) {
    delay(500);
    Serial.print(".");
  }

  Serial.println("");
  Serial.println("WiFi connected");
  Serial.println("IP address: ");
  Serial.println(WiFi.localIP());
}

void callback(char* topic, byte* message, unsigned int length) {
  Serial.print("Message arrived on topic: ");
  Serial.print(topic);
  Serial.print(". Message: ");
  String messageTemp;

  for (int i = 0; i < length; i++) {
    Serial.print((char)message[i]);
    messageTemp += (char)message[i];
  }
  Serial.println();

  // If a message is received on the topic "SF/LED", you check if the message is either "on" or "off".
  // Changes the output state according to the message
  if (String(topic) == "SF/LED") {
    Serial.print("Changing state to ");
    if (messageTemp == "on") {
      Serial.println("on");
      digitalWrite(ledPin, HIGH);
    } else if (messageTemp == "off") {
      Serial.println("off");
      digitalWrite(ledPin, LOW);
    }
  }
}

void reconnect() {
  // Loop until we're reconnected
  while (!client.connected()) {
    Serial.print("Attempting MQTT connection...");
    // Attempt to connect
    if (client.connect(unique_identifier)) {
      Serial.println("connected");
      // Subscribe
      client.subscribe("SF/LED");
    } else {
      Serial.print("failed, rc=");
      Serial.print(client.state());
      Serial.println(" try again in 5 seconds");
      // Wait 5 seconds before retrying
      delay(5000);
    }
  }
}

float thermistor() {
  int adcValue = analogRead(thermistorPin); // Read ADC value
  float voltage = (adcValue * referenceVoltage) / 4095.0; // Calculate voltage
  float resistance = (voltage * referenceResistor) / (referenceVoltage - voltage); // Calculate thermistor resistance with updated configuration

  // Calculate temperature using the Beta parameter equation
  float tempK = 1 / (((log(resistance / nominalResistance)) / beta) + (1 / (nominalTemperature + 273.15)));

  float tempC = tempK - 273.15; // Get temperature in Celsius
  float tempF = 1.8 * tempC + 32.0; // Get temperature in Fahrenheit

  //Print temperature
  Serial.print("Temp: ");
  Serial.println(tempC);
  delay(200); //wait for 200 milliseconds
  return tempC;
}

void loop() {
  if (!client.connected()) {
    reconnect();
  }
  client.loop();

  // if the button pressed, publish the temperature to topic "SF/TEMP"
  if (digitalRead(buttonPin)) {
    long now = millis();
    if (now - lastMsg > 5000) {
      lastMsg = now;
      char tempString[8];
      dtostrf(thermistor(), 1, 2, tempString);
      client.publish("SF/TEMP", tempString);
    }
  }
}
Common Course Links
Common Course Files
資源與參考資料
-
文件记录ESP32 Tutorial 46/55 - SunFounder doc page for IoT Communication with MQTTdocs.sunfounder.com
文件📁
冇文件可用。