ESP32 ٹیوٹوریل 54/55 - وائی فائی کے ذریعے WS2812 LED سٹرپ کا رنگ سیٹ کریں | سن فاؤنڈر کا ESP32 IoT لرننگ کٹ
اس ٹیوٹوریل میں، ہم سیکھیں گے کہ ESP32 مائیکروکنٹرولر کا استعمال کرتے ہوئے Wi-Fi کے ذریعے WS2812 RGB LED پٹی کے رنگ کو کیسے کنٹرول کیا جائے۔ کلر پکر استعمال کرکے، آپ اپنے موبائل ڈیوائس یا ڈیسک ٹاپ سے مختلف رنگ منتخب کرسکتے ہیں اور وہ معلومات LED پٹی کو بھیج سکتے ہیں۔ یہ پروجیکٹ ESP32 کی صلاحیتوں کو ظاہر کرتا ہے، جس سے ویب انٹرفیس کے ذریعے LED لائٹنگ کے ساتھ ہموار تعامل ممکن ہوتا ہے۔

ESP32 مائیکروکنٹرولر Wi-Fi اور بلوٹوتھ دونوں سے لیس ہے، جو اسے IoT ایپلیکیشنز کے لیے ایک ورسٹائل انتخاب بناتا ہے۔ اس پروجیکٹ میں، ہم LED پٹی کو کنٹرول کرنے کے لیے Wi-Fi فعالیت پر توجہ مرکوز کریں گے۔ صارفین متحرک طور پر رنگ منتخب کر سکیں گے، جس سے ایک بصری طور پر دلچسپ تجربہ پیدا ہوگا۔ اس پروجیکٹ پر مزید وضاحت کے لیے، ویڈیو ضرور دیکھیں (ویڈیو میں 00:00 پر)۔
ہارڈویئر کی وضاحت
اس پروجیکٹ کے بنیادی اجزاء میں ESP32 مائیکروکنٹرولر اور WS2812 LED پٹی شامل ہیں۔ ESP32 ایک طاقتور مائیکروکنٹرولر ہے جس میں بلٹ ان Wi-Fi صلاحیتیں ہیں، جو وائرلیس کمیونیکیشن اور کنٹرول کو قابل بناتی ہیں۔
WS2812 LED پٹی انفرادی طور پر ایڈریس ایبل RGB LEDs پر مشتمل ہے، جس سے آپ ہر LED کا رنگ آزادانہ طور پر سیٹ کرسکتے ہیں۔ ہر LED ایک ہی پیکیج میں ایک کنٹرول سرکٹ اور ایک RGB LED شامل کرتا ہے، جو متعدد LEDs کی وائرنگ اور کنٹرول کو آسان بناتا ہے۔
ڈیٹاشیٹ کی تفصیلات
| مینوفیکچرر | ورلڈ سیمی |
|---|---|
| پارٹ نمبر | WS2812B |
| لاجک/آئی او وولٹیج | 3.5–5.3 V |
| سپلائی وولٹیج | 5 V |
| آؤٹ پٹ کرنٹ (فی چینل) | 20 mA |
| پیک کرنٹ (فی چینل) | 60 mA |
| PWM فریکوئنسی رہنمائی | 400 Hz |
| ان پٹ لاجک تھریشولڈز | 0.3 × VDD (کم)، 0.7 × VDD (زیادہ) |
| وولٹیج ڈراپ / RDS(on) / سیچوریشن | 0.5 V |
| تھرمل حدود | –40 سے +80 °C |
| پیکیج | 5050 SMD |
| نوٹس / ویریئنٹس | مختلف لمبائیوں اور کنفیگریشنز میں دستیاب ہے۔ |
- LEDs کو نقصان پہنچانے سے بچنے کے لیے مناسب پاور سپلائی کو یقینی بنائیں۔
- ESP32 اور LED پٹی کے درمیان مشترکہ گراؤنڈ استعمال کریں۔
- سگنل کی کمی کو روکنے کے لیے ڈیٹا لائنوں کو چھوٹا رکھیں۔
- استحکام کے لیے پاور سپلائی کے پار ایک کپیسیٹر (1000 µF) شامل کرنے پر غور کریں۔
- سگنل کی سالمیت کے لیے ڈیٹا لائن پر ایک ریزسٹر (470 Ω) استعمال کریں۔
وائرنگ ہدایات
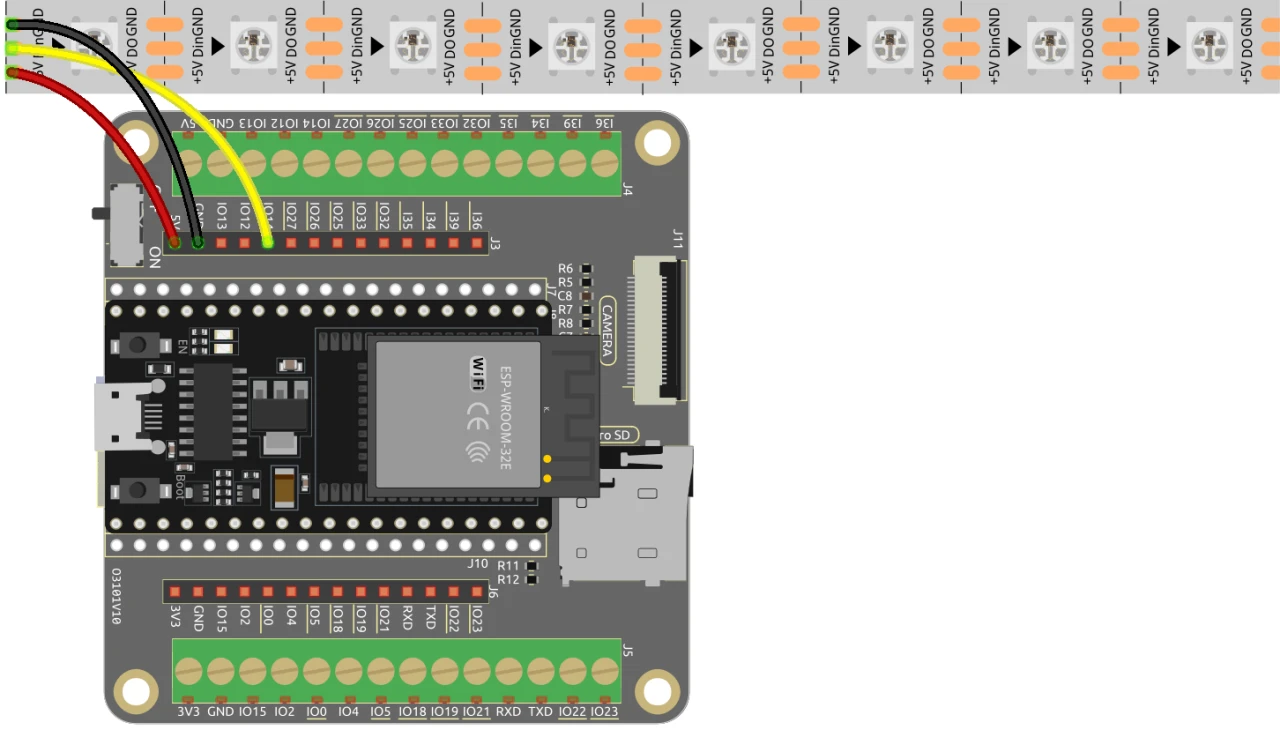
ESP32 کو WS2812 LED پٹی سے وائر کرنے کے لیے، اجزاء کو اس طرح جوڑیں: پہلے، LED پٹی کے 5V پن کو ESP32 کے 5V آؤٹ پٹ سے جوڑیں۔ اگلا، LED پٹی کے گراؤنڈ (GND) پن کو ESP32 پر ایک GND پن سے جوڑیں۔ آخر میں، LED پٹی کے ڈیٹا پن (عام طور پر DI یا ڈیٹا ان کے طور پر لیبل کیا جاتا ہے) کو ESP32 پر GPIO پن 13 سے جوڑیں۔ مناسب فعالیت کو یقینی بنانے کے لیے تمام کنکشنز کو محفوظ بنائیں۔
ویڈیو میں، متبادل وائرنگ طریقوں کا مختصراً ذکر کیا گیا ہے، لیکن یہاں بیان کردہ سیٹ اپ بہترین کارکردگی کے لیے تجویز کردہ کنفیگریشن ہے (ویڈیو میں 03:00 پر)۔
کوڈ مثالیں اور واک تھرو
کوڈ WS2812 LED پٹی کو کنٹرول کرنے اور ویب سرور سیٹ اپ کرنے کے لیے ضروری لائبریریوں کو شامل کرکے شروع ہوتا ہے۔ LED پن کو LED_PIN کے طور پر بیان کیا گیا ہے اور پٹی میں LEDs کی تعداد NUM_LEDS کے ساتھ سیٹ کی گئی ہے۔
#define LED_PIN 13 // NeoPixel LED پٹی
#define NUM_LEDS 8 // LEDs کی تعداد
Adafruit_NeoPixel strip = Adafruit_NeoPixel(NUM_LEDS, LED_PIN, NEO_GRB + NEO_KHZ800);
یہ سنیپٹ NeoPixel لائبریری کو انیشیالائز کرتا ہے اور مخصوص پن پر LED پٹی سیٹ کرتا ہے۔ Adafruit_NeoPixel آبجیکٹ، strip، وہ ہے جو آپ LED رنگوں کو کنٹرول کرنے کے لیے استعمال کریں گے۔
اگلا، کوڈ Wi-Fi کو انیشیالائز کرتا ہے اور آنے والی درخواستوں کو ہینڈل کرنے کے لیے ایک ویب سرور سیٹ اپ کرتا ہے۔ نیٹ ورک کے لیے SSID اور پاس ورڈ بیان کیے گئے ہیں، جس سے ESP32 Wi-Fi سے منسلک ہوسکتا ہے۔
const char *ssid = "your_SSID";
const char *password = "your_PASSWORD";
WebServer server(80);
اس اقتباس میں، your_SSID اور your_PASSWORD کو اپنی اصل Wi-Fi اسناد سے تبدیل کریں۔ یہ کنکشن ESP32 کو اسی نیٹ ورک پر موجود ڈیوائسز کے ساتھ بات چیت کرنے کے قابل بناتا ہے، جس سے LED پٹی کا ریموٹ کنٹرول ممکن ہوتا ہے۔
LED رنگ تبدیل کرنے کا مرکزی فنکشن setColor() ہے، جو ہر LED کے ذریعے iterate کرتا ہے اور منتخب کردہ RGB اقدار کی بنیاد پر اس کا رنگ سیٹ کرتا ہے۔
void setColor() {
  for (int i = 0; i < NUM_LEDS; i++) {
    strip.setPixelColor(i, valueR, valueG, valueB); // i-th LED کا رنگ سیٹ کریں
    strip.show(); // نئے رنگوں کے ساتھ LED پٹی کو اپڈیٹ کریں
    delay(10); // 10 ملی سیکنڈ انتظار کریں
  }
}
یہ فنکشن اس بات کو یقینی بناتا ہے کہ پٹی میں ہر LED منتخب کردہ رنگ کے ساتھ اپڈیٹ ہو۔ تاخیر LEDs کو آسانی سے رنگ تبدیل کرنے کی اجازت دیتی ہے۔ جیسے ہی آپ ویب انٹرفیس کے ساتھ تعامل کرتے ہیں، یہ فنکشن آپ کے رنگ کے انتخاب کو ظاہر کرنے کے لیے کال کیا جائے گا۔
ڈیمونسٹریشن / کیا توقع کریں
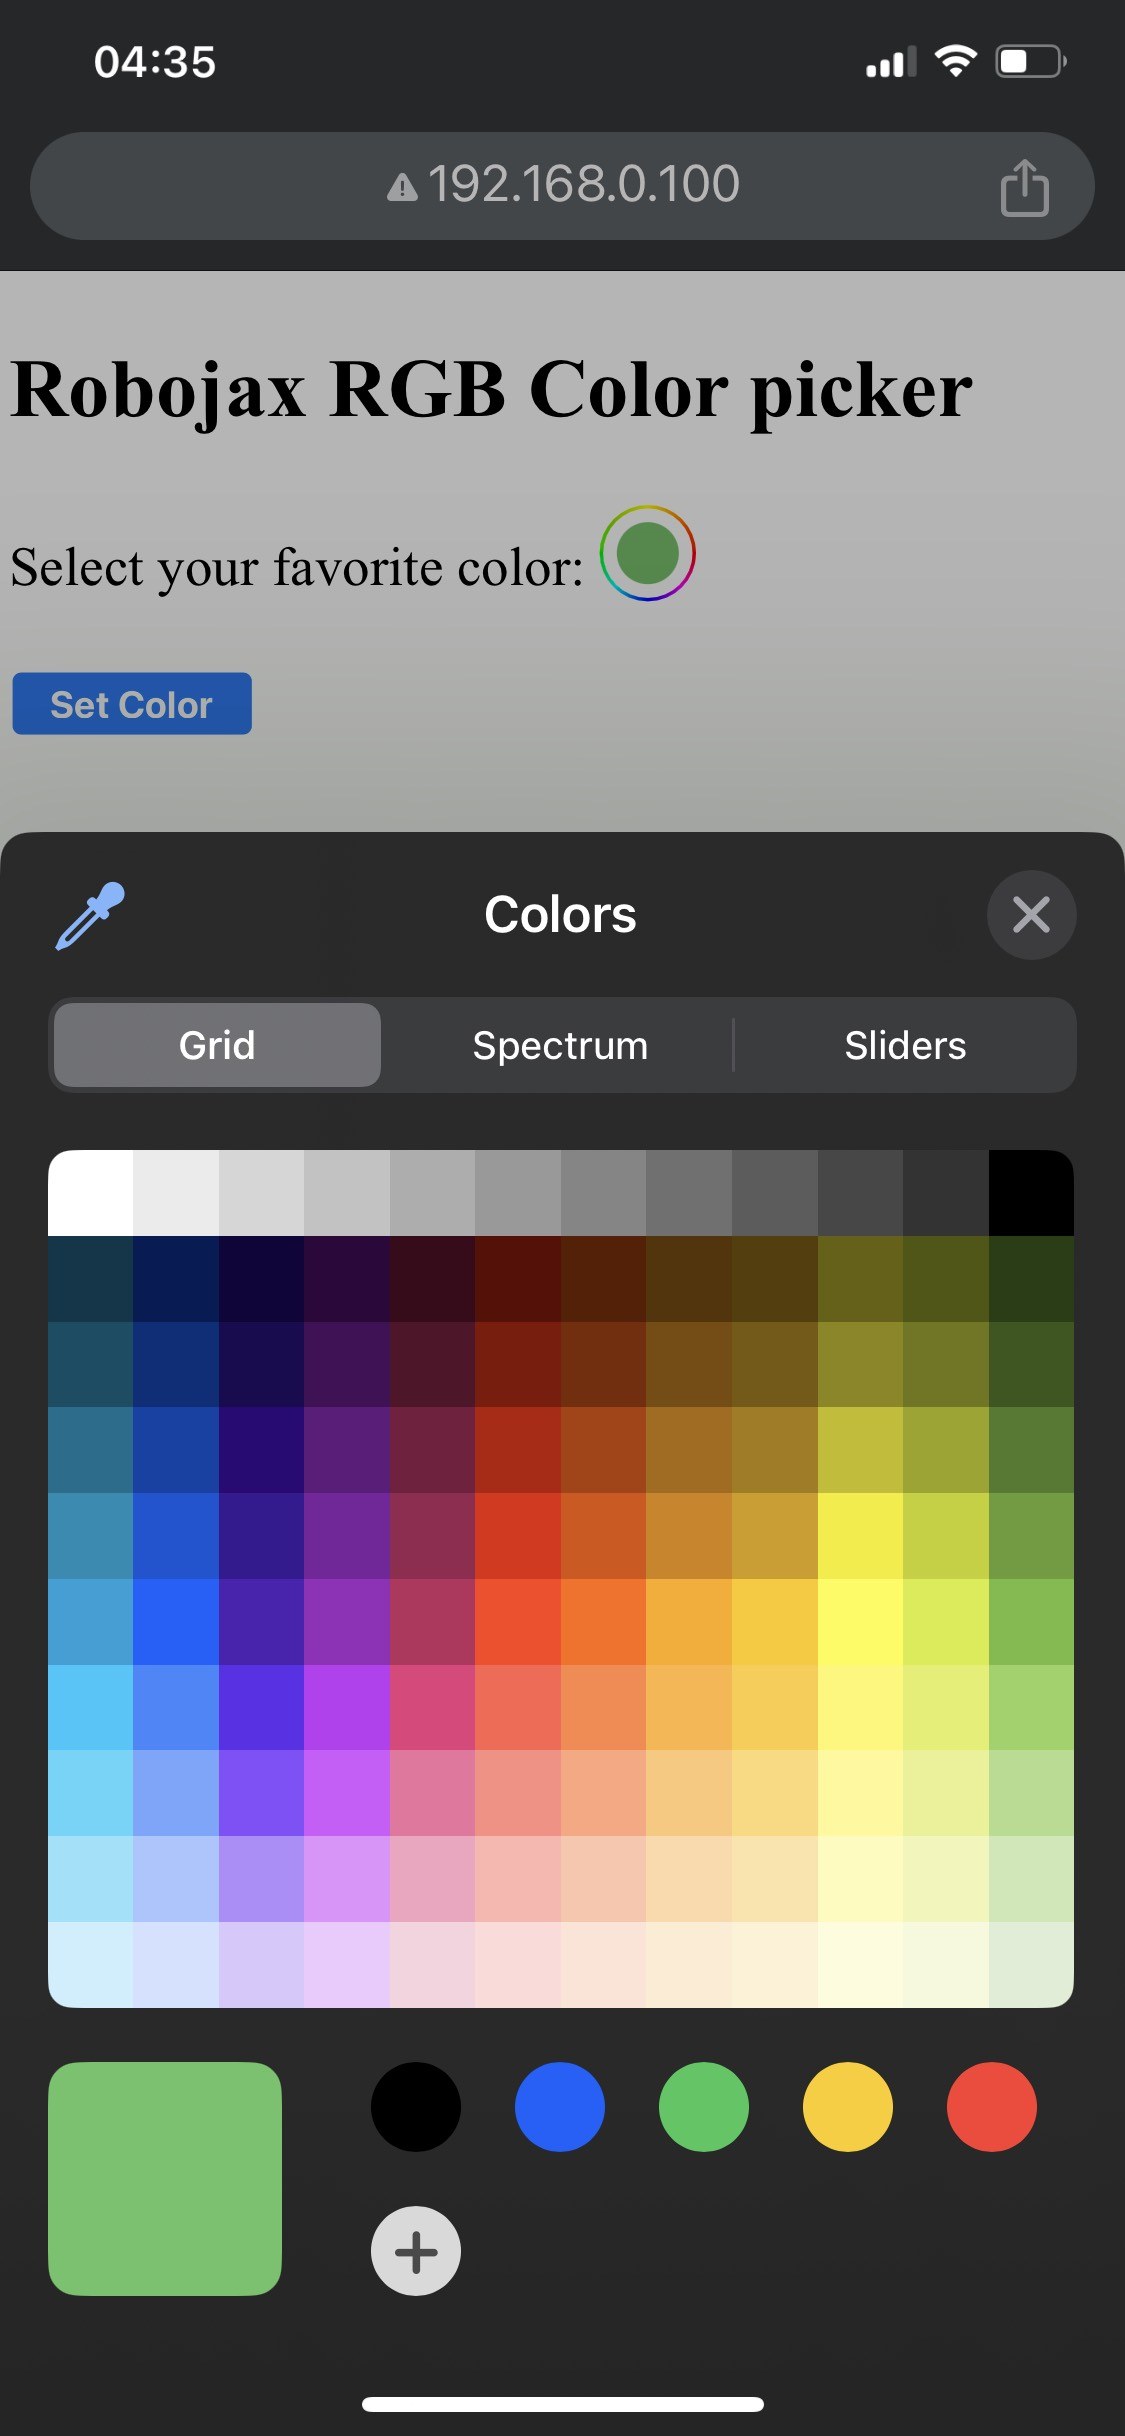

جب سیٹ اپ مکمل ہو جائے تو آپ کو ESP32 کے IP ایڈریس کے ذریعے ویب انٹرفیس تک رسائی حاصل کرنے کے قابل ہونا چاہیے۔ آپ کو ایک کلر پکر نظر آئے گا جو آپ کو کوئی بھی رنگ منتخب کرنے کی اجازت دیتا ہے، جو پھر LED سٹرپ کو بھیجا جائے گا۔ اگر ESP32 وائی فائی کنکشن کھو دیتا ہے تو سٹرپ ایک انتباہی رنگ جھپکائے گی، جو مسئلے کی نشاندہی کرے گا (ویڈیو میں 14:30 پر)۔
عام مسائل میں غلط وائرنگ شامل ہے، جس کی وجہ سے LEDs روشن نہیں ہو سکتیں، یا غلط SSID/پاس ورڈ کے امتزاج کا استعمال جو ESP32 کو نیٹ ورک سے منسلک ہونے سے روکتا ہے۔ ہمیشہ اپنے کنکشنز اور اسناد کی دو بار جانچ کریں۔
ویڈیو ٹائم اسٹیمپس
- 00:00 آغاز
- 2:01 پروجیکٹ کا تعارف
- 3:09 دستاویزات
- 3:47 RGB رنگ کی وضاحت
- 7:47 وائرنگ
- 8:40 WS2812 کے لیے Arduino کوڈ وائی فائی کے ساتھ بیان کیا گیا
- 19:35 Arduino IDE میں ESP32 بورڈ اور COM پورٹ کا انتخاب
- 21:17 وائی فائی ڈیمو پر LED سٹرپ کو کنٹرول کرنا
تصاویر
/*
 * Control RGB LED over wifi using ESP32
 *
 full video instrucions https://youtu.be/J_UFHk_T9aE
📚⬇️ Download and resource page https://robojax.com/RJT687
 * Written by Ahmad Shamshiri on Dec 18, 2023
 *
 * Watch video instruciton for this video:
 *
 * I have combined DHT library of Adafruit with ESP8266 WebServer both links
 * Adafruit DHT library on GitHub: https://github.com/adafruit/DHT-sensor-library
 * and
 * ESP8266 on GitHub : https://github.com/esp8266/Arduino
 *
   Copyright (c) 2015, Majenko Technologies
   All rights reserved.

   Redistribution and use in source and binary forms, with or without modification,
   are permitted provided that the following conditions are met:

 * * Redistributions of source code must retain the above copyright notice, this
     list of conditions and the following disclaimer.

 * * Redistributions in binary form must reproduce the above copyright notice, this
     list of conditions and the following disclaimer in the documentation and/or
     other materials provided with the distribution.

 * * Neither the name of Majenko Technologies nor the names of its
     contributors may be used to endorse or promote products derived from
     this software without specific prior written permission.

   THIS SOFTWARE IS PROVIDED BY THE COPYRIGHT HOLDERS AND CONTRIBUTORS "AS IS" AND
   ANY EXPRESS OR IMPLIED WARRANTIES, INCLUDING, BUT NOT LIMITED TO, THE IMPLIED
   WARRANTIES OF MERCHANTABILITY AND FITNESS FOR A PARTICULAR PURPOSE ARE
   DISCLAIMED. IN NO EVENT SHALL THE COPYRIGHT HOLDER OR CONTRIBUTORS BE LIABLE FOR
   ANY DIRECT, INDIRECT, INCIDENTAL, SPECIAL, EXEMPLARY, OR CONSEQUENTIAL DAMAGES
   (INCLUDING, BUT NOT LIMITED TO, PROCUREMENT OF SUBSTITUTE GOODS OR SERVICES;
   LOSS OF USE, DATA, OR PROFITS; OR BUSINESS INTERRUPTION) HOWEVER CAUSED AND ON
   ANY THEORY OF LIABILITY, WHETHER IN CONTRACT, STRICT LIABILITY, OR TORT
   (INCLUDING NEGLIGENCE OR OTHERWISE) ARISING IN ANY WAY OUT OF THE USE OF THIS
   SOFTWARE, EVEN IF ADVISED OF THE POSSIBILITY OF SUCH DAMAGE.
*/

#include <Adafruit_NeoPixel.h> // Include the Adafruit NeoPixel library

#define LED_PIN 13 // NeoPixel LED strip
#define NUM_LEDS 8 // Number of LEDs
// Create an instance of the Adafruit_NeoPixel class
Adafruit_NeoPixel strip = Adafruit_NeoPixel(NUM_LEDS, LED_PIN, NEO_GRB + NEO_KHZ800);


//initial color of LED strip
int valueR = 178;//from 0 to 255 for Red
int valueG = 27;//from 0 to 255 for Green
int valueB = 84;//from 0 to 255 for Blue

bool showSerialData = false;
String theColorR, theColorG, theColorB;
String theColor ="ff0000";

#include <WiFi.h>
#include <WiFiClient.h>
#include <WebServer.h>
#include <ESPmDNS.h>

const char *ssid = "dars";
const char *password = "hhhhhhhhhhh";

WebServer server(80);

void showColorPicker() {
  String page = "<!DOCTYPE html>\n";
  page +="<html>\n";
  page +="<body>\n";
  page +="<div style=\"zoom: 300%;\">\n";
  page +="<h2>Robojax RGB Color picker</h2>\n";
  page +="<p id=\"result\"></p>\n";
  page +="<form action=\"/color\">\n";
  page +="  <label for=\"favcolor\">Select your favorite color:</label>\n";
  page +="  <input type=\"color\" id=\"favcolor\" name=\"favcolor\" value=\"#";
  page += theColor;
  page +="\"><br><br>\n";
  page +="   <input type=\"submit\" value=\"Set Color\" />\n";
  page +="</form> \n</div>\n";
  page +="</body>\n";
  page +="</html>\n";

  server.send(200,  "text/html", page);


}

//from https://stackoverflow.com/questions/44683071/convert-string-as-hex-to-hexadecimal
uint64_t StrToHex(const char* str)
{
  return (uint64_t) strtoull(str, 0, 16);
}

void getColor(){

 // server.send(200, "text/plain", message);

  if(server.argName(0) == "favcolor")
  {
    String newColor = String(server.arg(0));//get the GET ardument 0 and convert it to string
    theColor = newColor.substring(1);//remove the # sybmot from the begining of color like #B2a48d
    theColorR = newColor.substring(1, 3);//extract B2 from  #B2a48d for example
    theColorG = newColor.substring(3, 5);//extract a4 from  #B2a48d for example
    theColorB = newColor.substring(5, 7);//extract 8d from  #B2a48d for example

    valueR = StrToHex(theColorR.c_str());//convert String to HEX for R
    valueG = StrToHex(theColorG.c_str());//convert String to HEX for G
    valueB = StrToHex(theColorB.c_str());//convert String to HEX for B
    if(showSerialData)
    {
      Serial.print("valueR: ");
      Serial.println(valueR);
      Serial.print("valueG: ");
      Serial.println(valueG);
      Serial.print("valueB: ");
      Serial.println(valueB );
    }

  }

  showColorPicker();//make sure the color picker is shown
  //server.send(200, "text/plain", message);

}


void setColor()
{
  for (int i = 0; i < NUM_LEDS; i++) {
    strip.setPixelColor(i, valueR, valueG, valueB); // Set the color of the i-th LED to red
    strip.show(); // Update the LED strip with the new colors
    delay(10); // Wait for 100 milliseconds
  }
}//

void noConnection()
{
   for (int i = 0; i < NUM_LEDS; i++) {
    strip.setPixelColor(i, 255, 45, 0); // Set the color of the i-th LED to red
    strip.show(); // Update the LED strip with the new colors
    delay(50); // Wait for 100 milliseconds
  }

  delay(200);
   for (int i = NUM_LEDS-1; i >=0; i--) {
    strip.setPixelColor(i, 0, 255, 180); // Set the color of the i-th LED to red
    strip.show(); // Update the LED strip with the new colors
    delay(50); // Wait for 100 milliseconds
  }
}

void handleNotFound() {
  String message = "File Not Found\n\n";
  message += "URI: ";
  message += server.uri();
  message += "\nMethod: ";
  message += (server.method() == HTTP_GET) ? "GET" : "POST";
  message += "\nArguments: ";
  message += server.args();
  message += "\n";

  for (uint8_t i = 0; i < server.args(); i++) {
    message += " " + server.argName(i) + ": " + server.arg(i) + "\n";
  }

  server.send(404, "text/plain", message);

}

void setup_wifi() {
  delay(10);
  // We start by connecting to a WiFi network
  WiFi.mode(WIFI_STA);
  WiFi.begin(ssid, password);
  Serial.println("");

  // Wait for connection
  while (WiFi.status() != WL_CONNECTED) {
    noConnection();
    delay(500);
    Serial.print(".");
  }

  Serial.println("");
  Serial.print("Connected to ");
  Serial.println(ssid);
  Serial.print("Open: http://");
  Serial.print(WiFi.localIP());
  Serial.println(" to read temperature");

  if (MDNS.begin("robojaxRGB")) {
    Serial.println("MDNS responder started");
  }

}

void setup(void) {

  Serial.begin(115200);

  strip.begin(); // Initialize the NeoPixel strip
  strip.show(); // Set initial color to black

  setup_wifi();

  server.on("/", showColorPicker);//show the main page with color picker
  //server.on("/color", setColor);//changes teh color on WS2812 RGB LED


  server.on("/color", HTTP_GET, getColor);


  server.on("/inline", []() {
    server.send(200, "text/plain", "this works as well");
  });
  server.onNotFound(handleNotFound);
  server.begin();
  Serial.println("HTTP server started");
}

void loop(void) {
  //Robojax.com
    while (WiFi.status() != WL_CONNECTED) {
      setup_wifi();
    }

  server.handleClient();
  //showColorPicker();
  setColor();
  delay(300);// change this to larger value (1000 or more) if you don't need very often reading
  // Robojax.com code for ESP32 and DHT11 DHT22
}
Common Course Links
Common Course Files
وسائل اور حوالہ جات
ابھی تک کوئی وسائل نہیں۔
فائلیں📁
کوئی فائلیں دستیاب نہیں ہیں۔