ESP32 튜토리얼 54/55 - Wifi를 통해 WS2812 LED 스트립 색상 설정하기 | SunFounder의 ESP32 IoT 학습 키트
이 튜토리얼에서는 ESP32 마이크로컨트롤러를 Wi-Fi를 통해 사용하여 WS2812 RGB LED 스트립의 색상을 제어하는 방법을 배웁니다. 색상 선택기를 활용하면 모바일 기기나 데스크톱에서 다양한 색상을 선택하고 해당 정보를 LED 스트립으로 전송할 수 있습니다. 이 프로젝트는 ESP32의 기능을 보여주며, 웹 인터페이스를 통해 LED 조명과 원활하게 상호작용할 수 있게 해줍니다.

ESP32 마이크로컨트롤러는 Wi-Fi와 Bluetooth를 모두 갖추고 있어 IoT 애플리케이션에 다재다능한 선택지입니다. 이 프로젝트에서는 LED 스트립을 제어하기 위해 Wi-Fi 기능에 초점을 맞출 것입니다. 사용자는 색상을 동적으로 선택할 수 있어 시각적으로 매력적인 경험을 만들 수 있습니다. 이 프로젝트에 대한 추가 설명을 위해 비디오(00:00 부분)를 꼭 확인하세요.
하드웨어 설명
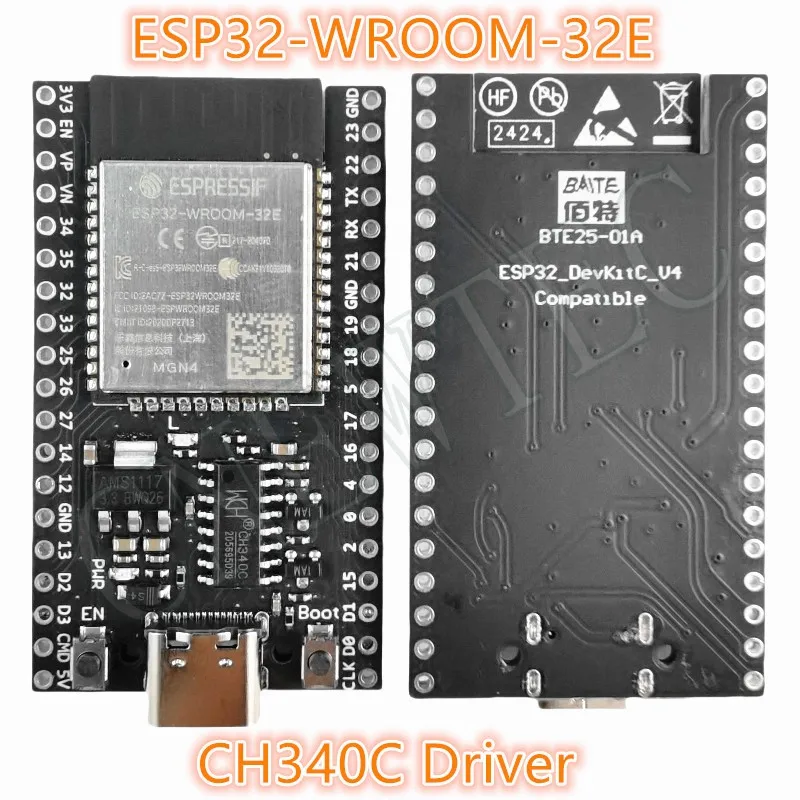
이 프로젝트의 주요 구성 요소는 ESP32 마이크로컨트롤러와 WS2812 LED 스트립입니다. ESP32는 내장 Wi-Fi 기능을 갖춘 강력한 마이크로컨트롤러로, 무선 통신과 제어를 가능하게 합니다.
WS2812 LED 스트립은 개별적으로 주소 지정이 가능한 RGB LED로 구성되어 있어 각 LED의 색상을 독립적으로 설정할 수 있습니다. 각 LED는 단일 패키지에 제어 회로와 RGB LED를 통합하고 있어 여러 LED의 배선과 제어를 단순화합니다.
데이터시트 세부 정보
| 제조업체 | Worldsemi |
|---|---|
| 부품 번호 | WS2812B |
| 로직/IO 전압 | 3.5–5.3 V |
| 공급 전압 | 5 V |
| 출력 전류 (채널당) | 20 mA |
| 피크 전류 (채널당) | 60 mA |
| PWM 주파수 가이드 | 400 Hz |
| 입력 로직 임계값 | 0.3 × VDD (낮음), 0.7 × VDD (높음) |
| 전압 강하 / RDS(on) / 포화 | 0.5 V |
| 열 제한 | –40 ~ +80 °C |
| 패키지 | 5050 SMD |
| 참고 사항 / 변형 | 다양한 길이와 구성으로 제공됩니다. |
- LED 손상을 방지하려면 적절한 전원 공급을 확인하세요.
- ESP32와 LED 스트립 사이에 공통 접지를 사용하세요.
- 신호 저하를 방지하려면 데이터 라인을 짧게 유지하세요.
- 안정성을 위해 전원 공급 장치에 커패시터(1000 µF)를 추가하는 것을 고려하세요.
- 신호 무결성을 위해 데이터 라인에 저항(470 Ω)을 사용하세요.
배선 지침
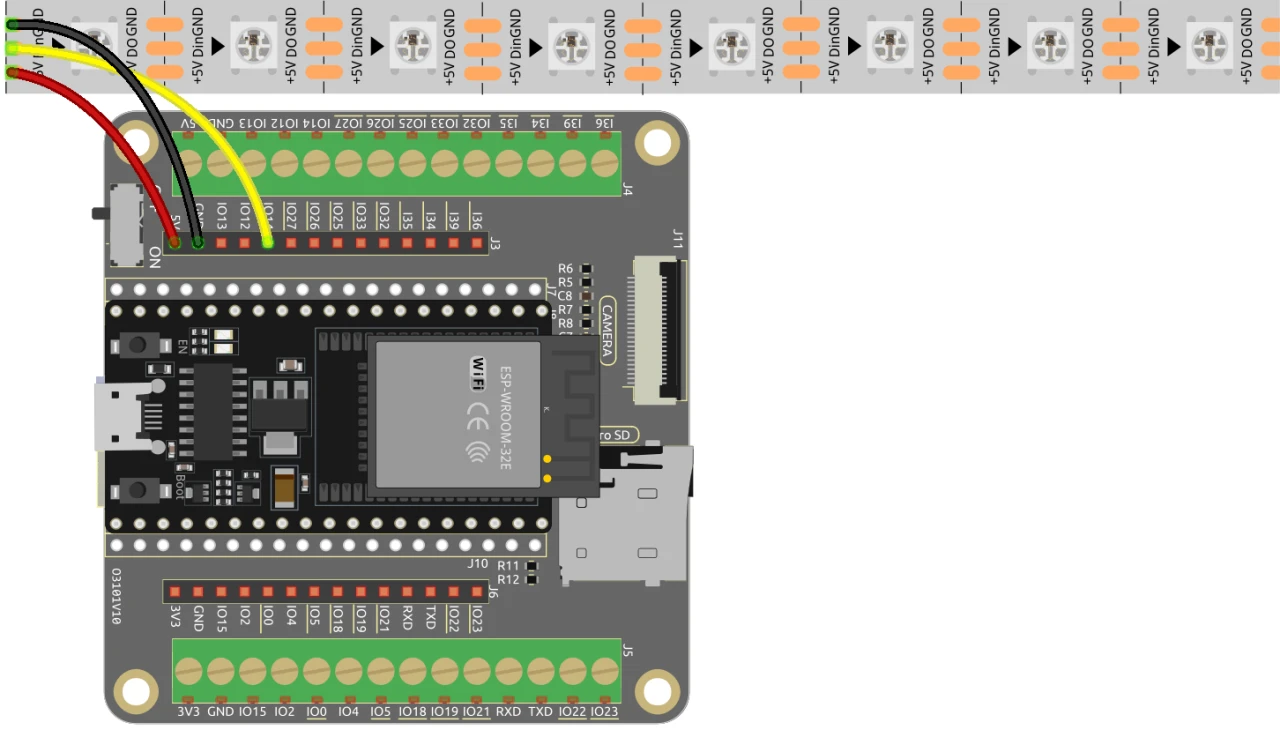
ESP32를 WS2812 LED 스트립에 배선하려면 다음과 같이 구성 요소를 연결하세요: 먼저 LED 스트립의 5V 핀을 ESP32의 5V 출력에 연결합니다. 다음으로 LED 스트립의 접지(GND) 핀을 ESP32의 GND 핀에 연결합니다. 마지막으로 LED 스트립의 데이터 핀(일반적으로 DI 또는 Data In으로 표시됨)을 ESP32의 GPIO 13번 핀에 연결합니다. 모든 연결이 확실한지 확인하여 제대로 작동하도록 하세요.
비디오에서는 대체 배선 방법이 간략히 언급되지만, 여기서 설명하는 설정이 최적의 성능을 위한 권장 구성입니다(03:00 부분).
코드 예제 및 설명
코드는 WS2812 LED 스트립을 제어하고 웹 서버를 설정하는 데 필요한 라이브러리를 포함하는 것으로 시작합니다. LED 핀은 LED_PIN으로 정의되고 스트립의 LED 수는 NUM_LEDS로 설정됩니다.
#define LED_PIN 13 // NeoPixel LED 스트립
#define NUM_LEDS 8 // LED 수
Adafruit_NeoPixel strip = Adafruit_NeoPixel(NUM_LEDS, LED_PIN, NEO_GRB + NEO_KHZ800);
이 스니펫은 NeoPixel 라이브러리를 초기화하고 지정된 핀에 LED 스트립을 설정합니다. Adafruit_NeoPixel 객체인 strip은 LED 색상을 제어하는 데 사용할 것입니다.
다음으로 코드는 Wi-Fi를 초기화하고 들어오는 요청을 처리할 웹 서버를 설정합니다. 네트워크의 SSID와 비밀번호가 정의되어 ESP32가 Wi-Fi에 연결할 수 있게 합니다.
const char *ssid = "your_SSID";
const char *password = "your_PASSWORD";
WebServer server(80);
이 부분에서 your_SSID와 your_PASSWORD를 실제 Wi-Fi 자격 증명으로 교체하세요. 이 연결을 통해 ESP32는 같은 네트워크의 장치와 통신할 수 있어 LED 스트립을 원격으로 제어할 수 있습니다.
LED 색상을 변경하는 주요 함수는 setColor()로, 각 LED를 반복하면서 선택된 RGB 값에 따라 색상을 설정합니다.
void setColor() {
  for (int i = 0; i < NUM_LEDS; i++) {
    strip.setPixelColor(i, valueR, valueG, valueB); // i번째 LED의 색상 설정
    strip.show(); // 새 색상으로 LED 스트립 업데이트
    delay(10); // 10밀리초 대기
  }
}
이 함수는 스트립의 각 LED가 선택된 색상으로 업데이트되도록 보장합니다. 지연 시간은 LED가 부드럽게 색상을 변경할 수 있게 합니다. 웹 인터페이스와 상호작용할 때 이 함수가 호출되어 색상 선택을 반영합니다.
데모 / 기대 효과
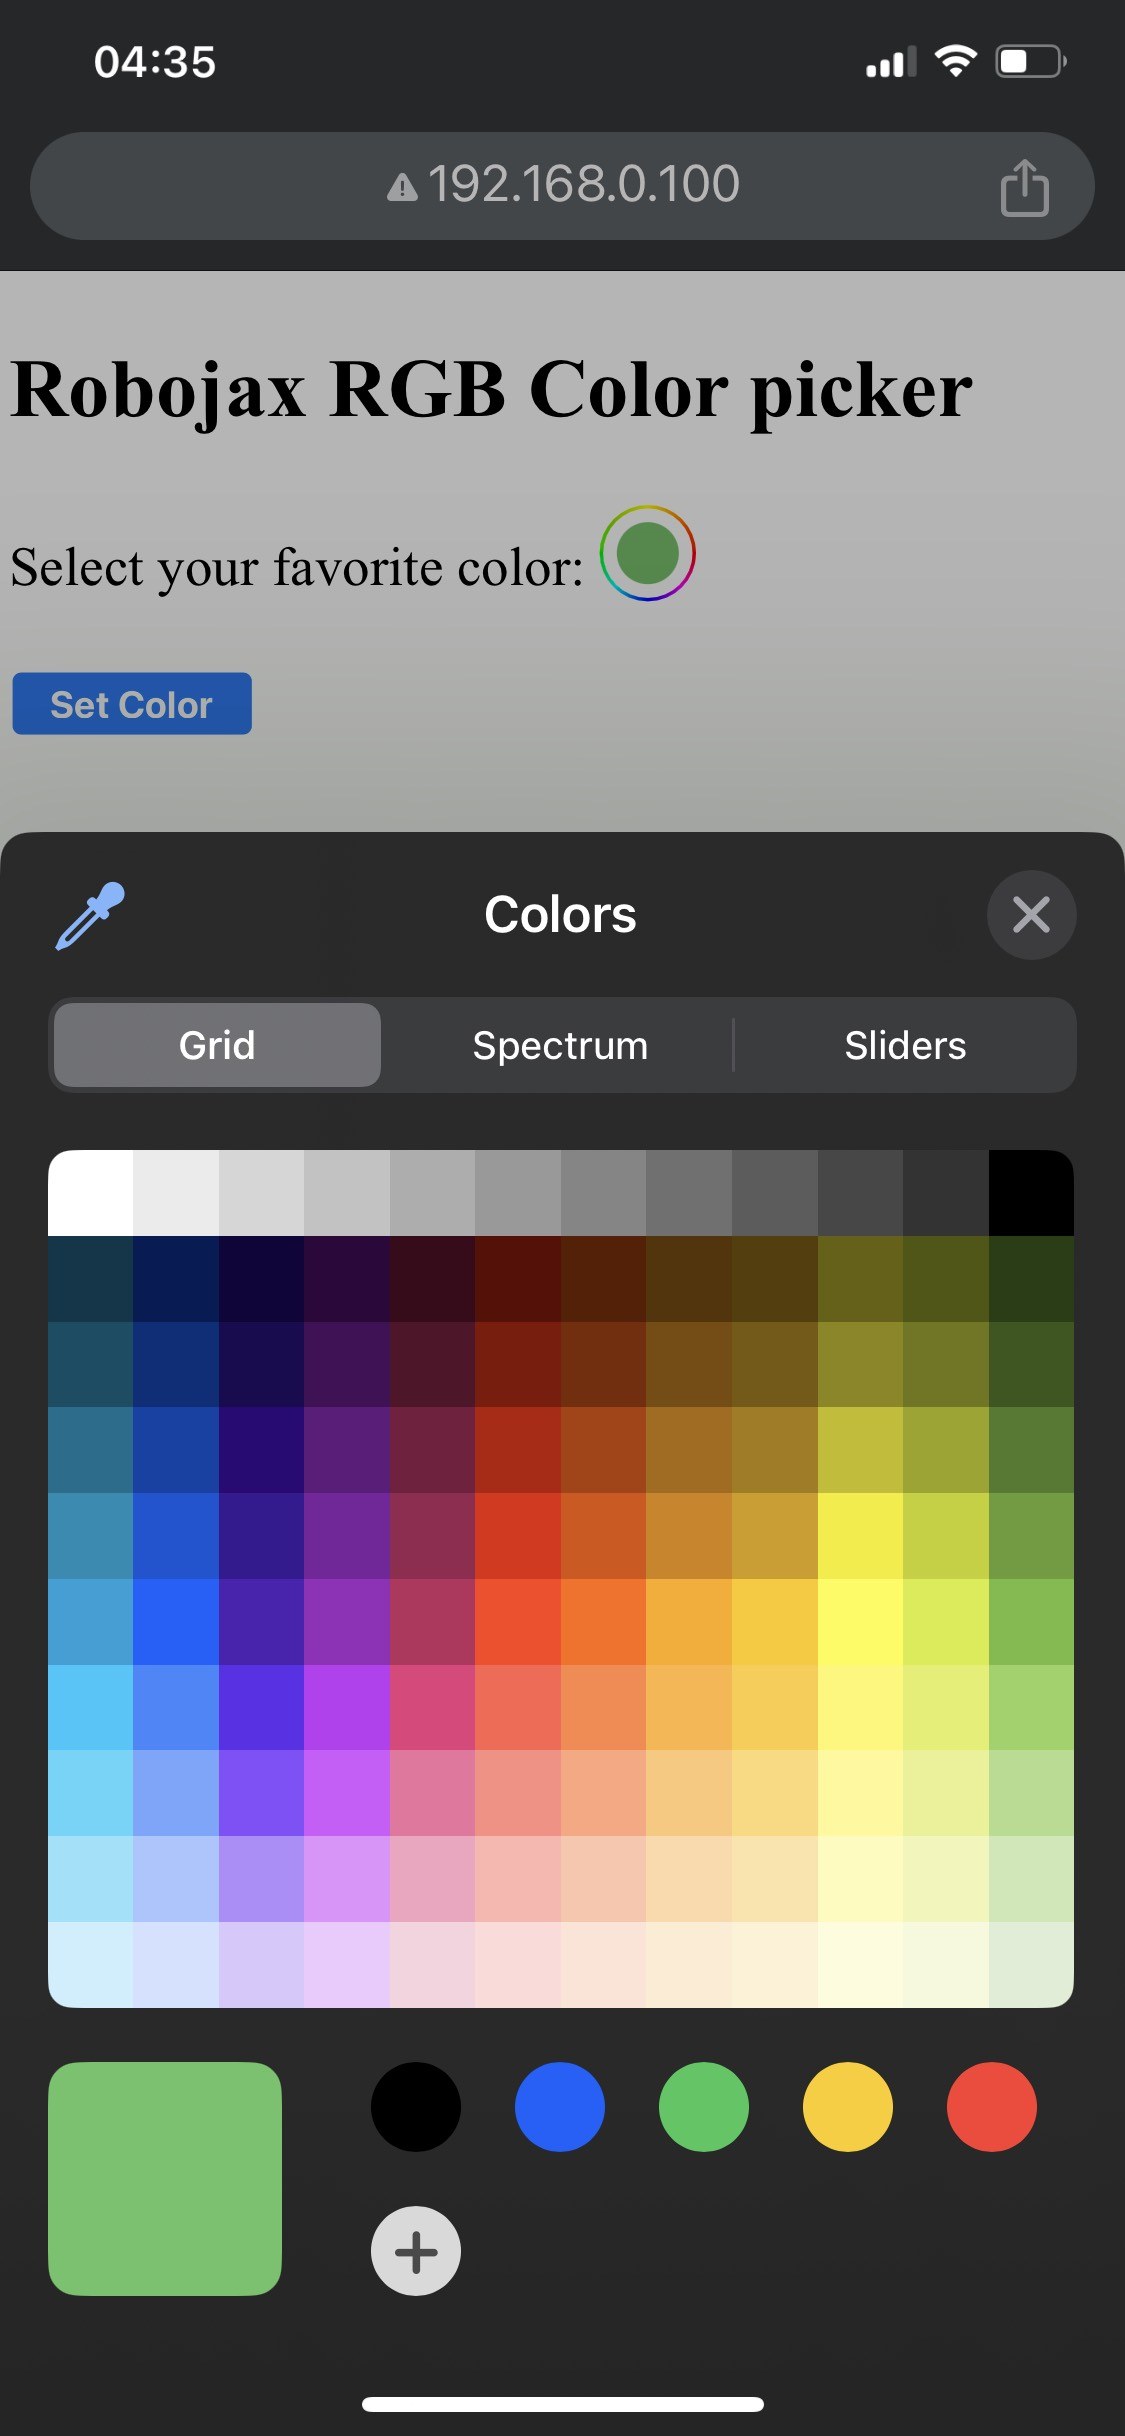

설정이 완료되면 ESP32의 IP 주소를 통해 웹 인터페이스에 접속할 수 있어야 합니다. 원하는 색상을 선택할 수 있는 색상 선택기가 표시되며, 선택한 색상은 LED 스트립으로 전송됩니다. ESP32가 Wi-Fi 연결을 잃으면 스트립이 경고 색상으로 깜빡여 문제를 알립니다(영상 14:30 부분).
흔한 실수로는 잘못된 배선으로 인해 LED가 켜지지 않거나, 잘못된 SSID/비밀번호 조합을 사용하여 ESP32가 네트워크에 연결되지 못하는 경우가 있습니다. 항상 연결과 자격 증명을 다시 확인하세요.
영상 타임스탬프
- 00:00 시작
- 2:01 프로젝트 소개
- 3:09 문서
- 3:47 RGB 색상 설명
- 7:47 배선
- 8:40 WIFI가 포함된 WS2812용 Arduino 코드 설명
- 19:35 Arduino IDE에서 ESP32 보드 및 COM 포트 선택
- 21:17 Wi-Fi를 통한 LED 스트립 제어 데모
이미지
/*
 * Control RGB LED over wifi using ESP32
 *
 full video instrucions https://youtu.be/J_UFHk_T9aE
📚⬇️ Download and resource page https://robojax.com/RJT687
 * Written by Ahmad Shamshiri on Dec 18, 2023
 *
 * Watch video instruciton for this video:
 *
 * I have combined DHT library of Adafruit with ESP8266 WebServer both links
 * Adafruit DHT library on GitHub: https://github.com/adafruit/DHT-sensor-library
 * and
 * ESP8266 on GitHub : https://github.com/esp8266/Arduino
 *
   Copyright (c) 2015, Majenko Technologies
   All rights reserved.

   Redistribution and use in source and binary forms, with or without modification,
   are permitted provided that the following conditions are met:

 * * Redistributions of source code must retain the above copyright notice, this
     list of conditions and the following disclaimer.

 * * Redistributions in binary form must reproduce the above copyright notice, this
     list of conditions and the following disclaimer in the documentation and/or
     other materials provided with the distribution.

 * * Neither the name of Majenko Technologies nor the names of its
     contributors may be used to endorse or promote products derived from
     this software without specific prior written permission.

   THIS SOFTWARE IS PROVIDED BY THE COPYRIGHT HOLDERS AND CONTRIBUTORS "AS IS" AND
   ANY EXPRESS OR IMPLIED WARRANTIES, INCLUDING, BUT NOT LIMITED TO, THE IMPLIED
   WARRANTIES OF MERCHANTABILITY AND FITNESS FOR A PARTICULAR PURPOSE ARE
   DISCLAIMED. IN NO EVENT SHALL THE COPYRIGHT HOLDER OR CONTRIBUTORS BE LIABLE FOR
   ANY DIRECT, INDIRECT, INCIDENTAL, SPECIAL, EXEMPLARY, OR CONSEQUENTIAL DAMAGES
   (INCLUDING, BUT NOT LIMITED TO, PROCUREMENT OF SUBSTITUTE GOODS OR SERVICES;
   LOSS OF USE, DATA, OR PROFITS; OR BUSINESS INTERRUPTION) HOWEVER CAUSED AND ON
   ANY THEORY OF LIABILITY, WHETHER IN CONTRACT, STRICT LIABILITY, OR TORT
   (INCLUDING NEGLIGENCE OR OTHERWISE) ARISING IN ANY WAY OUT OF THE USE OF THIS
   SOFTWARE, EVEN IF ADVISED OF THE POSSIBILITY OF SUCH DAMAGE.
*/

#include <Adafruit_NeoPixel.h> // Include the Adafruit NeoPixel library

#define LED_PIN 13 // NeoPixel LED strip
#define NUM_LEDS 8 // Number of LEDs
// Create an instance of the Adafruit_NeoPixel class
Adafruit_NeoPixel strip = Adafruit_NeoPixel(NUM_LEDS, LED_PIN, NEO_GRB + NEO_KHZ800);


//initial color of LED strip
int valueR = 178;//from 0 to 255 for Red
int valueG = 27;//from 0 to 255 for Green
int valueB = 84;//from 0 to 255 for Blue

bool showSerialData = false;
String theColorR, theColorG, theColorB;
String theColor ="ff0000";

#include <WiFi.h>
#include <WiFiClient.h>
#include <WebServer.h>
#include <ESPmDNS.h>

const char *ssid = "dars";
const char *password = "hhhhhhhhhhh";

WebServer server(80);

void showColorPicker() {
  String page = "<!DOCTYPE html>\n";
  page +="<html>\n";
  page +="<body>\n";
  page +="<div style=\"zoom: 300%;\">\n";
  page +="<h2>Robojax RGB Color picker</h2>\n";
  page +="<p id=\"result\"></p>\n";
  page +="<form action=\"/color\">\n";
  page +="  <label for=\"favcolor\">Select your favorite color:</label>\n";
  page +="  <input type=\"color\" id=\"favcolor\" name=\"favcolor\" value=\"#";
  page += theColor;
  page +="\"><br><br>\n";
  page +="   <input type=\"submit\" value=\"Set Color\" />\n";
  page +="</form> \n</div>\n";
  page +="</body>\n";
  page +="</html>\n";

  server.send(200,  "text/html", page);


}

//from https://stackoverflow.com/questions/44683071/convert-string-as-hex-to-hexadecimal
uint64_t StrToHex(const char* str)
{
  return (uint64_t) strtoull(str, 0, 16);
}

void getColor(){

 // server.send(200, "text/plain", message);

  if(server.argName(0) == "favcolor")
  {
    String newColor = String(server.arg(0));//get the GET ardument 0 and convert it to string
    theColor = newColor.substring(1);//remove the # sybmot from the begining of color like #B2a48d
    theColorR = newColor.substring(1, 3);//extract B2 from  #B2a48d for example
    theColorG = newColor.substring(3, 5);//extract a4 from  #B2a48d for example
    theColorB = newColor.substring(5, 7);//extract 8d from  #B2a48d for example

    valueR = StrToHex(theColorR.c_str());//convert String to HEX for R
    valueG = StrToHex(theColorG.c_str());//convert String to HEX for G
    valueB = StrToHex(theColorB.c_str());//convert String to HEX for B
    if(showSerialData)
    {
      Serial.print("valueR: ");
      Serial.println(valueR);
      Serial.print("valueG: ");
      Serial.println(valueG);
      Serial.print("valueB: ");
      Serial.println(valueB );
    }

  }

  showColorPicker();//make sure the color picker is shown
  //server.send(200, "text/plain", message);

}


void setColor()
{
  for (int i = 0; i < NUM_LEDS; i++) {
    strip.setPixelColor(i, valueR, valueG, valueB); // Set the color of the i-th LED to red
    strip.show(); // Update the LED strip with the new colors
    delay(10); // Wait for 100 milliseconds
  }
}//

void noConnection()
{
   for (int i = 0; i < NUM_LEDS; i++) {
    strip.setPixelColor(i, 255, 45, 0); // Set the color of the i-th LED to red
    strip.show(); // Update the LED strip with the new colors
    delay(50); // Wait for 100 milliseconds
  }

  delay(200);
   for (int i = NUM_LEDS-1; i >=0; i--) {
    strip.setPixelColor(i, 0, 255, 180); // Set the color of the i-th LED to red
    strip.show(); // Update the LED strip with the new colors
    delay(50); // Wait for 100 milliseconds
  }
}

void handleNotFound() {
  String message = "File Not Found\n\n";
  message += "URI: ";
  message += server.uri();
  message += "\nMethod: ";
  message += (server.method() == HTTP_GET) ? "GET" : "POST";
  message += "\nArguments: ";
  message += server.args();
  message += "\n";

  for (uint8_t i = 0; i < server.args(); i++) {
    message += " " + server.argName(i) + ": " + server.arg(i) + "\n";
  }

  server.send(404, "text/plain", message);

}

void setup_wifi() {
  delay(10);
  // We start by connecting to a WiFi network
  WiFi.mode(WIFI_STA);
  WiFi.begin(ssid, password);
  Serial.println("");

  // Wait for connection
  while (WiFi.status() != WL_CONNECTED) {
    noConnection();
    delay(500);
    Serial.print(".");
  }

  Serial.println("");
  Serial.print("Connected to ");
  Serial.println(ssid);
  Serial.print("Open: http://");
  Serial.print(WiFi.localIP());
  Serial.println(" to read temperature");

  if (MDNS.begin("robojaxRGB")) {
    Serial.println("MDNS responder started");
  }

}

void setup(void) {

  Serial.begin(115200);

  strip.begin(); // Initialize the NeoPixel strip
  strip.show(); // Set initial color to black

  setup_wifi();

  server.on("/", showColorPicker);//show the main page with color picker
  //server.on("/color", setColor);//changes teh color on WS2812 RGB LED


  server.on("/color", HTTP_GET, getColor);


  server.on("/inline", []() {
    server.send(200, "text/plain", "this works as well");
  });
  server.onNotFound(handleNotFound);
  server.begin();
  Serial.println("HTTP server started");
}

void loop(void) {
  //Robojax.com
    while (WiFi.status() != WL_CONNECTED) {
      setup_wifi();
    }

  server.handleClient();
  //showColorPicker();
  setColor();
  delay(300);// change this to larger value (1000 or more) if you don't need very often reading
  // Robojax.com code for ESP32 and DHT11 DHT22
}
Common Course Links
Common Course Files
자원 및 참고자료
아직 자원이 없습니다.
파일📁
파일이 없습니다.