ESP32 Tutorijal 54/55 - Postavi boju WS2812 LED trake preko Wifi-ja | SunFounder-ov ESP32 IoT komplet za učenje
U ovom tutorijalu naučit ćemo kako kontrolisati boju WS2812 RGB LED trake koristeći ESP32 mikrokontroler putem Wi-Fi-ja. Korištenjem birača boja, možete odabrati različite boje sa svog mobilnog uređaja ili računara i poslati te informacije LED traci. Ovaj projekat prikazuje mogućnosti ESP32-a, omogućavajući besprijekornu interakciju s LED rasvjetom putem web interfejsa.

ESP32 mikrokontroler opremljen je i Wi-Fi-jem i Bluetoothom, što ga čini svestranim izborom za IoT aplikacije. U ovom projektu fokusirat ćemo se na Wi-Fi funkcionalnost za kontrolu LED trake. Korisnici će moći dinamički birati boje, stvarajući vizualno privlačno iskustvo. Za dodatnu jasnoću ovog projekta, svakako pogledajte video na (u videu na 00:00).
Objašnjenje hardvera
Primarne komponente za ovaj projekat uključuju ESP32 mikrokontroler i WS2812 LED traku. ESP32 je moćan mikrokontroler s ugrađenim Wi-Fi mogućnostima, omogućavajući bežičnu komunikaciju i kontrolu.
WS2812 LED traka sastoji se od pojedinačno adresabilnih RGB LED dioda, što vam omogućava da postavite boju svake LED diode nezavisno. Svaka LED dioda sadrži upravljački krug i RGB LED u jednom paketu, što pojednostavljuje ožičenje i kontrolu više LED dioda.
Detalji iz tehničke dokumentacije
| Proizvođač | Worldsemi |
|---|---|
| Broj dijela | WS2812B |
| Logički/IO napon | 3.5–5.3 V |
| Napon napajanja | 5 V |
| Izlazna struja (po kanalu) | 20 mA |
| Maksimalna struja (po kanalu) | 60 mA |
| Smjernice za PWM frekvenciju | 400 Hz |
| Ulazni logički pragovi | 0.3 × VDD (niska), 0.7 × VDD (visoka) |
| Pad napona / RDS(on) / zasićenje | 0.5 V |
| Termička ograničenja | –40 do +80 °C |
| Paket | 5050 SMD |
| Napomene / varijante | Dostupno u različitim dužinama i konfiguracijama. |
- Osigurajte odgovarajuće napajanje kako biste izbjegli oštećenje LED dioda.
- Koristite zajedničko uzemljenje između ESP32-a i LED trake.
- Držite podatkovne linije kratkim kako biste spriječili degradaciju signala.
- Razmotrite dodavanje kondenzatora (1000 µF) preko napajanja radi stabilnosti.
- Koristite otpornik (470 Ω) na podatkovnoj liniji radi integriteta signala.
Upute za ožičenje
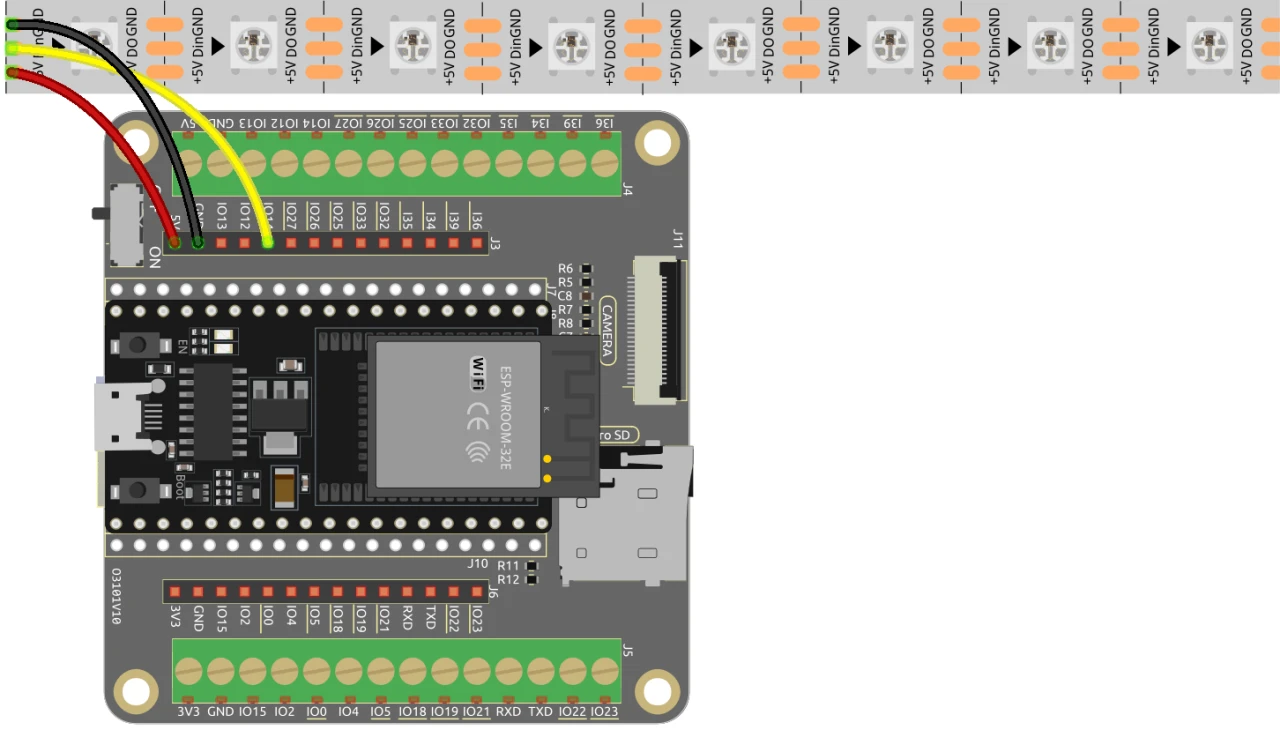
Za povezivanje ESP32-a s WS2812 LED trakom, spojite komponente na sljedeći način: Prvo, spojite 5V pin LED trake na 5V izlaz ESP32-a. Zatim, spojite pin uzemljenja (GND) LED trake na GND pin na ESP32-u. Na kraju, spojite podatkovni pin LED trake (obično označen kao DI ili Data In) na GPIO pin 13 na ESP32-u. Provjerite da su svi spojevi sigurni kako biste osigurali pravilnu funkcionalnost.
U videu se ukratko spominju alternativne metode ožičenja, ali postavka opisana ovdje je preporučena konfiguracija za optimalne performanse (u videu na 03:00).
Primjeri koda i objašnjenje
Kod počinje uključivanjem potrebnih biblioteka za kontrolu WS2812 LED trake i postavljanje web servera. LED pin je definiran kao LED_PIN, a broj LED dioda u traci postavljen je s NUM_LEDS.
#define LED_PIN 13 // NeoPixel LED traka
#define NUM_LEDS 8 // Broj LED dioda
Adafruit_NeoPixel strip = Adafruit_NeoPixel(NUM_LEDS, LED_PIN, NEO_GRB + NEO_KHZ800);
Ovaj isječak inicijalizira NeoPixel biblioteku i postavlja LED traku na navedeni pin. Adafruit_NeoPixel objekat, strip, je ono što ćete koristiti za kontrolu boja LED dioda.
Zatim, kod inicijalizira Wi-Fi i postavlja web server za obradu dolaznih zahtjeva. SSID i lozinka za mrežu su definirani, omogućavajući ESP32-u da se poveže na Wi-Fi.
const char *ssid = "your_SSID";
const char *password = "your_PASSWORD";
WebServer server(80);
U ovom izvatku, zamijenite your_SSID i your_PASSWORD s vašim stvarnim Wi-Fi akreditivima. Ova veza omogućava ESP32-u komunikaciju s uređajima na istoj mreži, omogućavajući daljinsku kontrolu LED trake.
Glavna funkcija za promjenu boje LED dioda je setColor(), koja prolazi kroz svaku LED diodu i postavlja njenu boju na osnovu odabranih RGB vrijednosti.
void setColor() {
  for (int i = 0; i < NUM_LEDS; i++) {
    strip.setPixelColor(i, valueR, valueG, valueB); // Postavi boju i-te LED diode
    strip.show(); // Ažuriraj LED traku s novim bojama
    delay(10); // Čekaj 10 milisekundi
  }
}
Ova funkcija osigurava da svaka LED dioda u traci bude ažurirana s odabranom bojom. Kašnjenje omogućava LED diodama da glatko mijenjaju boju. Dok komunicirate s web interfejsom, ova funkcija će biti pozvana kako bi odražavala vaše izbore boja.
Demonstracija / Šta očekivati
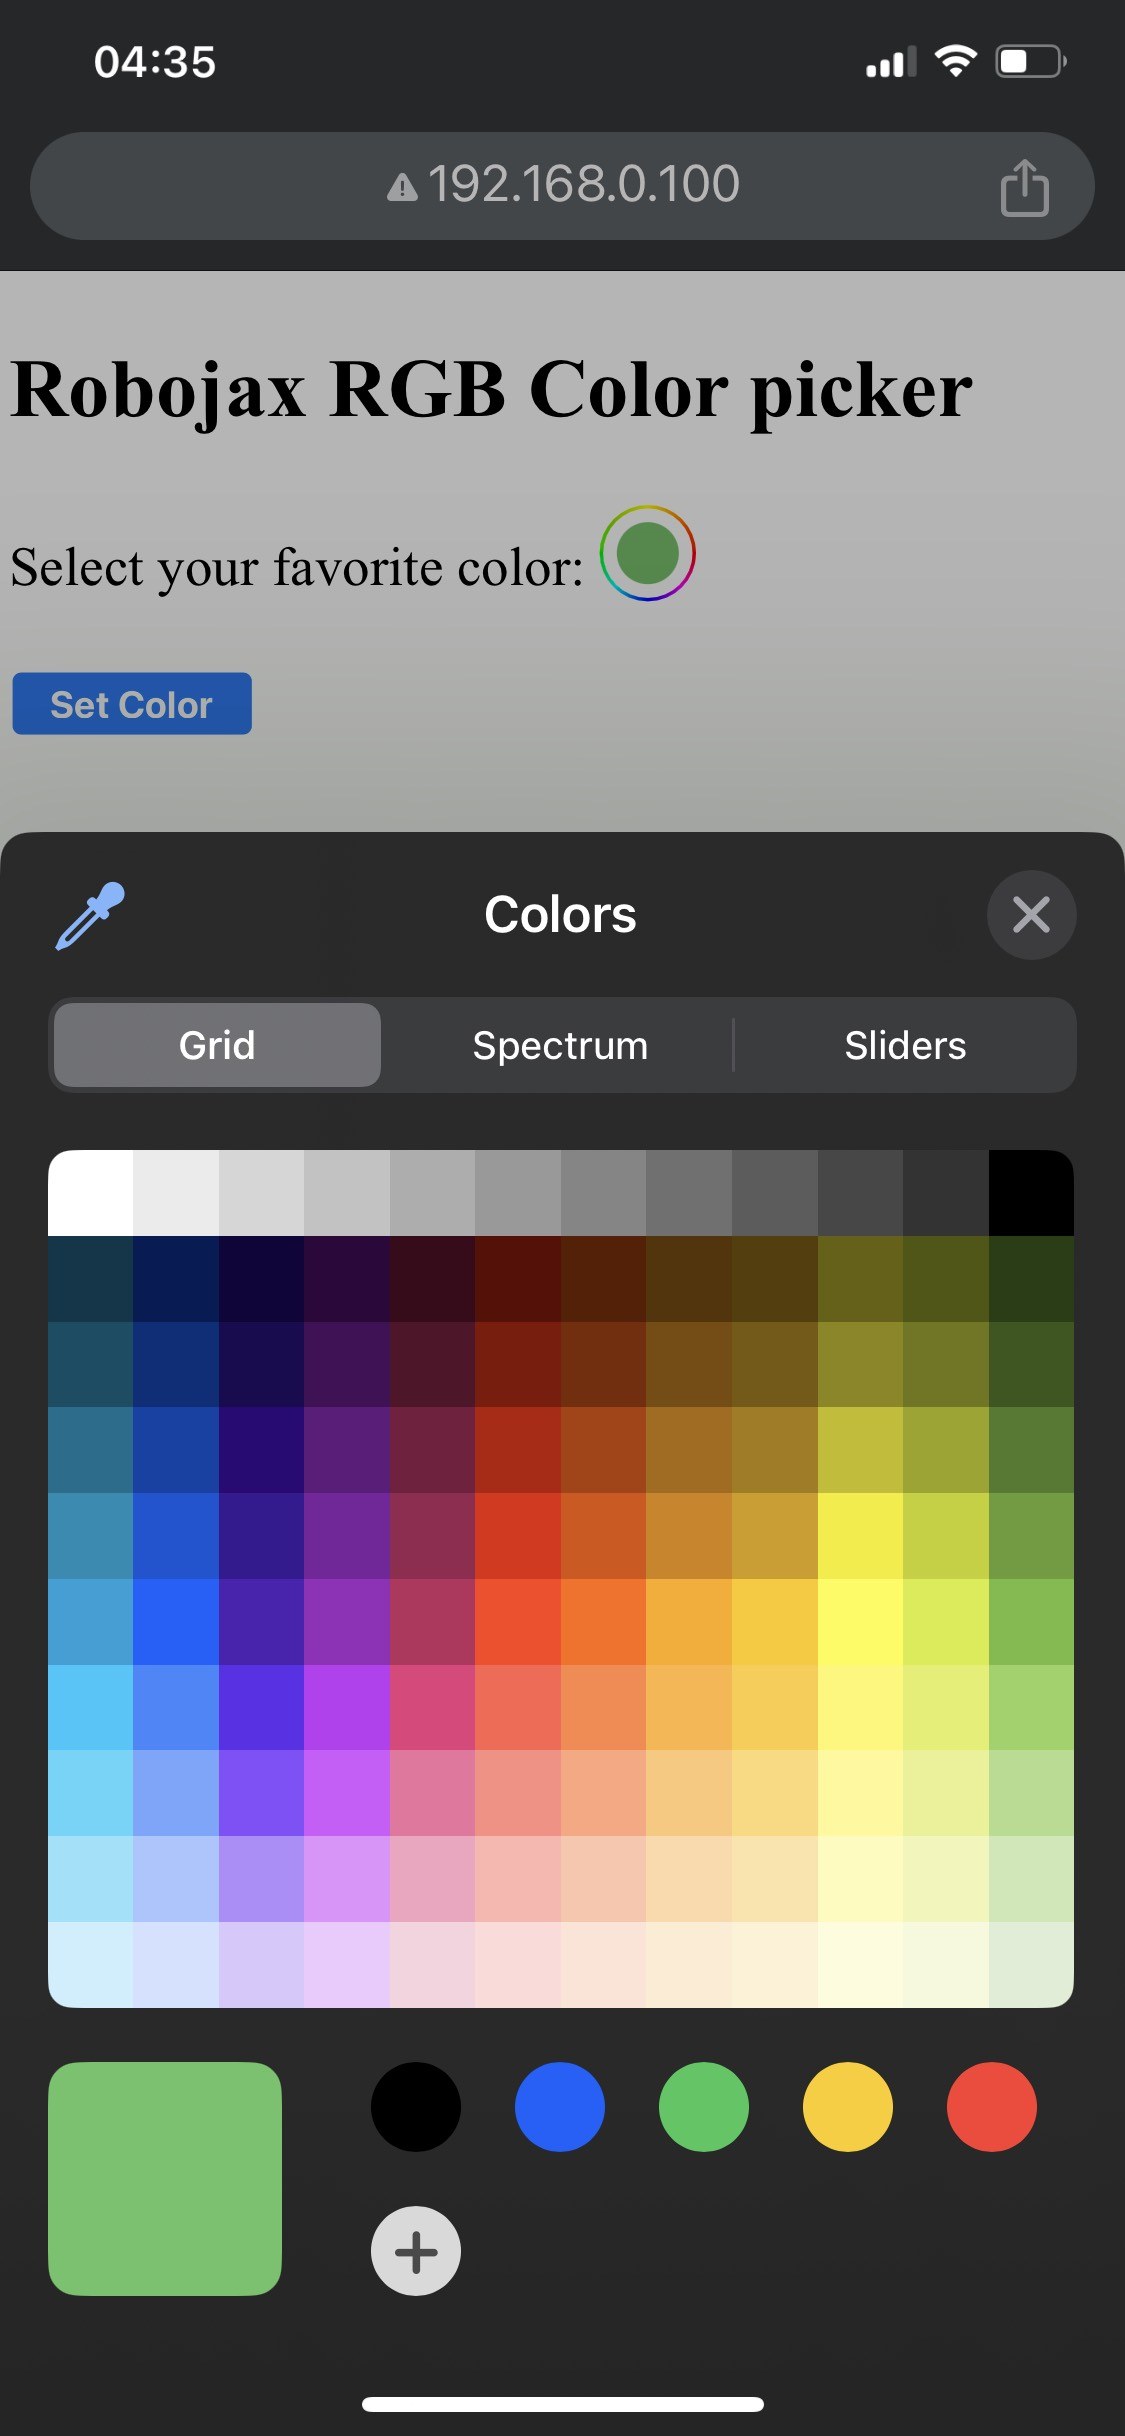

Kada je postavljanje završeno, trebali biste moći pristupiti web sučelju putem IP adrese ESP32. Vidjet ćete birač boja koji vam omogućava da odaberete bilo koju boju, koja će zatim biti poslana na LED traku. Ako ESP32 izgubi Wi-Fi vezu, traka će treptati upozoravajućom bojom, ukazujući na problem (u videu na 14:30).
Uobičajene zamke uključuju pogrešno ožičenje, koje može dovesti do toga da LED diode ne zasvijetle, ili korištenje pogrešnih SSID/lozinka kombinacija koje sprječavaju ESP32 da se poveže na mrežu. Uvijek dvaput provjerite svoje veze i akreditive.
Vremenske oznake videa
- 00:00 Početak
- 2:01 Uvod u projekat
- 3:09 Dokumentacija
- 3:47 RGB boja objašnjena
- 7:47 Ožičenje
- 8:40 Arduino kod za WS2812 sa WIFI objašnjen
- 19:35 Odabir ESP32 ploče i COM porta u Arduino IDE
- 21:17 Demo upravljanja LED trakom preko wifi-ja
Images
/*
 * Control RGB LED over wifi using ESP32
 *
 full video instrucions https://youtu.be/J_UFHk_T9aE
📚⬇️ Download and resource page https://robojax.com/RJT687
 * Written by Ahmad Shamshiri on Dec 18, 2023
 *
 * Watch video instruciton for this video:
 *
 * I have combined DHT library of Adafruit with ESP8266 WebServer both links
 * Adafruit DHT library on GitHub: https://github.com/adafruit/DHT-sensor-library
 * and
 * ESP8266 on GitHub : https://github.com/esp8266/Arduino
 *
   Copyright (c) 2015, Majenko Technologies
   All rights reserved.

   Redistribution and use in source and binary forms, with or without modification,
   are permitted provided that the following conditions are met:

 * * Redistributions of source code must retain the above copyright notice, this
     list of conditions and the following disclaimer.

 * * Redistributions in binary form must reproduce the above copyright notice, this
     list of conditions and the following disclaimer in the documentation and/or
     other materials provided with the distribution.

 * * Neither the name of Majenko Technologies nor the names of its
     contributors may be used to endorse or promote products derived from
     this software without specific prior written permission.

   THIS SOFTWARE IS PROVIDED BY THE COPYRIGHT HOLDERS AND CONTRIBUTORS "AS IS" AND
   ANY EXPRESS OR IMPLIED WARRANTIES, INCLUDING, BUT NOT LIMITED TO, THE IMPLIED
   WARRANTIES OF MERCHANTABILITY AND FITNESS FOR A PARTICULAR PURPOSE ARE
   DISCLAIMED. IN NO EVENT SHALL THE COPYRIGHT HOLDER OR CONTRIBUTORS BE LIABLE FOR
   ANY DIRECT, INDIRECT, INCIDENTAL, SPECIAL, EXEMPLARY, OR CONSEQUENTIAL DAMAGES
   (INCLUDING, BUT NOT LIMITED TO, PROCUREMENT OF SUBSTITUTE GOODS OR SERVICES;
   LOSS OF USE, DATA, OR PROFITS; OR BUSINESS INTERRUPTION) HOWEVER CAUSED AND ON
   ANY THEORY OF LIABILITY, WHETHER IN CONTRACT, STRICT LIABILITY, OR TORT
   (INCLUDING NEGLIGENCE OR OTHERWISE) ARISING IN ANY WAY OUT OF THE USE OF THIS
   SOFTWARE, EVEN IF ADVISED OF THE POSSIBILITY OF SUCH DAMAGE.
*/

#include <Adafruit_NeoPixel.h> // Include the Adafruit NeoPixel library

#define LED_PIN 13 // NeoPixel LED strip
#define NUM_LEDS 8 // Number of LEDs
// Create an instance of the Adafruit_NeoPixel class
Adafruit_NeoPixel strip = Adafruit_NeoPixel(NUM_LEDS, LED_PIN, NEO_GRB + NEO_KHZ800);


//initial color of LED strip
int valueR = 178;//from 0 to 255 for Red
int valueG = 27;//from 0 to 255 for Green
int valueB = 84;//from 0 to 255 for Blue

bool showSerialData = false;
String theColorR, theColorG, theColorB;
String theColor ="ff0000";

#include <WiFi.h>
#include <WiFiClient.h>
#include <WebServer.h>
#include <ESPmDNS.h>

const char *ssid = "dars";
const char *password = "hhhhhhhhhhh";

WebServer server(80);

void showColorPicker() {
  String page = "<!DOCTYPE html>\n";
  page +="<html>\n";
  page +="<body>\n";
  page +="<div style=\"zoom: 300%;\">\n";
  page +="<h2>Robojax RGB Color picker</h2>\n";
  page +="<p id=\"result\"></p>\n";
  page +="<form action=\"/color\">\n";
  page +="  <label for=\"favcolor\">Select your favorite color:</label>\n";
  page +="  <input type=\"color\" id=\"favcolor\" name=\"favcolor\" value=\"#";
  page += theColor;
  page +="\"><br><br>\n";
  page +="   <input type=\"submit\" value=\"Set Color\" />\n";
  page +="</form> \n</div>\n";
  page +="</body>\n";
  page +="</html>\n";

  server.send(200,  "text/html", page);


}

//from https://stackoverflow.com/questions/44683071/convert-string-as-hex-to-hexadecimal
uint64_t StrToHex(const char* str)
{
  return (uint64_t) strtoull(str, 0, 16);
}

void getColor(){

 // server.send(200, "text/plain", message);

  if(server.argName(0) == "favcolor")
  {
    String newColor = String(server.arg(0));//get the GET ardument 0 and convert it to string
    theColor = newColor.substring(1);//remove the # sybmot from the begining of color like #B2a48d
    theColorR = newColor.substring(1, 3);//extract B2 from  #B2a48d for example
    theColorG = newColor.substring(3, 5);//extract a4 from  #B2a48d for example
    theColorB = newColor.substring(5, 7);//extract 8d from  #B2a48d for example

    valueR = StrToHex(theColorR.c_str());//convert String to HEX for R
    valueG = StrToHex(theColorG.c_str());//convert String to HEX for G
    valueB = StrToHex(theColorB.c_str());//convert String to HEX for B
    if(showSerialData)
    {
      Serial.print("valueR: ");
      Serial.println(valueR);
      Serial.print("valueG: ");
      Serial.println(valueG);
      Serial.print("valueB: ");
      Serial.println(valueB );
    }

  }

  showColorPicker();//make sure the color picker is shown
  //server.send(200, "text/plain", message);

}


void setColor()
{
  for (int i = 0; i < NUM_LEDS; i++) {
    strip.setPixelColor(i, valueR, valueG, valueB); // Set the color of the i-th LED to red
    strip.show(); // Update the LED strip with the new colors
    delay(10); // Wait for 100 milliseconds
  }
}//

void noConnection()
{
   for (int i = 0; i < NUM_LEDS; i++) {
    strip.setPixelColor(i, 255, 45, 0); // Set the color of the i-th LED to red
    strip.show(); // Update the LED strip with the new colors
    delay(50); // Wait for 100 milliseconds
  }

  delay(200);
   for (int i = NUM_LEDS-1; i >=0; i--) {
    strip.setPixelColor(i, 0, 255, 180); // Set the color of the i-th LED to red
    strip.show(); // Update the LED strip with the new colors
    delay(50); // Wait for 100 milliseconds
  }
}

void handleNotFound() {
  String message = "File Not Found\n\n";
  message += "URI: ";
  message += server.uri();
  message += "\nMethod: ";
  message += (server.method() == HTTP_GET) ? "GET" : "POST";
  message += "\nArguments: ";
  message += server.args();
  message += "\n";

  for (uint8_t i = 0; i < server.args(); i++) {
    message += " " + server.argName(i) + ": " + server.arg(i) + "\n";
  }

  server.send(404, "text/plain", message);

}

void setup_wifi() {
  delay(10);
  // We start by connecting to a WiFi network
  WiFi.mode(WIFI_STA);
  WiFi.begin(ssid, password);
  Serial.println("");

  // Wait for connection
  while (WiFi.status() != WL_CONNECTED) {
    noConnection();
    delay(500);
    Serial.print(".");
  }

  Serial.println("");
  Serial.print("Connected to ");
  Serial.println(ssid);
  Serial.print("Open: http://");
  Serial.print(WiFi.localIP());
  Serial.println(" to read temperature");

  if (MDNS.begin("robojaxRGB")) {
    Serial.println("MDNS responder started");
  }

}

void setup(void) {

  Serial.begin(115200);

  strip.begin(); // Initialize the NeoPixel strip
  strip.show(); // Set initial color to black

  setup_wifi();

  server.on("/", showColorPicker);//show the main page with color picker
  //server.on("/color", setColor);//changes teh color on WS2812 RGB LED


  server.on("/color", HTTP_GET, getColor);


  server.on("/inline", []() {
    server.send(200, "text/plain", "this works as well");
  });
  server.onNotFound(handleNotFound);
  server.begin();
  Serial.println("HTTP server started");
}

void loop(void) {
  //Robojax.com
    while (WiFi.status() != WL_CONNECTED) {
      setup_wifi();
    }

  server.handleClient();
  //showColorPicker();
  setColor();
  delay(300);// change this to larger value (1000 or more) if you don't need very often reading
  // Robojax.com code for ESP32 and DHT11 DHT22
}
Common Course Links
Common Course Files
Resources & references
No resources yet.
Files📁
No files available.