Tutorial ESP32 51/55 - Temperatura y Humedad a través de WiFi con DHT | Kit de Aprendizaje IoT ESP32 de SunFounder
En este tutorial, aprenderemos cómo usar el SunFounder ESP32 con un sensor DHT11 o DHT22 para medir la temperatura y la humedad. Este proyecto nos permitirá leer los datos del sensor en nuestros dispositivos móviles o navegadores a través de Wi-Fi, mostrando las capacidades del ESP32 como servidor web. Configuraremos el ESP32, cablearemos los componentes correctamente y escribiremos el código necesario para que todo funcione sin problemas (en el video a las 00:15).
El microcontrolador ESP32 es un dispositivo potente con Wi-Fi y Bluetooth integrados. Esto nos permite conectarnos a Internet y transmitir datos de sensores de forma inalámbrica. El sensor DHT medirá la temperatura y la humedad, que luego se mostrarán en una página web accesible a través de la dirección IP del ESP32. Esta configuración es ideal para monitorear las condiciones ambientales de forma remota.
Hardware Explicado
Para este proyecto, utilizaremos los siguientes componentes principales:
- Microcontrolador ESP32:Este es el núcleo del proyecto que maneja la conectividad Wi-Fi y funciona como un servidor web para mostrar los datos del sensor.
- Sensor DHT11 o DHT22:Estos sensores miden la temperatura y la humedad. El DHT11 es adecuado para aplicaciones básicas, mientras que el DHT22 ofrece mejor precisión y un rango más amplio.
El sensor DHT se comunica con el ESP32 mediante un solo pin de datos. Envía lecturas de temperatura y humedad en un formato digital, que el ESP32 puede interpretar fácilmente. Luego, el ESP32 alojará una página web que muestra estas lecturas en tiempo real.
Detalles del folleto técnico
| Fabricante | Adafruit |
|---|---|
| Número de pieza | DHT11/DHT22 |
| Voltaje de lógica/entrada/salida | 3.3 V - 5.5 V |
| Tensión de alimentación | 3,3 V - 5,5 V |
| Corriente de salida (por canal) | 0.5 mA (típ.) |
| Corriente pico (por canal) | 2.5 mA (máx.) |
| Tiempo de respuesta | 1 s (típ.) |
| Rango de humedad | 20% a 90% HR |
| Rango de temperatura | -40°C a 80°C |
| Paquete | DIP-4 |
- Asegúrate de que el sensor DHT esté conectado al pin GPIO correcto en el ESP32.
- Utiliza resistencias pull-up para estabilizar la línea de datos.
- Presta atención al voltaje de la alimentación; tanto el DHT11 como el DHT22 funcionan bien a 3.3V.
- Mantén el cableado corto para evitar la degradación de la señal.
- Verifique la instalación correcta de la biblioteca para sensores DHT en el IDE de Arduino.
Instrucciones de cableado

Para conectar el sensor DHT al ESP32, conecta los siguientes pines:
- Sensor DHT VCC:Conéctalo al pin de 3.3V en el ESP32.
- GND del sensor DHT:Conéctate a un pin GND en el ESP32.
- Datos del sensor DHT:Conéctate al GPIO 14 en el ESP32 (esto se define en el código como
DHTPIN).
Asegúrate de tener el resistor correcto (típicamente 4.7kΩ) conectado entre el VCC y el pin de datos para una correcta integridad de la señal. Si usas el DHT22, simplemente cambia elDHTTYPEen el código deDHT11aDHT22para acomodar las diferencias en las características del sensor.
Ejemplos de código y guía paso a paso
En el código, comenzamos incluyendo las bibliotecas necesarias y definiendo algunos identificadores clave. Por ejemplo,refreshse establece en 3 segundos, lo que determina con qué frecuencia se actualizan las lecturas de temperatura y humedad.
const int refresh=3; // read every 3 seconds
boolean showSerial = true; // true or false
ElshowSerialla variable nos permite controlar si imprimir lecturas en el Monitor Serial. A continuación, definimos el pin y tipo del sensor:
#define DHTPIN 14  // Set the pin connected to the DHT11 data pin
#define DHTTYPE DHT11 // DHT 11
DHT dht(DHTPIN, DHTTYPE);
Aquí, elDHTse crea un objeto, vinculándolo al pin especificado y al tipo de sensor. La función principal para enviar datos de temperatura a través de la web se define comosendTemp():
void sendTemp() {
    String page = "\n";
    page += "\n";
    page += "\n";
    page += "\n";
    page += "\n";
    // Additional HTML content...
}
Esta función genera una página HTML que muestra las lecturas de temperatura y humedad. La página se actualiza en función de larefreshintervalo definido anteriormente. Para obtener detalles completos del código, consulte el código completo cargado debajo del artículo.
Demostración / Qué Esperar

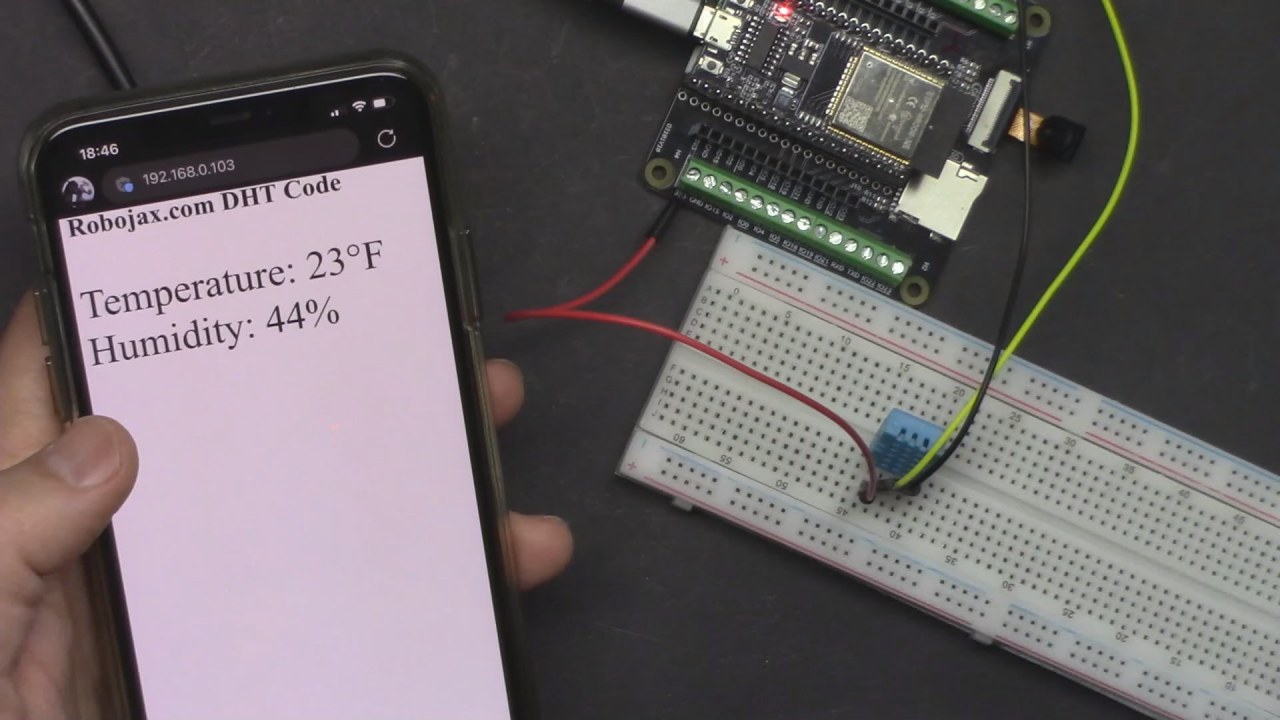
Después de subir el código al ESP32, deberías ver la dirección IP impresa en el Monitor Serial. Abre un navegador web e ingresa la dirección IP para ver las lecturas de temperatura y humedad. Los valores se actualizarán cada 3 segundos, proporcionando datos en tiempo real (en el video a las 12:30).
Ten cuidado con los errores comunes, como asegurarte de que el ESP32 y tu dispositivo estén conectados a la misma red Wi-Fi. Si encuentras problemas, revisa el cableado y asegúrate de que el sensor DHT esté funcionando correctamente.
Tiempos de video
- 00:00 Inicio
- 1:45 Introducción al proyecto wifi DHT
- 3:59 Código Arduino para ESP32 DHT Wifi
- 13:31 Selección de la placa ESP32 y el puerto COM en Arduino IDE
- 15:13 Demostración de temperatura a través de Wifi
Imágenes
/*
 * Display temperature on Browswer screen using DHT11, DHT22 with ESP32
 *
 * Written by Ahmad Shamshiri on Dec 18, 2023
 📚⬇️ Download and resource page https://robojax.com/RJT385
 *
 * Watch video instruciton for this video:  https://youtu.be/drrW1EHqKuM
 *
 * I have combined DHT library of Adafruit with ESP8266 WebServer both links
 * Adafruit DHT library on GitHub: https://github.com/adafruit/DHT-sensor-library
 * and
 * ESP8266 on GitHub : https://github.com/esp8266/Arduino
 *
   Copyright (c) 2015, Majenko Technologies
   All rights reserved.

   Redistribution and use in source and binary forms, with or without modification,
   are permitted provided that the following conditions are met:

 * * Redistributions of source code must retain the above copyright notice, this
     list of conditions and the following disclaimer.

 * * Redistributions in binary form must reproduce the above copyright notice, this
     list of conditions and the following disclaimer in the documentation and/or
     other materials provided with the distribution.

 * * Neither the name of Majenko Technologies nor the names of its
     contributors may be used to endorse or promote products derived from
     this software without specific prior written permission.

   THIS SOFTWARE IS PROVIDED BY THE COPYRIGHT HOLDERS AND CONTRIBUTORS "AS IS" AND
   ANY EXPRESS OR IMPLIED WARRANTIES, INCLUDING, BUT NOT LIMITED TO, THE IMPLIED
   WARRANTIES OF MERCHANTABILITY AND FITNESS FOR A PARTICULAR PURPOSE ARE
   DISCLAIMED. IN NO EVENT SHALL THE COPYRIGHT HOLDER OR CONTRIBUTORS BE LIABLE FOR
   ANY DIRECT, INDIRECT, INCIDENTAL, SPECIAL, EXEMPLARY, OR CONSEQUENTIAL DAMAGES
   (INCLUDING, BUT NOT LIMITED TO, PROCUREMENT OF SUBSTITUTE GOODS OR SERVICES;
   LOSS OF USE, DATA, OR PROFITS; OR BUSINESS INTERRUPTION) HOWEVER CAUSED AND ON
   ANY THEORY OF LIABILITY, WHETHER IN CONTRACT, STRICT LIABILITY, OR TORT
   (INCLUDING NEGLIGENCE OR OTHERWISE) ARISING IN ANY WAY OUT OF THE USE OF THIS
   SOFTWARE, EVEN IF ADVISED OF THE POSSIBILITY OF SUCH DAMAGE.
*/

const int refresh=3;//read every 3 seconds
boolean showSerial =true;//true or false

unsigned int unit=0;//0=C, 1=F,
char *title[]={"Temperature","Temperature","Humidity"};
char *unitText[]={"°C","°F","%"};\

#include "DHT.h"
#define DHTPIN 14  // Set the pin connected to the DHT11 data pin
#define DHTTYPE DHT11 // DHT 11
//#define DHTTYPE DHT22   // DHT 22  (AM2302), AM2321
//#define DHTTYPE DHT21   // DHT 21 (AM2301)
DHT dht(DHTPIN, DHTTYPE);
float temperatureValue,temperatureFValue, humidityValue;//


#include <WiFi.h>
#include <WiFiClient.h>
#include <WebServer.h>
#include <ESPmDNS.h>

const char *ssid = "dars";
const char *password = "5152535455";

WebServer server(80);

void sendTemp() {
//see video
  String page = "<!DOCTYPE html>\n";
  page +="<html>\n";
  page +="<head>\n";
  page +="<title>Robojax DHT</title>\n";
  page +="    <meta http-equiv='refresh' content='";
  page += String(refresh);// how often temperature is read
  page +="'/>\n";

  page +="<head>\n";
  page +="<body>\n";
  page +="<h1>Robojax.com DHT Code</h1>\n";
  page +="<p style=\"font-size:50px\"> \n";
  page +=title[unit];
  page +=": ";
  if (DHTTYPE ==DHT11){
    page += String((int)temperatureValue);
  }else{
    page += String(temperatureValue, 1);
  }
  page +=unitText[unit];
  page +="<br/>\n";
  //humidity starts
  page +=title[2];
  page +=": \n";
  page += String((int)humidityValue);
  page +=unitText[2];
  //humidity ends
  page +="</p>\n";

  page +="</body>";
  page +="</html>\n";
  server.send(200,  "text/html", page);

}


void handleNotFound() {
  String message = "File Not Found\n\n";
  message += "URI: ";
  message += server.uri();
  message += "\nMethod: ";
  message += (server.method() == HTTP_GET) ? "GET" : "POST";
  message += "\nArguments: ";
  message += server.args();
  message += "\n";

  for (uint8_t i = 0; i < server.args(); i++) {
    message += " " + server.argName(i) + ": " + server.arg(i) + "\n";
  }

  server.send(404, "text/plain", message);

}

void setup(void) {
   dht.begin();
  Serial.begin(115200);
  WiFi.mode(WIFI_STA);
  WiFi.begin(ssid, password);
  Serial.println("");

  // Wait for connection
  while (WiFi.status() != WL_CONNECTED) {
    delay(500);
    Serial.print(".");
  }

  Serial.println("");
  Serial.print("Connected to ");
  Serial.println(ssid);
  Serial.print("Open: http://");
  Serial.print(WiFi.localIP());
  Serial.println(" to read temperature");

  if (MDNS.begin("robojaxDHT")) {
    Serial.println("MDNS responder started");
  }

  server.on("/", sendTemp);

  server.on("/inline", []() {
    server.send(200, "text/plain", "this works as well");
  });
  server.onNotFound(handleNotFound);
  server.begin();
  Serial.println("HTTP server started");
}

void loop(void) {
  //Robojax.com code for ESP32 DHT11 DHT22
  server.handleClient();
  temperatureValue = dht.readTemperature();// Read temperature as Celsius (the default)
  humidityValue = dht.readHumidity();// Reading humidity
  temperatureFValue = dht.readTemperature(true);// Read temperature as Fahrenheit (isFahrenheit = true)

    if(showSerial){
        Serial.print(title[unit]);
        Serial.print(": ");
        if (DHTTYPE ==DHT11){
      Serial.println((int)temperatureValue);
        }else{
        Serial.print(temperatureValue,1);
        }

    }
  Serial.println();//just adds new line

  delay(300);// change this to larger value (1000 or more) if you don't need very often reading
  // Robojax.com code for ESP32 and DHT11 DHT22
}
Common Course Links
Common Course Files
Cosas que podrías necesitar
-
AliExpressAliExpresss.click.aliexpress.com
Recursos y referencias
-
ExternoAliExpresss.click.aliexpress.com
-
Interno
Archivos📁
No hay archivos disponibles.