Lesson 29/31: Car-7 Controlling SunFounder Smart Car using Remote Controller | Robojax
In this lesson, we will transform your SunFounder smart car into a remote-controlled vehicle using an infrared (IR) remote. Instead of relying on a wired connection or a smartphone app, you'll learn how to map the buttons on a standard IR remote to control the car's movement—forward, backward, turning, and even diagonal maneuvers—as well as adjust its speed on the fly. This project is a perfect next step after learning the basics of motor control and IR communication, as it combines both into a single, interactive system.
The real-world value here lies in understanding how to create a robust, user-friendly control interface for a robotics platform. The principles you'll learn are directly applicable to a wide range of projects, such as:
- Building a remote-controlled robot for home automation tasks, like a small delivery bot.
- Creating a programmable vehicle for educational robotics competitions.
- Developing a custom remote control for a camera slider or a pan-tilt mechanism.
- Prototyping a user interface for a larger, more complex automated system.
Hardware and Components
This project builds upon the SunFounder 3-in-1 Arduino kit. To follow along, you will need the components listed below. The wiring is straightforward, extending from the previous lessons in the course.
- SunFounder 3-in-1 Arduino Kit: This includes the smart car chassis, motor driver board, and the Arduino board.
- Infrared Remote Control: The standard remote that comes with the kit.
- IR Receiver Module: The sensor that will decode the signals from the remote.
- LED and 330-ohm Resistor: Used as a visual indicator to confirm that a key has been pressed. (in video at 04:08)
- Jumper Wires: For making the necessary connections on the breadboard.
Wiring Guide
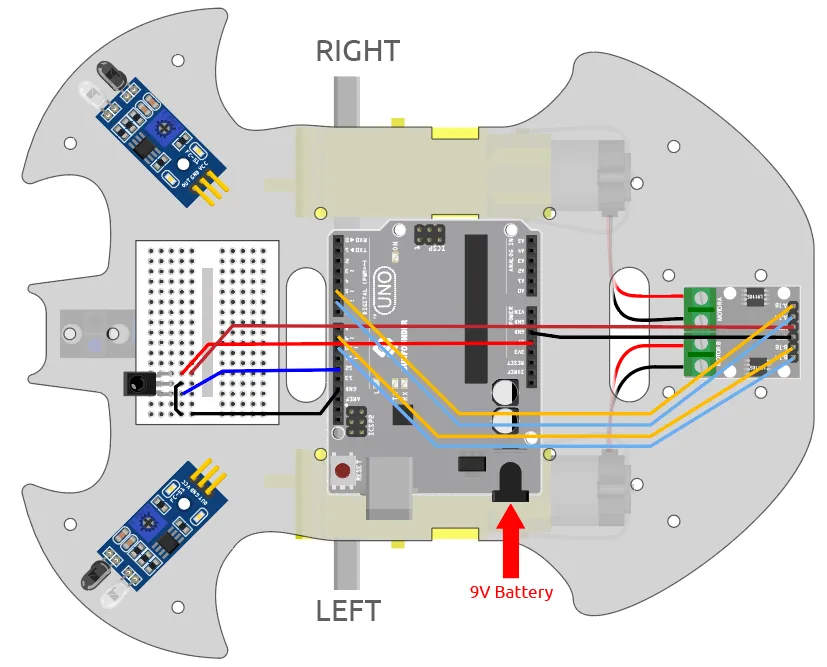
Before we dive into the code, let's ensure the hardware is connected correctly. The wiring for the IR receiver and the motor driver is consistent with previous lessons in this series. To make the project more interactive, we will also connect an external LED to pin 13 as a visual feedback indicator.
Here is a step-by-step guide to the connections:
- IR Receiver: The IR receiver has three pins. The positive pin connects to the 5V rail on the breadboard. The ground pin connects to the GND rail. The signal pin, which is the last pin, connects to digital pin 11 on your Arduino board. (in video at 05:29)
- External LED: Connect one leg of the 330-ohm resistor to digital pin 13 on the Arduino. Connect the other leg of the resistor to the longer (anode) leg of the LED. The shorter (cathode) leg of the LED should be connected to the GND rail on the breadboard. (in video at 04:08)
- Motor Driver: The four pins for the motor driver (A_1B, A_1A, B_1B, B_1A) are connected to pins 5, 6, 9, and 10 on the Arduino, respectively. This setup has been covered in previous lessons. (in video at 06:44)
For a visual reference of these connections, please refer to the wiring diagram below.
Code Explanation
The code for this project is designed to be intuitive. It uses the IRremote library to handle the complex task of decoding IR signals. Let's break down the user-configurable parts that you might want to adjust for your own projects.
At the top of the sketch, you will find the pin definitions. These are the first things you should check if you have wired your components to different pins than the ones used in this example.
const int IR_RECEIVE_PIN = 12;  // Define the pin number for the IR Sensor
const int A_1B = 5;
const int A_1A = 6;
const int B_1B = 9;
const int B_1A = 10;
IR_RECEIVE_PIN: This constant defines the digital pin connected to the signal pin of your IR receiver. If you connected it to a different pin, you would change the number here.A_1B,A_1A,B_1B,B_1A: These constants map to the four control pins on your motor driver. They control the speed and direction of the left and right motors.
Next, you'll find a crucial variable that controls the car's behavior.
int speed = 150;
speed: This variable sets the initial speed of the car. The value can range from 0 to 255. In this project, you can change it using the "+" and "-" keys on the remote. The code also includes logic to prevent the speed from exceeding 255 or dropping below 0. (in video at 09:22)
The core logic of the remote control is handled in the loop() function. When a key is pressed, the decodeKeyValue() function translates the raw IR code into a simple string like "2" for forward or "+" for speed up. This makes the if statements that follow very easy to read and modify. (in video at 07:58)
The custom functions like moveForward(), turnRight(), and moveLeft() are where the motor control happens. Each function takes the current speed as an argument. For example, moveForward(speed) will drive both motors forward at the specified speed. The key difference between a "turn" and a "move" is that a turn rotates both wheels in opposite directions, causing the car to spin in place, while a move rotates only one wheel, causing the car to arc around the stationary wheel. (in video at 10:14)
Live Project Demonstration
With the code uploaded and the car powered on, the remote control becomes your primary interface. The demonstration in the video highlights a few key behaviors:
- Speed Control: Pressing the "+" key increases the speed by 50, while the "-" key decreases it. The speed is capped at 255 and bottomed out at 0 to protect the motors. (in video at 11:56)
- Momentary Movement: When you press a directional key like "2" (forward) or "8" (backward), the car will move for one second and then stop automatically. This is a safety feature built into the code. (in video at 13:09)
- Turning and Maneuvering: The keys arranged in a cross pattern on the remote act like a joystick. Pressing "4" or "6" will turn the car left or right in place. Pressing the diagonal keys, like "1" or "3", will perform a "move left" or "move right," which is a sharper turn where one wheel is stationary. (in video at 16:42)
One thing you might notice is that the car doesn't always drive in a perfectly straight line. This is often due to minor differences in the motors or the tension of the car's assembly, which is a common and normal characteristic of these kits. (in video at 15:14)
Chapters
- [00:00] Introduction to IR Remote Control for the Smart Car
- [01:15] Prerequisites and Required Previous Lessons
- [01:56] Overview of the Project Documentation
- [02:29] Understanding the Remote Control Key Functions
- [03:29] Step-by-Step Wiring Guide for IR Receiver and LED
- [05:51] Opening and Loading the Project Code
- [07:41] Code Explanation: Loop, Key Decoding, and Actions
- [09:22] Speed Limiting and Safety Features in Code
- [10:08] Explanation of Motor Movement Functions
- [11:49] Live Demonstration: Testing Speed Control and LED Blink
- [13:27] Live Demonstration: Forward, Backward, and Turning
- [14:31] Full Car Demonstration with Power and Movement
Images
/*
Lesson 29/31: Car-7 Controlling SunFounder Smart Car using Remote Controller
Get this code and watch video Download and resource page https://robojax.com/RJT612

*/
#include <IRremote.h>

const int IR_RECEIVE_PIN = 12;  // Define the pin number for the IR Sensor

const int A_1B = 5;
const int A_1A = 6;
const int B_1B = 9;
const int B_1A = 10;


int speed = 150;

void setup() {
  Serial.begin(9600);

  //motor
  pinMode(A_1B, OUTPUT);
  pinMode(A_1A, OUTPUT);
  pinMode(B_1B, OUTPUT);
  pinMode(B_1A, OUTPUT);

  //IR remote
  IrReceiver.begin(IR_RECEIVE_PIN, ENABLE_LED_FEEDBACK);  // Start the IR receiver // Start the receiver
  Serial.println("REMOTE CONTROL START");

}

void loop() {

  if (IrReceiver.decode()) {
    //    Serial.println(results.value,HEX);
    String key = decodeKeyValue(IrReceiver.decodedIRData.command);
    if (key != "ERROR") {
      Serial.println(key);

      if (key == "+") {
        speed += 50;
      } else if (key == "-") {
        speed -= 50;
      } else if (key == "2") {
        moveForward(speed);
        delay(1000);
      } else if (key == "1") {
        moveLeft(speed);
      } else if (key == "3") {
        moveRight(speed);
      } else if (key == "4") {
        turnLeft(speed);
      } else if (key == "6") {
        turnRight(speed);
      } else if (key == "7") {
        backLeft(speed);
      } else if (key == "9") {
        backRight(speed);
      } else if (key == "8") {
        moveBackward(speed);
        delay(1000);
      }

      if (speed >= 255) {
        speed = 255;
      }
      if (speed <= 0) {
        speed = 0;
      }
      delay(500);
      stopMove();
    }

    IrReceiver.resume();  // Enable receiving of the next value
  }
}

void moveForward(int speed) {
  analogWrite(A_1B, 0);
  analogWrite(A_1A, speed);
  analogWrite(B_1B, speed);
  analogWrite(B_1A, 0);
}

void moveBackward(int speed) {
  analogWrite(A_1B, speed);
  analogWrite(A_1A, 0);
  analogWrite(B_1B, 0);
  analogWrite(B_1A, speed);
}

void turnRight(int speed) {
  analogWrite(A_1B, speed);
  analogWrite(A_1A, 0);
  analogWrite(B_1B, speed);
  analogWrite(B_1A, 0);
}

void turnLeft(int speed) {
  analogWrite(A_1B, 0);
  analogWrite(A_1A, speed);
  analogWrite(B_1B, 0);
  analogWrite(B_1A, speed);
}

void moveLeft(int speed) {
  analogWrite(A_1B, 0);
  analogWrite(A_1A, speed);
  analogWrite(B_1B, 0);
  analogWrite(B_1A, 0);
}

void moveRight(int speed) {
  analogWrite(A_1B, 0);
  analogWrite(A_1A, 0);
  analogWrite(B_1B, speed);
  analogWrite(B_1A, 0);
}

void backLeft(int speed) {
  analogWrite(A_1B, speed);
  analogWrite(A_1A, 0);
  analogWrite(B_1B, 0);
  analogWrite(B_1A, 0);
}

void backRight(int speed) {
  analogWrite(A_1B, 0);
  analogWrite(A_1A, 0);
  analogWrite(B_1B, 0);
  analogWrite(B_1A, speed);
}

void stopMove() {
  analogWrite(A_1B, 0);
  analogWrite(A_1A, 0);
  analogWrite(B_1B, 0);
  analogWrite(B_1A, 0);
}


String decodeKeyValue(long result)
{
  switch(result){
    case 0x16:
      return "0";
    case 0xC:
      return "1";
    case 0x18:
      return "2";
    case 0x5E:
      return "3";
    case 0x8:
      return "4";
    case 0x1C:
      return "5";
    case 0x5A:
      return "6";
    case 0x42:
      return "7";
    case 0x52:
      return "8";
    case 0x4A:
      return "9";
    case 0x9:
      return "+";
    case 0x15:
      return "-";
    case 0x7:
      return "EQ";
    case 0xD:
      return "U/SD";
    case 0x19:
      return "CYCLE";
    case 0x44:
      return "PLAY/PAUSE";
    case 0x43:
      return "FORWARD";
    case 0x40:
      return "BACKWARD";
    case 0x45:
      return "POWER";
    case 0x47:
      return "MUTE";
    case 0x46:
      return "MODE";
    case 0x0:
      return "ERROR";
    default :
      return "ERROR";
    }
}
Common Course Links
Common Course Files
Things you might need
-
AmazonSunFounder Arduino Learning kit on AliExpresss.click.aliexpress.com
-
Amazon
-
Amazon
-
Amazon
-
Amazon
Resources & references
-
ExternalPurchase SunFounder's 3-in-1 Smart car learning kitsunfounder.com
Files📁
Arduino Libraries (zip)
-
SunFounder's 3-in-1 Smart Car learning kit source code
3in1-kit-main-v2.zip12.80 MB