Lesson 27/31: Car-5 SunFounder Smart Car Follows Your Hand using Arduino | Robojax
Introduction
Have you ever wanted to build a robot that responds intuitively to your presence? This project transforms a standard SunFounder Smart Car into a gesture-controlled vehicle that follows your hand. Instead of using a remote control or a smartphone app, this car uses a combination of ultrasonic and infrared sensors to detect the position and distance of your hand, allowing you to guide it left, right, or forward with simple natural movements.
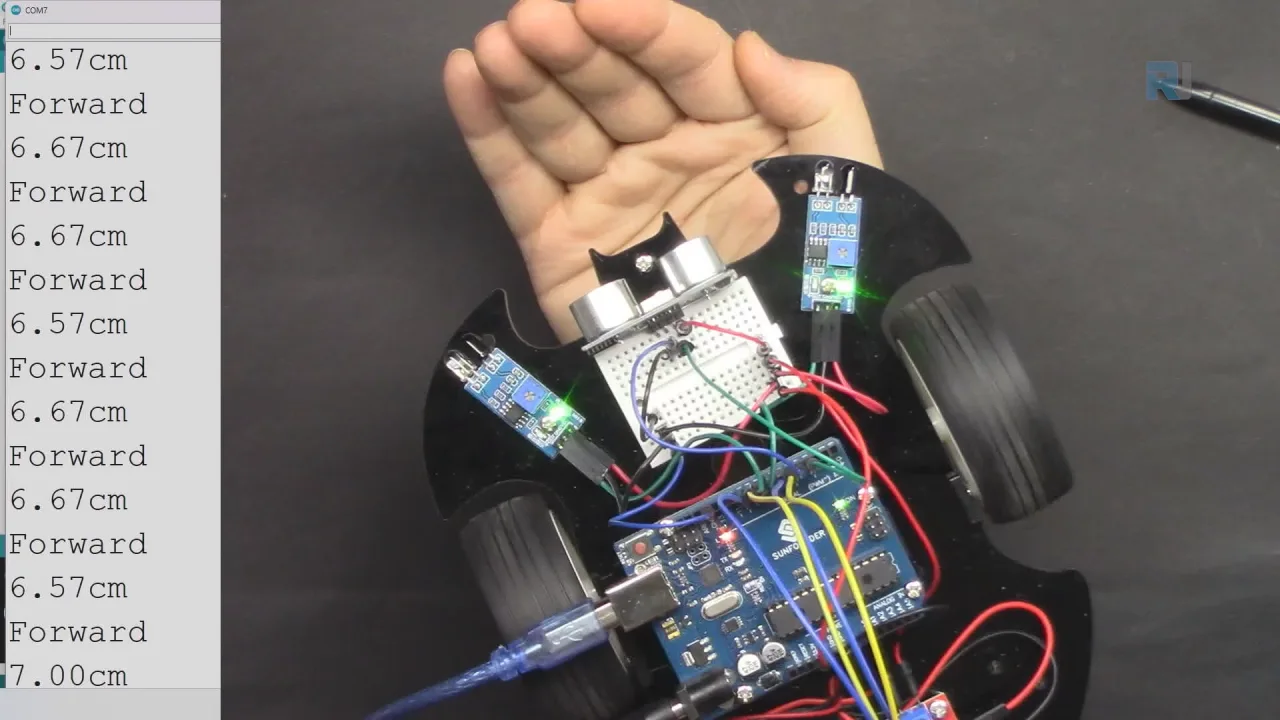
This project is part of the Robojax Arduino Course (Lesson 27/31) and is built using the SunFounder 3-in-1 Arduino kit. It's an excellent way to learn about sensor fusion, where multiple sensors work together to create a more complex and responsive behavior. The real-world value here is in understanding how to combine different types of inputs to make decisions, a fundamental concept in robotics and automation.
Here are a few practical ideas you could build upon with this logic:
- Interactive Exhibits: Create a small robotic display that follows visitors to draw their attention.
- Autonomous Obstacle-Avoiding Platform: Modify the code to have the car navigate a room by avoiding obstacles instead of following a hand.
- Educational Robotics Kit: Use this as a foundational project to teach students about sensor integration, logic, and motor control.
- Smart Delivery Trolley: In a controlled environment, this logic could be adapted for a small trolley that follows a person in a warehouse or factory setting.
Hardware & Components
This project uses the components included in the SunFounder 3-in-1 Arduino kit. The core components you will be using are:
- SunFounder Smart Car chassis: The physical platform with wheels and motors.
- Arduino board: The "brain" of the car that runs the code.
- Ultrasonic Sensor (HC-SR04): Used to measure the distance to an object (your hand) in front of the car.
- Two IR (Infrared) Obstacle Avoidance Sensors: Mounted on the left and right sides to detect the presence of your hand on those sides.
- Motor Driver: A module (often an L298N or similar) used to control the speed and direction of the car's motors based on signals from the Arduino.
- Power Source: Batteries to power the Arduino and motors.
Wiring Guide
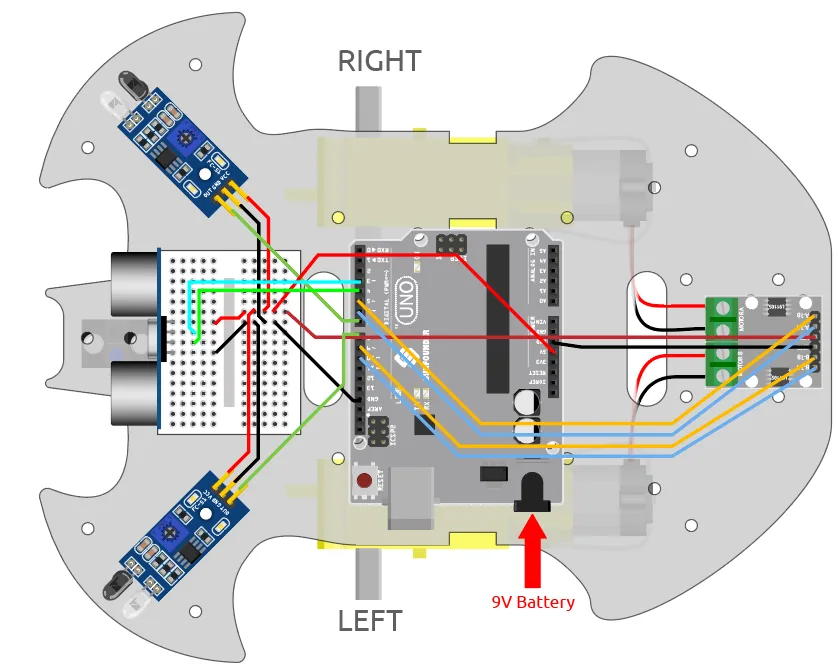
As mentioned in the video, the wiring for this project is identical to what was explained in previous lessons for the obstacle-avoiding car. The sensors and motors are all connected to the Arduino's digital and analog pins. For a visual reference, please refer to the wiring diagram for the SunFounder Smart Car.
The code defines the specific pins used for each component, which are detailed in the next section.
Code Explanation
This section focuses on the user-configurable parts of the code that you might want to adjust for your own car. The full program is available for download on the Robojax resource page.
At the very top of the sketch, you will find the pin definitions. These are the most critical lines to understand if you have wired your car differently than the instructor.
const int A_1B = 5;
const int A_1A = 6;
const int B_1B = 9;
const int B_1A = 10;

const int rightIR=7;
const int leftIR=8;

const int trigPin = 3;
const int echoPin = 4;
Here's what each group of pins does:
- Motor Pins (A_1A, A_1B, B_1A, B_1B): These are the pins connected to the motor driver to control the two motors. The "A" and "B" labels typically refer to the left and right motors, respectively. You must change these if your motor driver is connected to different Arduino pins.
- IR Sensor Pins (rightIR, leftIR): These digital input pins read the signal from the left and right infrared obstacle sensors. A value of
0means an obstacle (your hand) is detected, while1means the path is clear. - Ultrasonic Sensor Pins (trigPin, echoPin): The
trigPinis an output that sends a short ultrasonic pulse, and theechoPinis an input that reads the duration of the reflected pulse to calculate distance.
Inside the loop() function, you will find the main behavior logic. There is a single variable you may want to adjust:
int speed = 150;This speed variable controls the power sent to the motors during movement. It can range from 0 (stopped) to 255 (maximum speed). You can increase this value (e.g., to 200) for a faster car or decrease it (e.g., to 100) for more controlled, slower movements.
The code also contains functions like moveForward(), turnLeft(), and turnRight(). These functions are used to control the car's movement and are called based on the sensor readings. You don't need to modify them, but you can use them as building blocks to create your own custom behaviors.
How the "Follow Your Hand" Logic Works
The magic of this project lies in how the Arduino interprets the data from the three sensors. The logic is straightforward and is executed continuously in the loop() function.
First, the car measures the distance to an object directly in front of it using the ultrasonic sensor. Then, it checks the two infrared sensors to see if an object is on its left or right side. The decision-making process is as follows:
- Move Forward: If the distance measured by the ultrasonic sensor is greater than 5 cm but less than 10 cm, the car moves forward. This creates a "sweet spot" zone where the car will follow your hand.
- Turn Left: If the distance is not in that zone, the car checks the IR sensors. If the left sensor is blocked (your hand is on the left) and the right sensor is clear, the car turns left.
- Turn Right: Conversely, if the right sensor is blocked and the left is clear, the car turns right.
- Stop: If none of these conditions are met—for example, if your hand is too far away or too close—the car stops.
This simple set of rules allows the car to react dynamically to your hand's position, creating a smooth and intuitive following behavior.
Live Project Demonstration
In the video demonstration, the instructor shows the car's behavior in real-time. The serial monitor is used to display the distance read by the ultrasonic sensor. When the car is idle and your hand is far away (e.g., 36 cm), it remains stopped. As soon as you place your hand within the 5-10 cm zone in front of the car, it begins to move forward.
The demonstration also highlights the turning logic. When your hand is placed on the left side of the car, the left IR sensor is triggered, and the car turns left. Similarly, placing your hand on the right side makes the car turn right. The car will continue to follow your hand as you move it around, stopping only when your hand is removed from its sensor range or is too close. This confirms that the sensor fusion and logic are working as intended, creating a responsive and fun project.
Chapters
- [00:00] Introduction to the Hand-Following Smart Car
- [00:35] About the Robojax Arduino Course and Kit
- [01:41] Project Overview and Code Setup
- [02:19] Explanation of Pin Definitions and Setup
- [03:19] Code Logic for Following Your Hand
- [05:48] Live Demonstration of the Car in Action
- [07:28] Final Demonstration and Performance Review
Images
/*
Lesson 27/31: Car-5 SunFounder Smart Car Follows Your Hand
Get this code and watch video Download and resource page https://robojax.com/RJT610
YouTube video https://www.youtube.com/watch?v=mcbJlE7-8ro

*/
const int A_1B = 5;
const int A_1A = 6;
const int B_1B = 9;
const int B_1A = 10;

const int rightIR=7;
const int leftIR=8;

const int trigPin = 3;
const int echoPin = 4;

void setup() {
  Serial.begin(9600);

  //motor
  pinMode(A_1B, OUTPUT);
  pinMode(A_1A, OUTPUT);
  pinMode(B_1B, OUTPUT);
  pinMode(B_1A, OUTPUT);

  //IR obstacle
  pinMode(leftIR,INPUT);
  pinMode(rightIR,INPUT);

  //ultrasonic
  pinMode(echoPin, INPUT);
  pinMode(trigPin, OUTPUT);
}

void loop() {

  float distance = readSensorData();

  int left = digitalRead(leftIR);  // 0: Obstructed   1: Empty
  int right = digitalRead(rightIR);
  int speed = 150;

  if (distance>5 && distance<10){
    moveForward(speed);
  }else if(!left&&right){
    turnLeft(speed);
  }else if(left&&!right){
    turnRight(speed);
  }else{
    stopMove();
  }
}

float readSensorData() {
  digitalWrite(trigPin, LOW);
  delayMicroseconds(2);
  digitalWrite(trigPin, HIGH);
  delayMicroseconds(10);
  digitalWrite(trigPin, LOW);
  float distance = pulseIn(echoPin, HIGH) / 58.00; //Equivalent to (340m/s*1us)/2
  return distance;
}

void moveForward(int speed) {
  analogWrite(A_1B, 0);
  analogWrite(A_1A, speed);
  analogWrite(B_1B, speed);
  analogWrite(B_1A, 0);
}

void moveBackward(int speed) {
  analogWrite(A_1B, speed);
  analogWrite(A_1A, 0);
  analogWrite(B_1B, 0);
  analogWrite(B_1A, speed);
}

void turnRight(int speed) {
  analogWrite(A_1B, speed);
  analogWrite(A_1A, 0);
  analogWrite(B_1B, speed);
  analogWrite(B_1A, 0);
}

void turnLeft(int speed) {
  analogWrite(A_1B, 0);
  analogWrite(A_1A, speed);
  analogWrite(B_1B, 0);
  analogWrite(B_1A, speed);
}

void stopMove() {
  analogWrite(A_1B, 0);
  analogWrite(A_1A, 0);
  analogWrite(B_1B, 0);
  analogWrite(B_1A, 0);
}
Common Course Links
Common Course Files
Things you might need
-
AmazonSunFounder Arduino Learning Kit on AliExpresss.click.aliexpress.com
-
Amazon
-
Amazon
-
Amazon
-
Amazon
Resources & references
-
DocumentationDocumentation for SunFounder 3 in 1 IoT/Smart Car/Learning Kitdocs.sunfounder.com
-
ExternalPurchase SunFounder's 3-in-1 Smart car learning kitsunfounder.com
Files📁
Arduino Libraries (zip)
-
SunFounder's 3-in-1 Smart Car learning kit source code
3in1-kit-main-v2.zip12.80 MB