第22/31課:使用七段顯示器配合Arduino同電子骰仔 | SunFounder Robojax
喺呢一課,我哋會探討點樣用Arduino控制一個七段顯示器。與其用成打或更多嘅I/O引腳直接驅動每個LED段,我哋採用一個聰明嘅技巧:移位寄存器。呢粒細細粒又平嘅晶片,令我哋可以用Arduino嘅三條線就控制晒七個段(加埋小數點)。呢個係電子學入面一個基礎技術,令你可以擴展微控制器上可用嘅輸出數量,令你可以建立更複雜嘅項目而唔使升級你嘅開發板。
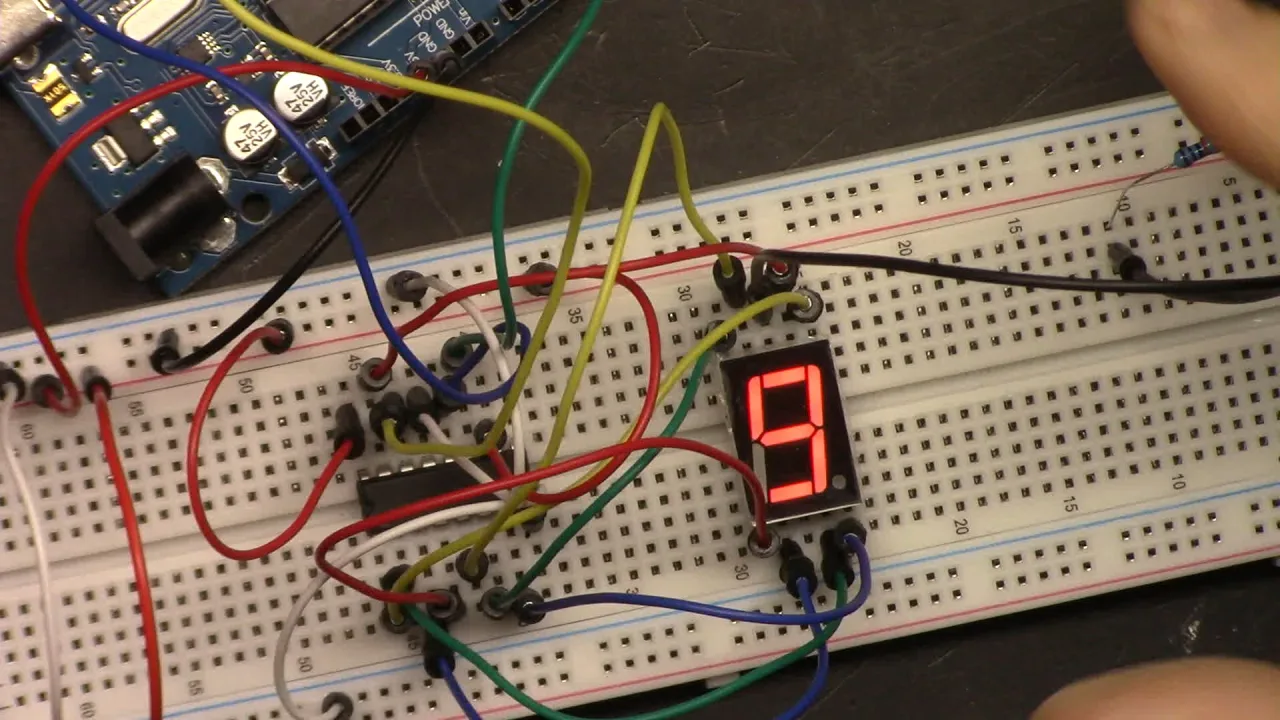
除咗基本計數器之外,我哋仲會整一個電子骰仔。呢個項目唔單止鞏固顯示控制嘅知識,仲會引入透過按鈕嘅用戶輸入同中斷嘅概念,創造一個有反應同互動嘅裝置。呢個指南係基於Robojax Arduino課程嘅一課,嗰個課程用SunFounder 3合1 Arduino套件。
以下係一啲你可以用呢啲知識整嘅實用主意:
- 整一個簡單嘅記分牌,用喺乒乓球或者籃球等遊戲。
- 整一個數碼計時器,用喺棋盤遊戲或者廚房倒數計時器。
- 整一個隨機數字產生器,用喺遊戲或者做決定。
- 整一個基本數碼溫度計,加一個溫度感測器就得。
硬件同零件
喺開始之前,我哋先收集所需嘅零件。呢個項目嘅核心係74HC595移位寄存器,佢係將所需引腳數量減到最少嘅關鍵。與其將七個段直接連去Arduino,我哋將佢哋連去移位寄存器。Arduino跟住將一個數字嘅數據串行(一次一個位元)傳送去晶片,晶片再輸出正確嘅模式去點亮各段。
- Arduino Uno(或者兼容板)
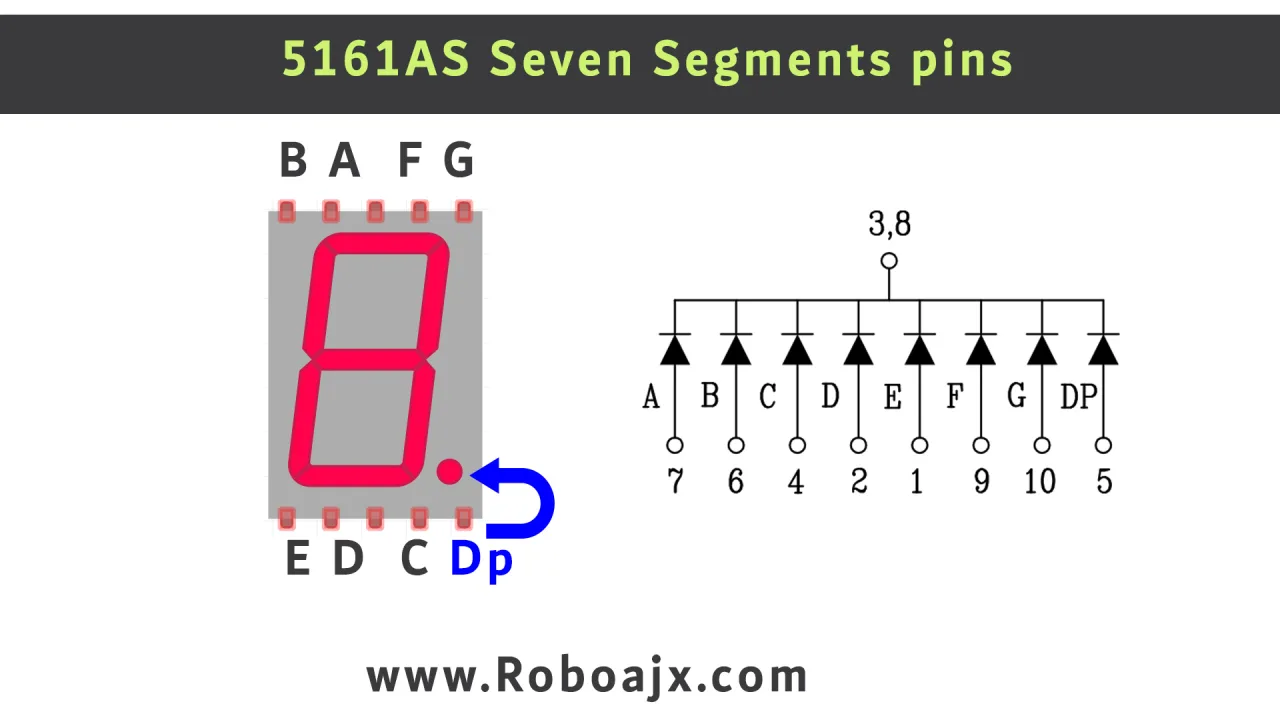
- 七段顯示器(型號5161AS,共陰極)
- 74HC595移位寄存器IC
- 按鈕
- 電阻(220Ω - 330Ω)
- 杜邦線
- 麵包板
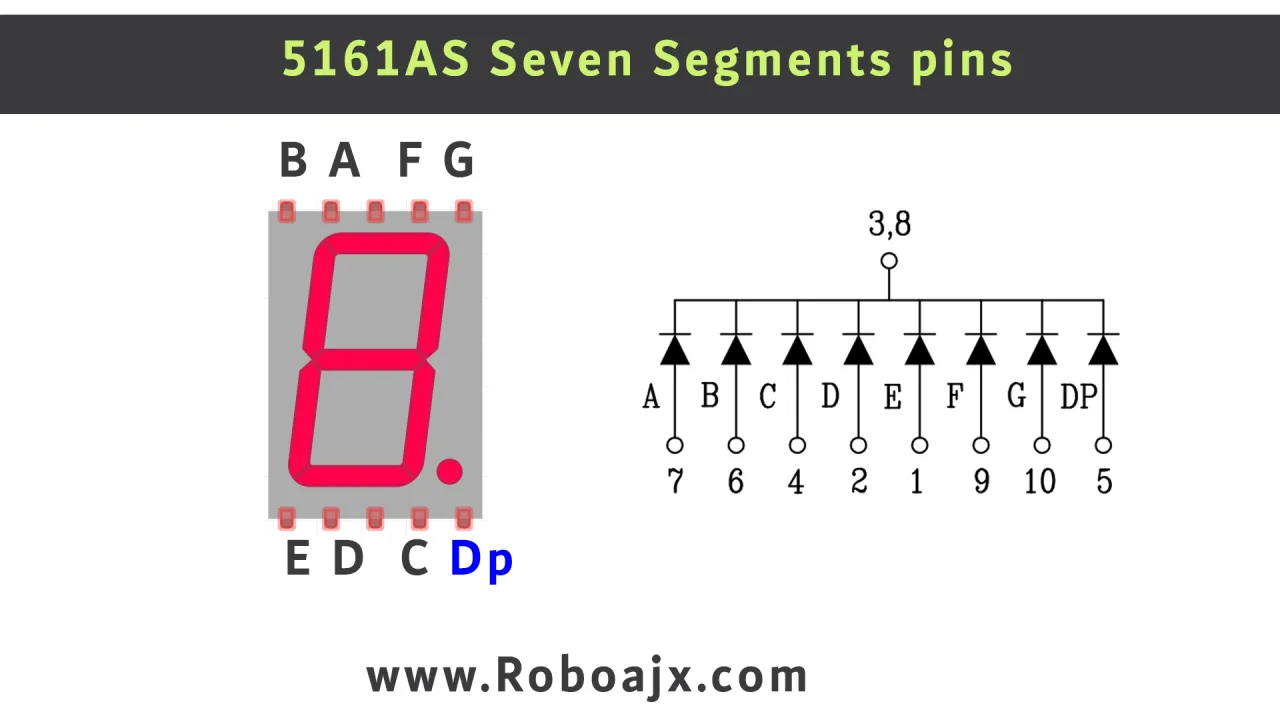
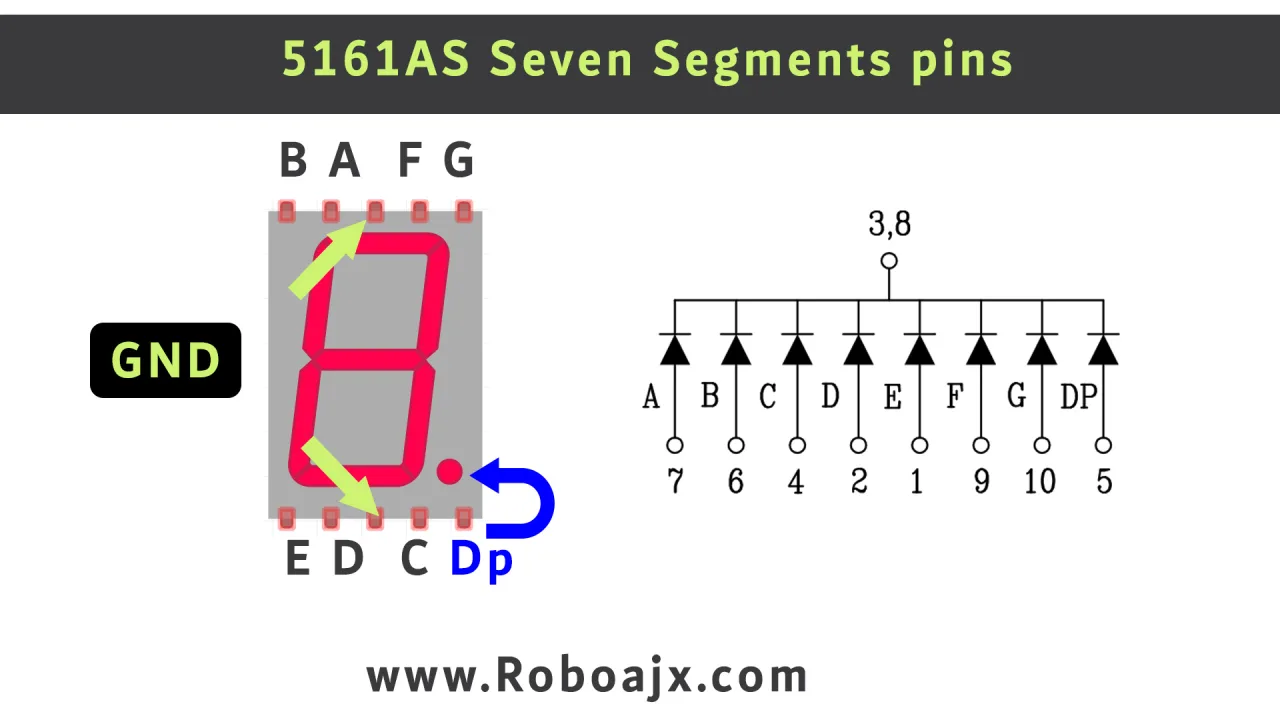
5161AS顯示器係共陰極類型。即係話內部所有LED嘅陰極(負極)都連埋一齊去一個共用接地引腳。要點亮一個段,你要畀正電壓去佢特定嘅陽極引腳。74HC595扮演橋樑角色,接收Arduino嘅串行數據,再輸出驅動呢啲陽極所需嘅並行信號。
接線指南
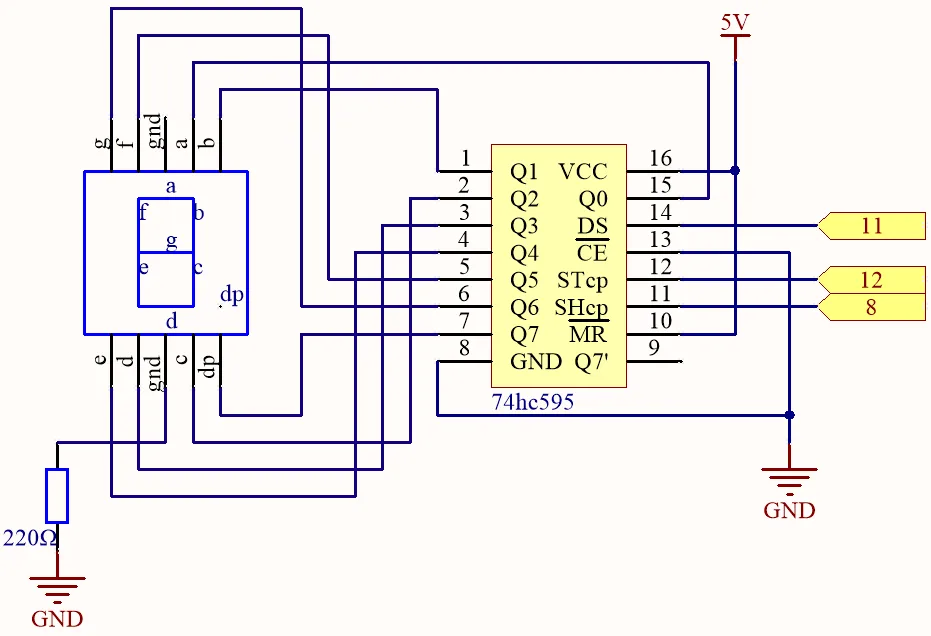
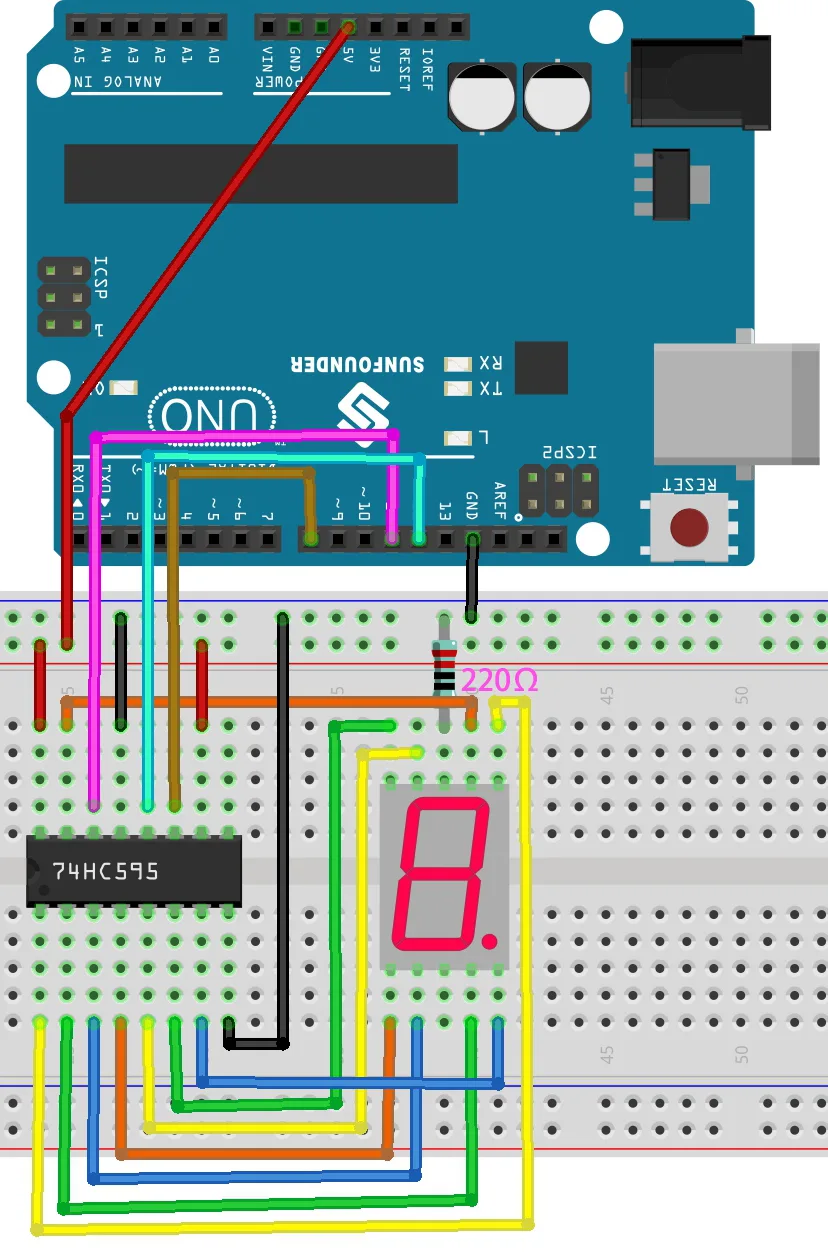
接駁移位寄存器同顯示器睇落可能好複雜,但係跟住圖一步步嚟係好重要。影片(喺04:48)提供咗呢個過程嘅詳細講解。74HC595晶片有一端有個凹口嚟識別引腳1。引腳由凹口開始逆時針編號(一邊係1-8,另一邊係9-16)。
以下係影片入面嘅接線總結:
- 電源同接地:將74HC595嘅引腳8同引腳13連去接地軌。將引腳10同引腳16連去5V軌。
- 數據線:將Arduino嘅數碼引腳連去移位寄存器嘅數據引腳:引腳12(STcp)去晶片引腳12,引腳8(SHcp)去晶片引腳11,引腳11(DS)去晶片引腳14。
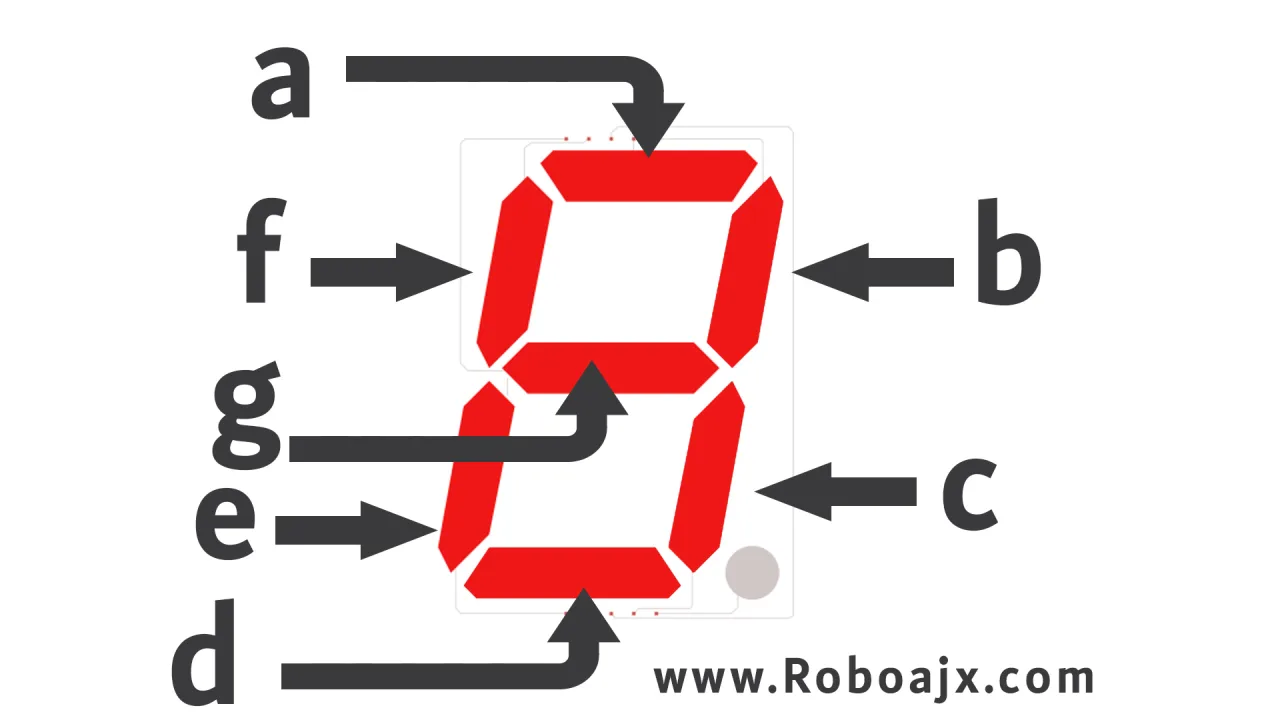
- 顯示器去移位寄存器:呢個係最複雜嘅部分。影片(喺07:18)詳細講解每個連接。例如,顯示器嘅'a'段連去晶片引腳6,'b'段連去引腳5,如此類推。顯示器嘅共陰極引腳透過一個電阻連去接地。
想睇視覺化同精確嘅指南,請參考官方接線圖:
確切嘅引腳連接好關鍵,好容易會出錯。慢慢嚟,對住圖逐條線檢查多幾次。影片係一個好好嘅參考,可以跟住做。
程式碼解釋
呢一課提供咗兩個程式碼例子。第一個係簡單計數器,第二個喺佢基礎上整電子骰仔。兩者共享相同嘅核心邏輯嚟控制顯示器。
以下係基本計數器嘅程式碼:
const int STcp = 12;//連去74HC595嘅ST_CP嘅引腳
const int SHcp = 8;//連去74HC595嘅SH_CP嘅引腳
const int DS = 11; //連去74HC595嘅DS嘅引腳

int datArray[] = {0x3f,0x06,0x5b,0x4f,0x66,0x6d,0x7d,0x07,0x7f,0x6f};
喺程式碼最頂,你可以設定連去移位寄存器嘅三條引腳。STcp、SHcp同DS分別分配畀Arduino引腳12、8同11。datArray[]係一個好關鍵嘅部分。佢係一個查詢表,包含數字0到9嘅十六進制值。每個值代表要點亮嗰個特定數字所需嘅段模式。
loop() 函數負責執行計數器。佢用一個 for 迴圈由 0 數到 9。喺迴圈入面,程式碼會將當前數字嘅數據傳送到移位暫存器。最後嘅 delay(1000) 設定計數器嘅速度,單位係毫秒。將呢個值改做 100 就可以數得快啲,或者改做 500 就可以慢啲。
電子骰仔嘅程式碼引入咗一個新元素:透過按鈕嚟做用戶輸入。主要嘅配置改動如下:
const int buttonPin = 2;
//...
pinMode(buttonPin, INPUT);
attachInterrupt(digitalPinToInterrupt(buttonPin), rollDice, FALLING);
呢度,buttonPin 設定為數碼引腳 2。呢個引腳特別在於佢可以用嚟做中斷。中斷容許 Arduino 喺按鈕被撳嘅時候即刻停止手頭上嘅工作,確保快速同可靠嘅回應。FALLING 模式會喺按鈕被撳(訊號由 HIGH 變做 LOW)時觸發中斷。
rollDice 函數由中斷呼叫。佢會將 state 變數喺 0 同 1 之間切換。當 state 係 0 嘅時候,骰仔就係「碌緊」,主 loop() 會隨機顯示數字。當按鈕再被撳多次,state 會變做 1,停止迴圈並顯示最終結果。showNumber() 函數同計數器嘅邏輯一樣,但佢接受一個數字作為參數嚟顯示。
實際項目同示範
一旦上載咗程式碼,計數器就會開始運行,以一秒嘅延遲顯示 0 到 9 嘅數字(喺影片 15:04)。影片示範咗改變延遲時間令計數器運行快好多。
電子骰仔嘅示範(喺影片 20:15)展示咗按鈕嘅運作。當你撳一次,顯示器會開始快速循環顯示數字。再撳多次就會停止循環,留低一個 1 到 6 之間嘅隨機數字,同真骰仔一樣。
章節
- [00:00] 七段顯示器項目簡介
- [01:25] 了解七段顯示器
- [03:51] 5161AS 顯示器數據手冊同規格
- [04:48] 接線顯示器同移位暫存器
- [12:24] 0-9 計數器嘅 Arduino 程式碼
- [15:04] 計數器示範同調整速度
- [16:27] 建立電子骰仔項目
- [20:15] 電子骰仔示範同防彈跳處理
圖片
/*
Lesson 23/31: Using Seven Segment Display
Get this code and watch video Download and resource page https://robojax.com/RJT605
YouTube video https://www.youtube.com/watch?v=3qoGAYh0lbc

*/
const int STcp = 12;//Pin connected to ST_CP of 74HC595
const int SHcp = 8;//Pin connected to SH_CP of 74HC595
const int DS = 11; //Pin connected to DS of 74HC595

int datArray[] = {0x3f,0x06,0x5b,0x4f,0x66,0x6d,0x7d,0x07,0x7f,0x6f};

void setup ()
{
  //set pins to output
  pinMode(STcp,OUTPUT);
  pinMode(SHcp,OUTPUT);
  pinMode(DS,OUTPUT);
}
void loop()
{
  for(int num = 0; num <10; num++)
  {
    digitalWrite(STcp,LOW); //ground ST_CP and hold low for as long as you are transmitting
    shiftOut(DS,SHcp,MSBFIRST,datArray[num]);
    digitalWrite(STcp,HIGH); //pull the ST_CPST_CP to save the data
    delay(1000);
  }
}
/*
Lesson 23/31: Electronic Dice
Get this code and watch video Download and resource page https://robojax.com/RJT605
YouTube video https://www.youtube.com/watch?v=3qoGAYh0lbc

*/
const int STcp = 12;//Pin connected to ST_CP of 74HC595
const int SHcp = 8;//Pin connected to SH_CP of 74HC595
const int DS = 11; //Pin connected to DS of 74HC595
const int buttonPin = 2;
int datArray[] = { 0x3f, 0x06, 0x5b, 0x4f, 0x66, 0x6d, 0x7d, 0x07, 0x7f,  0x6f};
int number = 0;
int state = 0;

void setup ()
{
  //set pins to output
  pinMode(STcp, OUTPUT);
  pinMode(SHcp, OUTPUT);
  pinMode(DS, OUTPUT);
  pinMode(buttonPin, INPUT);

  attachInterrupt(digitalPinToInterrupt(buttonPin), rollDice, FALLING);
}

void loop()
{
  if (state == 0) {
    showNumber((int)random(1, 7));
    delay(50);
  }
}

void showNumber(int num) {
  digitalWrite(STcp, LOW); //ground ST_CP and hold low for as long as you are transmitting
  shiftOut(DS, SHcp, MSBFIRST, datArray[num]);
  //return the latch pin high to signal chip that it
  //no longer needs to listen for information
  digitalWrite(STcp, HIGH); //pull the ST_CPST_CP to save the data
}


void rollDice() {
  state = !state;
}
Common Course Links
Common Course Files
你可能需要嘅嘢
-
亞馬遜SunFounder Arduino Learning Kit on AliExpresss.click.aliexpress.com
-
亞馬遜
-
亞馬遜
-
亞馬遜
資源與參考資料
-
文件记录Documentation for SunFounder 3 in 1 IoT/Smart Car/Learning Kitdocs.sunfounder.com
-
外部Purchase SunFounder's 3-in-1 Smart car learning kitsunfounder.com
文件📁
Arduino 函式庫 (zip)
-
SunFounder's 3-in-1 Smart Car learning kit source code
3in1-kit-main-v2.zip12.80 MB