第18/31课:使用伺服电机与Arduino SunFounder的Arduino套件
伺服馬達係無數機械人同遙控項目嘅主力,為轉向機構到機械臂等各種嘢提供精確嘅角度控制。呢個指南,基於SunFounder Arduino套件課程嘅第18課,會帶你了解用Arduino控制伺服馬達嘅基礎。你會學到點樣連接硬件,同埋用兩種唔同方法控制馬達位置:簡單嘅掃描動作同埋用旋鈕控制位置。你喺度學到嘅知識好實用,可以應用喺好多項目度,包括:
- 整一隻可以精確夾起同移動物件嘅機械臂。
- 整一部用伺服馬達轉向嘅遙控車或者船。
- 開發一個追蹤太陽以最大化收集能量嘅太陽能追蹤器。
- 為監控或者攝影整一個可以上下左右轉動嘅鏡頭支架。
- 自動化模型飛機嘅控制面,好似方向舵或者副翼咁。

硬件概述
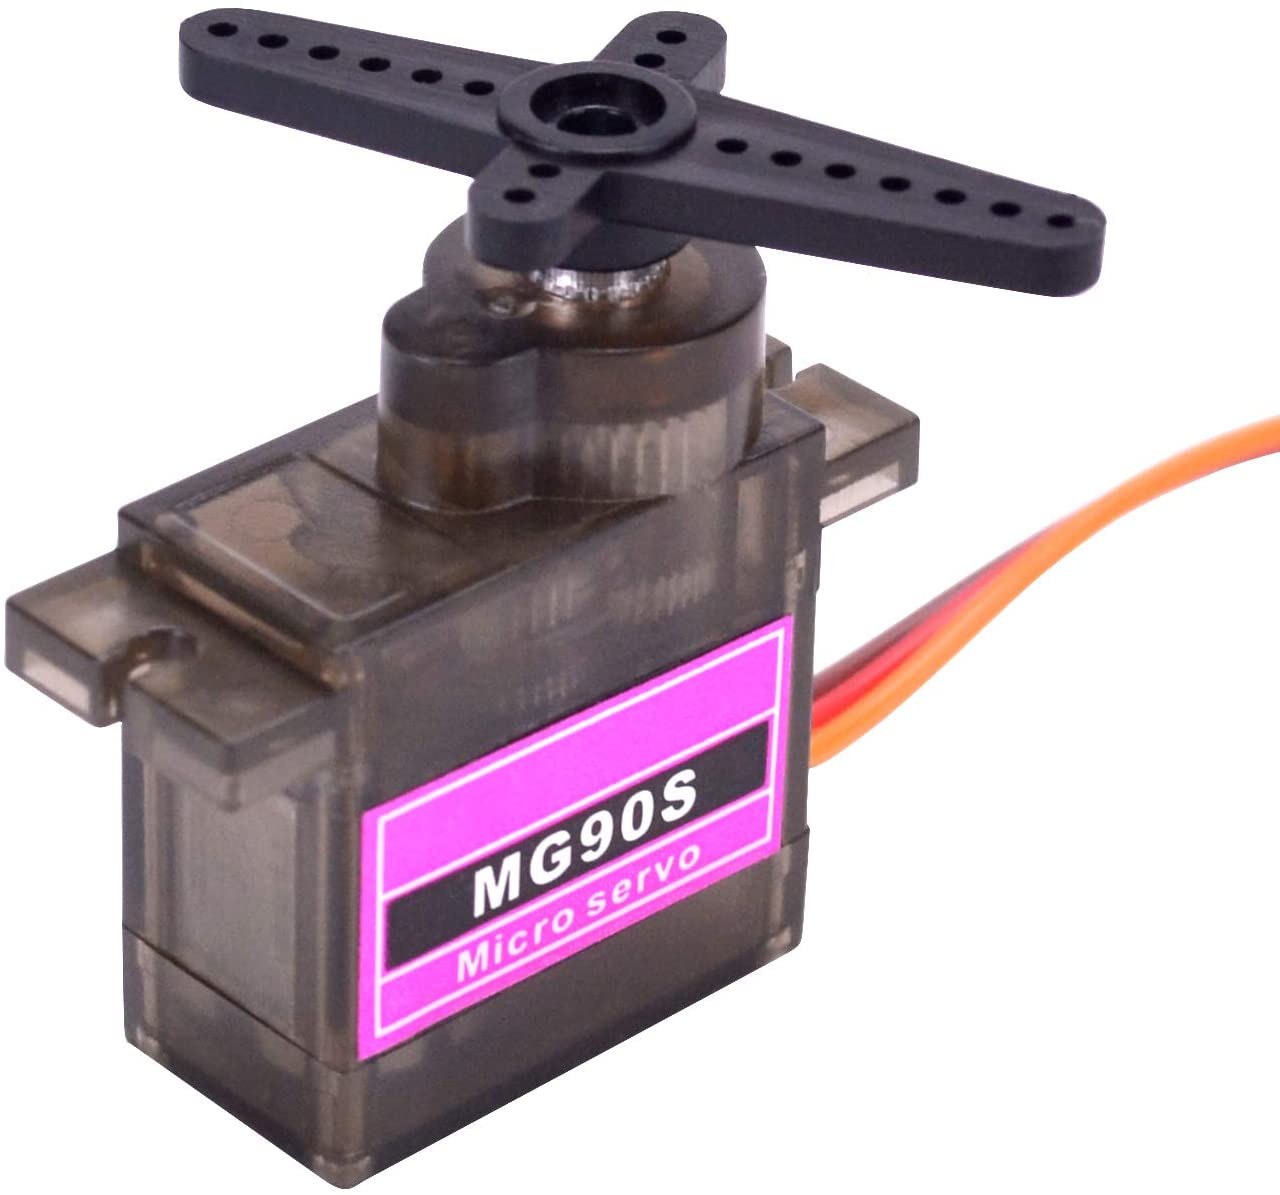
喺深入代碼之前,了解伺服馬達本身好重要。好似影片入面示範咁,伺服馬達唔似標準直流馬達咁連續轉動。相反,佢會轉到一個特定嘅角度位置,通常係0到180度之間。呢個令到佢好適合需要精確移動嘅應用。影片入面強調咗幾個例子,由控制遙控車轉向到控制機械臂嘅複雜關節(影片00:06位置)。
伺服馬達有好多唔同尺寸,物理尺寸同扭力等級決定咗佢哋嘅價錢同應用。一個細嘅微型伺服馬達啱晒輕量模型用,而一個更大、更有力嘅伺服馬達就需要用喺更重嘅任務,好似控制一部「好有力或者好厚嘅車」咁(影片01:59位置)。
大部分業餘伺服馬達都有三條線,收埋喺一個標準連接器入面。影片解釋咗一個聰明嘅設計選擇:中間嗰條線永遠係電源線(VCC),通常係5V。呢個係一個安全功能,防止如果連接器插反咗,會令到裝置受到錯誤極性嘅損害(影片03:27位置)。另外兩條線分別係接地(GND)同控制信號。
接線指南
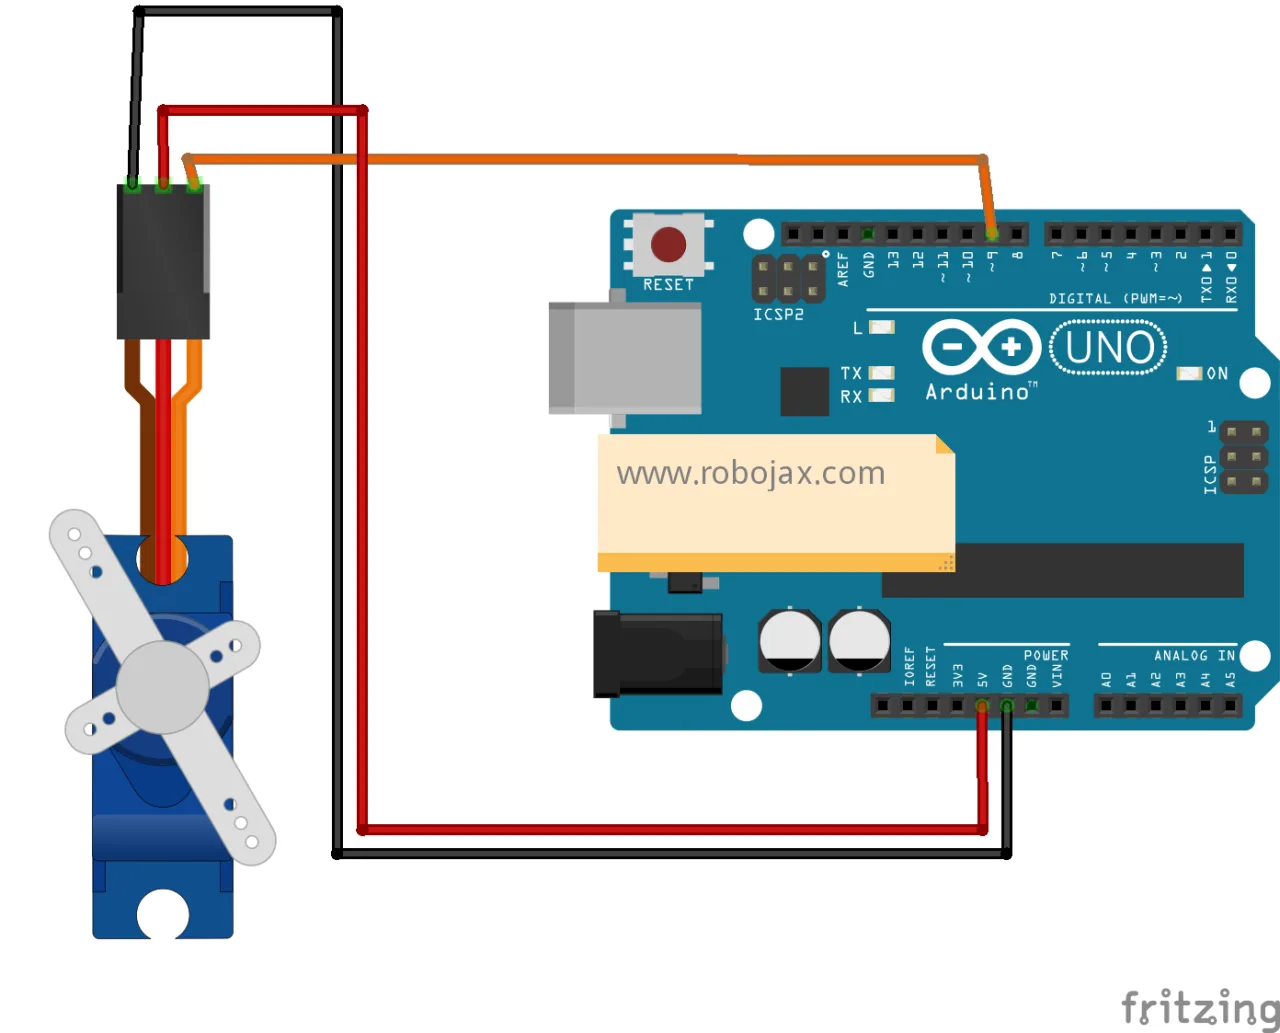
將伺服馬達接去Arduino好簡單。影片入面清楚示範咗點樣連接(影片04:48位置)。伺服馬達連接器上面嘅三個針腳係咁樣連去Arduino嘅:
- 信號線(通常係橙色或者黃色):將呢條線連去Arduino上面一個數碼PWM針腳。例子用咗針腳9。
- 電源線(通常係紅色):將呢條線連去Arduino上面嘅5V針腳。
- 接地線(通常係啡色或者黑色):將呢條線連去Arduino上面其中一個GND針腳。
喺影片入面,示範者用公對公嘅杜邦跳線,將伺服馬達上面嘅母連接器連去Arduino嘅針腳排(影片05:23位置)。
程式1:控制伺服馬達(掃描)
呢個第一個程式就係經典嘅「掃描」例子。佢嘅目的係通過將伺服馬達喺0到180度之間來回移動,示範佢嘅完整活動範圍。呢個係一個好好嘅方法去確認你嘅接線正確,同埋睇到伺服馬達運作。影片示範咗上載呢段代碼,然後睇住伺服馬達來回掃描(影片09:21位置)。
要控制伺服馬達,代碼首先包含內置嘅Servo.h函式庫,佢簡化咗產生必要控制信號嘅過程。然後你建立一個伺服馬達物件,同埋幫佢改個名,好似myservo咁。喺setup()函數入面,你用myservo.attach(9)將呢個物件連去一個特定針腳,話畀Arduino知伺服馬達嘅信號線係連去針腳9。
神奇嘅嘢發生喺loop()函數入面,佢用兩個for迴圈嚟移動伺服馬達。第一個迴圈將位置變數pos由0遞增到180,每次將伺服馬達移動一度。第二個迴圈就做相反嘅嘢,將pos由180遞減返去0。最關鍵嘅部分係每個迴圈疊代結尾嘅delay(15)。呢個暫停畀夠時間伺服馬達實際移動到新位置,先至發送下一個指令。如果冇呢個延遲,伺服馬達就跟唔上,會停頓或者震動(影片12:31位置)。
呢個例子好啱學習用,但係喺真實應用入面,你多數會想將伺服馬達設到一個特定角度。好似影片入面示範咁,你可以修改代碼,將for迴圈換成一個簡單指令,好似myservo.write(90)咁,將伺服馬達移到90度並保持喺嗰度(影片10:09位置)。
程式2:控制伺服馬達(旋鈕)
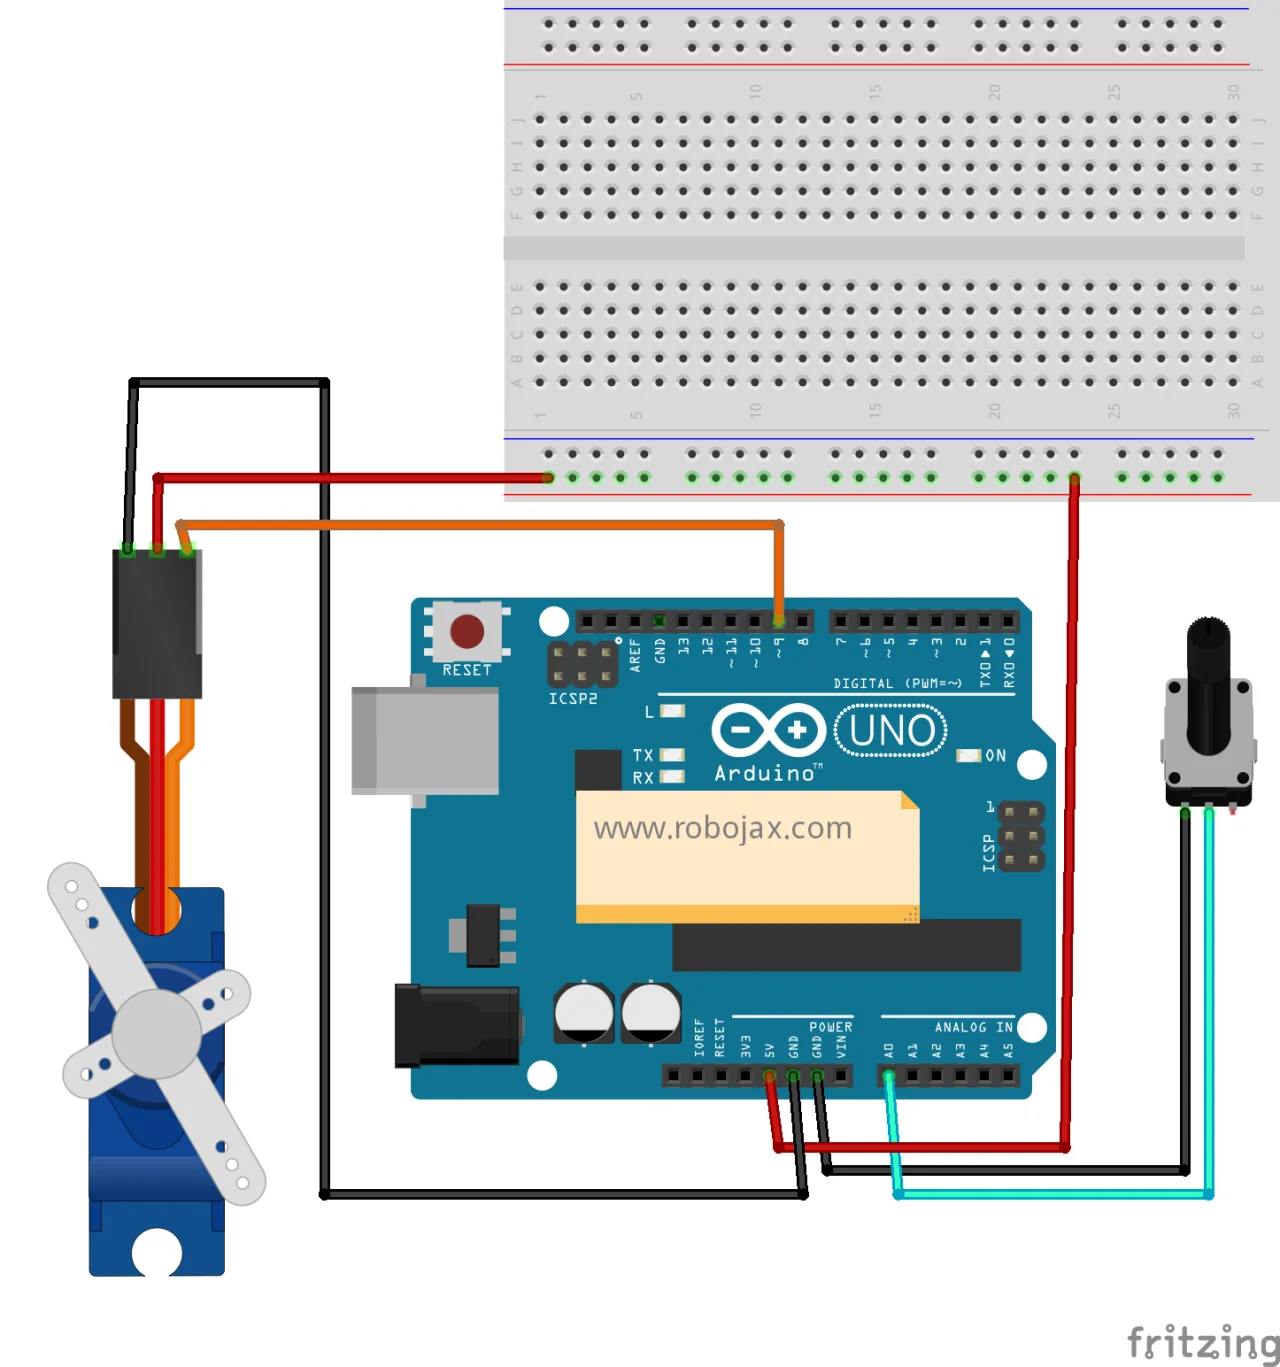
呢個第二個程式將伺服馬達控制再進一步,引入一個電位器(即係一個旋鈕),提供即時、手動嘅伺服馬達位置控制。呢個係一個好好嘅方法去了解模擬輸入點樣可以轉化成精確嘅物理移動。
呢個程式係喺之前嗰個基礎上,加咗一個電位器。電位器係一個可變電阻,作用好似一個模擬電壓分壓器。當你扭個掣,佢會改變輸出腳嘅電壓。Arduino 用佢其中一個模擬腳嘅模擬轉數碼轉換器(ADC)讀取呢個電壓,將佢轉做一個 0 到 1023 之間嘅數值。
呢個程式嘅關鍵係 map() 函數。呢個函數會將一個數字由一個範圍縮放到另一個範圍。喺呢個情況,佢用嚟將電位器嘅原始數值(0 到 1023)轉做適合伺服馬達嘅數值(0 到 180 度)。程式用 analogRead(potpin) 讀取電位器嘅數值,用 map(val, 0, 1023, 0, 180) 縮放佢,然後用 myservo.write(val) 將縮放後嘅數值傳俾伺服馬達。咁樣就建立咗一個直接嘅聯繫,扭個掣到中間位置,伺服馬達就會去到 90 度,如此類推。
呢種控制方法非常直觀,係好多人和機器介面嘅基礎,由簡單嘅遙控器到複雜嘅機械人控制器都係咁。
現場項目示範
條片提供咗兩個程式實際運行嘅現場示範。對於掃描程式,你可以見到伺服馬達臂由 0 度平滑噉移動到 180 度,再返轉頭。主持人仲示範咗點樣調整 for 迴圈入面嘅步長(例如由 1 度改做 20 度)同延遲時間,嚟改變伺服馬達嘅行為,令動作快咗但冇咁平滑(片入面 11:19 位置)。
對於旋鈕程式,示範顯示咗點樣扭電位器直接實時控制伺服馬達嘅位置。呢種視覺回饋對於理解模擬輸入同物理輸出之間嘅關係非常有用。
章節
- [00:00] 伺服馬達簡介
- [01:07] 伺服馬達嘅應用
- [02:57] 伺服馬達嘅結構
- [04:48] 將伺服馬達接駁到 Arduino
- [06:06] 探索掃描範例程式碼
- [09:21] 示範掃描程式
- [10:04] 設定自訂伺服馬達角度
- [11:19] 修改掃描速度同步長
- [13:15] 另一個伺服馬達嘅例子
圖片
/*
Lesson 18/31: Controlling servo motor (sweep)
Get this code and watch video Download and resource page https://robojax.com/RJT601
YouTube video https://www.youtube.com/watch?v=KAt1WUWpHLQ


 * This code is "AS IS" without warranty or liability. Free to be used as long as you keep this note intact.*
 * This code has been download from Robojax.com
    This program is free software: you can redistribute it and/or modify
    it under the terms of the GNU General Public License as published by
    the Free Software Foundation, either version 3 of the License, or
    (at your option) any later version.

    This program is distributed in the hope that it will be useful,
    but WITHOUT ANY WARRANTY; without even the implied warranty of
    MERCHANTABILITY or FITNESS FOR A PARTICULAR PURPOSE.  See the
    GNU General Public License for more details.

    You should have received a copy of the GNU General Public License
    along with this program.  If not, see <https://www.gnu.org/licenses/>.
 */

#include <Servo.h>

Servo myservo;  // create Servo object to control a servo
// twelve Servo objects can be created on most boards

int pos = 0;    // variable to store the servo position

void setup() {
  myservo.attach(9);  // attaches the servo on pin 9 to the Servo object
}

void loop() {
  for (pos = 0; pos <= 180; pos += 1) { // goes from 0 degrees to 180 degrees
    // in steps of 1 degree
    myservo.write(pos);              // tell servo to go to position in variable 'pos'
    delay(15);                       // waits 15 ms for the servo to reach the position
  }
  for (pos = 180; pos >= 0; pos -= 1) { // goes from 180 degrees to 0 degrees
    myservo.write(pos);              // tell servo to go to position in variable 'pos'
    delay(15);                       // waits 15 ms for the servo to reach the position
  }
}
/*
Lesson 18/31: Controlling servo motor (knob)
Get this code and watch video Download and resource page https://robojax.com/RJT601
YouTube video https://www.youtube.com/watch?v=KAt1WUWpHLQ


 * This code is "AS IS" without warranty or liability. Free to be used as long as you keep this note intact.*
 * This code has been download from Robojax.com
    This program is free software: you can redistribute it and/or modify
    it under the terms of the GNU General Public License as published by
    the Free Software Foundation, either version 3 of the License, or
    (at your option) any later version.

    This program is distributed in the hope that it will be useful,
    but WITHOUT ANY WARRANTY; without even the implied warranty of
    MERCHANTABILITY or FITNESS FOR A PARTICULAR PURPOSE.  See the
    GNU General Public License for more details.

    You should have received a copy of the GNU General Public License
    along with this program.  If not, see <https://www.gnu.org/licenses/>.
 */
#include <Servo.h>

Servo myservo;  // create servo object to control a servo

int potpin = 0;  // analog pin used to connect the potentiometer
int val;    // variable to read the value from the analog pin

void setup() {
  myservo.attach(9);  // attaches the servo on pin 9 to the servo object
}

void loop() {
  val = analogRead(potpin);            // reads the value of the potentiometer (value between 0 and 1023)
  val = map(val, 0, 1023, 0, 180);     // scale it to use it with the servo (value between 0 and 180)
  myservo.write(val);                  // sets the servo position according to the scaled value
  delay(15);                           // waits for the servo to get there
}
Common Course Links
Common Course Files
你可能需要嘅嘢
-
亞馬遜SunFounder Arduino Learning Kit on AliExpresss.click.aliexpress.com
-
亞馬遜
-
亞馬遜
-
亞馬遜
資源與參考資料
-
文件记录Documentation for SunFounder 3 in 1 IoT/Smart Car/Learning Kitdocs.sunfounder.com
-
外部Purchase SunFounder's 3-in-1 Smart car learning kitsunfounder.com
文件📁
Arduino 函式庫 (zip)
-
SunFounder's 3-in-1 Smart Car learning kit source code
3in1-kit-main-v2.zip12.80 MB