呢個教學係以下嘅一部分: WiFi LoRa 32 教程
所有与Heltec WiFi LoRa 32相关的视频都通过此群组进行关联。其他视频的链接位于本文下方。
使用Heltec WiFi LoRa 32 V3透過DHT22傳送溫度到1.4公里
喺呢個教學入面,我哋會探討點樣用 Heltec WiFi LoRa 32 V3 模組,將 DHT22 感測器嘅溫度數據傳送到好遠嘅距離,最遠可以去到 1.4 公里。呢個能力係透過 LoRa 技術實現嘅,呢種技術可以做到低功耗、長距離通訊。完成呢個指南之後,你就會有一個可以無線傳送溫度讀數嘅運作系統。
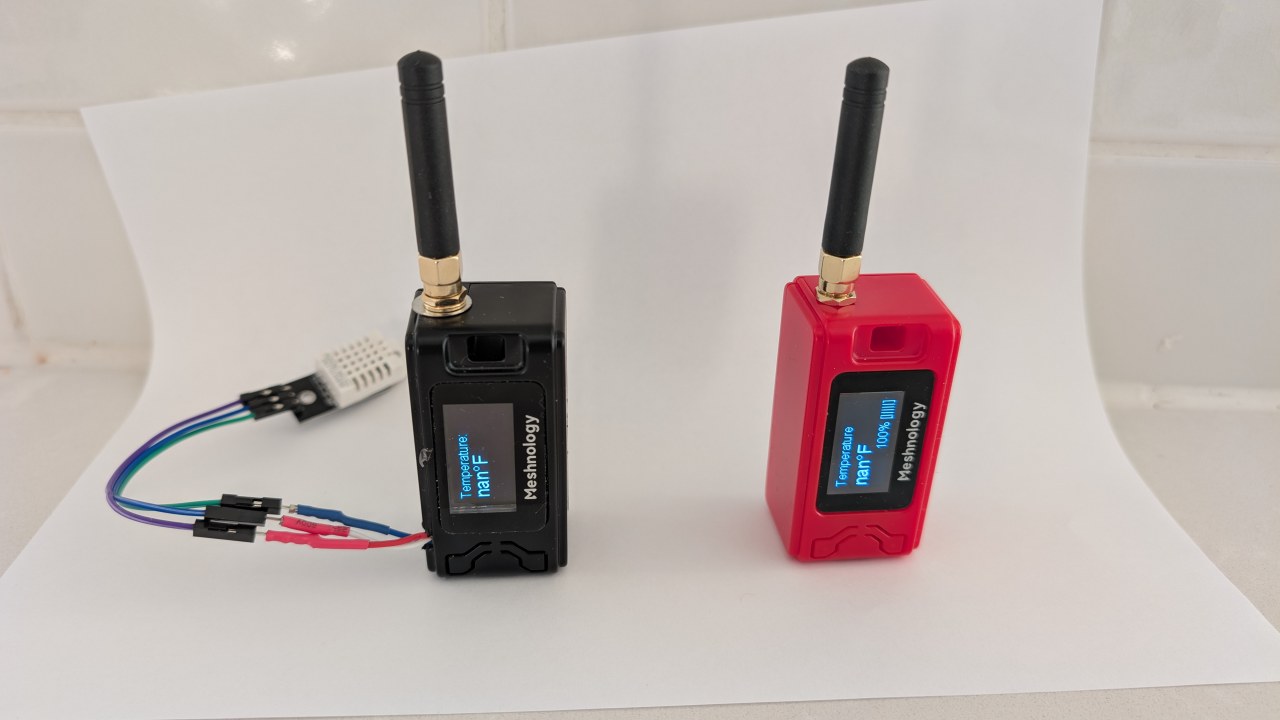
我哋會由呢個項目涉及嘅硬件組件概覽開始,包括 Heltec WiFi LoRa 32 V3 模組同 DHT22 感測器。之後,我哋會繼續做接線指示,你會學到點樣連接呢啲組件。最後,我哋會逐步講解令呢個系統運作所需嘅程式碼。如果想睇視覺指引,請參考影片入面嘅唔同時間點(影片 00:00 位置)。
硬件講解
呢個項目嘅主要組件係 Heltec WiFi LoRa 32 V3 模組同 DHT22 溫濕度感測器。Heltec 模組配備咗 ESP32 微控制器,除咗 LoRa 通訊之外,仲提供 Wi-Fi 同藍牙功能。咁樣就可以有靈活嘅數據傳送選項。
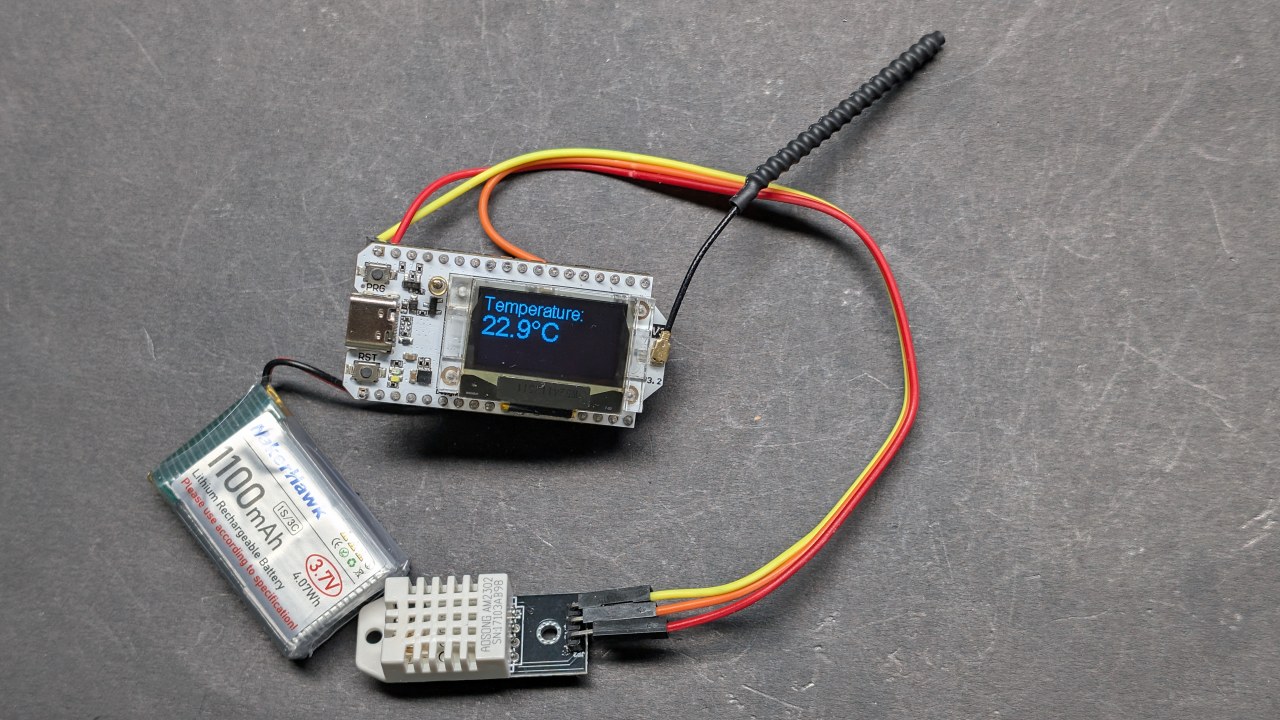
DHT22 感測器係一個數碼感測器,可以提供準確嘅溫度同濕度讀數。佢透過一個數碼輸出引腳同 ESP32 通訊,令到喺你嘅項目入面連接同使用都好容易。呢啲組件夾埋一齊,就形成一個穩健嘅無線溫度監測系統。
數據表詳情
| 製造商 | Heltec Automation |
|---|---|
| 零件編號 | WiFi LoRa 32 V3 |
| 邏輯/IO 電壓 | 3.3 V |
| 供電電壓 | 3.7–4.2 V |
| 輸出電流(每通道) | ~1 A |
| 峰值電流(每通道) | ~2 A |
| PWM 頻率指引 | 1 kHz(典型值) |
| 輸入邏輯閾值 | 0.7 V(高),0.3 V(低) |
| 電壓降 / RDS(on) / 飽和 | 0.3 V(最大) |
| 熱限制 | 85 °C(最大) |
| 封裝 | PCB 模組 |
| 備註 / 變體 | 有多種頻率選項(例如 433 MHz、868 MHz、915 MHz) |
- 確保用 3.3V 供電畀 DHT22,唔好用 5V。
- 喺 ESP32 同 DHT22 之間通訊要用合適嘅邏輯電平。
- 如果長時間用高電流運行,要考慮加散熱片。
- 檢查 LoRa 嘅天線連接,以最大化傳送距離。
- 留意你所在地區嘅 LoRa 頻率規例。
接線指示
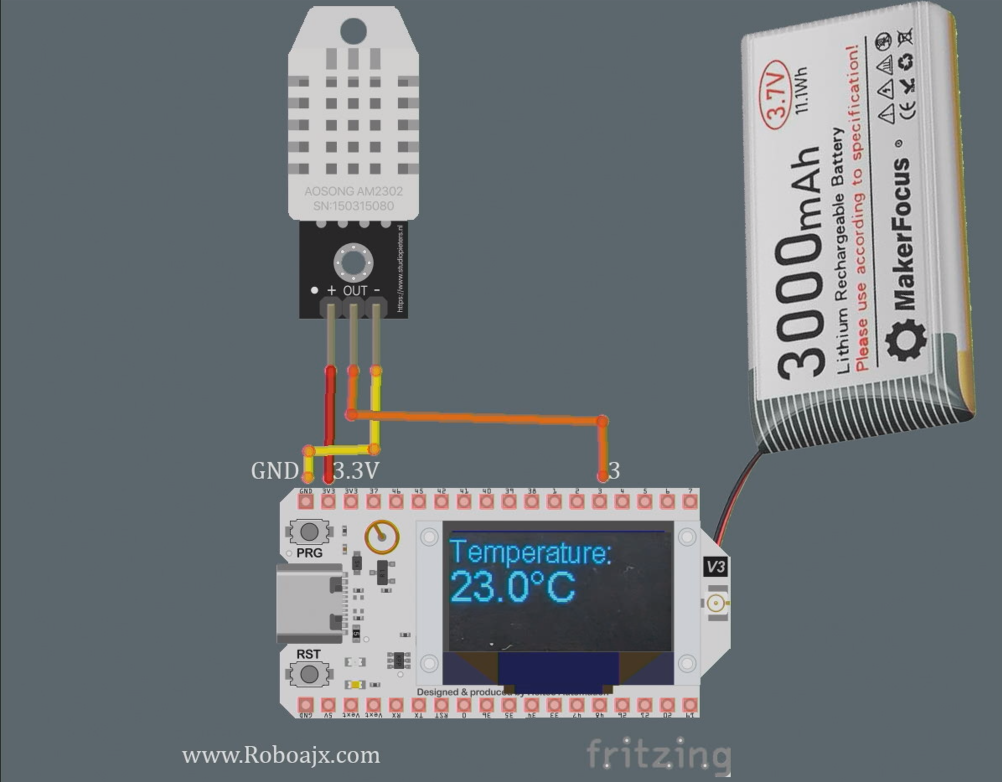
要將 Heltec WiFi LoRa 32 V3 同 DHT22 感測器接線,首先將感測器嘅 VCC 引腳連接到 Heltec 模組嘅 3.3V 引腳。跟住將 DHT22 嘅 GND 引腳連接到 Heltec 上面其中一個 GND 引腳。DHT22 嘅數據引腳就要連接到 Heltec 嘅 GPIO 引腳 3。
確保喺數據引腳同 VCC 之間用一個上拉電阻(大約 10kΩ),先至可以穩定讀數。另外,確保 LoRa 天線連接穩固,以增強傳送範圍。如果你用外部電源,要確保 Heltec 模組供電正確,避免出現操作問題。
安裝 Heltec ESP32 Boards
將呢個路徑加入你 Arduino IDE 嘅偏好設定入面,好似影片入面咁做:https://resource.heltec.cn/download/package_heltec_esp32_index.json
安裝 Heltec ESP32 Libraries
喺 Arduino IDE 打開之後,請撳 Library 圖示(1),然後喺搜尋欄輸入「Heltec」(2),再撳安裝(3),請睇圖片。

程式碼範例同講解
以下嘅程式碼片段示範點樣設定 Heltec 模組去讀取 DHT22 感測器嘅溫度數據,並透過 LoRa 傳送。程式碼會初始化顯示屏,並設定 DHT 感測器。
#include
#define DHTPIN 3         // DHT22 嘅 GPIO 引腳
#define DHTTYPE DHT22    // 定義 DHT 類型
DHT dht(DHTPIN, DHTTYPE);
void setup() {
  Serial.begin(115200);
  dht.begin(); // 初始化 DHT 感測器
}
喺呢個片段入面,我哋定義咗 DHT22 感測器連接嘅引腳,並喺 setup() 函數入面初始化佢。Serial.begin(115200) 呢行係用嚟做除錯輸出。
void loop() {
  float tempC = dht.readTemperature(); // 讀取攝氏溫度
  float tempF = dht.convertCtoF(tempC); // 轉換做華氏
  sendData(tempC, tempF); // 用嚟傳送溫度數據嘅函數
}
呢段節錄示範咗點樣喺 loop() 函數入面讀取溫度數據。sendData() 函數會被呼叫,用嚟透過 LoRa 傳送溫度讀數。
void sendData(float tempC, float tempF) {
  String data = "溫度: " + String(tempC) + "°C"; // 建立數據字串
  Radio.Send(data.c_str(), data.length()); // 發送數據
}
喺度,我哋建立包含溫度嘅數據字串,並用 Radio.Send() 方法發送。咁樣會將數據無線傳輸到接收模組。
請參考文章下面載入嘅完整代碼,了解詳細實現。
示範 / 預期效果
一旦所有嘢設定好並將代碼上傳到 Heltec 模組,你應該會喺 OLED 螢幕上見到溫度讀數。系統會傳輸溫度數據,可以由另一個設定為讀取數據嘅 Heltec 模組接收。你可以透過將接收器移離發射器嚟測試範圍,確認達到嘅最大距離(影片 1:30 位置)。
要小心常見錯誤,例如接線錯誤、電源供應不足,或者用錯 LoRa 頻率。確保 DHT22 正常運作,並且天線已連接以最大化範圍。
影片時間戳
- 00:00 開始
- 3:51 規格
- 8:32 文檔頁面
- 9:52 包裝同電池
- 12:58 第一次開機
- 16:37 安裝程式庫
- 18:19 發射器基本代碼
- 19:43 接收器基本代碼
- 20:39 發送接收文字示範
- 23:02 OLED 示範代碼
- 24:06 OLED 顯示基本文字代碼
- 26:26 OLED 顯示基本文字示範
- 26:58 用 DHT22 讀取溫度
- 28:49 LoRa 發射器溫度同顯示
- 30:07 LoRa 接收器溫度同顯示
- 32:13 溫度升高時觸發 LED
- 22:26 LoRa 傳輸範圍測試
- 35:01 dBm 同毫瓦
圖片
呢個教學係以下嘅一部分: WiFi LoRa 32 教程
- 13英里20公里冇WiFi?LoRa點樣將電壓傳到癲咗嘅距離!(Heltec WiFi LoRa 32 V3)
- 由13英里(21公里)外开启设备——终极离网LoRa项目,搭配WiFi LoRa 32!
- 13英里21公里外嘅遙距門警報系統 用LoRa – 完全離網!(Heltec WiFi LoRa 32 V3)
- 由幾里外控制Servo摩打!Heltec WiFi LoRa 32 V3 Arduino教學(TX)
- DIY遙控繼電器項目:13英里無Wi-Fi/無SIM Heltec LoRa 32模組
- How to Use the Heltec LoRa CubeCell Development Board HTCC-AB01
/*
This is a simple code to display text on the OLED display
WiFi LoRa 32 V3 ESP32 module
Written by Ahmad Shamshiri 02 April 2025
Watch full video explanation https://youtu.be/WkyQMXkQhE8
Resources page https://robojax.com/tutorial_view.php?id=387
*/
#include <Wire.h>
#include "HT_SSD1306Wire.h"


static SSD1306Wire  display(0x3c, 500000, SDA_OLED, SCL_OLED, GEOMETRY_128_64, RST_OLED); // addr , freq , i2c group , resolution , rst


void setup() {
  Serial.begin(115200);
  Serial.println();
  Serial.println();
  VextON();
  delay(100);

  // Initialising the UI will init the display too.
  display.init();

  display.setFont(ArialMT_Plain_10);

}


void displayTemperature(double temperature, int unit) {
    display.clear();  // Clear display before new content

    // Line 1: "Temperature:" in 16pt font
    display.setTextAlignment(TEXT_ALIGN_LEFT);
    display.setFont(ArialMT_Plain_16);
    display.drawString(0, 0, "Temperature:");

    // Line 2: Temperature value in 24pt font
    display.setFont(ArialMT_Plain_24);

    // Format temperature with correct unit symbol
    String tempString = String(temperature, 1); // 1 decimal place
    switch(unit) {
        case 1:  tempString += "�C"; break;  // Celsius
        case 2:  tempString += "�F"; break;  // Fahrenheit
        default: tempString += "�U"; break;  // Unknown unit
    }

    display.drawString(0, 20, tempString);  // Display at Y=20 (below label)
    display.display();  // Update OLED
}


void VextON(void)
{
  pinMode(Vext,OUTPUT);
  digitalWrite(Vext, LOW);
}

void VextOFF(void) //Vext default OFF
{
  pinMode(Vext,OUTPUT);
  digitalWrite(Vext, HIGH);
}


void loop() {
  // clear the display
  display.clear();
  displayTemperature(23.5, 1); // Displays "23.5�C" /1
  delay(2000);

}/*
written on March 27, 2025
written by Ahmad Shamshiri for www.Robojax.com
Transmits Temperature and Humidity over LoRa RF using ESP32 LoRA 32 V3 module.
and displays the information on the screen.
Watch full video explanation https://youtu.be/WkyQMXkQhE8
Resources page: https://robojax.com/tutorial_view.php?id=387
*/
#include <Wire.h>
#include "HT_SSD1306Wire.h"
static SSD1306Wire display(0x3c, 500000, SDA_OLED, SCL_OLED, GEOMETRY_128_64, RST_OLED); // addr , freq , i2c group , resolution , rst
#include <DHT.h>
#define DHTPIN 3 // GPIO21
#define DHTTYPE DHT22 // DHT22 (AM2302)
DHT dht(DHTPIN, DHTTYPE);
float tempC, tempF;
int humidity ;
//1=C
//2=F
//3=C, Humidity //only for display not for transmission
//4=F, Humidity //only for display not for transmission
//5=Humidity only
int dataType = 2;
String labelTemp = "Temperature";
String labelHumidity = "Humidity";
const int TX_POWER = 2;//dBm from 2 to 20. when powered via battery 2 to 14dBm is the best option
#include "mbedtls/aes.h"
#include <cstring> // For memset, memcpy
mbedtls_aes_context aes;
const char *userKey = "hyhT676#h~_876s"; //Security key.
#include "LoRaWan_APP.h"
#include "Arduino.h"
#define RF_FREQUENCY 915000000 // Hz
#define TX_OUTPUT_POWER TX_POWER // dBm from 2 to 20. when powered via battery 2 to 14dBm
#define LORA_BANDWIDTH 0 // [0: 125 kHz,
// 1: 250 kHz,
// 2: 500 kHz,
// 3: Reserved]
#define LORA_SPREADING_FACTOR 7 // [SF7..SF12]
#define LORA_CODINGRATE 1 // [1: 4/5,
// 2: 4/6,
// 3: 4/7,
// 4: 4/8]
#define LORA_PREAMBLE_LENGTH 8 // Same for Tx and Rx
#define LORA_SYMBOL_TIMEOUT 0 // Symbols
#define LORA_FIX_LENGTH_PAYLOAD_ON false
#define LORA_IQ_INVERSION_ON false
#define RX_TIMEOUT_VALUE 1000
#define BUFFER_SIZE 30 // Define the payload size here
char txpacket[BUFFER_SIZE];
char rxpacket[BUFFER_SIZE];
double txNumber;
bool lora_idle=true;
static RadioEvents_t RadioEvents;
unsigned long lastTxTime = 0;
void OnTxDone( void );
void OnTxTimeout( void );
void decryptAES(uint8_t *data, const char *key);
void encryptAES(uint8_t *data, const char *key);
void processKey(const char *userKey, uint8_t *processedKey, size_t keySize);
void setup() {
Serial.begin(115200);
Serial.println();
VextON();
delay(100);
// Initialising the UI will init the display too.
display.init();
display.setFont(ArialMT_Plain_10);
dht.begin();
//LoRa stuff
Mcu.begin(HELTEC_BOARD,SLOW_CLK_TPYE);
txNumber=0;
RadioEvents.TxDone = OnTxDone;
RadioEvents.TxTimeout = OnTxTimeout;
Radio.Init( &RadioEvents );
Radio.SetChannel( RF_FREQUENCY );
Radio.SetTxConfig( MODEM_LORA, TX_OUTPUT_POWER, 0, LORA_BANDWIDTH,
LORA_SPREADING_FACTOR, LORA_CODINGRATE,
LORA_PREAMBLE_LENGTH, LORA_FIX_LENGTH_PAYLOAD_ON,
true, 0, 0, LORA_IQ_INVERSION_ON, 3000 );
}
void displayTemperature(int unit) {
display.clear(); // Clear display before new content
// Line 1: "Temperature:" in 16pt font
display.setTextAlignment(TEXT_ALIGN_LEFT);
// Line 2: Temperature value in 24pt font
display.setFont(ArialMT_Plain_24);
// Format temperature with correct unit symbol
String tempStringC = String(tempC, 1) + "°C"; // 1 decimal place
String tempStringF = String(tempF, 1)+ "°F"; // 1 decimal place
String tempStringHumidity = String(humidity)+ "% RH";
String tempString;
switch(unit) {
case 1:
tempString =tempStringC;
display.setFont(ArialMT_Plain_16);
display.drawString(0, 0, "Temperature:");
display.setFont(ArialMT_Plain_24);
display.drawString(0, 15, tempString);
break; // Celsius
case 2: tempString =tempStringF;
display.setFont(ArialMT_Plain_16);
display.drawString(0, 0, "Temperature:");
display.setFont(ArialMT_Plain_24);
display.drawString(0, 15, tempString);
break; // Fahrenheit
case 3: tempString =tempStringC;
display.setFont(ArialMT_Plain_16);
display.drawString(0, 0, "Temperature:");
display.setFont(ArialMT_Plain_24);
display.drawString(0, 15, tempString);
display.setFont(ArialMT_Plain_16);
display.drawString(0, 40, "Humidity:");
display.drawString(70, 40, tempStringHumidity);
break; // Celsius
case 4: tempString =tempStringF;
display.setFont(ArialMT_Plain_16);
display.drawString(0, 0, "Temperature:");
display.setFont(ArialMT_Plain_24);
display.drawString(0, 15, tempString);
display.setFont(ArialMT_Plain_16);
display.drawString(0, 40, "Humidity:");
display.drawString(70, 40, tempStringHumidity );
break; // Celsius
case 5:
display.setFont(ArialMT_Plain_16);
display.drawString(0, 0, "Humidity:");
display.setFont(ArialMT_Plain_24);
display.drawString(0, 20, tempStringHumidity);
break; // Celsius
default: tempString =tempStringC + "°C"; break;; // default
}
display.display(); // Update OLED
}
void readSensor()
{
tempC = dht.readTemperature();
humidity = dht.readHumidity();
tempF = dht.convertCtoF(tempC);
}
void VextON(void)
{
pinMode(Vext,OUTPUT);
digitalWrite(Vext, LOW);
}
void VextOFF(void) //Vext default OFF
{
pinMode(Vext,OUTPUT);
digitalWrite(Vext, HIGH);
}
void sendData()
{
String tempStringC = String(tempC, 1) + " °C"; // 1 decimal place
String tempStringF = String(tempF, 1)+ " °F"; // 1 decimal place
String tempStringHumidity = String(humidity)+ " % RH";
String txData;
//1=C
//2=F
//3=C, Humidity
//4=F, Humidity
//5=Humidity only
switch(dataType) {
case 1:
txData = labelTemp + " " + tempStringC;
break;
case 2:
txData = labelTemp + " " + tempStringF;
break;
case 3:
txData = labelHumidity + " " + tempStringHumidity;
break;
default:
txData = labelTemp + " " + tempStringC;
break;
}
uint8_t data[32];
memset(data, 0, sizeof(data)); // Zero-padding
strncpy((char*)data, txData.c_str(), sizeof(data) - 1); // Copy string safely
encryptAES(data, userKey); // Encrypt before sending
if(lora_idle == true)
{
delay(1000);
Radio.Send(data, sizeof(data));
Serial.print("Sending: ");
Serial.println((char *)data);
lora_idle = false;
}
Radio.IrqProcess( );
}
void loop() {
readSensor();//read the data
// clear the display
display.clear();
displayTemperature(dataType); //
sendData();
delay(100);
}
void OnTxDone( void )
{
Serial.println("TX done......");
lora_idle = true;
}
void OnTxTimeout( void )
{
Radio.Sleep( );
Serial.println("TX Timeout......");
lora_idle = true;
}
/**
* Converts a user-provided plaintext key into a fixed-length 16-byte (128-bit)
* or 32-byte (256-bit) key.
*/
void processKey(const char *userKey, uint8_t *processedKey, size_t keySize) {
memset(processedKey, 0, keySize); // Fill with zeros
size_t len = strlen(userKey);
if (len > keySize) len = keySize; // Truncate if too long
memcpy(processedKey, userKey, len); // Copy valid key part
}
/**
* Encrypts a 16-byte (one block) message using AES-128.
*/
void encryptAES(uint8_t *data, const char *key) {
uint8_t processedKey[16]; // 128-bit key
processKey(key, processedKey, 16);
mbedtls_aes_init(&aes);
mbedtls_aes_setkey_enc(&aes, processedKey, 128);
mbedtls_aes_crypt_ecb(&aes, MBEDTLS_AES_ENCRYPT, data, data);
mbedtls_aes_free(&aes);
}
/**
* Decrypts a 16-byte (one block) message using AES-128.
*/
void decryptAES(uint8_t *data, const char *key) {
uint8_t processedKey[16]; // 128-bit key
processKey(key, processedKey, 16);
mbedtls_aes_init(&aes);
mbedtls_aes_setkey_dec(&aes, processedKey, 128);
mbedtls_aes_crypt_ecb(&aes, MBEDTLS_AES_DECRYPT, data, data);
mbedtls_aes_free(&aes);
}/*
Written on April 01, 2025
written by Ahmad Shamshiri for www.Robojax.com
this sktech receives the secure temperature or humidity from WiFi LoRa 32 and decrypts it
and displays it on the OLED. There is action feature to triggerd if the temperature is below triggerdValue
Watch full video explaination https://youtu.be/WkyQMXkQhE8
Resources page: https://robojax.com/tutorial_view.php?id=387
*/
#include <Arduino.h>
// Alert configuration
const String triggerdText = "Too High"; // Correct String type
const float triggerdValue = 90.0f; // exclusive (this value is not included)
const int triggerdYpos = 45;
const bool triggerdType = true;//true is > (greter than triggerdValue) and false is < (less than triggerdValue)
const int triggerdOutputPin = 7;//GPIO07 goes HIGH when triggered
const bool triggerdBlink4Me= true;//should blink or not
#include "mbedtls/aes.h"
#include <cstring> // For memset, memcpy
mbedtls_aes_context aes;
const char *userKey = "hyhT676#h~_876s"; //Security key
#define MIN_RSSI -120 // Worst possible signal
#define MAX_RSSI -50 // Best possible signal
// For a connection via I2C using the Arduino Wire include:
#include <Wire.h>
#include "HT_SSD1306Wire.h"
static SSD1306Wire display(0x3c, 500000, SDA_OLED, SCL_OLED, GEOMETRY_128_64, RST_OLED); // addr , freq , i2c group , resolution , rst
#include "LoRaWan_APP.h"
#include "Arduino.h"
#define RF_FREQUENCY 915000000 // Hz
#define TX_OUTPUT_POWER 14 // dBm
#define LORA_BANDWIDTH 0 // [0: 125 kHz,
// 1: 250 kHz,
// 2: 500 kHz,
// 3: Reserved]
#define LORA_SPREADING_FACTOR 7 // [SF7..SF12]
#define LORA_CODINGRATE 1 // [1: 4/5,
// 2: 4/6,
// 3: 4/7,
// 4: 4/8]
#define LORA_PREAMBLE_LENGTH 8 // Same for Tx and Rx
#define LORA_SYMBOL_TIMEOUT 0 // Symbols
#define LORA_FIX_LENGTH_PAYLOAD_ON false
#define LORA_IQ_INVERSION_ON false
#define RX_TIMEOUT_VALUE 1000
#define BUFFER_SIZE 30 // Define the payload size here
char txpacket[BUFFER_SIZE];
char rxpacket[BUFFER_SIZE];
static RadioEvents_t RadioEvents;
int16_t txNumber;
int16_t rssi,rxSize;
bool lora_idle = true;
unsigned long lastRxTime = 0;
const unsigned long SIGNAL_TIMEOUT = 5000; // 5 seconds
void decryptAES(uint8_t *data, const char *key);
void encryptAES(uint8_t *data, const char *key);
void processKey(const char *userKey, uint8_t *processedKey, size_t keySize);
void setup() {
Serial.begin(115200);
Serial.println();
Serial.println();
VextON();
delay(100);
// Initialising the UI will init the display too.
display.init();
display.setFont(ArialMT_Plain_10);
pinMode(triggerdOutputPin, OUTPUT);
//LoRa stuff blow this line
Mcu.begin(HELTEC_BOARD,SLOW_CLK_TPYE);
txNumber=0;
rssi=0;
RadioEvents.RxDone = OnRxDone;
Radio.Init( &RadioEvents );
Radio.SetChannel( RF_FREQUENCY );
Radio.SetRxConfig( MODEM_LORA, LORA_BANDWIDTH, LORA_SPREADING_FACTOR,
LORA_CODINGRATE, 0, LORA_PREAMBLE_LENGTH,
LORA_SYMBOL_TIMEOUT, LORA_FIX_LENGTH_PAYLOAD_ON,
0, true, 0, 0, LORA_IQ_INVERSION_ON, true );
}
void displayTemperature(String data1, String data2) {
display.clear(); // Clear display before new content
// Line 1: "Temperature:" in 16pt font
display.setTextAlignment(TEXT_ALIGN_LEFT);
display.setFont(ArialMT_Plain_16);
display.drawString(0, 0, data1);
// Line 2: Temperature value in 24pt font
display.setFont(ArialMT_Plain_24);
display.drawString(0, 20, data2); //
displaySignalStrength(rssi);
// display.display(); // Update OLED
}
void displayLine(String data, int y) {
// Line 1: "Temperature:" in 16pt font
display.setTextAlignment(TEXT_ALIGN_LEFT);
display.setFont(ArialMT_Plain_10);
if (triggerdBlink4Me) {
// Blink effect: Display text, wait, clear text, wait, then return
display.drawString(0, y, data);
display.display();
delay(500); // Keep text visible for 500ms
display.clear(); // Clear the screen
display.display();
delay(500); // Keep screen blank for 500ms
}
else {
// Normal display without blinking
display.drawString(0, y, data);
display.display();
}
}
void VextON(void)
{
pinMode(Vext,OUTPUT);
digitalWrite(Vext, LOW);
}
void VextOFF(void) //Vext default OFF
{
pinMode(Vext,OUTPUT);
digitalWrite(Vext, HIGH);
}
void loop() {
RaIrqProcessdio( );
if(lora_idle)
{
lora_idle = false;
Serial.println("into RX mode");
Radio.Rx(0);
}
noSignalCheck();
delay(100);
}
void displaySignalStrength(int16_t rssi) {
// Convert RSSI to percentage (0-100%)
int percent = map(constrain(rssi, MIN_RSSI, MAX_RSSI), MIN_RSSI, MAX_RSSI, 0, 100);
// Display at bottom right corner
display.setTextAlignment(TEXT_ALIGN_RIGHT);
display.setFont(ArialMT_Plain_16);
// Create signal strength indicator
String strength = String(percent) + "% [";
for (int i = 0; i < 5; i++) {
strength += (percent > (i * 20)) ? "|" : " ";
}
strength += "]";
display.drawString(128, 45, strength); // Position at bottom-right
}
void noSignalCheck()
{
// Automatic "No Signal" after timeout
if (millis() - lastRxTime > SIGNAL_TIMEOUT) {
display.clear();
display.setTextAlignment(TEXT_ALIGN_CENTER);
display.setFont(ArialMT_Plain_16);
display.drawString(64, 20, "No Signal");
display.display();
}
}
/**
* Triggers an action based on a threshold comparison.
*
* @param type - If true, triggers when floatValue **exceeds** triggerdValue.
* If false, triggers when floatValue **falls below** triggerdValue.
* @param floatValue - The current measured value to compare.
* @param triggerdValue - The threshold value that determines the trigger condition.
*/
void triggerAction(float floatValue)
{
if(triggerdType)
{
if (floatValue > triggerdValue) {
displayLine(triggerdText, triggerdYpos);
Serial.println(triggerdText);
digitalWrite(triggerdOutputPin, HIGH);//turns triggerdOutputPin to HIGH
}else{
digitalWrite(triggerdOutputPin, LOW);
}
}else{
if (floatValue < triggerdValue) {
displayLine(triggerdText, triggerdYpos);
Serial.println(triggerdText);
digitalWrite(triggerdOutputPin, HIGH);//turns triggerdOutputPin to HIGH
} else{
digitalWrite(triggerdOutputPin, LOW);//turns triggerdOutputPin to LOW
}
}
}
void OnRxDone( uint8_t *payload, uint16_t size, int16_t rssi, int8_t snr )
{
lastRxTime = millis(); // Reset timer on new data
rssi=rssi;
rxSize=size;
memcpy(rxpacket, payload, size );
rxpacket[size]='\0';
Radio.Sleep( );
Serial.printf("\r\nreceived packet \"%s\" with rssi %d , length %d\r\n",rxpacket,rssi,rxSize);
// Serial.println("Encrypted Data (Hex):");
// for (int i = 0; i < 16; i++) {
// Serial.printf("%02X ", rxpacket[i]);
// }
// Serial.println();
decryptAES((uint8_t *)rxpacket, userKey);
// Split the received packet into parts
String receivedStr = String((char*)rxpacket);
int firstSpacePos = receivedStr.indexOf(' ');
if (firstSpacePos != -1) {
// First part (before first space)
String part1 = receivedStr.substring(0, firstSpacePos); // "Temperature"
// Find second space (after the number)
int secondSpacePos = receivedStr.indexOf(' ', firstSpacePos + 1);
if (secondSpacePos != -1) {
// Second part (numeric value)
String part2 = receivedStr.substring(firstSpacePos + 1, secondSpacePos); // "34.5"
float floatValue = part2.toFloat(); // Convert to float 34.5
// Third part (unit)
String part3 = receivedStr.substring(secondSpacePos + 1); // "°C"
displayTemperature(part1, part2+part3);
display.display();
Serial.print("part1: " + part1);
Serial.print(" part2: " + part2);
Serial.println(" part3: " + part3);
Serial.println("floatValue " + String(floatValue));
//to trigger an action.
triggerAction(floatValue);
} else {
Serial.println("No second space found for unit");
}
}else {
Serial.println("No space found in packet - can't split");
}
lora_idle = true;
}
/**
* Converts a user-provided plaintext key into a fixed-length 16-byte (128-bit)
* or 32-byte (256-bit) key.
*/
void processKey(const char *userKey, uint8_t *processedKey, size_t keySize) {
memset(processedKey, 0, keySize); // Fill with zeros
size_t len = strlen(userKey);
if (len > keySize) len = keySize; // Truncate if too long
memcpy(processedKey, userKey, len); // Copy valid key part
}
/**
* Encrypts a 16-byte (one block) message using AES-128.
*/
void encryptAES(uint8_t *data, const char *key) {
uint8_t processedKey[16]; // 128-bit key
processKey(key, processedKey, 16);
mbedtls_aes_init(&aes);
mbedtls_aes_setkey_enc(&aes, processedKey, 128);
mbedtls_aes_crypt_ecb(&aes, MBEDTLS_AES_ENCRYPT, data, data);
mbedtls_aes_free(&aes);
}
/**
* Decrypts a 16-byte (one block) message using AES-128.
*/
void decryptAES(uint8_t *data, const char *key) {
uint8_t processedKey[16]; // 128-bit key
processKey(key, processedKey, 16);
mbedtls_aes_init(&aes);
mbedtls_aes_setkey_dec(&aes, processedKey, 128);
mbedtls_aes_crypt_ecb(&aes, MBEDTLS_AES_DECRYPT, data, data);
mbedtls_aes_free(&aes);
}Common Course Links
Common Course Files
資源與參考資料
-
外部
-
外部
-
外部
-
外部Purchase a WiFi LoRa 32 V3 from AliExpresss.click.aliexpress.com
-
外部Purchase a WiFi LoRa 32 V3 from AliExpress-2s.click.aliexpress.com
-
外部
-
外部Purchase Wi-Fi LoRa 32 from Meshnologymeshnology.com
文件📁
Arduino 函式庫 (zip)
-
Heltec ESP32 libraries 2.1.5Libraries for all Heltec ESP32 boards. This is version 2.1.5.
Heltec_ESP32-master.zip3.86 MB
其他文件
-
Heltec WiFi LoRa 32 V3 Schematic Diagram (V3.1)
Heltec_WiFiLoRAV3_Schematic_Diagram.pdf0.18 MB