Tento návod je súčasťou: Návody na WiFi LoRa 32
Všetky videá súvisiace s Heltec WiFi LoRa 32 súvisia pomocou tejto skupiny. Odkazy na ďalšie videá nájdete pod týmto článkom.
Použitie Heltec WiFi LoRa 32 V3 na prenos teploty pomocou DHT22 na vzdialenosť 1,4 km
V tomto návode preskúmame, ako použiť modul Heltec WiFi LoRa 32 V3 na prenos údajov o teplote zo senzora DHT22 na veľké vzdialenosti, pričom dosiahneme dosah až 1,4 kilometra. Táto schopnosť je možná vďaka technológii LoRa, ktorá umožňuje nízkopríkonovú komunikáciu na veľké vzdialenosti. Na konci tejto príručky budete mať funkčný systém, ktorý dokáže bezdrôtovo odosielať údaje o teplote.
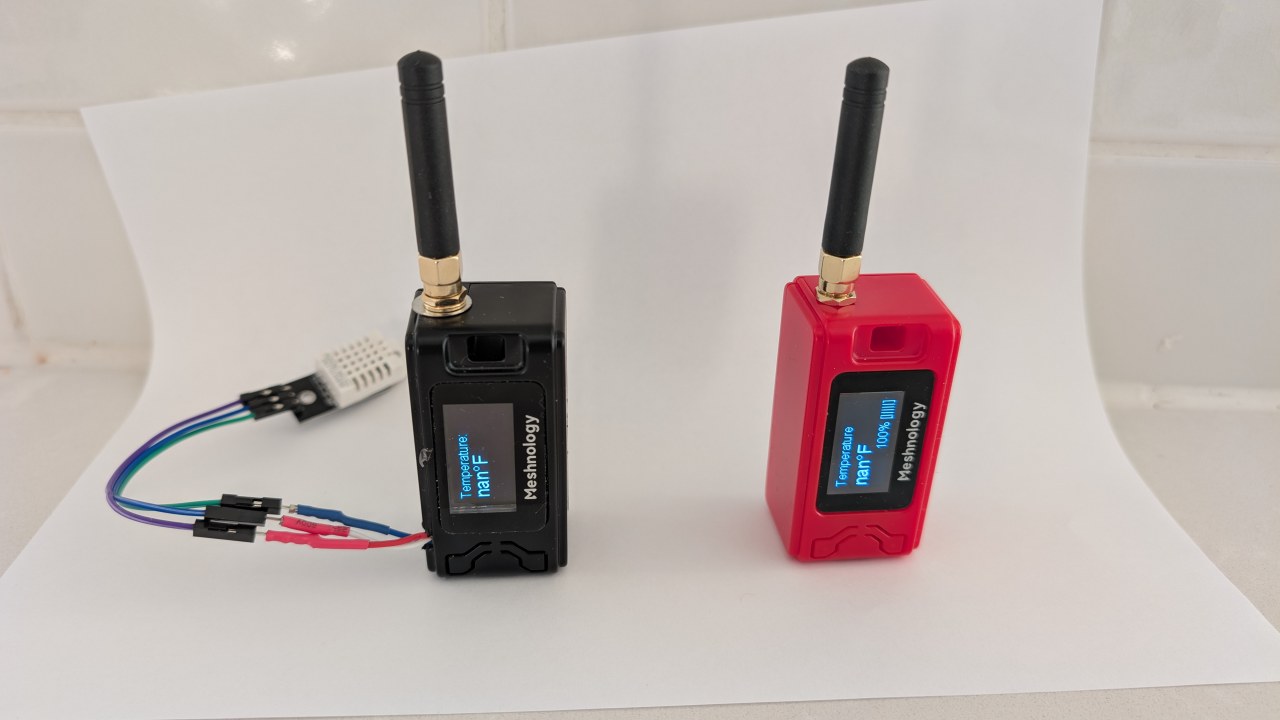
Začneme prehľadom hardvérových komponentov použitých v tomto projekte, vrátane modulu Heltec WiFi LoRa 32 V3 a senzora DHT22. Potom prejdeme na pokyny na zapojenie, kde sa naučíte, ako tieto komponenty prepojiť. Nakoniec si prejdeme kód potrebný na uvedenie tohto systému do prevádzky. Pre vizuálne vedenie si pozrite video v rôznych časových značkách (vo videu o 00:00).
Vysvetlenie hardvéru
Hlavnými komponentmi tohto projektu sú modul Heltec WiFi LoRa 32 V3 a senzor teploty a vlhkosti DHT22. Modul Heltec obsahuje mikrokontrolér ESP32, ktorý poskytuje možnosti Wi-Fi a Bluetooth spolu s komunikáciou LoRa. To umožňuje flexibilné možnosti prenosu údajov.
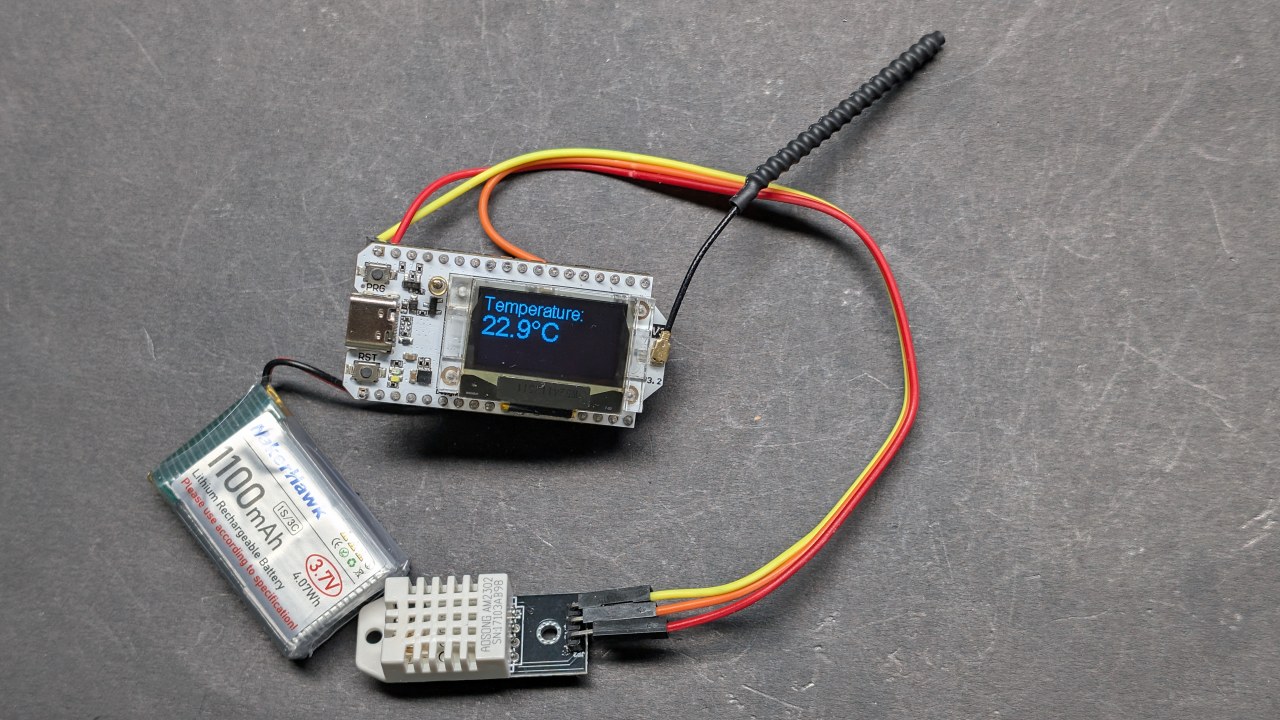
Senor DHT22 je digitálny senzor, ktorý poskytuje presné údaje o teplote a vlhkosti. S ESP32 komunikuje cez jeden digitálny výstupný pin, vďaka čomu je ľahké ho pripojiť a používať vo vašich projektoch. Spolu tieto komponenty tvoria robustný systém na bezdrôtové monitorovanie teploty.
Podrobnosti z datasheetu
| Výrobca | Heltec Automation |
|---|---|
| Označenie dielu | WiFi LoRa 32 V3 |
| Logické/IO napätie | 3,3 V |
| Napájacie napätie | 3,7–4,2 V |
| Výstupný prúd (na kanál) | ~1 A |
| Špičkový prúd (na kanál) | ~2 A |
| Odporúčaná PWM frekvencia | 1 kHz (typ.) |
| Vstupné logické úrovne | 0,7 V (vysoká), 0,3 V (nízka) |
| Pokles napätia / RDS(on) / saturácia | 0,3 V (max.) |
| Tepelné limity | 85 °C (max.) |
| Puzdro | PCB modul |
| Poznámky / varianty | Dostupné rôzne frekvenčné možnosti (napr. 433 MHz, 868 MHz, 915 MHz) |
- Uistite sa, že napájate DHT22 napätím 3,3 V, nie 5 V.
- Použite vhodné logické úrovne pre komunikáciu medzi ESP32 a DHT22.
- Zvážte chladenie, ak pracujete s vysokými prúdmi po dlhší čas.
- Skontrolujte pripojenie antény pre LoRa, aby ste maximalizovali dosah.
- Majte na pamäti predpisy o frekvenciách LoRa vo vašom regióne.
Pokyny na zapojenie
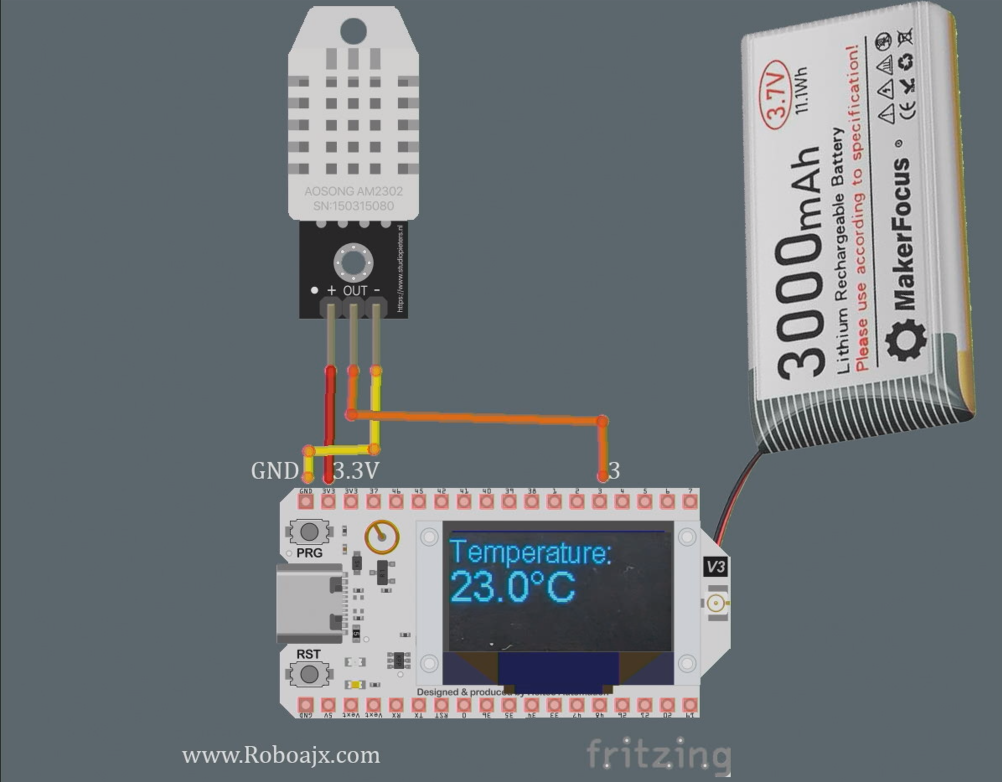
Na zapojenie modulu Heltec WiFi LoRa 32 V3 so senzorom DHT22 začnite pripojením pinu VCC senzora na pin 3,3 V na module Heltec. Potom pripojte pin GND senzora DHT22 na jeden z GND pinov na Heltecu. Dátový pin senzora DHT22 by mal byť pripojený na GPIO pin 3 na Heltecu.
Uistite sa, že používate pull-up rezistor (približne 10kΩ) medzi dátovým pinom a VCC pre stabilné údaje. Okrem toho sa uistite, že je anténa LoRa bezpečne pripojená na zvýšenie prenosového dosahu. Ak používate externé napájanie, uistite sa, že je modul Heltec správne napájaný, aby ste predišli prevádzkovým problémom.
Inštalácia dosiek Heltec ESP32
Pridajte túto cestu do preferencií vášho Arduino IDE, ako je znázornené vo videu:https://resource.heltec.cn/download/package_heltec_esp32_index.json
Inštalácia knižníc Heltec ESP32
V Arduino IDE po otvorení kliknite na ikonu Knižnice (1), potom napíšte "Heltec" do vyhľadávania (2) a kliknite na Inštalovať (3), pozri obrázok.

Príklady kódu a vysvetlenie
Nasledujúce úryvky kódu ilustrujú, ako nastaviť modul Heltec na čítanie údajov o teplote zo senzora DHT22 a ich prenos cez LoRa. Kód inicializuje displej a nastaví senzor DHT.
#include
#define DHTPIN 3         // GPIO pin pre DHT22
#define DHTTYPE DHT22    // Definícia typu DHT
DHT dht(DHTPIN, DHTTYPE);
void setup() {
  Serial.begin(115200);
  dht.begin(); // Inicializácia senzora DHT
}
V tomto úryvku definujeme pin, na ktorý je pripojený senzor DHT22, a inicializujeme ho vo funkcii setup(). Riadok Serial.begin(115200) slúži na výstup ladenia.
void loop() {
  float tempC = dht.readTemperature(); // Čítanie teploty v stupňoch Celzia
  float tempF = dht.convertCtoF(tempC); // Konverzia na Fahrenheita
  sendData(tempC, tempF); // Funkcia na odoslanie údajov o teplote
}
Tento výňatok ukazuje, ako čítať údaje o teplote vo funkcii loop(). Funkcia sendData() sa volá na prenos údajov o teplote cez LoRa.
void sendData(float tempC, float tempF) {
  String data = "Teplota: " + String(tempC) + "°C"; // Vytvorenie dátového reťazca
  Radio.Send(data.c_str(), data.length()); // Odoslanie dát
}
Tu vytvoríme dátový reťazec obsahujúci teplotu a odošleme ho pomocou metódy Radio.Send(). Tým sa dáta bezdrôtovo prenesú do prijímacieho modulu.
Podrobnú implementáciu nájdete v úplnom kóde načítanom nižšie pod článkom.
Ukážka / Čo očakávať
Keď bude všetko nastavené a kód nahraný do modulu Heltec, mali by ste vidieť hodnoty teploty zobrazené na OLED obrazovke. Systém bude prenášať údaje o teplote, ktoré môže prijímať ďalší modul Heltec nakonfigurovaný na čítanie dát. Dosah môžete otestovať pohybom prijímača ďalej od vysielača, čím potvrdíte maximálnu dosiahnutú vzdialenosť (vo videu v čase 1:30).
Dávajte si pozor na bežné chyby, ako je nesprávne zapojenie, nedostatočné napájanie alebo použitie nesprávnej frekvencie LoRa. Uistite sa, že DHT22 funguje správne a že je anténa pripojená na maximalizáciu dosahu.
Časové značky videa
- 00:00 Začiatok
- 3:51 Špecifikácie
- 8:32 Dokumentačná stránka
- 9:52 Balenie a batéria
- 12:58 Prvé zapnutie
- 16:37 Inštalácia knižnice
- 18:19 Základný kód vysielača
- 19:43 Základný kód prijímača
- 20:39 Ukážka odosielania a prijímania textu
- 23:02 Ukážkový kód OLED
- 24:06 Základný text na OLED displeji – kód
- 26:26 Základný text na OLED displeji – ukážka
- 26:58 Čítanie teploty pomocou DHT22
- 28:49 LoRa vysielač – teplota a displej
- 30:07 LoRa prijímač – teplota a displej
- 32:13 Spustenie LED pri zvýšení teploty
- 22:26 Test dosahu prenosu LoRa
- 35:01 dBm a miliwatt
Obrázky
Tento návod je súčasťou: Návody na WiFi LoRa 32
- 13 Míľ 20 km bez WiFi? Ako LoRa poslalo napätie na šialené vzdialenosti! (Heltec WiFi LoRa 32 V3)
- Zapnite zariadenie zo vzdialenosti 13 míľ (21 km) – Ultimátny off-grid LoRa projekt s WiFi LoRa 32!
- Systém diaľkového upozornenia na dvere zo vzdialenosti 13 míľ (21 km) pomocou LoRa – mimo siete! (Heltec WiFi LoRa 32 V3)
- Ovládajte servomotor z diaľky! Heltec WiFi LoRa 32 V3 Arduino tutoriál (TX)
- DIY projekt diaľkového relé: 13 míľ bez Wi-Fi/bez SIM modul Heltec LoRa 32
- How to Use the Heltec LoRa CubeCell Development Board HTCC-AB01
/*
This is a simple code to display text on the OLED display
WiFi LoRa 32 V3 ESP32 module
Written by Ahmad Shamshiri 02 April 2025
Watch full video explanation https://youtu.be/WkyQMXkQhE8
Resources page https://robojax.com/tutorial_view.php?id=387
*/
#include <Wire.h>
#include "HT_SSD1306Wire.h"


static SSD1306Wire  display(0x3c, 500000, SDA_OLED, SCL_OLED, GEOMETRY_128_64, RST_OLED); // addr , freq , i2c group , resolution , rst


void setup() {
  Serial.begin(115200);
  Serial.println();
  Serial.println();
  VextON();
  delay(100);

  // Initialising the UI will init the display too.
  display.init();

  display.setFont(ArialMT_Plain_10);

}


void displayTemperature(double temperature, int unit) {
    display.clear();  // Clear display before new content

    // Line 1: "Temperature:" in 16pt font
    display.setTextAlignment(TEXT_ALIGN_LEFT);
    display.setFont(ArialMT_Plain_16);
    display.drawString(0, 0, "Temperature:");

    // Line 2: Temperature value in 24pt font
    display.setFont(ArialMT_Plain_24);

    // Format temperature with correct unit symbol
    String tempString = String(temperature, 1); // 1 decimal place
    switch(unit) {
        case 1:  tempString += "�C"; break;  // Celsius
        case 2:  tempString += "�F"; break;  // Fahrenheit
        default: tempString += "�U"; break;  // Unknown unit
    }

    display.drawString(0, 20, tempString);  // Display at Y=20 (below label)
    display.display();  // Update OLED
}


void VextON(void)
{
  pinMode(Vext,OUTPUT);
  digitalWrite(Vext, LOW);
}

void VextOFF(void) //Vext default OFF
{
  pinMode(Vext,OUTPUT);
  digitalWrite(Vext, HIGH);
}


void loop() {
  // clear the display
  display.clear();
  displayTemperature(23.5, 1); // Displays "23.5�C" /1
  delay(2000);

}/*
written on March 27, 2025
written by Ahmad Shamshiri for www.Robojax.com
Transmits Temperature and Humidity over LoRa RF using ESP32 LoRA 32 V3 module.
and displays the information on the screen.
Watch full video explanation https://youtu.be/WkyQMXkQhE8
Resources page: https://robojax.com/tutorial_view.php?id=387
*/
#include <Wire.h>
#include "HT_SSD1306Wire.h"
static SSD1306Wire display(0x3c, 500000, SDA_OLED, SCL_OLED, GEOMETRY_128_64, RST_OLED); // addr , freq , i2c group , resolution , rst
#include <DHT.h>
#define DHTPIN 3 // GPIO21
#define DHTTYPE DHT22 // DHT22 (AM2302)
DHT dht(DHTPIN, DHTTYPE);
float tempC, tempF;
int humidity ;
//1=C
//2=F
//3=C, Humidity //only for display not for transmission
//4=F, Humidity //only for display not for transmission
//5=Humidity only
int dataType = 2;
String labelTemp = "Temperature";
String labelHumidity = "Humidity";
const int TX_POWER = 2;//dBm from 2 to 20. when powered via battery 2 to 14dBm is the best option
#include "mbedtls/aes.h"
#include <cstring> // For memset, memcpy
mbedtls_aes_context aes;
const char *userKey = "hyhT676#h~_876s"; //Security key.
#include "LoRaWan_APP.h"
#include "Arduino.h"
#define RF_FREQUENCY 915000000 // Hz
#define TX_OUTPUT_POWER TX_POWER // dBm from 2 to 20. when powered via battery 2 to 14dBm
#define LORA_BANDWIDTH 0 // [0: 125 kHz,
// 1: 250 kHz,
// 2: 500 kHz,
// 3: Reserved]
#define LORA_SPREADING_FACTOR 7 // [SF7..SF12]
#define LORA_CODINGRATE 1 // [1: 4/5,
// 2: 4/6,
// 3: 4/7,
// 4: 4/8]
#define LORA_PREAMBLE_LENGTH 8 // Same for Tx and Rx
#define LORA_SYMBOL_TIMEOUT 0 // Symbols
#define LORA_FIX_LENGTH_PAYLOAD_ON false
#define LORA_IQ_INVERSION_ON false
#define RX_TIMEOUT_VALUE 1000
#define BUFFER_SIZE 30 // Define the payload size here
char txpacket[BUFFER_SIZE];
char rxpacket[BUFFER_SIZE];
double txNumber;
bool lora_idle=true;
static RadioEvents_t RadioEvents;
unsigned long lastTxTime = 0;
void OnTxDone( void );
void OnTxTimeout( void );
void decryptAES(uint8_t *data, const char *key);
void encryptAES(uint8_t *data, const char *key);
void processKey(const char *userKey, uint8_t *processedKey, size_t keySize);
void setup() {
Serial.begin(115200);
Serial.println();
VextON();
delay(100);
// Initialising the UI will init the display too.
display.init();
display.setFont(ArialMT_Plain_10);
dht.begin();
//LoRa stuff
Mcu.begin(HELTEC_BOARD,SLOW_CLK_TPYE);
txNumber=0;
RadioEvents.TxDone = OnTxDone;
RadioEvents.TxTimeout = OnTxTimeout;
Radio.Init( &RadioEvents );
Radio.SetChannel( RF_FREQUENCY );
Radio.SetTxConfig( MODEM_LORA, TX_OUTPUT_POWER, 0, LORA_BANDWIDTH,
LORA_SPREADING_FACTOR, LORA_CODINGRATE,
LORA_PREAMBLE_LENGTH, LORA_FIX_LENGTH_PAYLOAD_ON,
true, 0, 0, LORA_IQ_INVERSION_ON, 3000 );
}
void displayTemperature(int unit) {
display.clear(); // Clear display before new content
// Line 1: "Temperature:" in 16pt font
display.setTextAlignment(TEXT_ALIGN_LEFT);
// Line 2: Temperature value in 24pt font
display.setFont(ArialMT_Plain_24);
// Format temperature with correct unit symbol
String tempStringC = String(tempC, 1) + "°C"; // 1 decimal place
String tempStringF = String(tempF, 1)+ "°F"; // 1 decimal place
String tempStringHumidity = String(humidity)+ "% RH";
String tempString;
switch(unit) {
case 1:
tempString =tempStringC;
display.setFont(ArialMT_Plain_16);
display.drawString(0, 0, "Temperature:");
display.setFont(ArialMT_Plain_24);
display.drawString(0, 15, tempString);
break; // Celsius
case 2: tempString =tempStringF;
display.setFont(ArialMT_Plain_16);
display.drawString(0, 0, "Temperature:");
display.setFont(ArialMT_Plain_24);
display.drawString(0, 15, tempString);
break; // Fahrenheit
case 3: tempString =tempStringC;
display.setFont(ArialMT_Plain_16);
display.drawString(0, 0, "Temperature:");
display.setFont(ArialMT_Plain_24);
display.drawString(0, 15, tempString);
display.setFont(ArialMT_Plain_16);
display.drawString(0, 40, "Humidity:");
display.drawString(70, 40, tempStringHumidity);
break; // Celsius
case 4: tempString =tempStringF;
display.setFont(ArialMT_Plain_16);
display.drawString(0, 0, "Temperature:");
display.setFont(ArialMT_Plain_24);
display.drawString(0, 15, tempString);
display.setFont(ArialMT_Plain_16);
display.drawString(0, 40, "Humidity:");
display.drawString(70, 40, tempStringHumidity );
break; // Celsius
case 5:
display.setFont(ArialMT_Plain_16);
display.drawString(0, 0, "Humidity:");
display.setFont(ArialMT_Plain_24);
display.drawString(0, 20, tempStringHumidity);
break; // Celsius
default: tempString =tempStringC + "°C"; break;; // default
}
display.display(); // Update OLED
}
void readSensor()
{
tempC = dht.readTemperature();
humidity = dht.readHumidity();
tempF = dht.convertCtoF(tempC);
}
void VextON(void)
{
pinMode(Vext,OUTPUT);
digitalWrite(Vext, LOW);
}
void VextOFF(void) //Vext default OFF
{
pinMode(Vext,OUTPUT);
digitalWrite(Vext, HIGH);
}
void sendData()
{
String tempStringC = String(tempC, 1) + " °C"; // 1 decimal place
String tempStringF = String(tempF, 1)+ " °F"; // 1 decimal place
String tempStringHumidity = String(humidity)+ " % RH";
String txData;
//1=C
//2=F
//3=C, Humidity
//4=F, Humidity
//5=Humidity only
switch(dataType) {
case 1:
txData = labelTemp + " " + tempStringC;
break;
case 2:
txData = labelTemp + " " + tempStringF;
break;
case 3:
txData = labelHumidity + " " + tempStringHumidity;
break;
default:
txData = labelTemp + " " + tempStringC;
break;
}
uint8_t data[32];
memset(data, 0, sizeof(data)); // Zero-padding
strncpy((char*)data, txData.c_str(), sizeof(data) - 1); // Copy string safely
encryptAES(data, userKey); // Encrypt before sending
if(lora_idle == true)
{
delay(1000);
Radio.Send(data, sizeof(data));
Serial.print("Sending: ");
Serial.println((char *)data);
lora_idle = false;
}
Radio.IrqProcess( );
}
void loop() {
readSensor();//read the data
// clear the display
display.clear();
displayTemperature(dataType); //
sendData();
delay(100);
}
void OnTxDone( void )
{
Serial.println("TX done......");
lora_idle = true;
}
void OnTxTimeout( void )
{
Radio.Sleep( );
Serial.println("TX Timeout......");
lora_idle = true;
}
/**
* Converts a user-provided plaintext key into a fixed-length 16-byte (128-bit)
* or 32-byte (256-bit) key.
*/
void processKey(const char *userKey, uint8_t *processedKey, size_t keySize) {
memset(processedKey, 0, keySize); // Fill with zeros
size_t len = strlen(userKey);
if (len > keySize) len = keySize; // Truncate if too long
memcpy(processedKey, userKey, len); // Copy valid key part
}
/**
* Encrypts a 16-byte (one block) message using AES-128.
*/
void encryptAES(uint8_t *data, const char *key) {
uint8_t processedKey[16]; // 128-bit key
processKey(key, processedKey, 16);
mbedtls_aes_init(&aes);
mbedtls_aes_setkey_enc(&aes, processedKey, 128);
mbedtls_aes_crypt_ecb(&aes, MBEDTLS_AES_ENCRYPT, data, data);
mbedtls_aes_free(&aes);
}
/**
* Decrypts a 16-byte (one block) message using AES-128.
*/
void decryptAES(uint8_t *data, const char *key) {
uint8_t processedKey[16]; // 128-bit key
processKey(key, processedKey, 16);
mbedtls_aes_init(&aes);
mbedtls_aes_setkey_dec(&aes, processedKey, 128);
mbedtls_aes_crypt_ecb(&aes, MBEDTLS_AES_DECRYPT, data, data);
mbedtls_aes_free(&aes);
}/*
Written on April 01, 2025
written by Ahmad Shamshiri for www.Robojax.com
this sktech receives the secure temperature or humidity from WiFi LoRa 32 and decrypts it
and displays it on the OLED. There is action feature to triggerd if the temperature is below triggerdValue
Watch full video explaination https://youtu.be/WkyQMXkQhE8
Resources page: https://robojax.com/tutorial_view.php?id=387
*/
#include <Arduino.h>
// Alert configuration
const String triggerdText = "Too High"; // Correct String type
const float triggerdValue = 90.0f; // exclusive (this value is not included)
const int triggerdYpos = 45;
const bool triggerdType = true;//true is > (greter than triggerdValue) and false is < (less than triggerdValue)
const int triggerdOutputPin = 7;//GPIO07 goes HIGH when triggered
const bool triggerdBlink4Me= true;//should blink or not
#include "mbedtls/aes.h"
#include <cstring> // For memset, memcpy
mbedtls_aes_context aes;
const char *userKey = "hyhT676#h~_876s"; //Security key
#define MIN_RSSI -120 // Worst possible signal
#define MAX_RSSI -50 // Best possible signal
// For a connection via I2C using the Arduino Wire include:
#include <Wire.h>
#include "HT_SSD1306Wire.h"
static SSD1306Wire display(0x3c, 500000, SDA_OLED, SCL_OLED, GEOMETRY_128_64, RST_OLED); // addr , freq , i2c group , resolution , rst
#include "LoRaWan_APP.h"
#include "Arduino.h"
#define RF_FREQUENCY 915000000 // Hz
#define TX_OUTPUT_POWER 14 // dBm
#define LORA_BANDWIDTH 0 // [0: 125 kHz,
// 1: 250 kHz,
// 2: 500 kHz,
// 3: Reserved]
#define LORA_SPREADING_FACTOR 7 // [SF7..SF12]
#define LORA_CODINGRATE 1 // [1: 4/5,
// 2: 4/6,
// 3: 4/7,
// 4: 4/8]
#define LORA_PREAMBLE_LENGTH 8 // Same for Tx and Rx
#define LORA_SYMBOL_TIMEOUT 0 // Symbols
#define LORA_FIX_LENGTH_PAYLOAD_ON false
#define LORA_IQ_INVERSION_ON false
#define RX_TIMEOUT_VALUE 1000
#define BUFFER_SIZE 30 // Define the payload size here
char txpacket[BUFFER_SIZE];
char rxpacket[BUFFER_SIZE];
static RadioEvents_t RadioEvents;
int16_t txNumber;
int16_t rssi,rxSize;
bool lora_idle = true;
unsigned long lastRxTime = 0;
const unsigned long SIGNAL_TIMEOUT = 5000; // 5 seconds
void decryptAES(uint8_t *data, const char *key);
void encryptAES(uint8_t *data, const char *key);
void processKey(const char *userKey, uint8_t *processedKey, size_t keySize);
void setup() {
Serial.begin(115200);
Serial.println();
Serial.println();
VextON();
delay(100);
// Initialising the UI will init the display too.
display.init();
display.setFont(ArialMT_Plain_10);
pinMode(triggerdOutputPin, OUTPUT);
//LoRa stuff blow this line
Mcu.begin(HELTEC_BOARD,SLOW_CLK_TPYE);
txNumber=0;
rssi=0;
RadioEvents.RxDone = OnRxDone;
Radio.Init( &RadioEvents );
Radio.SetChannel( RF_FREQUENCY );
Radio.SetRxConfig( MODEM_LORA, LORA_BANDWIDTH, LORA_SPREADING_FACTOR,
LORA_CODINGRATE, 0, LORA_PREAMBLE_LENGTH,
LORA_SYMBOL_TIMEOUT, LORA_FIX_LENGTH_PAYLOAD_ON,
0, true, 0, 0, LORA_IQ_INVERSION_ON, true );
}
void displayTemperature(String data1, String data2) {
display.clear(); // Clear display before new content
// Line 1: "Temperature:" in 16pt font
display.setTextAlignment(TEXT_ALIGN_LEFT);
display.setFont(ArialMT_Plain_16);
display.drawString(0, 0, data1);
// Line 2: Temperature value in 24pt font
display.setFont(ArialMT_Plain_24);
display.drawString(0, 20, data2); //
displaySignalStrength(rssi);
// display.display(); // Update OLED
}
void displayLine(String data, int y) {
// Line 1: "Temperature:" in 16pt font
display.setTextAlignment(TEXT_ALIGN_LEFT);
display.setFont(ArialMT_Plain_10);
if (triggerdBlink4Me) {
// Blink effect: Display text, wait, clear text, wait, then return
display.drawString(0, y, data);
display.display();
delay(500); // Keep text visible for 500ms
display.clear(); // Clear the screen
display.display();
delay(500); // Keep screen blank for 500ms
}
else {
// Normal display without blinking
display.drawString(0, y, data);
display.display();
}
}
void VextON(void)
{
pinMode(Vext,OUTPUT);
digitalWrite(Vext, LOW);
}
void VextOFF(void) //Vext default OFF
{
pinMode(Vext,OUTPUT);
digitalWrite(Vext, HIGH);
}
void loop() {
RaIrqProcessdio( );
if(lora_idle)
{
lora_idle = false;
Serial.println("into RX mode");
Radio.Rx(0);
}
noSignalCheck();
delay(100);
}
void displaySignalStrength(int16_t rssi) {
// Convert RSSI to percentage (0-100%)
int percent = map(constrain(rssi, MIN_RSSI, MAX_RSSI), MIN_RSSI, MAX_RSSI, 0, 100);
// Display at bottom right corner
display.setTextAlignment(TEXT_ALIGN_RIGHT);
display.setFont(ArialMT_Plain_16);
// Create signal strength indicator
String strength = String(percent) + "% [";
for (int i = 0; i < 5; i++) {
strength += (percent > (i * 20)) ? "|" : " ";
}
strength += "]";
display.drawString(128, 45, strength); // Position at bottom-right
}
void noSignalCheck()
{
// Automatic "No Signal" after timeout
if (millis() - lastRxTime > SIGNAL_TIMEOUT) {
display.clear();
display.setTextAlignment(TEXT_ALIGN_CENTER);
display.setFont(ArialMT_Plain_16);
display.drawString(64, 20, "No Signal");
display.display();
}
}
/**
* Triggers an action based on a threshold comparison.
*
* @param type - If true, triggers when floatValue **exceeds** triggerdValue.
* If false, triggers when floatValue **falls below** triggerdValue.
* @param floatValue - The current measured value to compare.
* @param triggerdValue - The threshold value that determines the trigger condition.
*/
void triggerAction(float floatValue)
{
if(triggerdType)
{
if (floatValue > triggerdValue) {
displayLine(triggerdText, triggerdYpos);
Serial.println(triggerdText);
digitalWrite(triggerdOutputPin, HIGH);//turns triggerdOutputPin to HIGH
}else{
digitalWrite(triggerdOutputPin, LOW);
}
}else{
if (floatValue < triggerdValue) {
displayLine(triggerdText, triggerdYpos);
Serial.println(triggerdText);
digitalWrite(triggerdOutputPin, HIGH);//turns triggerdOutputPin to HIGH
} else{
digitalWrite(triggerdOutputPin, LOW);//turns triggerdOutputPin to LOW
}
}
}
void OnRxDone( uint8_t *payload, uint16_t size, int16_t rssi, int8_t snr )
{
lastRxTime = millis(); // Reset timer on new data
rssi=rssi;
rxSize=size;
memcpy(rxpacket, payload, size );
rxpacket[size]='\0';
Radio.Sleep( );
Serial.printf("\r\nreceived packet \"%s\" with rssi %d , length %d\r\n",rxpacket,rssi,rxSize);
// Serial.println("Encrypted Data (Hex):");
// for (int i = 0; i < 16; i++) {
// Serial.printf("%02X ", rxpacket[i]);
// }
// Serial.println();
decryptAES((uint8_t *)rxpacket, userKey);
// Split the received packet into parts
String receivedStr = String((char*)rxpacket);
int firstSpacePos = receivedStr.indexOf(' ');
if (firstSpacePos != -1) {
// First part (before first space)
String part1 = receivedStr.substring(0, firstSpacePos); // "Temperature"
// Find second space (after the number)
int secondSpacePos = receivedStr.indexOf(' ', firstSpacePos + 1);
if (secondSpacePos != -1) {
// Second part (numeric value)
String part2 = receivedStr.substring(firstSpacePos + 1, secondSpacePos); // "34.5"
float floatValue = part2.toFloat(); // Convert to float 34.5
// Third part (unit)
String part3 = receivedStr.substring(secondSpacePos + 1); // "°C"
displayTemperature(part1, part2+part3);
display.display();
Serial.print("part1: " + part1);
Serial.print(" part2: " + part2);
Serial.println(" part3: " + part3);
Serial.println("floatValue " + String(floatValue));
//to trigger an action.
triggerAction(floatValue);
} else {
Serial.println("No second space found for unit");
}
}else {
Serial.println("No space found in packet - can't split");
}
lora_idle = true;
}
/**
* Converts a user-provided plaintext key into a fixed-length 16-byte (128-bit)
* or 32-byte (256-bit) key.
*/
void processKey(const char *userKey, uint8_t *processedKey, size_t keySize) {
memset(processedKey, 0, keySize); // Fill with zeros
size_t len = strlen(userKey);
if (len > keySize) len = keySize; // Truncate if too long
memcpy(processedKey, userKey, len); // Copy valid key part
}
/**
* Encrypts a 16-byte (one block) message using AES-128.
*/
void encryptAES(uint8_t *data, const char *key) {
uint8_t processedKey[16]; // 128-bit key
processKey(key, processedKey, 16);
mbedtls_aes_init(&aes);
mbedtls_aes_setkey_enc(&aes, processedKey, 128);
mbedtls_aes_crypt_ecb(&aes, MBEDTLS_AES_ENCRYPT, data, data);
mbedtls_aes_free(&aes);
}
/**
* Decrypts a 16-byte (one block) message using AES-128.
*/
void decryptAES(uint8_t *data, const char *key) {
uint8_t processedKey[16]; // 128-bit key
processKey(key, processedKey, 16);
mbedtls_aes_init(&aes);
mbedtls_aes_setkey_dec(&aes, processedKey, 128);
mbedtls_aes_crypt_ecb(&aes, MBEDTLS_AES_DECRYPT, data, data);
mbedtls_aes_free(&aes);
}Common Course Links
Common Course Files
Zdroje a referencie
-
Externé
-
Externé
-
Externé
-
Externé
-
ExternéPurchase a WiFi LoRa 32 V3 from AliExpresss.click.aliexpress.com
-
ExternéPurchase a WiFi LoRa 32 V3 from AliExpress-2s.click.aliexpress.com
-
Externé
-
ExternéPurchase Wi-Fi LoRa 32 from Meshnologymeshnology.com
Súbory📁
Knižnice Arduino (zip)
-
Heltec ESP32 libraries 2.1.5Libraries for all Heltec ESP32 boards. This is version 2.1.5.
Heltec_ESP32-master.zip3.86 MB
Iné súbory
-
Heltec WiFi LoRa 32 V3 Schematic Diagram (V3.1)
Heltec_WiFiLoRAV3_Schematic_Diagram.pdf0.18 MB