ESP32 Tutorial 28/55 - DHT11 Temperature Sensor with LCD | SunFounder's ESP32 IoT Learning kit
In this tutorial, we will explore how to interface the DHT11 temperature and humidity sensor with the ESP32 microcontroller. Using this setup, we will measure the ambient temperature and humidity, displaying the results on both the serial monitor and an LCD screen. Additionally, we will implement a buzzer that activates when the temperature exceeds a certain threshold.

This project not only demonstrates the use of the DHT11 sensor but also showcases the versatility of the ESP32, which includes built-in Wi-Fi and Bluetooth capabilities. By the end of this tutorial, you will have a working setup that continuously monitors environmental conditions and provides real-time feedback.
For a visual guide, check out the video accompanying this tutorial (in video at 00:00). Let's dive in!
Hardware Explained
The main components used in this project are the ESP32 microcontroller, the DHT11 sensor, and an LCD display. The ESP32 will serve as the brain of the operation, processing data from the DHT11 sensor and controlling the LCD output.
The DHT11 sensor measures humidity and temperature, providing readings through a single data line. It requires a power supply of 3.3V to 5.5V and has a low current consumption, making it suitable for battery-powered applications. The LCD will display the temperature and humidity values in real-time.
Datasheet Details
| Manufacturer | GROVE |
|---|---|
| Part number | DHT11 |
| Logic/IO voltage | 3.3 – 5.5 V |
| Supply voltage | 3.3 V |
| Output current (per channel) | 0.5 mA typ. |
| Peak current (per channel) | 2.5 mA max. |
| PWM frequency guidance | N/A |
| Input logic thresholds | 0.3 VCC (low), 0.7 VCC (high) |
| Voltage drop / RDS(on) / saturation | Not applicable |
| Thermal limits | 0°C to 60°C |
| Package | DIP-4 |
| Notes / variants | Resolution: 1°C / 1% RH |
- Use a pull-up resistor (5 kΩ recommended) on the data line.
- Keep sensor wires short (less than 20 m) to ensure accurate readings.
- Power the DHT11 with 3.3V for optimal performance.
- Sampling period should not be less than 1 second.
- Check wiring connections if readings fail (e.g., not connected, incorrect pin).
Wiring Instructions


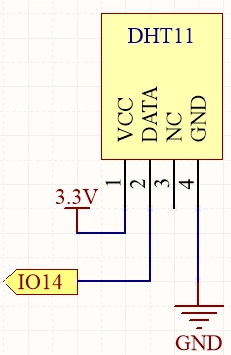
To wire the DHT11 sensor to the ESP32, start by connecting the VCC pin of the DHT11 (the leftmost pin) to the 3.3V output of the ESP32. Next, connect the ground pin (the fourth pin) to a ground (GND) pin on the ESP32. The data pin (the second pin) should be connected to GPIO pin 14 on the ESP32.
For the LCD, connect the VCC pin to the 5V output of the ESP32. The ground pin should be connected to a ground pin on the ESP32. The SDA and SCL pins of the LCD should be connected to GPIO pins 21 and 22, respectively. Ensure all connections are secure to avoid any issues while reading data.
Code Examples & Walkthrough
In the first part of the code, we initialize the DHT sensor and set the pin number with #define DHTPIN 14. This identifier allows us to easily reference the pin connected to the DHT11 data line throughout the code.
#include "DHT.h"

#define DHTPIN 14  // Set the pin connected to the DHT11 data pin
#define DHTTYPE DHT11 // DHT 11
DHT dht(DHTPIN, DHTTYPE);

void setup() {
  Serial.begin(115200);
  dht.begin();
}
In the setup() function, we initialize serial communication for debugging and begin the DHT sensor. The main loop includes a delay of 2 seconds to ensure we do not overwhelm the sensor with requests.
Next, we read the humidity and temperature values using float humidity = dht.readHumidity(); and float temperature = dht.readTemperature();. These identifiers store the measured values for later use.
void loop() {
  delay(2000);
  float humidity = dht.readHumidity();
  float temperature = dht.readTemperature();
}
Finally, we check for any read errors and print the values to the serial monitor using Serial.print(). This allows us to observe the readings in real-time.
if (isnan(humidity) || isnan(temperature)) {
  Serial.println("Failed to read from DHT sensor!");
  return;
}
Serial.print("Humidity: ");
Serial.print(humidity);
Serial.print(" %\t");
Serial.print("Temperature: ");
Serial.print(temperature);
Serial.println(" *C");
In the LCD code, we initialize the LCD and display the temperature and humidity on the screen using the lcd.print() function. This provides a visual representation of the data collected by the DHT11 sensor.
Demonstration / What to Expect
Once everything is wired correctly and the code is uploaded to the ESP32, you should see the temperature and humidity readings displayed on the serial monitor and the LCD screen. If the temperature exceeds 30°C, the buzzer will activate, providing an audible alert.
Be cautious of reversed connections and ensure the sensor is not exposed to extreme conditions, as it can affect the readings. You might need to adjust the threshold for the buzzer depending on your requirements (in video at 15:30).
Video Timestamps
- 00:00 Start
- 1:57 Introduction to DHT11
- 6:18 Wiring DHT11 with ESP32
- 7:67 Arduino Code explained
- 11:49 Selecting ESP32 board and COM port in Arduino IDE
- 13:30 Project demonstration
- 15:32 Getting Fahrenheit
- 16:04 displaying temperature on LCD using ESP32
- 17:20 DHT11 and LCD with ESP32 code
- 19:49 DHT11 LCD demo with ESP32
- 21:33 Taking action on Temperature value
Images

#include "DHT.h"

#define DHTPIN 14  // Set the pin connected to the DHT11 data pin
#define DHTTYPE DHT11 // DHT 11

DHT dht(DHTPIN, DHTTYPE);

void setup() {
  Serial.begin(115200);
  Serial.println("DHT11 test!");
  dht.begin();
}

void loop() {
  // Wait a few seconds between measurements.
  delay(2000);

  // Reading temperature or humidity takes about 250 milliseconds!
  // Sensor readings may also be up to 2 seconds 'old' (it's a very slow sensor)
  float humidity = dht.readHumidity();
  // Read temperature as Celsius (the default)
  float temperature = dht.readTemperature();

  // Check if any reads failed and exit early (to try again).
  if (isnan(humidity) || isnan(temperature)) {
    Serial.println("Failed to read from DHT sensor!");
    return;
  }
  // Print the humidity and temperature
  Serial.print("Humidity: ");
  Serial.print(humidity);
  Serial.print(" %\t");
  Serial.print("Temperature: ");
  Serial.print(temperature);
  Serial.println(" *C");
}
/*
This is Arduino code to measure temperature and humidity using DHT11/DHT22 and displays it on LCD screen
written by Ahmad Shamshiri for SunFounder's ESP32 IoT learning kit
watch full video https://youtu.be/qRUFZX4eDJg
Full code, wiring diagram and other resources for this tutorial is at https://robojax.com/RJT711
*/
#include "DHT.h"
#include <Wire.h>
#include <LiquidCrystal_I2C.h>


#define DHTPIN 14      // Set the pin connected to the DHT11 data pin
#define DHTTYPE DHT11  // DHT 11

DHT dht(DHTPIN, DHTTYPE);

// Initialize the LCD object with I2C address 0x27, 16 columns, and 2 rows
LiquidCrystal_I2C lcd(0x27, 16, 2);

void setup() {

  // Begin serial communication at 115200 baud
  Serial.begin(115200);

  // Initialize the dht11
  dht.begin();

  // Initialize the LCD
  lcd.init();
  lcd.backlight();

  // Clear the LCD
  lcd.clear();
}

void loop() {
  // Wait a few seconds between measurements.
  delay(2000);

  // Reading temperature or humidity takes about 250 milliseconds!
  // Sensor readings may also be up to 2 seconds 'old' (it's a very slow sensor)
  float humidity = dht.readHumidity();
  // Read temperature as Celsius (the default)
  float temperature = dht.readTemperature();

  // Check if any reads failed and exit early (to try again).
  if (isnan(humidity) || isnan(temperature)) {
    Serial.println("Failed to read from DHT sensor!");
    return;
  }

  // Display temperature and humidity on the LCD
  lcd.setCursor(0, 0);
  lcd.print("Temp: ");
  lcd.print(temperature);
  lcd.write(223);  // Degree symbol
  lcd.print("C");

  lcd.setCursor(0, 1);
  lcd.print("Humi: ");
  lcd.print(humidity);
  lcd.print("%");
}
Common Course Links
Common Course Files
Things you might need
-
AmazonPurchase DHT11 from Amazonamzn.to
-
BanggoodPurchase DHT11 module from Banggoodbanggood.com
Resources & references
-
DocumentationESP32 Tutorial 28/55- SunFounder doc page for DHT temperature sensordocs.sunfounder.com
Files📁
Fritzing File
-
DHT11 Humitidy and Temperature Sensor (3 pins)
DHT11 Humitidy and Temperature Sensor (3 pins).fzpz0.20 MB
User’s Manual
-
DHT11 User's Manual
robojax-DHT11_manual.pdf0.82 MB