ESP32 튜토리얼 25/55 - NTC 및 LCD를 사용한 온도 측정 | SunFounder의 ESP32 IoT 학습 키트
이 튜토리얼에서는 NTC(부온도계수) 서미스터를 사용하여 온도를 측정하고 ESP32 마이크로컨트롤러를 사용하여 LCD 화면에 측정값을 표시하는 방법을 배웁니다. 이 프로젝트는 NTC 서미스터를 ESP32에 연결하고 LCD를 사용하여 섭씨와 화씨로 온도 측정값을 표시하는 것을 포함합니다. 이는 ESP32 플랫폼을 사용하여 온도 감지 및 표시 기술을 시작하는 좋은 방법입니다.

우리는 SunFounder의 ESP32 확장 보드를 활용할 것입니다. 이 보드는 내장 Wi-Fi와 Bluetooth로 ESP32의 기능을 향상시킵니다. 이 보드는 다양한 센서 및 디스플레이와 쉽게 통합될 수 있어 IoT 프로젝트에 이상적입니다. NTC 서미스터는 온도에 반비례하여 변하는 저항을 기반으로 온도 측정값을 제공합니다. 설정 및 코드에 대한 추가 설명은 비디오(비디오의 00:00 지점)를 확인하세요.
하드웨어 설명
이 프로젝트에 사용되는 주요 구성 요소는 ESP32 마이크로컨트롤러, NTC 서미스터, 저항 및 LCD 디스플레이입니다. ESP32는 중앙 처리 장치 역할을 하여 서미스터의 데이터를 처리하고 LCD 디스플레이를 제어합니다. NTC 서미스터는 온도에 따라 저항이 변하므로 고정 저항과의 전압 분배기 구성에 따라 온도를 계산할 수 있습니다.

LCD 디스플레이는 섭씨와 화씨로 온도 측정값을 표시합니다. I2C 프로토콜을 사용하여 LCD와 통신할 것이며, 이는 필요한 핀 수를 줄여 배선을 단순화합니다. NTC 서미스터는 온도가 증가하면 저항이 감소하는 특성을 가지며, 이는 계산에 중요합니다.
데이터시트 세부 정보
| 제조업체 | SunFounder |
|---|---|
| 부품 번호 | NTC 서미스터 |
| 공칭 저항 | 10 kΩ |
| 베타 값 | 3950 K |
| 온도 범위 | -40°C ~ 125°C |
| 패키지 | 축 방향 |
- 서미스터가 예상 온도 범위에 적합한지 확인하세요.
- 전압 분배기에는 10 kΩ 저항을 사용하세요. 그렇지 않으면 측정값이 부정확해집니다.
- 단락을 방지하기 위해 연결을 확인하세요.
- LCD의 I2C 주소가 올바른지 확인하세요(일반적으로 0x27).
- ESP32 및 주변 장치에 적절한 전원 공급 레벨을 사용하세요.
- 시리얼 모니터의 보드레이트가 코드 설정(115200)과 일치하는지 확인하세요.
배선 지침


구성 요소를 배선하려면 먼저 NTC 서미스터를 ESP32에 연결하세요. 서미스터는 극성이 없으므로 어느 방향으로든 연결할 수 있습니다. 서미스터의 한 리드를 ESP32의 접지(GND) 핀에 연결하세요. 다른 리드는 10 kΩ 저항에 연결하고, 이 저항은 ESP32의 3.3V 핀에 연결됩니다. 서미스터와 저항 사이의 접합점은 ESP32의 핀 35에 연결되며, 이 핀에서 온도 계산을 위한 전압을 읽습니다.
LCD의 경우 접지 핀(일반적으로 위에서 두 번째 핀)을 ESP32의 GND에 연결하세요. 그런 다음 VCC(종종 첫 번째 핀)를 ESP32의 5V 핀에 연결하세요. SDA 핀(보통 세 번째 핀)은 ESP32의 핀 21에 연결하고, SCL 핀(종종 네 번째 핀)은 핀 22에 연결해야 합니다. 모든 연결이 안전한지 확인하고 실수를 방지하기 위해 핀 번호를 다시 확인하세요.
코드 예제 및 설명
코드는 서미스터에 대한 상수(핀 번호, 기준 전압 및 저항 값 포함)를 정의하는 것으로 시작합니다. 설정 함수는 시리얼 통신을 초기화하고 서미스터 핀을 입력으로 설정합니다.
const int thermistorPin = 35; // 서미스터에 연결된 핀
const float referenceVoltage = 3.3;
const float referenceResistor = 10000; // '다른' 저항
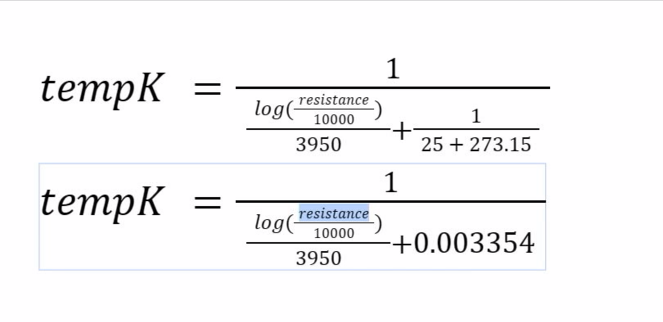
메인 루프는 서미스터 핀에서 아날로그 값을 읽고 저항을 계산한 다음 베타 매개변수 방정식을 사용하여 섭씨와 화씨로 온도를 계산합니다. 계산된 값은 시리얼 모니터에 출력됩니다.
int adcValue = analogRead(thermistorPin); // ADC 값 읽기
float voltage = (adcValue * referenceVoltage) / 4095.0; // 전압 계산
float resistance = (voltage * referenceResistor) / (referenceVoltage - voltage); // 서미스터 저항 계산
마지막으로 온도가 LCD에 표시됩니다. lcd.print() 함수를 사용하여 온도 값과 도 기호를 표시합니다.
lcd.setCursor(0, 0);
lcd.print("Temp: ");
lcd.print(tempC, 1);
lcd.write(223); // 도 기호
lcd.print("C");
이 코드는 300밀리초마다 최신 온도 측정값으로 LCD를 효과적으로 업데이트하여 실시간 모니터링을 가능하게 합니다.
시연 / 기대 효과
코드를 실행하고 배선을 완료하면 LCD에 섭씨와 화씨로 온도 판독값이 표시되는 것을 볼 수 있습니다. 서미스터를 손에 쥐고 있으면 저항이 감소함에 따라 온도가 증가하는 것을 확인할 수 있습니다. 극성 반전에 주의하고 연결이 확실한지 확인하세요. 잘못된 배선은 부정확한 판독값을 초래할 수 있습니다(비디오 04:50 참조).
비디오 타임스탬프
- 00:00 시작
- 1:50 프로젝트 소개
- 5:32 배선 설명
- 8:20 ESP32용 Arduino NTC 코드 설명
- 13:38 Arduino IDE에서 ESP32 보드 및 COM 포트 선택
- 15:20 NTC 온도 측정 데모
- 17:34 ESP32와 함께 LCD1602에 NTC 온도 표시
- 18:42 LCD와 함께 사용하는 NTC Arduino 코드 설명
- 21:15 LCD 온도 표시 데모
- 23:13 녹색 LCD 또는 파란색 LCD1601?
이미지


// Define constants
const int thermistorPin = 35; // Pin connected to the thermistor
const float referenceVoltage = 3.3;
const float referenceResistor = 10000; // the 'other' resistor
const float beta = 3950; // Beta value (Typical Value)
const float nominalTemperature = 25; // Nominal temperature for calculating the temperature coefficient
const float nominalResistance = 10000; // Resistance value at nominal temperature

void setup() {
  Serial.begin(115200); // Initialize serial communication
  pinMode(thermistorPin, INPUT); // Set pin as input
}

void loop() {
  int adcValue = analogRead(thermistorPin); // Read ADC value
  float voltage = (adcValue * referenceVoltage) / 4095.0; // Calculate voltage
  float resistance = (voltage * referenceResistor) / (referenceVoltage - voltage); // Calculate thermistor resistance with updated configuration

  // Calculate temperature using the Beta parameter equation
  float tempK = 1 / (((log(resistance / nominalResistance)) / beta) + (1 / (nominalTemperature + 273.15)));

  float tempC = tempK - 273.15; // Get temperature in Celsius
  float tempF = 1.8 * tempC + 32.0; // Get temperature in Fahrenheit

  //Print temperature
  printf("TempC: %.2f C\n", tempC);
  printf("TempF: %.2f F\n", tempF);

  delay(300); // Wait 1 second
}
/*
This is Lesson 25/55 of SunFounder's ESP32 IoT Learning kit code
displays temperature from NTC on LCD screen
written by Ahmad Shamshiri for SunFounder's ESP32 IoT Learnign kit
watch full video https://youtu.be/zJh-gWY0DmE
download this code, wiring diagram and other resources from https://robojax.com/RJT707

*/

#include <Wire.h>
#include <LiquidCrystal_I2C.h>

//SDA->21,SCL->22
LiquidCrystal_I2C lcd(0x27,16,2);  // set the LCD address to 0x27 for a 16 chars and 2 line display


// Define constants
const int thermistorPin = 35; // Pin connected to the thermistor
const float referenceVoltage = 3.3;
const float referenceResistor = 10000; // Resistance value (10k)
const float beta = 3950; // Beta value (Typical Value)
const float nominalTemperature = 25; // Nominal temperature for calculating the temperature coefficient
const float nominalResistance = 10000; // Resistance value at nominal temperature

void setup() {

  lcd.clear();
  lcd.init();// initialize the lcd
  lcd.backlight(); // Turns on the LCD backlight.

  //Serial.begin(115200); // Initialize serial communication
  pinMode(thermistorPin, INPUT); // Set pin as input
}

void loop() {
  int adcValue = analogRead(thermistorPin); // Read ADC value
  float voltage = (adcValue * referenceVoltage) / 4095.0; // Calculate voltage
  float resistance = (voltage * referenceResistor) / (referenceVoltage - voltage); // Calculate thermistor resistance with updated configuration

  // Calculate temperature using the Beta parameter equation
  float tempK = 1 / (((log(resistance / nominalResistance)) / beta) + (1 / (nominalTemperature + 273.15)));

  float tempC = tempK - 273.15; // Get temperature in Celsius
  float tempF = 1.8 * tempC + 32.0; // Get temperature in Fahrenheit

  //Print temperature
  //printf("TempC: %.2f C\n", tempC);
  //printf("TempF: %.2f F\n", tempF);

  // Display temperature on LCD
  lcd.setCursor(0, 0);
  lcd.print("Temp: ");
  lcd.print(tempC, 1);
  lcd.write(223); // Degree symbol
  lcd.print("C");

  lcd.setCursor(0, 1);
  lcd.print("Temp: ");
  lcd.print(tempF, 1);
  lcd.write(223); // Degree symbol
  lcd.print("F");

  delay(300); // Wait 1 second
}
Common Course Links
Common Course Files
자원 및 참고자료
-
문서화ESP32 Tutorial 25/55 - SunFounder doc page for NTC thermometerdocs.sunfounder.com
-
문서화Learn about NTC Thermistordocs.sunfounder.com
파일📁
파일이 없습니다.