ESP32 บทเรียน 38/55 - การควบคุม RGB LED จากโทรศัพท์มือถือของคุณ | ชุดเรียนรู้ IoT ESP32 ของ SunFounder
ในบทช่วยสอนนี้ เราจะสำรวจวิธีการควบคุม LED RGB โดยใช้โมดูล ESP32 จากชุดเรียนรู้ ESP32 ของ SunFounder โดยการส่งคำสั่งจากอุปกรณ์มือถือของคุณ คุณสามารถเปลี่ยนสีของ LED หรือปิดมันทั้งหมดได้ โปรเจกต์นี้ใช้ความสามารถของ ESP32 โดยใช้ประโยชน์จากคุณสมบัติ Wi-Fi และ Bluetooth ในตัวเพื่อการเชื่อมต่อและการควบคุมที่ราบรื่น
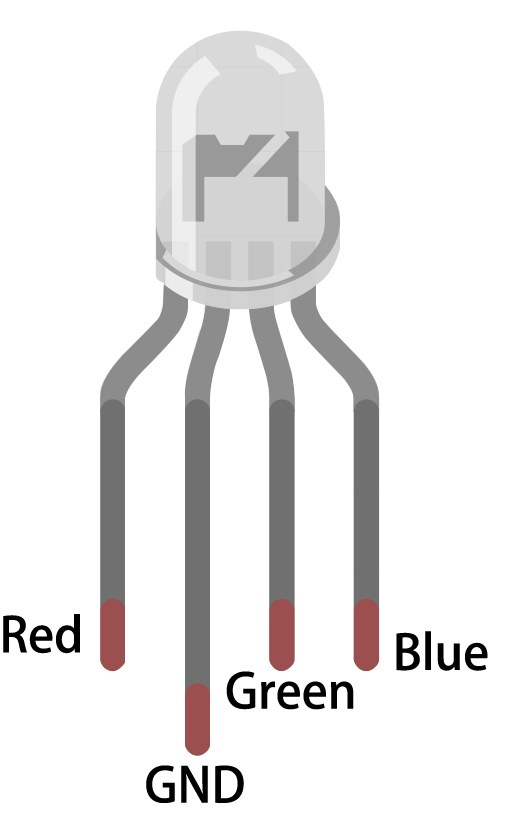
LED RGB ประกอบด้วย LED แต่ละดวงสามดวง: สีแดง สีเขียว และสีน้ำเงิน ซึ่งสามารถผสมกันเพื่อสร้างสีต่างๆ ได้ ในโปรเจกต์นี้ คุณจะได้เรียนรู้วิธีการเชื่อมต่อ LED RGB อย่างถูกต้องและเขียนโปรแกรม ESP32 เพื่อตอบสนองต่อคำสั่ง Bluetooth บทช่วยสอนนี้จะแนะนำคุณผ่านส่วนประกอบของโค้ดที่จำเป็นเพื่อให้บรรลุฟังก์ชันนี้ (ในวิดีโอที่ 02:15)
อธิบายฮาร์ดแวร์
ส่วนประกอบหลักสำหรับโปรเจกต์นี้ประกอบด้วยไมโครคอนโทรลเลอร์ ESP32 และ LED RGB ESP32 เป็นโมดูลที่ทรงพลังพร้อม Wi-Fi และ Bluetooth ในตัว ทำให้เหมาะสำหรับแอปพลิเคชัน IoT ในโปรเจกต์นี้ มันจะทำหน้าที่เป็นเซิร์ฟเวอร์เพื่อรับคำสั่งจากอุปกรณ์มือถือและควบคุม LED RGB ตามนั้น
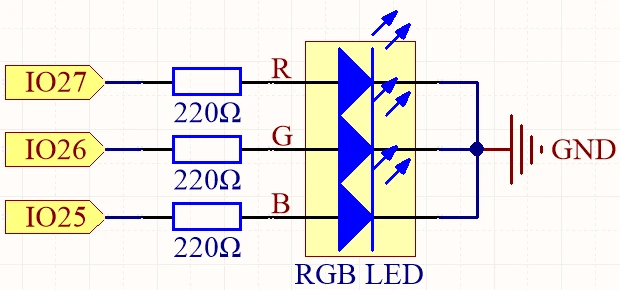
LED RGB มีสี่ขา: ขาร่วมหนึ่งขา (either anode หรือ cathode) และสามขาสำหรับสีแต่ละสี ขาร่วมเชื่อมต่อกับแหล่งจ่ายไฟหรือกราวด์ ในขณะที่อีกสามขาเชื่อมต่อกับขา GPIO ของ ESP32 ผ่านตัวต้านทานเพื่อจำกัดกระแสและป้องกัน LED การตั้งค่านี้ช่วยให้สามารถควบคุมความสว่างของแต่ละสีได้อย่างแม่นยำ สร้างสีได้หลากหลาย
รายละเอียด Datasheet
| ผู้ผลิต | SunFounder |
|---|---|
| หมายเลขชิ้นส่วน | LED RGB |
| ประเภทขาร่วม | Common anode / Common cathode |
| แรงดันไฟฟ้าไปข้างหน้า (V) | 2.0 - 3.2 V |
| กระแสไปข้างหน้าสูงสุด (A) | 20 mA |
| กระแสทั่วไป (A) | 15 mA |
| ความละเอียดสี | 8 บิต (0-255) |
| แพ็คเกจ | Through-hole / SMD |
- ตรวจสอบให้แน่ใจว่าค่าตัวต้านทานเหมาะสม (โดยทั่วไป 220 โอห์ม) เพื่อจำกัดกระแสผ่านแต่ละช่อง LED
- ตรวจสอบการกำหนดค่าขาร่วม (anode หรือ cathode) ก่อนการเดินสาย
- ใช้ PWM สำหรับการหรี่แสงและการผสมสีโดยการปรับสัญญาณที่ส่งไปยัง LED แต่ละดวง
- ระมัดระวังในการเดินสายเพื่อหลีกเลี่ยงการลัดวงจร เชื่อมต่อทีละขา
- ทดสอบแต่ละสีแยกกันหลังการตั้งค่าเพื่อยืนยันการเดินสายที่ถูกต้อง
คำแนะนำการเดินสาย

ในการเชื่อมต่อ LED RGB เข้ากับ ESP32 ให้เริ่มต้นโดยวาง LED RGB บนเบรดบอร์ด ขาที่ยาวกว่าคือขาร่วม ซึ่งคุณจะเชื่อมต่อกับแรงดันไฟฟ้าบวก (สำหรับ common anode) หรือกราวด์ (สำหรับ common cathode) หากคุณใช้ common anode ให้เชื่อมต่อขาที่ยาวเข้ากับขา 3.3V บน ESP32 สำหรับ common cathode ให้เชื่อมต่อกับขา GND
ถัดไป ใช้ตัวต้านทาน 220 โอห์มสามตัวและเชื่อมต่อปลายด้านหนึ่งของตัวต้านทานแต่ละตัวเข้ากับขา RGB ที่สอดคล้องกันของ LED เชื่อมต่อปลายอีกด้านของตัวต้านทานเข้ากับขา GPIO ของ ESP32: เชื่อมต่อขาสีแดงของ LED เข้ากับ GPIO 27 ขาสีเขียวเข้ากับ GPIO 26 และขาสีน้ำเงินเข้ากับ GPIO 25 สุดท้าย ตรวจสอบให้แน่ใจว่าขาร่วมเชื่อมต่ออย่างเหมาะสมตามการกำหนดค่าของคุณ (anode หรือ cathode)
ตัวอย่างโค้ดและคำอธิบาย
โค้ดสำหรับโปรเจกต์นี้เริ่มต้นด้วยการกำหนดขาที่เชื่อมต่อกับ LED RGB ข้อความที่ตัดตอนมาต่อไปนี้แสดงวิธีการประกาศขา:
const int redPin = 27;
const int greenPin = 26;
const int bluePin = 25;
ที่นี่ redPin, greenPin และ bluePin ถูกกำหนดหมายเลข GPIO เฉพาะบน ESP32 สำหรับแต่ละช่องสีของ LED RGB
ในฟังก์ชัน setup Bluetooth จะถูกเริ่มต้น และการตั้งค่า PWM จะถูกนำไปใช้ ข้อความที่ตัดตอนมานี้แสดงการเริ่มต้นนี้:
void setup() {
  Serial.begin(115200);      // เริ่มต้นพอร์ตอนุกรม
  setupBLE();                // เริ่มต้น Bluetooth BLE

  ledcAttach(redPin, freq, resolution);
  ledcAttach(greenPin, freq, resolution);
  ledcAttach(bluePin, freq, resolution);
}
โค้ดนี้เริ่มต้นการสื่อสารแบบอนุกรมและตั้งค่าฟังก์ชัน Bluetooth ในขณะที่แนบขา LED RGB เข้ากับช่อง PWM เพื่อการควบคุม
สุดท้าย ฟังก์ชัน loop จะตรวจสอบข้อความ Bluetooth ที่ได้รับและปรับสี LED ตามนั้น:
if (value == "red") {
  setColor(255, 0, 0); // สีแดง
  Serial.println("red");
}
ในส่วนนี้ หากค่าที่ได้รับคือ "red" LED จะถูกตั้งค่าเป็นความสว่างสีแดงเต็มที่โดยใช้ฟังก์ชัน setColor
สำหรับความเข้าใจที่สมบูรณ์ของโค้ด ขอแนะนำให้ดูวิดีโอแนะนำซึ่งโค้ดเต็มถูกโหลดไว้ด้านล่างบทความ
การสาธิต / สิ่งที่คาดหวัง
เมื่อทุกอย่างเชื่อมต่อและอัปโหลดโค้ดแล้ว คุณควรจะสามารถควบคุม LED RGB จากอุปกรณ์มือถือของคุณผ่าน Bluetooth ได้ โดยการส่งคำสั่งเช่น "red", "green", "blue" ฯลฯ คุณจะเห็น LED เปลี่ยนสีตามนั้น หากคุณส่ง "LED_off" LED RGB จะปิด ตรวจสอบให้แน่ใจว่าได้ตรวจสอบจอภาพอนุกรมสำหรับข้อความดีบักใดๆ เพื่อยืนยันว่าคำสั่งได้รับอย่างถูกต้อง (ในวิดีโอที่ 10:45)
เวลาประทับในวิดีโอ
- 00:00 เริ่มต้น
- 1:59 RGB LED คืออะไร?
- 6:01 อธิบายสี RGB
- 10:01 หน้าหน้าเอกสาร
- 11:19 อธิบายการเดินสายไฟ
- 13:34 การเลือกบอร์ด ESP32 และพอร์ต COM ใน Arduino IDE
- 15:15 โค้ด Arduino
- 18:02 การสาธิตการควบคุม RGB LED โดยใช้โทรศัพท์ของคุณ
ภาพ
#include "BLEDevice.h"
#include "BLEServer.h"
#include "BLEUtils.h"
#include "BLE2902.h"

// Define RGB LED pins
const int redPin = 27;
const int greenPin = 26;
const int bluePin = 25;

// Define PWM frequency and resolution
const int freq = 5000;
const int resolution = 8;

// Define the Bluetooth device name
const char *bleName = "ESP32_Bluetooth";

// Define the received text and the time of the last message
String receivedText = "";
unsigned long lastMessageTime = 0;

// Define the UUIDs of the service and characteristics
#define SERVICE_UUID "8785d8b3-9d23-473b-aee5-3fabe2ba9583"
#define CHARACTERISTIC_UUID_RX "b2bcd13b-aab6-4660-92ae-40abf6941fce"
#define CHARACTERISTIC_UUID_TX "4219d86a-d701-4fd2-bd84-04db50f70fe2"

// Define the Bluetooth characteristic
BLECharacteristic *pCharacteristic;

void setup() {
  Serial.begin(115200);      // Initialize the serial port
  setupBLE();                // Initialize the Bluetooth BLE

  ledcAttach(redPin, freq, resolution);
  ledcAttach(greenPin, freq, resolution);
  ledcAttach(bluePin, freq, resolution);
}

void loop() {
  // When the received text is not empty and the time since the last message is over 1 second
  // Send a notification and print the received text
  if (receivedText.length() > 0 && millis() - lastMessageTime > 1000) {
    Serial.print("Received message: ");
    Serial.println(receivedText);
    pCharacteristic->setValue(receivedText.c_str());
    pCharacteristic->notify();
    receivedText = "";
  }

  // Read data from the serial port and send it to BLE characteristic
  if (Serial.available() > 0) {
    String str = Serial.readStringUntil('\n');
    const char *newValue = str.c_str();
    pCharacteristic->setValue(newValue);
    pCharacteristic->notify();
  }
}

// Define the BLE server callbacks
class MyServerCallbacks : public BLEServerCallbacks {
  // Print the connection message when a client is connected
  void onConnect(BLEServer *pServer) {
    Serial.println("Connected");
  }
  // Print the disconnection message when a client is disconnected
  void onDisconnect(BLEServer *pServer) {
    Serial.println("Disconnected");
  }
};

// Define the BLE characteristic callbacks
class MyCharacteristicCallbacks : public BLECharacteristicCallbacks {
  void onWrite(BLECharacteristic *pCharacteristic) {
    std::string value = std::string(pCharacteristic->getValue().c_str());
    if (value == "led_off") {
      setColor(0, 0, 0); // turn the RGB LED off
      Serial.println("RGB LED turned off");
    } else if (value == "red") {
      setColor(255, 0, 0); // Red
      Serial.println("red");
    }
    else if (value == "green") {
      setColor(0, 255, 0); // green
      Serial.println("green");
    }
    else if (value == "blue") {
      setColor(0, 0, 255); // blue
      Serial.println("blue");
    }
    else if (value == "yellow") {
      setColor(255, 150, 0); // yellow
      Serial.println("yellow");
    }
    else if (value == "purple") {
      setColor(80, 0, 80); // purple
      Serial.println("purple");
    }
  }
};

// Initialize the Bluetooth BLE
void setupBLE() {
  BLEDevice::init(bleName);                        // Initialize the BLE device
  BLEServer *pServer = BLEDevice::createServer();  // Create the BLE server
  // Print the error message if the BLE server creation fails
  if (pServer == nullptr) {
    Serial.println("Error creating BLE server");
    return;
  }
  pServer->setCallbacks(new MyServerCallbacks());  // Set the BLE server callbacks

  // Create the BLE service
  BLEService *pService = pServer->createService(SERVICE_UUID);
  // Print the error message if the BLE service creation fails
  if (pService == nullptr) {
    Serial.println("Error creating BLE service");
    return;
  }
  // Create the BLE characteristic for sending notifications
  pCharacteristic = pService->createCharacteristic(CHARACTERISTIC_UUID_TX, BLECharacteristic::PROPERTY_NOTIFY);
  pCharacteristic->addDescriptor(new BLE2902());  // Add the descriptor
  // Create the BLE characteristic for receiving data
  BLECharacteristic *pCharacteristicRX = pService->createCharacteristic(CHARACTERISTIC_UUID_RX, BLECharacteristic::PROPERTY_WRITE);
  pCharacteristicRX->setCallbacks(new MyCharacteristicCallbacks());  // Set the BLE characteristic callbacks
  pService->start();                                                 // Start the BLE service
  pServer->getAdvertising()->start();                                // Start advertising
  Serial.println("Waiting for a client connection...");              // Wait for a client connection
}

void setColor(int red, int green, int blue) {
  // For common-anode RGB LEDs, use 255 minus the color value
  ledcWrite(redPin, red);
  ledcWrite(greenPin, green);
  ledcWrite(bluePin, blue);
}
Common Course Links
Common Course Files
แหล่งข้อมูลและเอกสารอ้างอิง
-
เอกสารESP32 Tutorial 38/55- SunFounder doc page for Bluetooth RGB LEDdocs.sunfounder.com
ไฟล์📁
ไม่มีไฟล์ที่พร้อมใช้งาน