ESP32 教學 36/55 - 猜數字遊戲 | SunFounder 嘅 ESP32 IoT 學習套件
喺呢個教學入面,我哋會用ESP32微控制器,配合紅外線遙控同LCD顯示屏,整一個好玩嘅猜數字遊戲。玩家要嘗試估一個隨機生成、介乎0到99之間嘅數字,遊戲會提供提示,話俾你知個估測係太高定太低。透過呢個項目,你會學到點樣用紅外線接收器、喺LCD上面顯示數值,以及管理嚟自遙控器嘅用戶輸入。你可以參考條片嚟睇得更清楚(片入面00:00位置)。


硬件解說
呢個項目用到嘅主要組件包括ESP32微控制器、一個紅外線遙控器、一個紅外線接收器,同一個LCD顯示屏。ESP32係主要嘅處理單元,能夠處理無線通訊,令佢成為物聯網項目嘅一個多用途選擇。紅外線遙控器容許用戶輸入猜測,唔需要直接掂到塊板,而LCD就用嚟顯示遊戲狀態同提示。
紅外線接收器偵測嚟自遙控器嘅訊號,並將佢解碼,等遊戲可以用到。遙控器上面每個掣撳落去,都會對應一個特定數值,ESP32可以解讀到。LCD顯示屏就為用戶提供一個視覺介面,顯示目前嘅猜測範圍,以及個猜測啱唔啱。
數據表詳情
| 製造商 | SunFounder |
|---|---|
| 零件編號 | ESP32 |
| 邏輯/IO電壓 | 3.3 V |
| 供電電壓 | 5 V(經USB) |
| 輸出電流(每通道) | 12 mA(最大) |
| PWM頻率指引 | 1 kHz |
| 輸入邏輯閾值 | 0.3 * Vcc 至 0.7 * Vcc |
| 電壓降 / RDS(on) / 飽和 | 0.2 V |
| 熱限制 | 工作溫度:-40 至 85 °C |
| 封裝 | WROOM-32模組 |
| 備註 / 變體 | 支援Wi-Fi同藍牙 |
- 確保所有組件喺適用嘅情況下,都係額定3.3 V同5 V。
- 為IR接收器使用合適嘅上拉電阻,避免浮動輸入。
- 如果長時間以最大輸出電流運行,要考慮使用散熱器。
- 使用PWM時,保持頻率大約1 kHz,以達到最佳性能。
- 接線要小心;確保連接穩固,避免間歇性故障。
接線說明
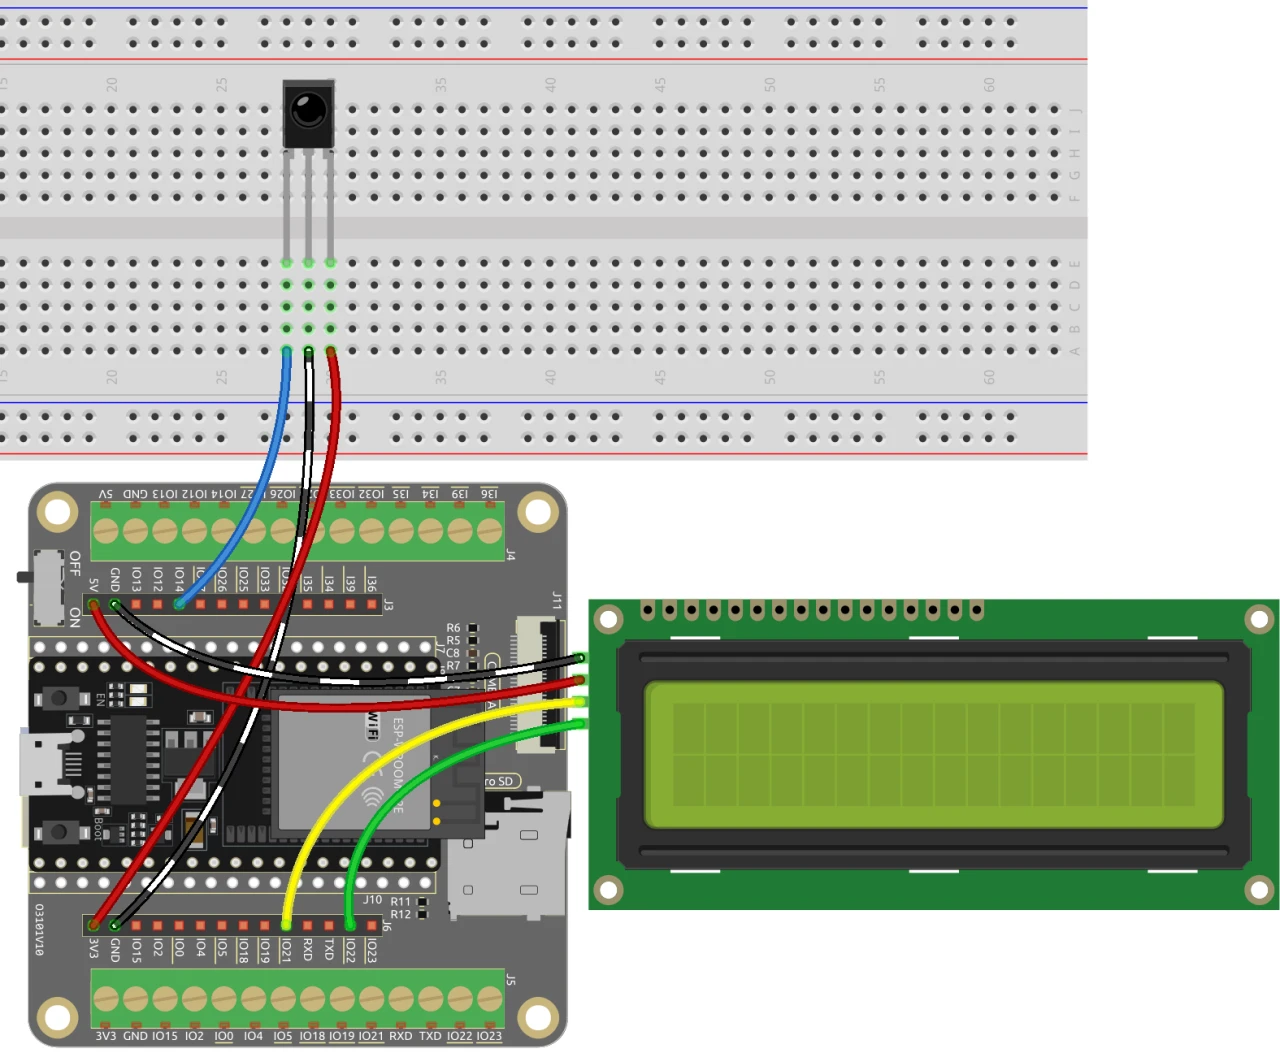
要設定猜數字遊戲嘅接線,首先連接紅外線接收器。將接收器右邊針腳嘅紅色線,連接到ESP32上面嘅3.3 V電源。黑色線應該接地,而紅外線接收器嘅左邊針腳就連接到ESP32上面嘅針腳14。
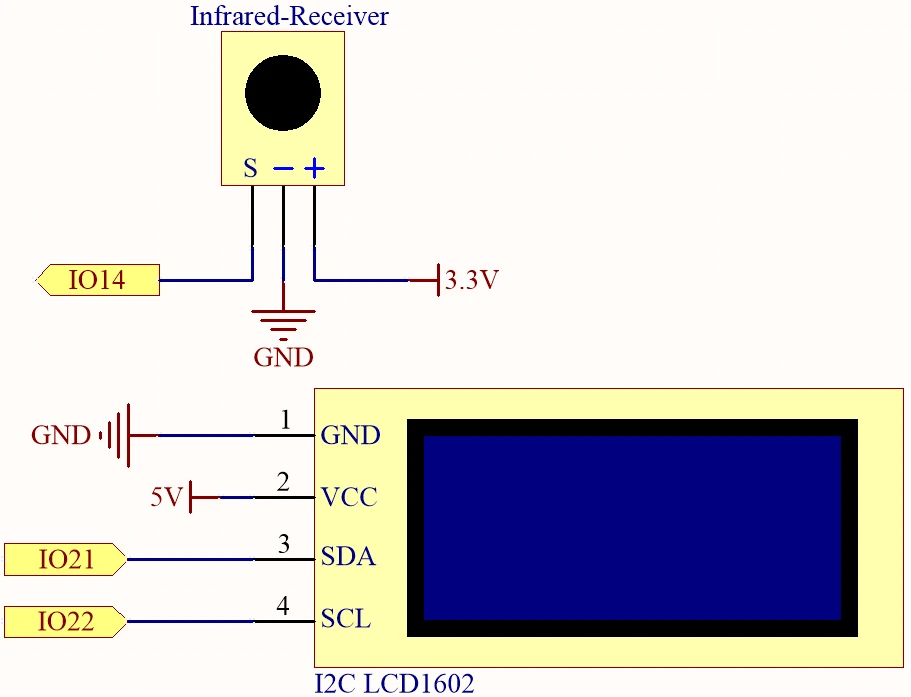
跟住,接駁LCD顯示屏。將LCD嘅VCC針腳連接到ESP32上面嘅5 V電源,而接地針腳就接地。LCD嘅SDA同SCL針腳應該分別連接到針腳21同22。確保SDA同SCL連接之間有兩個空位,避免針腳衝突。最後,喺供電畀塊板之前,記得攞走電池上面嘅任何膠套。
代碼示例同講解
以下代碼片段展示咗用喺猜數字遊戲嘅程式入面嘅重要部分。我哋首先包含必要嘅函式庫,並定義關鍵嘅識別碼。
#include
#include
#include
#include

const uint16_t IR_RECEIVE_PIN = 14;
IRrecv irrecv(IR_RECEIVE_PIN);
decode_results results;
喺呢段摘錄入面,我哋包含咗用嚟處理LCD同IR接收器功能嘅函式庫。紅外線接收器嘅針腳定義為14,而我哋建立咗必要物件嘅實例,用嚟管理輸入同輸出。
void setup() {
  lcd.init();
  lcd.backlight();
  Serial.begin(9600);
  irrecv.enableIRIn();
  initNewValue();
}呢個片段顯示咗setup函數,我哋喺度初始化LCD、開始串列通訊,並啟用IR接收器。函數initNewValue()會被呼叫,用嚟生成一個新嘅隨機數字,等玩家去估。
bool detectPoint() {
  if (count > pointValue) {
    if (count < upper) upper = count;
  } else if (count < pointValue) {
    if (count > lower) lower = count;
  } else if (count == pointValue) {
    count = 0;
    return 1;
  }
  count = 0;
  return 0;
}
呢個函數會檢查玩家嘅猜測,同隨機生成嘅數字比較,並相應噉調整上限同下限。如果個猜測啱咗,佢會重置個count,並返回true。
完整嘅代碼會喺文章下面載入,方便你參考。
示範 / 預期效果
一旦所有嘢接好晒、程式碼上載好之後,遊戲就會叫你喺遙控器上撳任何一個數字掣。跟住遊戲會就你嘅猜測畀出回饋,更新可能數字嘅範圍,直到你啱啱估中目標數字為止。如果你撳POWER掣,遊戲就會重置並重新開始(喺影片02:30度)。
常見嘅問題包括要確保紅外線接收器方向正確,同埋所有連接都要穩固。如果遊戲冇反應,就要檢查電源供應,同埋確認喺Arduino IDE入面揀啱咗板同埋連接埠。
影片時間標記
- 00:00 開始
- 2:17 遊戲項目介紹
- 4:37 接線
- 6:15 Arduino程式碼講解
- 12:32 喺Arduino IDE入面揀ESP32板同COM連接埠
- 16:16 玩猜數字遊戲
圖片
#include <Wire.h>
#include <LiquidCrystal_I2C.h>
#include <IRremoteESP8266.h>
#include <IRrecv.h>

// Define the IR receiver pin
const uint16_t IR_RECEIVE_PIN = 14;

// Create an IRrecv object
IRrecv irrecv(IR_RECEIVE_PIN);

// Create a decode_results object
decode_results results;

const long interval = 1000;

unsigned long previousMillis = 0;

// Initialize the LCD object
LiquidCrystal_I2C lcd(0x27, 16, 2);

// Initialize the input number value
int count = 0;

// Initialize the random lucky point
int pointValue = 0;

// Initialize the upper and lower limit tips
int upper = 99;
int lower = 0;

void setup() {
  // Initialize the LCD screen
  lcd.init();
  lcd.backlight();

  // Start the serial communication
  Serial.begin(9600);

  // Enable the IR receiver
  irrecv.enableIRIn();

  // Initialize a new lucky point value
  initNewValue();
}

void loop() {
  // If a signal is received from the IR receiver
  if (irrecv.decode(&results)) {
    bool result = 0;
    String num = decodeKeyValue(results.value);

    // If the POWER button is pressed
    if (num == "POWER") {
      initNewValue(); // Initialize a new lucky point value
    }

    // If the CYCLE button is pressed
    else if (num == "CYCLE") {
      result = detectPoint(); // Detect the input number
      lcdShowInput(result); // Show the result on the LCD screen
    }

    // If a number button (0-9) is pressed,
    //add the digit to the input number
    //and detect the number if it is greater than or equal to 10
    else if (num >= "0" && num <= "9") {
      count = count * 10;
      count += num.toInt();
      if (count >= 10) {
        result = detectPoint();
      }
      lcdShowInput(result);
    }
    irrecv.resume();
  }
}

// Function to initialize a new lucky point value
void initNewValue() {
  // Set the random seed based on the analog value from pin A0
  randomSeed(analogRead(A0));

  // Generate a new random lucky point value
  pointValue = random(99);

  // Reset the upper and lower limit tips
  upper = 99;
  lower = 0;

  // Show the welcome message on the LCD screen
  lcd.clear();
  lcd.print("    Welcome!");
  lcd.setCursor(0, 1);
  lcd.print("Press Any Number");

  // Reset the input number value
  count = 0;

  // Print the lucky point value to the serial monitor
  Serial.print("point is ");
  Serial.println(pointValue);
}

// Detect the input number
//and update the upper/lower limit tips accordingly
bool detectPoint() {
  if (count > pointValue) {
    if (count < upper)upper = count;
  }
  else if (count < pointValue) {
    if (count > lower)lower = count;
  }

  // If the input number is equal to the lucky point value,
  else if (count == pointValue) {

    // Reset the input number and return true
    count = 0;
    return 1;
  }
  // Reset the input number and return false
  count = 0;
  return 0;
}

// Show the input number and the upper/lower limit tips
void lcdShowInput(bool result) {
  lcd.clear();

  // If the input number is equal to the lucky point value
  if (result == 1)
  {
    // Show the success message and initialize a new lucky point value
    lcd.setCursor(0, 1);
    lcd.print(" You've got it! ");
    delay(5000);
    initNewValue();
    return;
  }
  lcd.print("Enter number:");
  lcd.print(count);
  lcd.setCursor(0, 1);
  lcd.print(lower);
  lcd.print(" < Point < ");
  lcd.print(upper);
}

// Function to decode the key value from the IR receiver signal
String decodeKeyValue(long result)
{
  switch(result){
    case 0xFF6897:
      return "0";
    case 0xFF30CF:
      return "1";
    case 0xFF18E7:
      return "2";
    case 0xFF7A85:
      return "3";
    case 0xFF10EF:
      return "4";
    case 0xFF38C7:
      return "5";
    case 0xFF5AA5:
     return "6";
    case 0xFF42BD:
      return "7";
    case 0xFF4AB5:
      return "8";
    case 0xFF52AD:
      return "9";
    case 0xFF906F:
      return "+";
    case 0xFFA857:
      return "-";
    case 0xFFE01F:
      return "EQ";
    case 0xFFB04F:
      return "U/SD";
    case 0xFF9867:
      return "CYCLE";
    case 0xFF22DD:
      return "PLAY/PAUSE";
    case 0xFF02FD:
      return "BACKWARD";
    case 0xFFC23D:
      return "FORWARD";
    case 0xFFA25D:
      return "POWER";
    case 0xFFE21D:
      return "MUTE";
    case 0xFF629D:
      return "MODE";
    case 0xFFFFFFFF:
      return "ERROR";
    default :
      return "ERROR";
    }
}
Common Course Links
Common Course Files
資源與參考資料
-
文件记录ESP32 Tutorial 36/55 - SunFounder doc page for guessing numberdocs.sunfounder.com
文件📁
冇文件可用。


![*NEW!* Compatible with Arduino UNO R4 WiFi [ABX00087] - Renesas RA4M1 / ESP32-S3](https://i.ebayimg.com/images/g/xpEAAOSwmCFmTed8/s-l225.jpg)