ESP32 튜토리얼 42/55 - 카메라로 사진 촬영하여 Micro SD CAM-1에 저장하기 | SunFounder의 ESP32 키트
이 튜토리얼에서는 SunFounder의 확장 보드와 함께 ESP32 마이크로컨트롤러를 사용하여 카메라로 사진을 촬영하고 micro SD 카드에 직접 저장하는 방법을 배우게 됩니다. 이 프로젝트는 Wi-Fi와 Bluetooth를 포함한 ESP32의 내장 기능을 활용하여 컴팩트한 사진 촬영 장치를 만듭니다. 이 튜토리얼이 끝나면 사진을 촬영하고 저장할 수 있는 작동하는 설정을 갖추게 되며, 나중에 컴퓨터에서 접근할 수 있습니다.

ESP32 생태계에 처음인 분들을 위해, 이 키트는 이 프로젝트를 포함한 다양한 프로젝트를 위한 다재다능한 플랫폼을 제공합니다. 이 프로젝트에서 사용되는 카메라는 OV2640으로, 1600x1200 픽셀의 해상도를 제공합니다. 최신 스마트폰의 품질에는 미치지 못할 수 있지만, 기본적인 이미지 캡처 작업에는 충분합니다. 단계를 명확히 하기 위해 이 튜토리얼에 포함된 비디오(비디오의 00:00 지점)를 확인하세요.

하드웨어 설명
이 프로젝트의 주요 구성 요소는 ESP32 마이크로컨트롤러, 카메라 모듈(OV2640), 그리고 저장을 위한 micro SD 카드입니다. ESP32는 통합 Wi-Fi 및 Bluetooth 기능을 갖춘 강력한 마이크로컨트롤러로, IoT 애플리케이션에 이상적입니다. 카메라 모듈은 이미지를 캡처하고, ESP32가 이를 처리합니다.
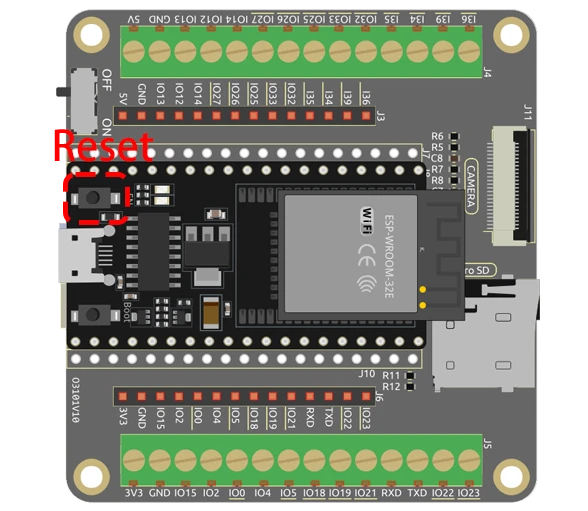
micro SD 카드는 캡처된 이미지의 저장 매체 역할을 합니다. 이 설정에서 ESP32는 특정 GPIO 핀을 사용하여 카메라 모듈과 통신하며, 이미지는 SD 카드에 JPEG 형식으로 저장됩니다. 이를 통해 나중에 사진을 쉽게 검색하고 볼 수 있습니다.
- ESP32 보드에 삽입할 때 카메라가 올바르게 방향이 맞는지 확인하세요.
- 호환성 문제를 피하기 위해 32GB 이하 용량의 micro SD 카드를 사용하세요.
- 프로그래밍 모드를 위해 GPIO 0을 GND에 연결하세요.
- 브라운아웃 문제를 피하기 위해 전원 공급에 주의하세요.
- 흐릿한 이미지를 피하기 위해 사진 촬영 중 카메라를 안정적으로 유지하세요.
배선 지침
ESP32 카메라 모듈을 배선하려면 먼저 ESP32의 전원이 꺼져 있는지 확인하세요. 다음 핀을 사용하여 micro SD 카드 모듈을 ESP32에 연결하세요: SD 카드의 CS 핀을 ESP32의 GPIO 5에, MOSI를 GPIO 23에, MISO를 GPIO 19에, SCK를 GPIO 18에 연결하세요. 다음으로 카메라 모듈 핀을 다음과 같이 연결하세요: PWDN을 GPIO 32에, XCLK를 GPIO 0에, SIOD를 GPIO 26에, SIOC를 GPIO 27에 연결하세요. 픽셀 데이터 핀 Y2부터 Y9까지는 코드에 정의된 대로 GPIO 5부터 GPIO 39까지 연결해야 합니다.
접지 및 전원 핀을 적절히 연결해야 합니다. ESP32는 키트에 포함된 배터리로 전원을 공급할 수 있습니다. 배선 후 장치의 전원을 켜기 전에 연결이 안전한지 확인하세요. 지침을 주의 깊게 따르면 코드를 업로드할 때 카메라가 올바르게 초기화되는 것을 볼 수 있습니다.
코드 예제 및 설명


코드에서는 필요한 라이브러리를 포함하고 카메라 핀 구성을 정의하는 것으로 시작합니다. pictureNumber 변수는 촬영된 사진 수를 추적하기 위해 초기화됩니다.
int pictureNumber = 0;

void setup() {
  WRITE_PERI_REG(RTC_CNTL_BROWN_OUT_REG, 0);  // 브라운아웃 감지기 비활성화
  Serial.begin(115200);
  camera_config_t config;
  // 카메라 구성 설정
  config.ledc_channel = LEDC_CHANNEL_0;
  // 추가 카메라 설정...
}
setup 함수는 직렬 통신을 초기화하고 카메라 설정을 구성합니다. 구성에는 최적의 성능을 위한 ledc_channel, pin_d0, xclk_freq_hz와 같은 매개변수가 포함됩니다.
다음으로, 루프를 사용하여 여러 장의 사진을 촬영하는 이미지 캡처 과정을 처리합니다. 이미지 데이터는 pictureNumber를 기반으로 한 파일 이름으로 SD 카드에 저장됩니다.
for (int shoot = 0; shoot < 5; shoot++) {
    camera_fb_t *fb = esp_camera_fb_get(); // 사진 촬영
    String path = "/picture" + String(pictureNumber) + ".jpg"; // 파일 경로
    File file = fs.open(path.c_str(), FILE_WRITE); // 쓰기 위해 파일 열기
    // 파일에 이미지 데이터 쓰기
    file.write(fb->buf, fb->len);
    // EEPROM에 사진 번호 업데이트
    EEPROM.write(0, pictureNumber);
}
이 루프는 최대 5개의 이미지를 캡처하며, 각 이미지는 고유한 파일 이름으로 저장됩니다. EEPROM을 사용하면 프로그램이 마지막 사진 번호를 기억하여 각 새 이미지가 고유한 식별자를 갖도록 보장합니다.
시연 / 기대 효과
코드를 실행하면 ESP32가 카메라와 SD 카드를 초기화합니다. ESP32의 리셋 버튼을 누른 후, EEPROM 값을 기준으로 0부터 255까지 순차적으로 번호가 매겨진 일련의 사진을 촬영합니다. 이미지 촬영이 끝나면 micro SD 카드를 제거하고 컴퓨터에서 사진을 볼 수 있습니다.
흔히 발생하는 문제로는 micro SD 카드가 올바르게 포맷되고 삽입되었는지 확인하는 것과, 흐릿한 이미지를 피하기 위해 카메라 위치를 안정적으로 유지하는 것이 있습니다. 카메라가 이미지를 촬영하지 않는 문제가 발생하면 배선과 코드에 설정된 구성(영상 06:45 부분)을 다시 확인하세요.
영상 타임스탬프
- 00:00 시작
- 1:39 소개
- 5:19 ESP32 카메라 코드 설명
- 11:10 Arduino IDE에서 ESP32 보드 및 COM 포트 선택
- 12:52 실내 및 실외 테스트 사진 촬영
이미지
/*********
  Rui Santos
  Complete project details at https://RandomNerdTutorials.com/esp32-cam-take-photo-save-microsd-card

  IMPORTANT!!!
   - Select Board "AI Thinker ESP32-CAM"
   - GPIO 0 must be connected to GND to upload a sketch
   - After connecting GPIO 0 to GND, press the ESP32-CAM on-board RESET button to put your board in flashing mode

  Permission is hereby granted, free of charge, to any person obtaining a copy
  of this software and associated documentation files.
  The above copyright notice and this permission notice shall be included in all
  copies or substantial portions of the Software.
*********/

#include "esp_camera.h"
#include "Arduino.h"
#include "FS.h"                // SD Card ESP32
#include "SD_MMC.h"            // SD Card ESP32
#include "soc/soc.h"           // Disable brownour problems
#include "soc/rtc_cntl_reg.h"  // Disable brownour problems
#include "driver/rtc_io.h"
#include <EEPROM.h>  // read and write from flash memory

// define the number of bytes you want to access
#define EEPROM_SIZE 1

// Pin definition for CAMERA_MODEL_AI_THINKER
#define PWDN_GPIO_NUM 32
#define RESET_GPIO_NUM -1
#define XCLK_GPIO_NUM 0
#define SIOD_GPIO_NUM 26
#define SIOC_GPIO_NUM 27

#define Y9_GPIO_NUM 35
#define Y8_GPIO_NUM 34
#define Y7_GPIO_NUM 39
#define Y6_GPIO_NUM 36
#define Y5_GPIO_NUM 21
#define Y4_GPIO_NUM 19
#define Y3_GPIO_NUM 18
#define Y2_GPIO_NUM 5
#define VSYNC_GPIO_NUM 25
#define HREF_GPIO_NUM 23
#define PCLK_GPIO_NUM 22

int pictureNumber = 0;

void setup() {
  WRITE_PERI_REG(RTC_CNTL_BROWN_OUT_REG, 0);  //disable brownout detector

  Serial.begin(115200);
  //Serial.setDebugOutput(true);
  //Serial.println();

  camera_config_t config;
  config.ledc_channel = LEDC_CHANNEL_0;
  config.ledc_timer = LEDC_TIMER_0;
  config.pin_d0 = Y2_GPIO_NUM;
  config.pin_d1 = Y3_GPIO_NUM;
  config.pin_d2 = Y4_GPIO_NUM;
  config.pin_d3 = Y5_GPIO_NUM;
  config.pin_d4 = Y6_GPIO_NUM;
  config.pin_d5 = Y7_GPIO_NUM;
  config.pin_d6 = Y8_GPIO_NUM;
  config.pin_d7 = Y9_GPIO_NUM;
  config.pin_xclk = XCLK_GPIO_NUM;
  config.pin_pclk = PCLK_GPIO_NUM;
  config.pin_vsync = VSYNC_GPIO_NUM;
  config.pin_href = HREF_GPIO_NUM;
  config.pin_sscb_sda = SIOD_GPIO_NUM;
  config.pin_sscb_scl = SIOC_GPIO_NUM;
  config.pin_pwdn = PWDN_GPIO_NUM;
  config.pin_reset = RESET_GPIO_NUM;
  config.xclk_freq_hz = 20000000;
  config.pixel_format = PIXFORMAT_JPEG;

  if (psramFound()) {
    config.frame_size = FRAMESIZE_UXGA;  // FRAMESIZE_ + QVGA|CIF|VGA|SVGA|XGA|SXGA|UXGA
    config.jpeg_quality = 10;
    config.fb_count = 2;
  } else {
    config.frame_size = FRAMESIZE_SVGA;
    config.jpeg_quality = 12;
    config.fb_count = 1;
  }

  // Init Camera
  esp_err_t err = esp_camera_init(&config);
  if (err != ESP_OK) {
    Serial.printf("Camera init failed with error 0x%x", err);
    return;
  }

  //Serial.println("Starting SD Card");
  if (!SD_MMC.begin()) {
    Serial.println("SD Card Mount Failed");
    return;
  }

  uint8_t cardType = SD_MMC.cardType();
  if (cardType == CARD_NONE) {
    Serial.println("No SD Card attached");
    return;
  }

  // initialize EEPROM with predefined size
  EEPROM.begin(EEPROM_SIZE);
  pictureNumber = EEPROM.read(0) + 1;

  for (int shoot = 0; shoot < 5; shoot++) {
    camera_fb_t *fb = NULL;

    // Take Picture with Camera
    fb = esp_camera_fb_get();
    if (!fb) {
      Serial.println("Camera capture failed");
      return;
    }

    // Path where new picture will be saved in SD Card
    String path = "/picture" + String(pictureNumber) + ".jpg";

    fs::FS &fs = SD_MMC;
    // Serial.printf("Picture file name: %s\n", path.c_str());

    File file = fs.open(path.c_str(), FILE_WRITE);
    if (!file) {
      Serial.println("Failed to open file in writing mode");
    } else {
      file.write(fb->buf, fb->len);  // Write image data to file
      if (shoot == 4) {
        Serial.printf("Saved file to path: %s\n", path.c_str());
      }else{
        Serial.printf("Shooting... \n");
      }
      EEPROM.write(0, pictureNumber);  // Update the picture number in EEPROM
      EEPROM.commit();
    }
    file.close();                      // Close the file
    esp_camera_fb_return(fb);          // Return the frame buffer back to the camera driver
    delay(200);                        // Short delay between shots
  }
  // Turns off the ESP32-CAM white on-board LED (flash) connected to GPIO 4
  pinMode(4, OUTPUT);
  digitalWrite(4, LOW);
  rtc_gpio_hold_en(GPIO_NUM_4);

  // Put the ESP32-CAM to deep sleep
  delay(2000);
  Serial.println("Going to sleep now");
  delay(2000);
  esp_deep_sleep_start();
  Serial.println("This will never be printed");
}

void loop() {
  // Empty loop as we are putting the ESP32-CAM to deep sleep
}
Common Course Links
Common Course Files
자원 및 참고자료
-
문서화ESP32 Tutorial 42/55- SunFounder doc page taking photodocs.sunfounder.com
파일📁
파일이 없습니다.