บทช่วยสอน ESP32 46/55 - การตรวจวัดอุณหภูมิระยะไกลโดยใช้ HiveMQ MQTT | ชุด ESP32 ของ SunFounder
ในบทช่วยสอนนี้ เราจะสร้างระบบตรวจวัดอุณหภูมิระยะไกลโดยใช้ ESP32 และโปรโตคอล MQTT โปรเจกต์นี้ช่วยให้เราส่งข้อมูลอุณหภูมิไปยัง MQTT broker และควบคุม LED จากระยะไกลผ่านเว็บอินเทอร์เฟซ โดยการกดปุ่ม เราสามารถส่งค่าอุณหภูมิไปยังคลาวด์ และยังสามารถรับคำสั่งเพื่อเปิดหรือปิด LED ได้อีกด้วย

ESP32 เป็นไมโครคอนโทรลเลอร์ที่ทรงพลังซึ่งมาพร้อมกับ Wi-Fi และ Bluetooth ในตัว ทำให้เหมาะสำหรับแอปพลิเคชัน Internet of Things (IoT) ในการตั้งค่านี้ เราจะใช้เทอร์มิสเตอร์ NTC เพื่อวัดอุณหภูมิ ปุ่มกดเพื่อสั่งให้อ่านค่า และ LED เพื่อแสดงสถานะ ข้อมูลจะถูกส่งไปยัง HiveMQ ซึ่งเป็น MQTT broker ยอดนิยม ที่ซึ่งสามารถเข้าถึงได้จากระยะไกล (ในวิดีโอที่เวลา 00:45)
อธิบายฮาร์ดแวร์
สำหรับโปรเจกต์นี้ เราจะใช้ส่วนประกอบต่อไปนี้:
- ไมโครคอนโทรลเลอร์ ESP32: บอร์ดนี้ทำหน้าที่เป็นหน่วยประมวลผลกลาง จัดการการเชื่อมต่อ Wi-Fi และการสื่อสาร MQTT
- เทอร์มิสเตอร์ NTC: เซนเซอร์วัดอุณหภูมินี้จะเปลี่ยนความต้านทานตามอุณหภูมิ โดยให้สัญญาณแอนะล็อกที่ ESP32 สามารถอ่านเพื่อกำหนดอุณหภูมิปัจจุบันได้
- LED: ไดโอดเปล่งแสงนี้จะใช้เพื่อแสดงสถานะตามคำสั่งที่ได้รับผ่าน MQTT
- ปุ่มกด: ปุ่มนี้จะสั่งให้ ESP32 อ่านอุณหภูมิและเผยแพร่ไปยัง MQTT broker
รายละเอียดจาก Datasheet
| ผู้ผลิต | SunFounder |
|---|---|
| หมายเลขชิ้นส่วน | ESP32 |
| แรงดันไฟฟ้าลอจิก/IO | 3.3 V |
| แรงดันไฟฟ้าจ่าย | 5 V (ผ่าน USB) |
| กระแสเอาต์พุต (ต่อช่อง) | สูงสุด 12 mA |
| คำแนะนำความถี่ PWM | สูงถึง 40 kHz |
| เกณฑ์ลอจิกอินพุต | 0.3 V (ต่ำ), 2.4 V (สูง) |
| ขีดจำกัดความร้อน | -40 ถึง 85 °C |
| แพ็กเกจ | ESP32-WROOM-32 |
- ตรวจสอบให้แน่ใจว่าระดับแรงดันไฟฟ้าถูกต้องเพื่อหลีกเลี่ยงความเสียหาย
- ใช้ตัวต้านทาน pull-up สำหรับปุ่มกดเพื่อให้การอ่านค่ามีความเสถียร
- ตัวเก็บประจุ decoupling สามารถช่วยทำให้แหล่งจ่ายไฟมีเสถียรภาพ
- ระมัดระวังการเดินสายของเทอร์มิสเตอร์เพื่อหลีกเลี่ยงการอ่านค่าที่ผิดพลาด
- ตรวจสอบรายละเอียด MQTT broker ของคุณเพื่อการเชื่อมต่อที่สำเร็จ
คำแนะนำการเดินสาย

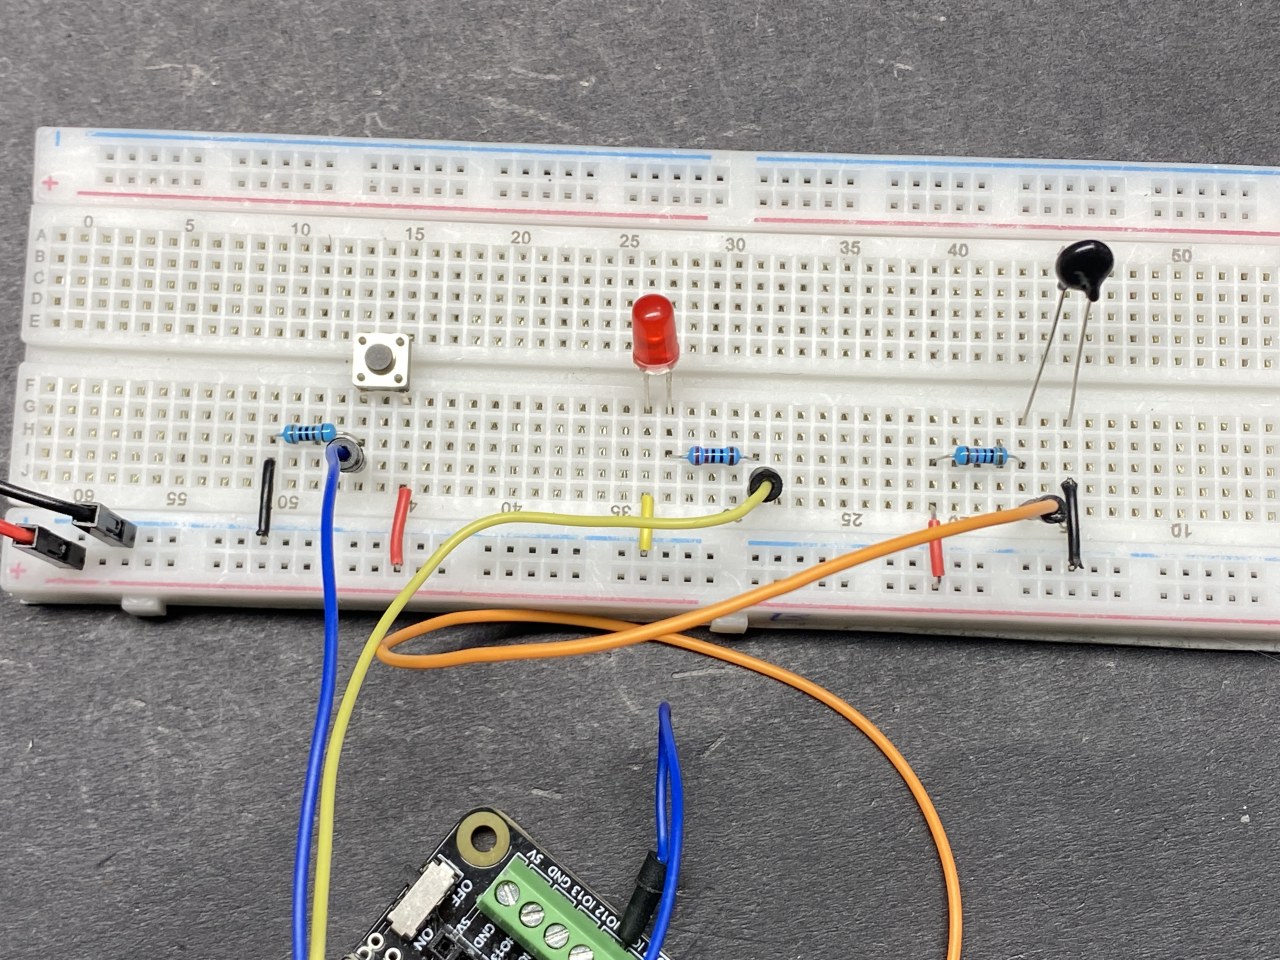
ในการเดินสายส่วนประกอบ เริ่มต้นด้วยการเชื่อมต่อเทอร์มิสเตอร์ NTC เชื่อมต่อขาหนึ่งของเทอร์มิสเตอร์เข้ากับแหล่งจ่าย 3.3 V บน ESP32 ขาอีกข้างเชื่อมต่อกับขา 36 บน ESP32 และควรเชื่อมต่อกับตัวต้านทาน 10 kΩ ซึ่งจากนั้นเชื่อมต่อกับกราวด์ สิ่งนี้สร้างวงจรแบ่งแรงดันไฟฟ้าที่ช่วยให้ ESP32 อ่านค่าความต้านทานของเทอร์มิสเตอร์ได้
ถัดไป เชื่อมต่อ LED ขาที่ยาวกว่า (แอโนด) ของ LED เชื่อมต่อกับขา 4 บน ESP32 ผ่านตัวต้านทาน 220 Ω ในขณะที่ขาที่สั้นกว่า (แคโทด) เชื่อมต่อกับกราวด์ สำหรับปุ่มกด ให้เชื่อมต่อด้านหนึ่งเข้ากับ 3.3 V และอีกด้านหนึ่งเข้ากับขา 14 บน ESP32 นอกจากนี้ ให้เชื่อมต่อตัวต้านทาน 10 kΩ จากขาของปุ่มไปยังกราวด์เพื่อให้แน่ใจว่ามีสถานะ LOW ที่เสถียรเมื่อไม่ได้กดปุ่ม
ติดตั้งไลบรารีที่จำเป็น
ไลบรารี PubSubClient ถูกใช้ที่นี่ คุณสามารถติดตั้งได้จาก Library Manager

ตัวอย่างโค้ดและคำอธิบาย
ในการตั้งค่า เราเริ่มต้นการสื่อสารแบบอนุกรม ตั้งค่าการเชื่อมต่อ Wi-Fi และกำหนดค่าเซิร์ฟเวอร์ MQTT นี่คือส่วนหนึ่งของโค้ดการตั้งค่า:
void setup() {
  Serial.begin(115200);
  setup_wifi();
  client.setServer(mqtt_server, 1883);
  client.setCallback(callback);
  pinMode(buttonPin, INPUT);
  pinMode(ledPin, OUTPUT);
}
ส่วนนี้ของโค้ดสร้างการเชื่อมต่อกับเครือข่าย Wi-Fi และตั้งค่าเซิร์ฟเวอร์ MQTT โหมดของขาสำหรับปุ่มและ LED ก็ถูกกำหนดค่าที่นี่เช่นกัน
ฟังก์ชัน loop จะตรวจสอบสถานะของปุ่มอย่างต่อเนื่องและเผยแพร่ข้อมูลอุณหภูมิเมื่อมีการกด นี่คือส่วนที่เน้นจาก loop:
void loop() {
  if (!client.connected()) {
    reconnect();
  }
  client.loop();
  if (digitalRead(buttonPin)) {
    long now = millis();
    if (now - lastMsg > 5000) {
      lastMsg = now;
      char tempString[8];
      dtostrf(thermistor(), 1, 2, tempString);
      client.publish("SF/TEMP", tempString);
    }
  }
}
ใน loop นี้ เราตรวจสอบว่า ESP32 เชื่อมต่อกับ MQTT broker หรือไม่ หากกดปุ่ม มันจะอ่านอุณหภูมิจากเทอร์มิสเตอร์และเผยแพร่ไปยังหัวข้อ "SF/TEMP" ทุก ๆ 5 วินาที
การสาธิต / สิ่งที่คาดหวัง
เมื่อโปรเจกต์ถูกตั้งค่าและทำงานเรียบร้อยแล้ว การกดปุ่มจะเผยแพร่อุณหภูมิปัจจุบันไปยัง MQTT broker คุณสามารถตรวจสอบข้อมูลนี้ได้จากไคลเอนต์ MQTT ใดก็ได้ นอกจากนี้ คุณยังสามารถส่งข้อความเพื่อควบคุม LED ได้ โดยการส่ง "on" จะทำให้ไฟติด ในขณะที่ "off" จะทำให้ไฟดับ สังเกตพฤติกรรมที่คาดหวังได้ในวิดีโอที่เวลา 15:30 ซึ่งจะแสดงค่าอุณหภูมิหลังจากการกดปุ่มแต่ละครั้ง
เวลาของวิดีโอ
- 00:00 เริ่มต้น
- 2:05 แนะนำโปรเจกต์
- 7:06 บริการ HiveMQ ฟรี
- 7:56 อธิบายการเดินสายไฟ
- 11:11 อธิบายโค้ด Arduino
- 18:46 การเลือกบอร์ด ESP32 และพอร์ต COM ใน Arduino IDE
- 20:30 การสาธิต HiveMQ Free broker
ภาพ
/*********
  :ref: https://randomnerdtutorials.com/esp32-mqtt-publish-subscribe-arduino-ide/
  https://docs.sunfounder.com/projects/kepler-kit/en/latest/iotproject/5.mqtt_pub.html
*********/

#include <WiFi.h>
#include <PubSubClient.h>
//#include <Wire.h>

// Replace the next variables with your SSID/Password combination
const char* ssid = "SSID";
const char* password = "PASSWORD";

// Add your MQTT Broker address, example:
const char* mqtt_server = "broker.hivemq.com";
const char* unique_identifier = "sunfounder-client-sdgvsda";

WiFiClient espClient;
PubSubClient client(espClient);
long lastMsg = 0;
int value = 0;


// LED Pin
const int ledPin = 4;
const int buttonPin = 14;

// When you connect to WIFI, only 36 39 34 35 32 33 pins can be used for analog reading.
// Define constants
const int thermistorPin = 36; // Pin connected to the thermistor
const float referenceVoltage = 3.3;
const float referenceResistor = 10000; // Resistance value (10k)
const float beta = 3950; // Beta value (Typical Value)
const float nominalTemperature = 25; // Nominal temperature for calculating the temperature coefficient
const float nominalResistance = 10000; // Resistance value at nominal temperature


void setup() {
  Serial.begin(115200);

  // default settings
  setup_wifi();
  client.setServer(mqtt_server, 1883);
  client.setCallback(callback);

  pinMode(buttonPin, INPUT);
  pinMode(ledPin, OUTPUT);
}

void setup_wifi() {
  delay(10);
  // We start by connecting to a WiFi network
  Serial.println();
  Serial.print("Connecting to ");
  Serial.println(ssid);

  WiFi.begin(ssid, password);

  while (WiFi.status() != WL_CONNECTED) {
    delay(500);
    Serial.print(".");
  }

  Serial.println("");
  Serial.println("WiFi connected");
  Serial.println("IP address: ");
  Serial.println(WiFi.localIP());
}

void callback(char* topic, byte* message, unsigned int length) {
  Serial.print("Message arrived on topic: ");
  Serial.print(topic);
  Serial.print(". Message: ");
  String messageTemp;

  for (int i = 0; i < length; i++) {
    Serial.print((char)message[i]);
    messageTemp += (char)message[i];
  }
  Serial.println();

  // If a message is received on the topic "SF/LED", you check if the message is either "on" or "off".
  // Changes the output state according to the message
  if (String(topic) == "SF/LED") {
    Serial.print("Changing state to ");
    if (messageTemp == "on") {
      Serial.println("on");
      digitalWrite(ledPin, HIGH);
    } else if (messageTemp == "off") {
      Serial.println("off");
      digitalWrite(ledPin, LOW);
    }
  }
}

void reconnect() {
  // Loop until we're reconnected
  while (!client.connected()) {
    Serial.print("Attempting MQTT connection...");
    // Attempt to connect
    if (client.connect(unique_identifier)) {
      Serial.println("connected");
      // Subscribe
      client.subscribe("SF/LED");
    } else {
      Serial.print("failed, rc=");
      Serial.print(client.state());
      Serial.println(" try again in 5 seconds");
      // Wait 5 seconds before retrying
      delay(5000);
    }
  }
}

float thermistor() {
  int adcValue = analogRead(thermistorPin); // Read ADC value
  float voltage = (adcValue * referenceVoltage) / 4095.0; // Calculate voltage
  float resistance = (voltage * referenceResistor) / (referenceVoltage - voltage); // Calculate thermistor resistance with updated configuration

  // Calculate temperature using the Beta parameter equation
  float tempK = 1 / (((log(resistance / nominalResistance)) / beta) + (1 / (nominalTemperature + 273.15)));

  float tempC = tempK - 273.15; // Get temperature in Celsius
  float tempF = 1.8 * tempC + 32.0; // Get temperature in Fahrenheit

  //Print temperature
  Serial.print("Temp: ");
  Serial.println(tempC);
  delay(200); //wait for 200 milliseconds
  return tempC;
}

void loop() {
  if (!client.connected()) {
    reconnect();
  }
  client.loop();

  // if the button pressed, publish the temperature to topic "SF/TEMP"
  if (digitalRead(buttonPin)) {
    long now = millis();
    if (now - lastMsg > 5000) {
      lastMsg = now;
      char tempString[8];
      dtostrf(thermistor(), 1, 2, tempString);
      client.publish("SF/TEMP", tempString);
    }
  }
}
Common Course Links
Common Course Files
แหล่งข้อมูลและเอกสารอ้างอิง
-
เอกสารESP32 Tutorial 46/55- SunFounder doc page for IoT Communication with MQTTdocs.sunfounder.com
ไฟล์📁
ไม่มีไฟล์ที่พร้อมใช้งาน