ESP32 튜토리얼 46/55 - HiveMQ MQTT를 사용한 원격 온도 모니터링 | SunFounder의 ESP32 키트
이 튜토리얼에서는 ESP32와 MQTT 프로토콜을 사용하여 원격 온도 모니터링 시스템을 만들어 보겠습니다. 이 프로젝트를 통해 온도 데이터를 MQTT 브로커에 게시하고 웹 인터페이스를 사용하여 LED를 원격으로 제어할 수 있습니다. 버튼을 누르면 온도 측정값을 클라우드로 보낼 수 있으며, LED를 켜거나 끄는 명령을 받을 수도 있습니다.

ESP32는 Wi-Fi와 Bluetooth가 내장된 강력한 마이크로컨트롤러로, 사물인터넷(IoT) 애플리케이션에 이상적입니다. 이 설정에서는 NTC 서미스터를 사용하여 온도를 측정하고, 푸시 버튼으로 측정을 트리거하며, LED로 상태를 표시합니다. 데이터는 인기 있는 MQTT 브로커인 HiveMQ로 전송되어 원격으로 액세스할 수 있습니다(비디오 00:45 참조).
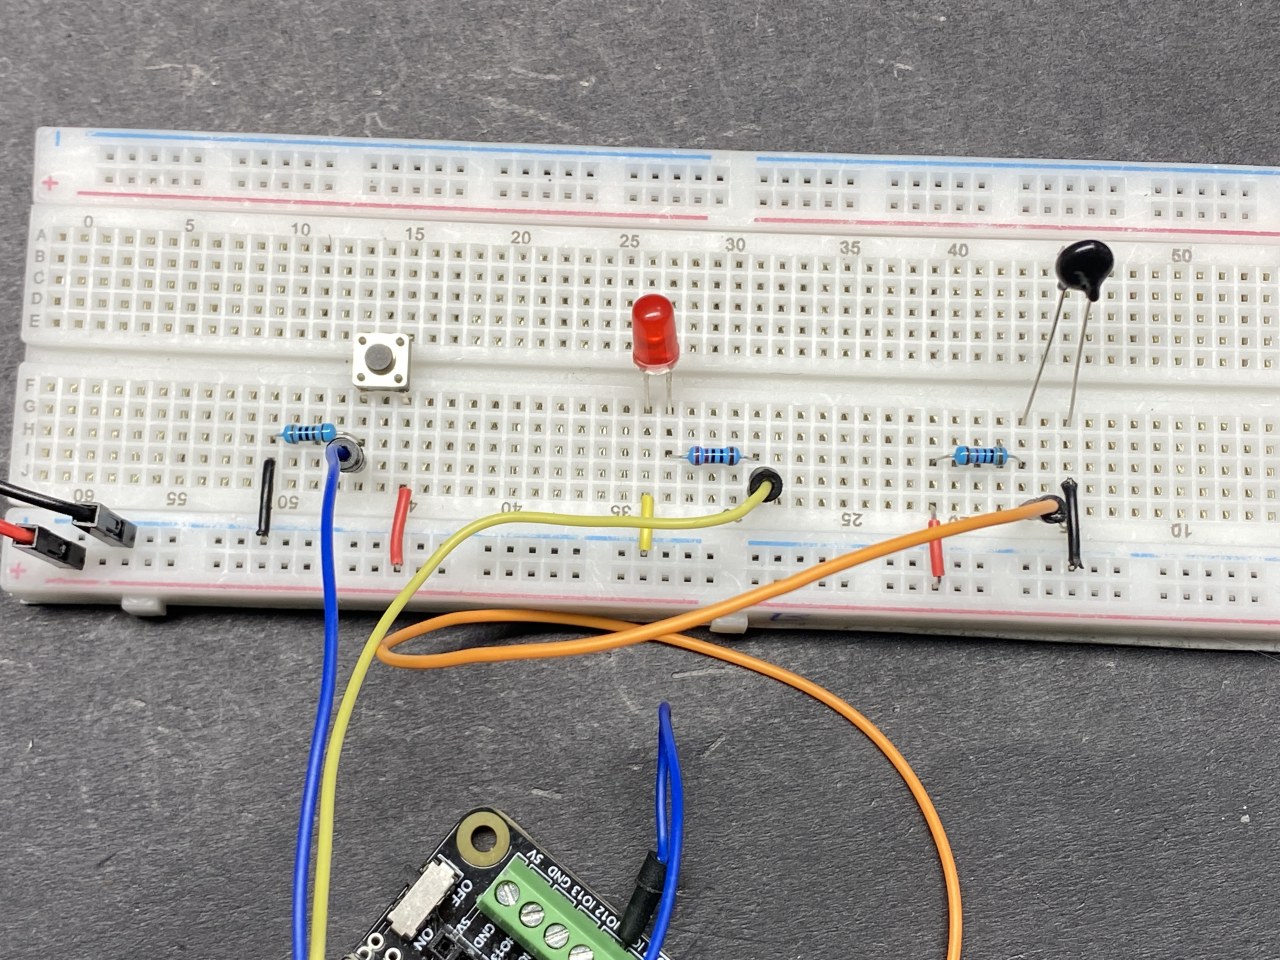
하드웨어 설명
이 프로젝트에는 다음 구성 요소를 사용합니다:
- ESP32 마이크로컨트롤러: 이 보드는 중앙 처리 장치 역할을 하며 Wi-Fi 연결 및 MQTT 통신을 처리합니다.
- NTC 서미스터: 이 온도 센서는 온도에 따라 저항이 변화합니다. ESP32가 읽어 현재 온도를 결정할 수 있는 아날로그 신호를 제공합니다.
- LED: 이 발광 다이오드는 MQTT를 통해 수신된 명령에 따라 상태를 표시하는 데 사용됩니다.
- 푸시 버튼: 이 버튼은 ESP32가 온도를 읽고 MQTT 브로커에 게시하도록 트리거합니다.
데이터시트 세부 정보
| 제조업체 | SunFounder |
|---|---|
| 부품 번호 | ESP32 |
| 로직/IO 전압 | 3.3 V |
| 공급 전압 | 5 V (USB 통해) |
| 출력 전류 (채널당) | 최대 12 mA |
| PWM 주파수 가이드 | 최대 40 kHz |
| 입력 로직 임계값 | 0.3 V (낮음), 2.4 V (높음) |
| 열 제한 | -40 ~ 85 °C |
| 패키지 | ESP32-WROOM-32 |
- 손상을 방지하려면 적절한 전압 레벨을 유지하세요.
- 안정적인 판독을 위해 푸시 버튼에 풀업 저항을 사용하세요.
- 디커플링 커패시터는 전원 공급을 안정화하는 데 도움이 될 수 있습니다.
- 잘못된 판독을 방지하려면 서미스터 배선에 주의하세요.
- 성공적인 연결을 위해 MQTT 브로커 세부 정보를 확인하세요.
배선 지침

구성 요소를 배선하려면 먼저 NTC 서미스터를 연결하세요. 서미스터의 한 핀을 ESP32의 3.3 V 공급 장치에 연결합니다. 다른 핀은 ESP32의 핀 36에 연결하고, 접지에 연결된 10 kΩ 저항에도 연결해야 합니다. 이렇게 하면 ESP32가 서미스터의 저항을 읽을 수 있는 전압 분배기가 생성됩니다.
다음으로 LED를 연결합니다. LED의 긴 핀(양극)은 220 Ω 저항을 통해 ESP32의 핀 4에 연결하고, 짧은 핀(음극)은 접지에 연결합니다. 푸시 버튼의 경우 한쪽을 3.3 V에 연결하고 다른 쪽을 ESP32의 핀 14에 연결합니다. 또한 버튼 핀에서 접지로 10 kΩ 저항을 연결하여 버튼을 누르지 않았을 때 안정적인 LOW 상태를 보장합니다.
필수 라이브러리 설치
PubSubClient 라이브러리가 여기서 사용되며, 라이브러리 관리자에서 설치할 수 있습니다.

코드 예제 및 설명
설정에서는 직렬 통신을 초기화하고, Wi-Fi 연결을 설정하며, MQTT 서버를 구성합니다. 다음은 설정 코드의 일부입니다:
void setup() {
  Serial.begin(115200);
  setup_wifi();
  client.setServer(mqtt_server, 1883);
  client.setCallback(callback);
  pinMode(buttonPin, INPUT);
  pinMode(ledPin, OUTPUT);
}
이 코드 부분은 Wi-Fi 네트워크에 대한 연결을 설정하고 MQTT 서버를 구성합니다. 버튼과 LED의 핀 모드도 여기서 구성됩니다.
루프 함수는 버튼 상태를 지속적으로 확인하고 버튼을 누르면 온도 데이터를 게시합니다. 다음은 루프의 핵심 부분입니다:
void loop() {
  if (!client.connected()) {
    reconnect();
  }
  client.loop();
  if (digitalRead(buttonPin)) {
    long now = millis();
    if (now - lastMsg > 5000) {
      lastMsg = now;
      char tempString[8];
      dtostrf(thermistor(), 1, 2, tempString);
      client.publish("SF/TEMP", tempString);
    }
  }
}
이 루프에서는 ESP32가 MQTT 브로커에 연결되어 있는지 확인합니다. 버튼을 누르면 서미스터에서 온도를 읽고 5초마다 "SF/TEMP" 토픽에 게시합니다.
데모 / 기대 효과
프로젝트가 설정되고 실행되면, 버튼을 누르면 현재 온도가 MQTT 브로커에 게시됩니다. 모든 MQTT 클라이언트에서 이 데이터를 모니터링할 수 있습니다. 또한 LED를 제어하기 위해 메시지를 보낼 수 있습니다. "on"을 보내면 LED가 켜지고, "off"를 보내면 꺼집니다. 15:30의 비디오에서 예상되는 동작을 확인하세요. 버튼을 누를 때마다 온도 판독값이 표시됩니다.
비디오 타임스탬프
- 00:00 시작
- 2:05 프로젝트 소개
- 7:06 무료 HiveMQ 서비스
- 7:56 배선 설명
- 11:11 Arduino 코드 설명
- 18:46 Arduino IDE에서 ESP32 보드 및 COM 포트 선택
- 20:30 HiveMQ Free 브로커 데모
이미지
/*********
  :ref: https://randomnerdtutorials.com/esp32-mqtt-publish-subscribe-arduino-ide/
  https://docs.sunfounder.com/projects/kepler-kit/en/latest/iotproject/5.mqtt_pub.html
*********/

#include <WiFi.h>
#include <PubSubClient.h>
//#include <Wire.h>

// Replace the next variables with your SSID/Password combination
const char* ssid = "SSID";
const char* password = "PASSWORD";

// Add your MQTT Broker address, example:
const char* mqtt_server = "broker.hivemq.com";
const char* unique_identifier = "sunfounder-client-sdgvsda";

WiFiClient espClient;
PubSubClient client(espClient);
long lastMsg = 0;
int value = 0;


// LED Pin
const int ledPin = 4;
const int buttonPin = 14;

// When you connect to WIFI, only 36 39 34 35 32 33 pins can be used for analog reading.
// Define constants
const int thermistorPin = 36; // Pin connected to the thermistor
const float referenceVoltage = 3.3;
const float referenceResistor = 10000; // Resistance value (10k)
const float beta = 3950; // Beta value (Typical Value)
const float nominalTemperature = 25; // Nominal temperature for calculating the temperature coefficient
const float nominalResistance = 10000; // Resistance value at nominal temperature


void setup() {
  Serial.begin(115200);

  // default settings
  setup_wifi();
  client.setServer(mqtt_server, 1883);
  client.setCallback(callback);

  pinMode(buttonPin, INPUT);
  pinMode(ledPin, OUTPUT);
}

void setup_wifi() {
  delay(10);
  // We start by connecting to a WiFi network
  Serial.println();
  Serial.print("Connecting to ");
  Serial.println(ssid);

  WiFi.begin(ssid, password);

  while (WiFi.status() != WL_CONNECTED) {
    delay(500);
    Serial.print(".");
  }

  Serial.println("");
  Serial.println("WiFi connected");
  Serial.println("IP address: ");
  Serial.println(WiFi.localIP());
}

void callback(char* topic, byte* message, unsigned int length) {
  Serial.print("Message arrived on topic: ");
  Serial.print(topic);
  Serial.print(". Message: ");
  String messageTemp;

  for (int i = 0; i < length; i++) {
    Serial.print((char)message[i]);
    messageTemp += (char)message[i];
  }
  Serial.println();

  // If a message is received on the topic "SF/LED", you check if the message is either "on" or "off".
  // Changes the output state according to the message
  if (String(topic) == "SF/LED") {
    Serial.print("Changing state to ");
    if (messageTemp == "on") {
      Serial.println("on");
      digitalWrite(ledPin, HIGH);
    } else if (messageTemp == "off") {
      Serial.println("off");
      digitalWrite(ledPin, LOW);
    }
  }
}

void reconnect() {
  // Loop until we're reconnected
  while (!client.connected()) {
    Serial.print("Attempting MQTT connection...");
    // Attempt to connect
    if (client.connect(unique_identifier)) {
      Serial.println("connected");
      // Subscribe
      client.subscribe("SF/LED");
    } else {
      Serial.print("failed, rc=");
      Serial.print(client.state());
      Serial.println(" try again in 5 seconds");
      // Wait 5 seconds before retrying
      delay(5000);
    }
  }
}

float thermistor() {
  int adcValue = analogRead(thermistorPin); // Read ADC value
  float voltage = (adcValue * referenceVoltage) / 4095.0; // Calculate voltage
  float resistance = (voltage * referenceResistor) / (referenceVoltage - voltage); // Calculate thermistor resistance with updated configuration

  // Calculate temperature using the Beta parameter equation
  float tempK = 1 / (((log(resistance / nominalResistance)) / beta) + (1 / (nominalTemperature + 273.15)));

  float tempC = tempK - 273.15; // Get temperature in Celsius
  float tempF = 1.8 * tempC + 32.0; // Get temperature in Fahrenheit

  //Print temperature
  Serial.print("Temp: ");
  Serial.println(tempC);
  delay(200); //wait for 200 milliseconds
  return tempC;
}

void loop() {
  if (!client.connected()) {
    reconnect();
  }
  client.loop();

  // if the button pressed, publish the temperature to topic "SF/TEMP"
  if (digitalRead(buttonPin)) {
    long now = millis();
    if (now - lastMsg > 5000) {
      lastMsg = now;
      char tempString[8];
      dtostrf(thermistor(), 1, 2, tempString);
      client.publish("SF/TEMP", tempString);
    }
  }
}
Common Course Links
Common Course Files
자원 및 참고자료
-
문서화ESP32 Tutorial 46/55- SunFounder doc page for IoT Communication with MQTTdocs.sunfounder.com
파일📁
파일이 없습니다.