Hướng dẫn ESP32 54/55 - Đặt màu dải đèn LED WS2812 qua Wifi | Bộ học IoT ESP32 của SunFounder
Trong hướng dẫn này, chúng ta sẽ học cách điều khiển màu sắc của dải đèn LED RGB WS2812 bằng vi điều khiển ESP32 qua Wi-Fi. Bằng cách sử dụng bộ chọn màu, bạn có thể chọn các màu khác nhau từ thiết bị di động hoặc máy tính để bàn và gửi thông tin đó đến dải đèn LED. Dự án này thể hiện khả năng của ESP32, cho phép tương tác liền mạch với đèn LED thông qua giao diện web.

Vi điều khiển ESP32 được trang bị cả Wi-Fi và Bluetooth, khiến nó trở thành lựa chọn linh hoạt cho các ứng dụng IoT. Trong dự án này, chúng ta sẽ tập trung vào chức năng Wi-Fi để điều khiển dải đèn LED. Người dùng sẽ có thể chọn màu sắc một cách linh hoạt, tạo ra trải nghiệm trực quan hấp dẫn. Để hiểu rõ hơn về dự án này, hãy xem video tại (trong video ở 00:00).
Phần cứng được giải thích
Các thành phần chính cho dự án này bao gồm vi điều khiển ESP32 và dải đèn LED WS2812. ESP32 là một vi điều khiển mạnh mẽ với khả năng Wi-Fi tích hợp, cho phép giao tiếp và điều khiển không dây.
Dải đèn LED WS2812 bao gồm các đèn LED RGB có thể định địa chỉ riêng lẻ, cho phép bạn đặt màu cho từng đèn LED một cách độc lập. Mỗi đèn LED kết hợp một mạch điều khiển và một đèn LED RGB trong một gói duy nhất, giúp đơn giản hóa việc nối dây và điều khiển nhiều đèn LED.
Chi tiết bảng dữ liệu
| Nhà sản xuất | Worldsemi |
|---|---|
| Số bộ phận | WS2812B |
| Điện áp Logic/IO | 3.5–5.3 V |
| Điện áp cung cấp | 5 V |
| Dòng điện đầu ra (mỗi kênh) | 20 mA |
| Dòng điện đỉnh (mỗi kênh) | 60 mA |
| Hướng dẫn tần số PWM | 400 Hz |
| Ngưỡng logic đầu vào | 0.3 × VDD (thấp), 0.7 × VDD (cao) |
| Sụt áp / RDS(on) / bão hòa | 0.5 V |
| Giới hạn nhiệt độ | –40 đến +80 °C |
| Đóng gói | 5050 SMD |
| Ghi chú / biến thể | Có sẵn với nhiều chiều dài và cấu hình khác nhau. |
- Đảm bảo nguồn điện phù hợp để tránh làm hỏng đèn LED.
- Sử dụng chung một điểm nối đất giữa ESP32 và dải đèn LED.
- Giữ các đường dữ liệu ngắn để tránh suy giảm tín hiệu.
- Cân nhắc thêm tụ điện (1000 µF) trên nguồn điện để ổn định.
- Sử dụng điện trở (470 Ω) trên đường dữ liệu để đảm bảo tính toàn vẹn tín hiệu.
Hướng dẫn nối dây
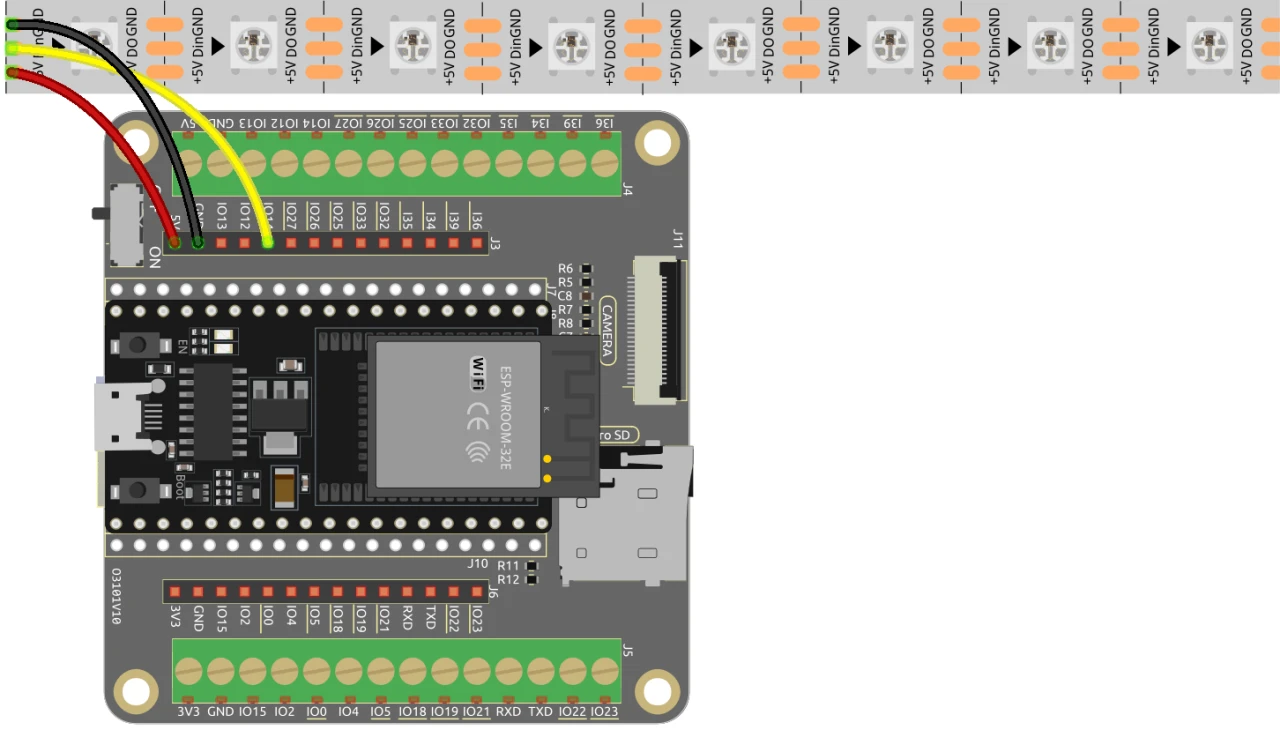
Để nối dây ESP32 với dải đèn LED WS2812, hãy kết nối các thành phần như sau: Đầu tiên, kết nối chân 5V của dải đèn LED với đầu ra 5V của ESP32. Tiếp theo, kết nối chân nối đất (GND) của dải đèn LED với chân GND trên ESP32. Cuối cùng, kết nối chân dữ liệu của dải đèn LED (thường được đánh dấu là DI hoặc Data In) với chân GPIO 13 trên ESP32. Đảm bảo tất cả các kết nối được chắc chắn để đảm bảo hoạt động đúng.
Trong video, các phương pháp nối dây thay thế được đề cập ngắn gọn, nhưng thiết lập được mô tả ở đây là cấu hình được khuyến nghị để có hiệu suất tối ưu (trong video ở 03:00).
Ví dụ mã & hướng dẫn chi tiết
Mã bắt đầu bằng việc bao gồm các thư viện cần thiết để điều khiển dải đèn LED WS2812 và thiết lập máy chủ web. Chân LED được định nghĩa là LED_PIN và số lượng đèn LED trong dải được đặt bằng NUM_LEDS.
#define LED_PIN 13 // Dải đèn NeoPixel LED
#define NUM_LEDS 8 // Số lượng đèn LED
Adafruit_NeoPixel strip = Adafruit_NeoPixel(NUM_LEDS, LED_PIN, NEO_GRB + NEO_KHZ800);
Đoạn mã này khởi tạo thư viện NeoPixel và thiết lập dải đèn LED trên chân được chỉ định. Đối tượng Adafruit_NeoPixel, strip, là thứ bạn sẽ sử dụng để điều khiển màu sắc của đèn LED.
Tiếp theo, mã khởi tạo Wi-Fi và thiết lập một máy chủ web để xử lý các yêu cầu đến. SSID và mật khẩu cho mạng được định nghĩa, cho phép ESP32 kết nối với Wi-Fi.
const char *ssid = "your_SSID";
const char *password = "your_PASSWORD";
WebServer server(80);
Trong đoạn trích này, hãy thay thế your_SSID và your_PASSWORD bằng thông tin đăng nhập Wi-Fi thực tế của bạn. Kết nối này cho phép ESP32 giao tiếp với các thiết bị trên cùng một mạng, cho phép điều khiển từ xa dải đèn LED.
Chức năng chính để thay đổi màu đèn LED là setColor(), hàm này lặp qua từng đèn LED và đặt màu của nó dựa trên các giá trị RGB đã chọn.
void setColor() {
  for (int i = 0; i < NUM_LEDS; i++) {
    strip.setPixelColor(i, valueR, valueG, valueB); // Đặt màu cho đèn LED thứ i
    strip.show(); // Cập nhật dải đèn LED với màu mới
    delay(10); // Chờ 10 mili giây
  }
}
Hàm này đảm bảo rằng mỗi đèn LED trong dải được cập nhật với màu đã chọn. Độ trễ cho phép các đèn LED thay đổi màu một cách mượt mà. Khi bạn tương tác với giao diện web, hàm này sẽ được gọi để phản ánh các lựa chọn màu sắc của bạn.
Trình diễn / Điều mong đợi
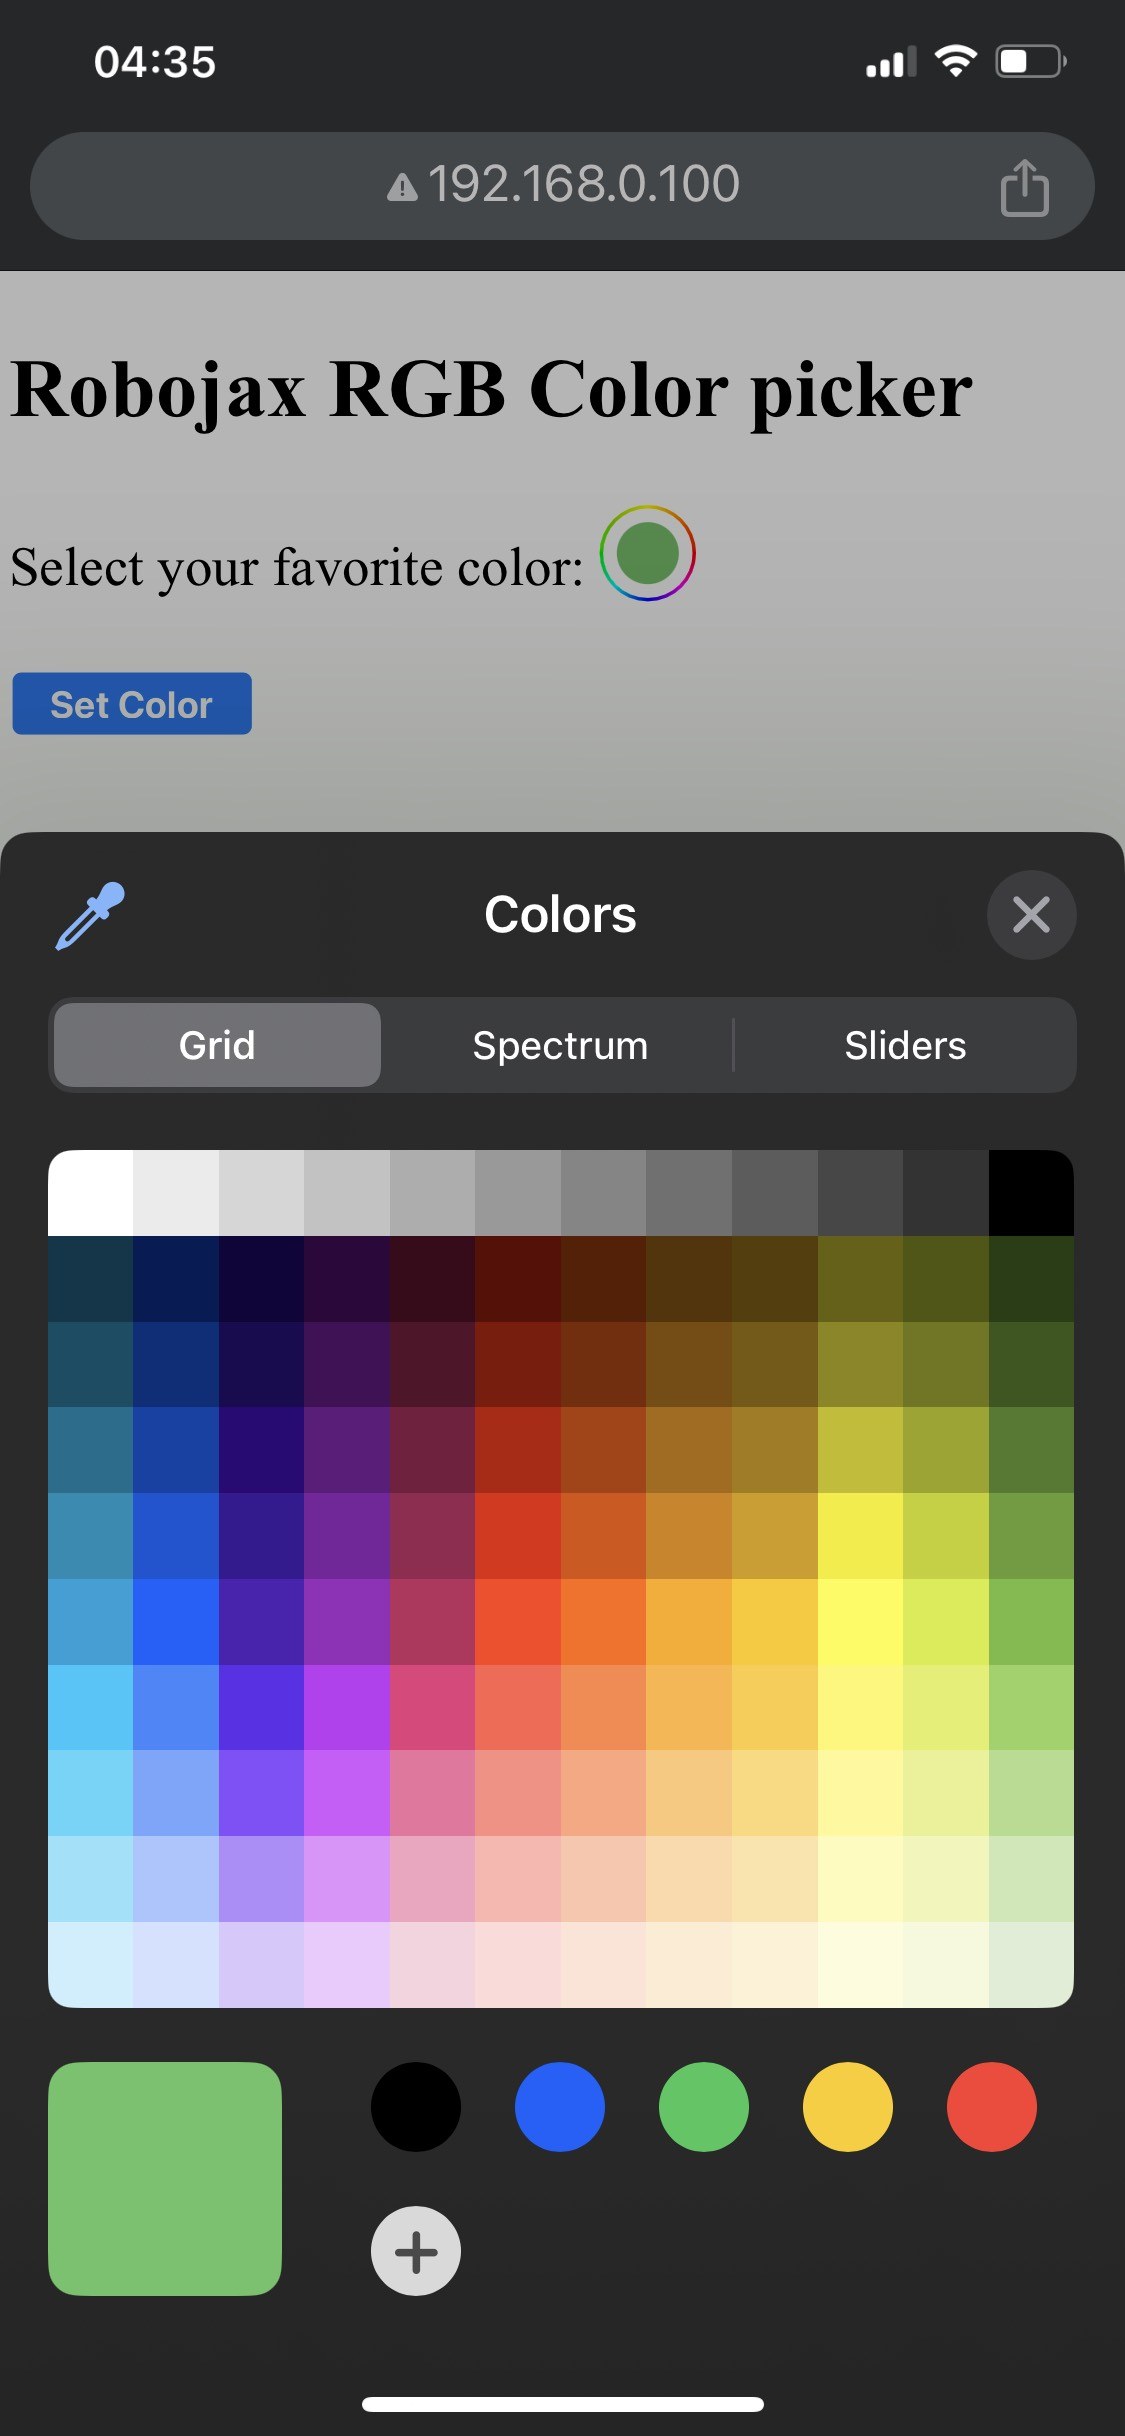

Khi quá trình thiết lập hoàn tất, bạn sẽ có thể truy cập giao diện web qua địa chỉ IP của ESP32. Bạn sẽ thấy một bộ chọn màu cho phép bạn chọn bất kỳ màu nào, sau đó màu này sẽ được gửi đến dải đèn LED. Nếu ESP32 mất kết nối Wi-Fi, dải đèn sẽ nhấp nháy màu cảnh báo để chỉ ra sự cố (trong video ở phút 14:30).
Các lỗi thường gặp bao gồm đấu dây sai, có thể khiến đèn LED không sáng, hoặc sử dụng sai tổ hợp SSID/mật khẩu khiến ESP32 không kết nối được với mạng. Luôn kiểm tra kỹ các kết nối và thông tin đăng nhập của bạn.
Mốc thời gian trong video
- 00:00 Bắt đầu
- 2:01 Giới thiệu về dự án
- 3:09 Tài liệu
- 3:47 Giải thích về màu RGB
- 7:47 Đấu dây
- 8:40 Giải thích mã Arduino cho WS2812 với WIFI
- 19:35 Chọn bo mạch ESP32 và cổng COM trong Arduino IDE
- 21:17 Trình diễn điều khiển dải đèn LED qua wifi
Hình ảnh
/*
 * Control RGB LED over wifi using ESP32
 *
 full video instrucions https://youtu.be/J_UFHk_T9aE
📚⬇️ Download and resource page https://robojax.com/RJT687
 * Written by Ahmad Shamshiri on Dec 18, 2023
 *
 * Watch video instruciton for this video:
 *
 * I have combined DHT library of Adafruit with ESP8266 WebServer both links
 * Adafruit DHT library on GitHub: https://github.com/adafruit/DHT-sensor-library
 * and
 * ESP8266 on GitHub : https://github.com/esp8266/Arduino
 *
   Copyright (c) 2015, Majenko Technologies
   All rights reserved.

   Redistribution and use in source and binary forms, with or without modification,
   are permitted provided that the following conditions are met:

 * * Redistributions of source code must retain the above copyright notice, this
     list of conditions and the following disclaimer.

 * * Redistributions in binary form must reproduce the above copyright notice, this
     list of conditions and the following disclaimer in the documentation and/or
     other materials provided with the distribution.

 * * Neither the name of Majenko Technologies nor the names of its
     contributors may be used to endorse or promote products derived from
     this software without specific prior written permission.

   THIS SOFTWARE IS PROVIDED BY THE COPYRIGHT HOLDERS AND CONTRIBUTORS "AS IS" AND
   ANY EXPRESS OR IMPLIED WARRANTIES, INCLUDING, BUT NOT LIMITED TO, THE IMPLIED
   WARRANTIES OF MERCHANTABILITY AND FITNESS FOR A PARTICULAR PURPOSE ARE
   DISCLAIMED. IN NO EVENT SHALL THE COPYRIGHT HOLDER OR CONTRIBUTORS BE LIABLE FOR
   ANY DIRECT, INDIRECT, INCIDENTAL, SPECIAL, EXEMPLARY, OR CONSEQUENTIAL DAMAGES
   (INCLUDING, BUT NOT LIMITED TO, PROCUREMENT OF SUBSTITUTE GOODS OR SERVICES;
   LOSS OF USE, DATA, OR PROFITS; OR BUSINESS INTERRUPTION) HOWEVER CAUSED AND ON
   ANY THEORY OF LIABILITY, WHETHER IN CONTRACT, STRICT LIABILITY, OR TORT
   (INCLUDING NEGLIGENCE OR OTHERWISE) ARISING IN ANY WAY OUT OF THE USE OF THIS
   SOFTWARE, EVEN IF ADVISED OF THE POSSIBILITY OF SUCH DAMAGE.
*/

#include <Adafruit_NeoPixel.h> // Include the Adafruit NeoPixel library

#define LED_PIN 13 // NeoPixel LED strip
#define NUM_LEDS 8 // Number of LEDs
// Create an instance of the Adafruit_NeoPixel class
Adafruit_NeoPixel strip = Adafruit_NeoPixel(NUM_LEDS, LED_PIN, NEO_GRB + NEO_KHZ800);


//initial color of LED strip
int valueR = 178;//from 0 to 255 for Red
int valueG = 27;//from 0 to 255 for Green
int valueB = 84;//from 0 to 255 for Blue

bool showSerialData = false;
String theColorR, theColorG, theColorB;
String theColor ="ff0000";

#include <WiFi.h>
#include <WiFiClient.h>
#include <WebServer.h>
#include <ESPmDNS.h>

const char *ssid = "dars";
const char *password = "hhhhhhhhhhh";

WebServer server(80);

void showColorPicker() {
  String page = "<!DOCTYPE html>\n";
  page +="<html>\n";
  page +="<body>\n";
  page +="<div style=\"zoom: 300%;\">\n";
  page +="<h2>Robojax RGB Color picker</h2>\n";
  page +="<p id=\"result\"></p>\n";
  page +="<form action=\"/color\">\n";
  page +="  <label for=\"favcolor\">Select your favorite color:</label>\n";
  page +="  <input type=\"color\" id=\"favcolor\" name=\"favcolor\" value=\"#";
  page += theColor;
  page +="\"><br><br>\n";
  page +="   <input type=\"submit\" value=\"Set Color\" />\n";
  page +="</form> \n</div>\n";
  page +="</body>\n";
  page +="</html>\n";

  server.send(200,  "text/html", page);


}

//from https://stackoverflow.com/questions/44683071/convert-string-as-hex-to-hexadecimal
uint64_t StrToHex(const char* str)
{
  return (uint64_t) strtoull(str, 0, 16);
}

void getColor(){

 // server.send(200, "text/plain", message);

  if(server.argName(0) == "favcolor")
  {
    String newColor = String(server.arg(0));//get the GET ardument 0 and convert it to string
    theColor = newColor.substring(1);//remove the # sybmot from the begining of color like #B2a48d
    theColorR = newColor.substring(1, 3);//extract B2 from  #B2a48d for example
    theColorG = newColor.substring(3, 5);//extract a4 from  #B2a48d for example
    theColorB = newColor.substring(5, 7);//extract 8d from  #B2a48d for example

    valueR = StrToHex(theColorR.c_str());//convert String to HEX for R
    valueG = StrToHex(theColorG.c_str());//convert String to HEX for G
    valueB = StrToHex(theColorB.c_str());//convert String to HEX for B
    if(showSerialData)
    {
      Serial.print("valueR: ");
      Serial.println(valueR);
      Serial.print("valueG: ");
      Serial.println(valueG);
      Serial.print("valueB: ");
      Serial.println(valueB );
    }

  }

  showColorPicker();//make sure the color picker is shown
  //server.send(200, "text/plain", message);

}


void setColor()
{
  for (int i = 0; i < NUM_LEDS; i++) {
    strip.setPixelColor(i, valueR, valueG, valueB); // Set the color of the i-th LED to red
    strip.show(); // Update the LED strip with the new colors
    delay(10); // Wait for 100 milliseconds
  }
}//

void noConnection()
{
   for (int i = 0; i < NUM_LEDS; i++) {
    strip.setPixelColor(i, 255, 45, 0); // Set the color of the i-th LED to red
    strip.show(); // Update the LED strip with the new colors
    delay(50); // Wait for 100 milliseconds
  }

  delay(200);
   for (int i = NUM_LEDS-1; i >=0; i--) {
    strip.setPixelColor(i, 0, 255, 180); // Set the color of the i-th LED to red
    strip.show(); // Update the LED strip with the new colors
    delay(50); // Wait for 100 milliseconds
  }
}

void handleNotFound() {
  String message = "File Not Found\n\n";
  message += "URI: ";
  message += server.uri();
  message += "\nMethod: ";
  message += (server.method() == HTTP_GET) ? "GET" : "POST";
  message += "\nArguments: ";
  message += server.args();
  message += "\n";

  for (uint8_t i = 0; i < server.args(); i++) {
    message += " " + server.argName(i) + ": " + server.arg(i) + "\n";
  }

  server.send(404, "text/plain", message);

}

void setup_wifi() {
  delay(10);
  // We start by connecting to a WiFi network
  WiFi.mode(WIFI_STA);
  WiFi.begin(ssid, password);
  Serial.println("");

  // Wait for connection
  while (WiFi.status() != WL_CONNECTED) {
    noConnection();
    delay(500);
    Serial.print(".");
  }

  Serial.println("");
  Serial.print("Connected to ");
  Serial.println(ssid);
  Serial.print("Open: http://");
  Serial.print(WiFi.localIP());
  Serial.println(" to read temperature");

  if (MDNS.begin("robojaxRGB")) {
    Serial.println("MDNS responder started");
  }

}

void setup(void) {

  Serial.begin(115200);

  strip.begin(); // Initialize the NeoPixel strip
  strip.show(); // Set initial color to black

  setup_wifi();

  server.on("/", showColorPicker);//show the main page with color picker
  //server.on("/color", setColor);//changes teh color on WS2812 RGB LED


  server.on("/color", HTTP_GET, getColor);


  server.on("/inline", []() {
    server.send(200, "text/plain", "this works as well");
  });
  server.onNotFound(handleNotFound);
  server.begin();
  Serial.println("HTTP server started");
}

void loop(void) {
  //Robojax.com
    while (WiFi.status() != WL_CONNECTED) {
      setup_wifi();
    }

  server.handleClient();
  //showColorPicker();
  setColor();
  delay(300);// change this to larger value (1000 or more) if you don't need very often reading
  // Robojax.com code for ESP32 and DHT11 DHT22
}
Common Course Links
Common Course Files
Tài nguyên & tài liệu tham khảo
Chưa có tài nguyên nào.
Tập tin📁
Không có tệp nào khả dụng.