บทช่วยสอน ESP32 54/55 - ตั้งค่าสีแถบ LED WS2812 ผ่าน Wifi | ชุดเรียนรู้ IoT ESP32 ของ SunFounder
ในบทช่วยสอนนี้ เราจะเรียนรู้วิธีควบคุมสีของแถบ LED RGB WS2812 โดยใช้ไมโครคอนโทรลเลอร์ ESP32 ผ่าน Wi-Fi โดยการใช้ตัวเลือกสี คุณสามารถเลือกสีต่างๆ จากอุปกรณ์มือถือหรือเดสก์ท็อปของคุณและส่งข้อมูลนั้นไปยังแถบ LED โปรเจกต์นี้แสดงให้เห็นถึงความสามารถของ ESP32 ที่ช่วยให้การโต้ตอบกับไฟ LED ผ่านเว็บอินเทอร์เฟซเป็นไปอย่างราบรื่น

ไมโครคอนโทรลเลอร์ ESP32 มาพร้อมกับทั้ง Wi-Fi และบลูทูธ ทำให้เป็นตัวเลือกที่หลากหลายสำหรับแอปพลิเคชัน IoT ในโปรเจกต์นี้ เราจะมุ่งเน้นไปที่ฟังก์ชัน Wi-Fi เพื่อควบคุมแถบ LED ผู้ใช้จะสามารถเลือกสีได้แบบไดนามิก สร้างประสบการณ์ที่ดึงดูดสายตา สำหรับความชัดเจนเพิ่มเติมเกี่ยวกับโปรเจกต์นี้ อย่าลืมดูวิดีโอที่ (ในวิดีโอที่ 00:00)
อธิบายฮาร์ดแวร์
ส่วนประกอบหลักสำหรับโปรเจกต์นี้ประกอบด้วยไมโครคอนโทรลเลอร์ ESP32 และแถบ LED WS2812 ESP32 เป็นไมโครคอนโทรลเลอร์ที่ทรงพลังพร้อมความสามารถ Wi-Fi ในตัว ทำให้สามารถสื่อสารและควบคุมแบบไร้สายได้
แถบ LED WS2812 ประกอบด้วย LED RGB ที่สามารถระบุตำแหน่งได้ทีละดวง ทำให้คุณสามารถตั้งค่าสีของ LED แต่ละดวงได้อย่างอิสระ LED แต่ละดวงมีวงจรควบคุมและ LED RGB อยู่ในแพ็คเกจเดียว ซึ่งช่วยลดความซับซ้อนของการเดินสายไฟและการควบคุม LED หลายดวง
รายละเอียดดาต้าชีต
| ผู้ผลิต | Worldsemi |
|---|---|
| หมายเลขชิ้นส่วน | WS2812B |
| แรงดันไฟฟ้าลอจิก/IO | 3.5–5.3 V |
| แรงดันไฟฟ้าจ่าย | 5 V |
| กระแสเอาต์พุต (ต่อช่อง) | 20 mA |
| กระแสสูงสุด (ต่อช่อง) | 60 mA |
| คำแนะนำความถี่ PWM | 400 Hz |
| เกณฑ์ลอจิกอินพุต | 0.3 × VDD (ต่ำ), 0.7 × VDD (สูง) |
| แรงดันตก / RDS(on) / อิ่มตัว | 0.5 V |
| ขีดจำกัดความร้อน | –40 ถึง +80 °C |
| แพ็คเกจ | 5050 SMD |
| หมายเหตุ / รุ่นต่างๆ | มีให้เลือกหลายความยาวและการกำหนดค่า |
- ตรวจสอบให้แน่ใจว่าแหล่งจ่ายไฟเพียงพอเพื่อหลีกเลี่ยงความเสียหายต่อ LED
- ใช้กราวด์ร่วมระหว่าง ESP32 และแถบ LED
- รักษาสายข้อมูลให้สั้นเพื่อป้องกันการเสื่อมคุณภาพของสัญญาณ
- พิจารณาเพิ่มตัวเก็บประจุ (1000 µF) ข้ามแหล่งจ่ายไฟเพื่อความเสถียร
- ใช้ตัวต้านทาน (470 Ω) บนสายข้อมูลเพื่อความสมบูรณ์ของสัญญาณ
คำแนะนำการเดินสายไฟ
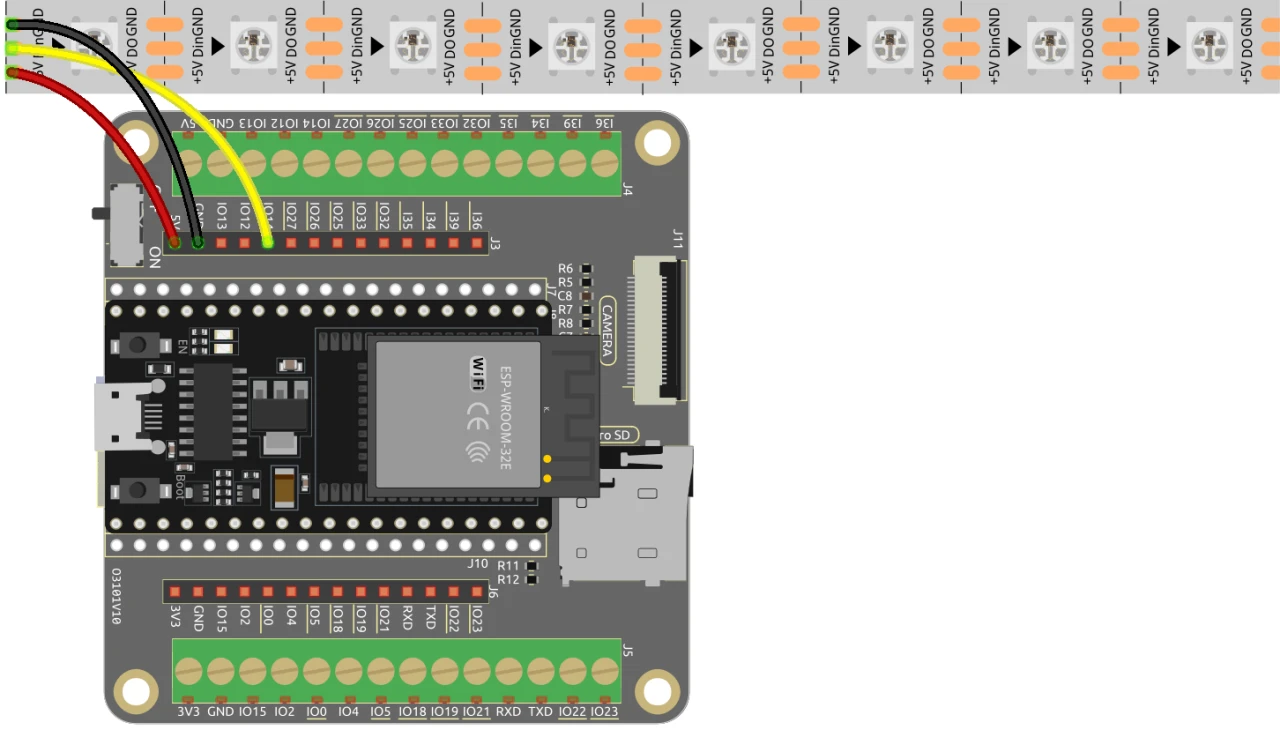
ในการเดินสายไฟ ESP32 เข้ากับแถบ LED WS2812 ให้เชื่อมต่อส่วนประกอบดังนี้: ขั้นแรก เชื่อมต่อพิน 5V ของแถบ LED เข้ากับเอาต์พุต 5V ของ ESP32 จากนั้น เชื่อมต่อพินกราวด์ (GND) ของแถบ LED เข้ากับพิน GND บน ESP32 สุดท้าย เชื่อมต่อพินข้อมูลของแถบ LED (โดยปกติจะระบุว่า DI หรือ Data In) เข้ากับพิน GPIO 13 บน ESP32 ตรวจสอบให้แน่ใจว่าการเชื่อมต่อทั้งหมดแน่นหนาเพื่อให้ทำงานได้อย่างถูกต้อง
ในวิดีโอ มีการกล่าวถึงวิธีการเดินสายไฟแบบอื่นๆ โดยย่อ แต่การตั้งค่าที่อธิบายที่นี่คือการกำหนดค่าที่แนะนำสำหรับประสิทธิภาพที่ดีที่สุด (ในวิดีโอที่ 03:00)
ตัวอย่างโค้ดและคำอธิบาย
โค้ดเริ่มต้นด้วยการรวมไลบรารีที่จำเป็นสำหรับการควบคุมแถบ LED WS2812 และการตั้งค่าเว็บเซิร์ฟเวอร์ พิน LED ถูกกำหนดเป็น LED_PIN และจำนวน LED ในแถบถูกตั้งค่าด้วย NUM_LEDS
#define LED_PIN 13 // NeoPixel LED strip
#define NUM_LEDS 8 // Number of LEDs
Adafruit_NeoPixel strip = Adafruit_NeoPixel(NUM_LEDS, LED_PIN, NEO_GRB + NEO_KHZ800);
ส่วนนี้เริ่มต้นไลบรารี NeoPixel และตั้งค่าแถบ LED บนพินที่ระบุ ออบเจกต์ Adafruit_NeoPixel ชื่อ strip คือสิ่งที่คุณจะใช้ในการควบคุมสี LED
ถัดไป โค้ดเริ่มต้น Wi-Fi และตั้งค่าเว็บเซิร์ฟเวอร์เพื่อจัดการคำขอที่เข้ามา SSID และรหัสผ่านสำหรับเครือข่ายถูกกำหนด ทำให้ ESP32 สามารถเชื่อมต่อกับ Wi-Fi ได้
const char *ssid = "your_SSID";
const char *password = "your_PASSWORD";
WebServer server(80);
ในส่วนนี้ ให้แทนที่ your_SSID และ your_PASSWORD ด้วยข้อมูลรับรอง Wi-Fi จริงของคุณ การเชื่อมต่อนี้ช่วยให้ ESP32 สื่อสารกับอุปกรณ์บนเครือข่ายเดียวกัน ทำให้สามารถควบคุมแถบ LED จากระยะไกลได้
ฟังก์ชันหลักสำหรับการเปลี่ยนสี LED คือ setColor() ซึ่งจะวนซ้ำผ่าน LED แต่ละดวงและตั้งค่าสีตามค่า RGB ที่เลือก
void setColor() {
  for (int i = 0; i < NUM_LEDS; i++) {
    strip.setPixelColor(i, valueR, valueG, valueB); // Set the color of the i-th LED
    strip.show(); // Update the LED strip with the new colors
    delay(10); // Wait for 10 milliseconds
  }
}
ฟังก์ชันนี้ช่วยให้แน่ใจว่า LED แต่ละดวงในแถบได้รับการอัปเดตด้วยสีที่เลือก การหน่วงเวลาช่วยให้ LED เปลี่ยนสีได้อย่างราบรื่น เมื่อคุณโต้ตอบกับเว็บอินเทอร์เฟซ ฟังก์ชันนี้จะถูกเรียกใช้เพื่อสะท้อนการเลือกสีของคุณ
การสาธิต / สิ่งที่คาดหวัง
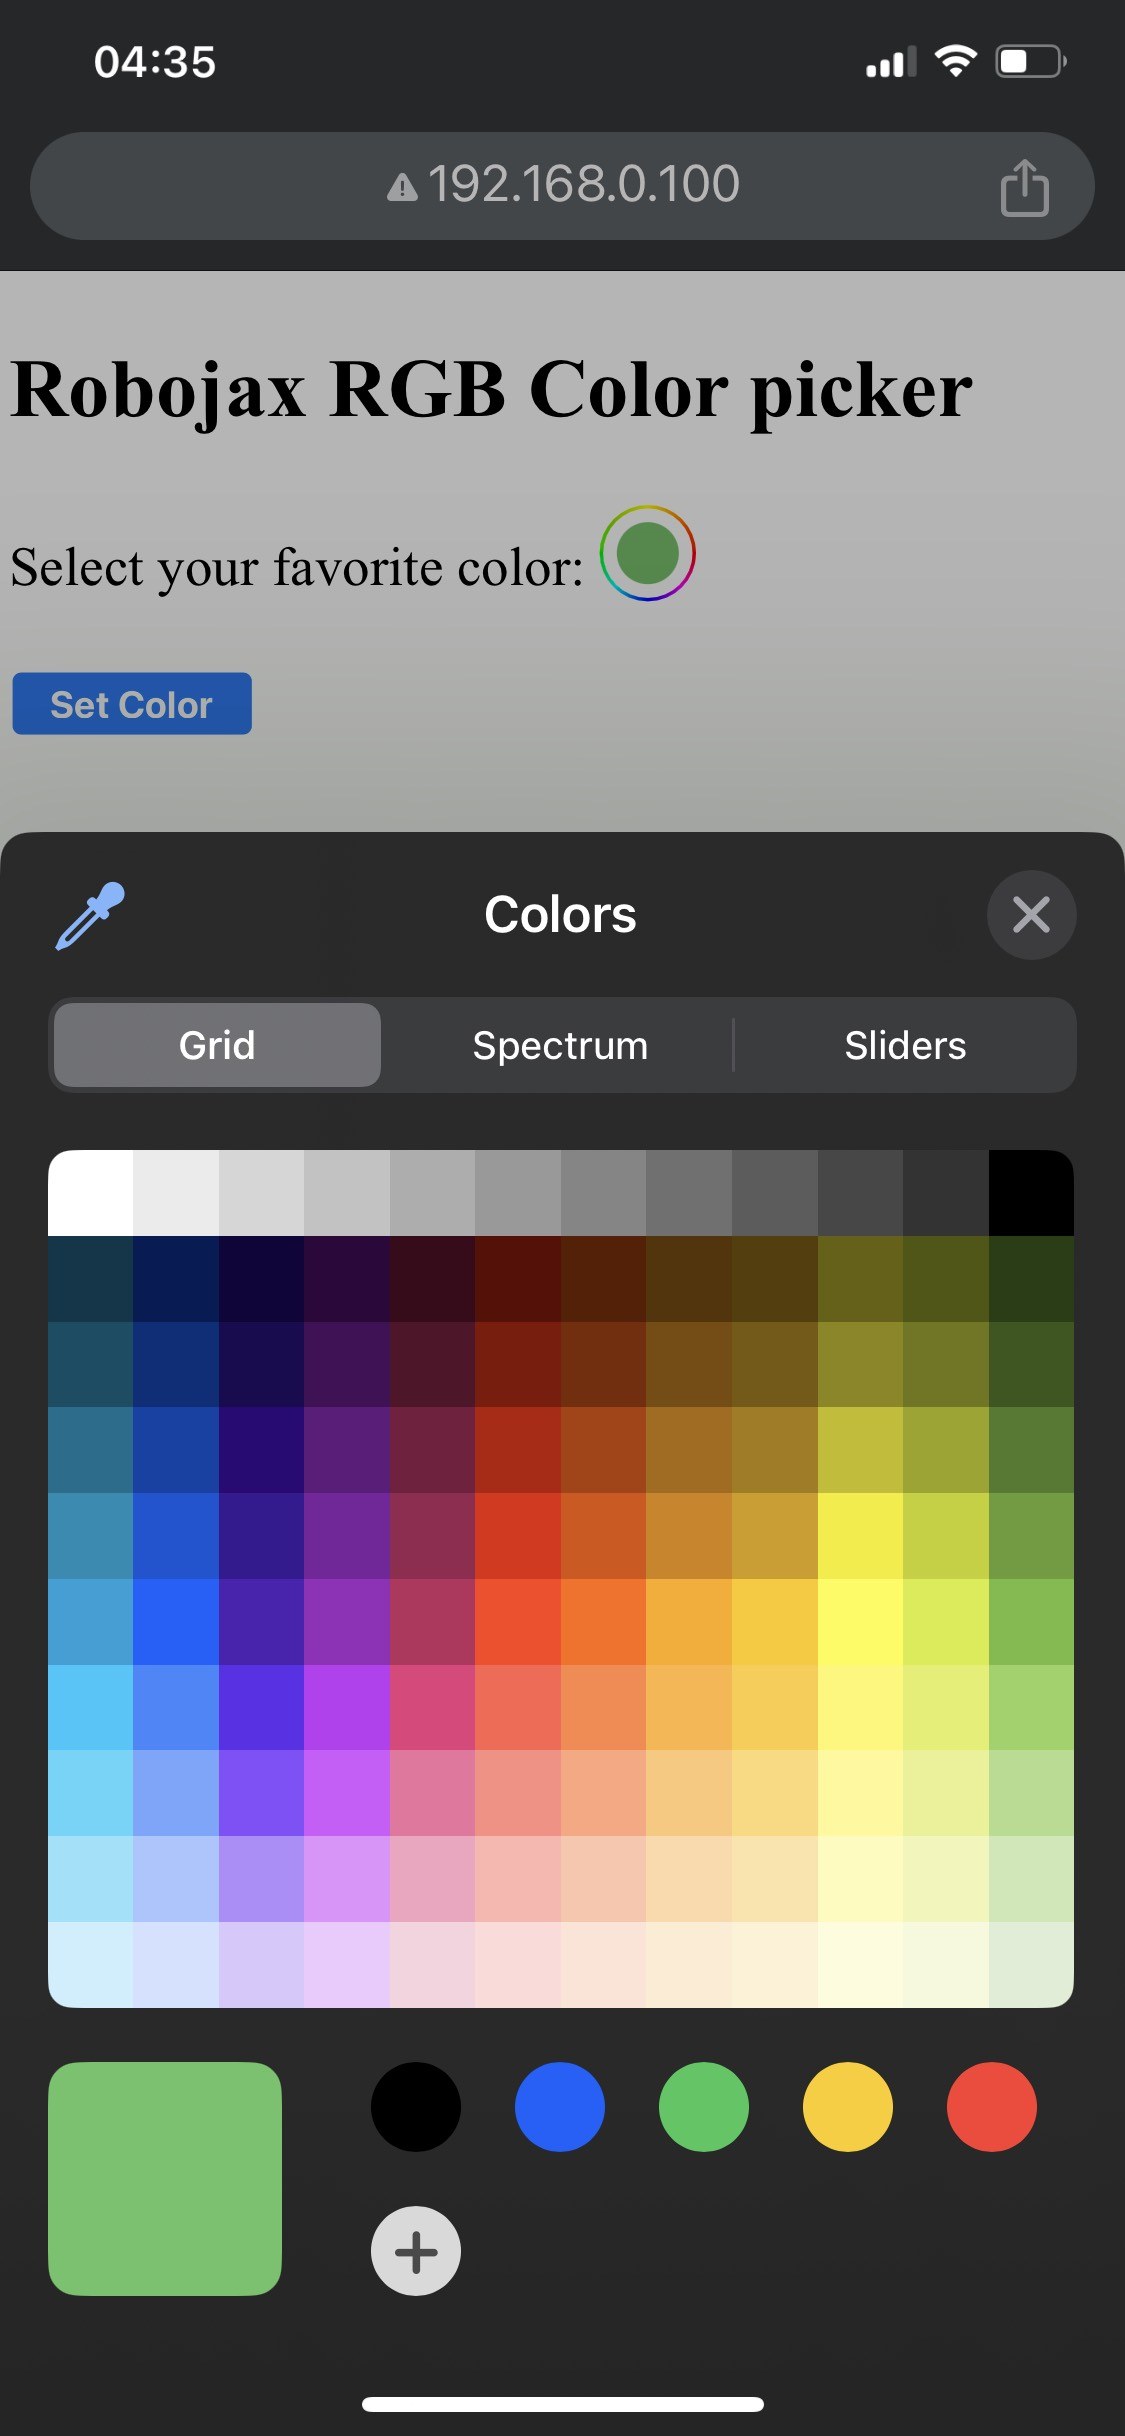

เมื่อการตั้งค่าเสร็จสมบูรณ์ คุณควรจะสามารถเข้าถึงอินเทอร์เฟซเว็บผ่านที่อยู่ IP ของ ESP32 ได้ คุณจะเห็นตัวเลือกสีที่ให้คุณเลือกสีใดก็ได้ ซึ่งจะถูกส่งไปยังแถบ LED หาก ESP32 สูญเสียการเชื่อมต่อ Wi-Fi แถบไฟจะกระพริบเป็นสีเตือน เพื่อบ่งบอกถึงปัญหา (ในวิดีโอที่เวลา 14:30)
ข้อผิดพลาดทั่วไป ได้แก่ การเดินสายไฟที่ไม่ถูกต้อง ซึ่งอาจทำให้ LED ไม่ติด หรือการใช้ชุด SSID/รหัสผ่านที่ไม่ถูกต้อง ซึ่งทำให้ ESP32 ไม่สามารถเชื่อมต่อกับเครือข่ายได้ ควรตรวจสอบการเชื่อมต่อและข้อมูลประจำตัวของคุณอีกครั้งเสมอ
ไทม์สแตมป์ของวิดีโอ
- 00:00 เริ่มต้น
- 2:01 แนะนำโปรเจกต์
- 3:09 เอกสาร
- 3:47 อธิบายสี RGB
- 7:47 การเดินสายไฟ
- 8:40 อธิบายโค้ด Arduino สำหรับ WS2812 พร้อม WIFI
- 19:35 การเลือกบอร์ด ESP32 และพอร์ต COM ใน Arduino IDE
- 21:17 สาธิตการควบคุมแถบ LED ผ่าน wifi
ภาพ
/*
 * Control RGB LED over wifi using ESP32
 *
 full video instrucions https://youtu.be/J_UFHk_T9aE
📚⬇️ Download and resource page https://robojax.com/RJT687
 * Written by Ahmad Shamshiri on Dec 18, 2023
 *
 * Watch video instruciton for this video:
 *
 * I have combined DHT library of Adafruit with ESP8266 WebServer both links
 * Adafruit DHT library on GitHub: https://github.com/adafruit/DHT-sensor-library
 * and
 * ESP8266 on GitHub : https://github.com/esp8266/Arduino
 *
   Copyright (c) 2015, Majenko Technologies
   All rights reserved.

   Redistribution and use in source and binary forms, with or without modification,
   are permitted provided that the following conditions are met:

 * * Redistributions of source code must retain the above copyright notice, this
     list of conditions and the following disclaimer.

 * * Redistributions in binary form must reproduce the above copyright notice, this
     list of conditions and the following disclaimer in the documentation and/or
     other materials provided with the distribution.

 * * Neither the name of Majenko Technologies nor the names of its
     contributors may be used to endorse or promote products derived from
     this software without specific prior written permission.

   THIS SOFTWARE IS PROVIDED BY THE COPYRIGHT HOLDERS AND CONTRIBUTORS "AS IS" AND
   ANY EXPRESS OR IMPLIED WARRANTIES, INCLUDING, BUT NOT LIMITED TO, THE IMPLIED
   WARRANTIES OF MERCHANTABILITY AND FITNESS FOR A PARTICULAR PURPOSE ARE
   DISCLAIMED. IN NO EVENT SHALL THE COPYRIGHT HOLDER OR CONTRIBUTORS BE LIABLE FOR
   ANY DIRECT, INDIRECT, INCIDENTAL, SPECIAL, EXEMPLARY, OR CONSEQUENTIAL DAMAGES
   (INCLUDING, BUT NOT LIMITED TO, PROCUREMENT OF SUBSTITUTE GOODS OR SERVICES;
   LOSS OF USE, DATA, OR PROFITS; OR BUSINESS INTERRUPTION) HOWEVER CAUSED AND ON
   ANY THEORY OF LIABILITY, WHETHER IN CONTRACT, STRICT LIABILITY, OR TORT
   (INCLUDING NEGLIGENCE OR OTHERWISE) ARISING IN ANY WAY OUT OF THE USE OF THIS
   SOFTWARE, EVEN IF ADVISED OF THE POSSIBILITY OF SUCH DAMAGE.
*/

#include <Adafruit_NeoPixel.h> // Include the Adafruit NeoPixel library

#define LED_PIN 13 // NeoPixel LED strip
#define NUM_LEDS 8 // Number of LEDs
// Create an instance of the Adafruit_NeoPixel class
Adafruit_NeoPixel strip = Adafruit_NeoPixel(NUM_LEDS, LED_PIN, NEO_GRB + NEO_KHZ800);


//initial color of LED strip
int valueR = 178;//from 0 to 255 for Red
int valueG = 27;//from 0 to 255 for Green
int valueB = 84;//from 0 to 255 for Blue

bool showSerialData = false;
String theColorR, theColorG, theColorB;
String theColor ="ff0000";

#include <WiFi.h>
#include <WiFiClient.h>
#include <WebServer.h>
#include <ESPmDNS.h>

const char *ssid = "dars";
const char *password = "hhhhhhhhhhh";

WebServer server(80);

void showColorPicker() {
  String page = "<!DOCTYPE html>\n";
  page +="<html>\n";
  page +="<body>\n";
  page +="<div style=\"zoom: 300%;\">\n";
  page +="<h2>Robojax RGB Color picker</h2>\n";
  page +="<p id=\"result\"></p>\n";
  page +="<form action=\"/color\">\n";
  page +="  <label for=\"favcolor\">Select your favorite color:</label>\n";
  page +="  <input type=\"color\" id=\"favcolor\" name=\"favcolor\" value=\"#";
  page += theColor;
  page +="\"><br><br>\n";
  page +="   <input type=\"submit\" value=\"Set Color\" />\n";
  page +="</form> \n</div>\n";
  page +="</body>\n";
  page +="</html>\n";

  server.send(200,  "text/html", page);


}

//from https://stackoverflow.com/questions/44683071/convert-string-as-hex-to-hexadecimal
uint64_t StrToHex(const char* str)
{
  return (uint64_t) strtoull(str, 0, 16);
}

void getColor(){

 // server.send(200, "text/plain", message);

  if(server.argName(0) == "favcolor")
  {
    String newColor = String(server.arg(0));//get the GET ardument 0 and convert it to string
    theColor = newColor.substring(1);//remove the # sybmot from the begining of color like #B2a48d
    theColorR = newColor.substring(1, 3);//extract B2 from  #B2a48d for example
    theColorG = newColor.substring(3, 5);//extract a4 from  #B2a48d for example
    theColorB = newColor.substring(5, 7);//extract 8d from  #B2a48d for example

    valueR = StrToHex(theColorR.c_str());//convert String to HEX for R
    valueG = StrToHex(theColorG.c_str());//convert String to HEX for G
    valueB = StrToHex(theColorB.c_str());//convert String to HEX for B
    if(showSerialData)
    {
      Serial.print("valueR: ");
      Serial.println(valueR);
      Serial.print("valueG: ");
      Serial.println(valueG);
      Serial.print("valueB: ");
      Serial.println(valueB );
    }

  }

  showColorPicker();//make sure the color picker is shown
  //server.send(200, "text/plain", message);

}


void setColor()
{
  for (int i = 0; i < NUM_LEDS; i++) {
    strip.setPixelColor(i, valueR, valueG, valueB); // Set the color of the i-th LED to red
    strip.show(); // Update the LED strip with the new colors
    delay(10); // Wait for 100 milliseconds
  }
}//

void noConnection()
{
   for (int i = 0; i < NUM_LEDS; i++) {
    strip.setPixelColor(i, 255, 45, 0); // Set the color of the i-th LED to red
    strip.show(); // Update the LED strip with the new colors
    delay(50); // Wait for 100 milliseconds
  }

  delay(200);
   for (int i = NUM_LEDS-1; i >=0; i--) {
    strip.setPixelColor(i, 0, 255, 180); // Set the color of the i-th LED to red
    strip.show(); // Update the LED strip with the new colors
    delay(50); // Wait for 100 milliseconds
  }
}

void handleNotFound() {
  String message = "File Not Found\n\n";
  message += "URI: ";
  message += server.uri();
  message += "\nMethod: ";
  message += (server.method() == HTTP_GET) ? "GET" : "POST";
  message += "\nArguments: ";
  message += server.args();
  message += "\n";

  for (uint8_t i = 0; i < server.args(); i++) {
    message += " " + server.argName(i) + ": " + server.arg(i) + "\n";
  }

  server.send(404, "text/plain", message);

}

void setup_wifi() {
  delay(10);
  // We start by connecting to a WiFi network
  WiFi.mode(WIFI_STA);
  WiFi.begin(ssid, password);
  Serial.println("");

  // Wait for connection
  while (WiFi.status() != WL_CONNECTED) {
    noConnection();
    delay(500);
    Serial.print(".");
  }

  Serial.println("");
  Serial.print("Connected to ");
  Serial.println(ssid);
  Serial.print("Open: http://");
  Serial.print(WiFi.localIP());
  Serial.println(" to read temperature");

  if (MDNS.begin("robojaxRGB")) {
    Serial.println("MDNS responder started");
  }

}

void setup(void) {

  Serial.begin(115200);

  strip.begin(); // Initialize the NeoPixel strip
  strip.show(); // Set initial color to black

  setup_wifi();

  server.on("/", showColorPicker);//show the main page with color picker
  //server.on("/color", setColor);//changes teh color on WS2812 RGB LED


  server.on("/color", HTTP_GET, getColor);


  server.on("/inline", []() {
    server.send(200, "text/plain", "this works as well");
  });
  server.onNotFound(handleNotFound);
  server.begin();
  Serial.println("HTTP server started");
}

void loop(void) {
  //Robojax.com
    while (WiFi.status() != WL_CONNECTED) {
      setup_wifi();
    }

  server.handleClient();
  //showColorPicker();
  setColor();
  delay(300);// change this to larger value (1000 or more) if you don't need very often reading
  // Robojax.com code for ESP32 and DHT11 DHT22
}
Common Course Links
Common Course Files
แหล่งข้อมูลและเอกสารอ้างอิง
ยังไม่มีทรัพยากรเลย
ไฟล์📁
ไม่มีไฟล์ที่พร้อมใช้งาน