ESP32 Tutorial 54/55 - Stel WS2812 LED-stripkleur in via Wifi | SunFounder's ESP32 IoT-leerkit
In deze tutorial leren we hoe we de kleur van een WS2812 RGB LED-strip kunnen bedienen met een ESP32-microcontroller via Wi-Fi. Door gebruik te maken van een kleurkiezer kun je verschillende kleuren selecteren vanaf je mobiele apparaat of desktop en die informatie naar de LED-strip sturen. Dit project laat de mogelijkheden van de ESP32 zien, waardoor naadloze interactie met LED-verlichting via een webinterface mogelijk is.

De ESP32-microcontroller is uitgerust met zowel Wi-Fi als Bluetooth, waardoor het een veelzijdige keuze is voor IoT-toepassingen. In dit project richten we ons op de Wi-Fi-functionaliteit om de LED-strip te bedienen. Gebruikers kunnen dynamisch kleuren kiezen, wat een visueel aantrekkelijke ervaring creëert. Voor extra duidelijkheid over dit project, bekijk zeker de video op (in video op 00:00).
Hardware uitgelegd
De primaire componenten voor dit project zijn de ESP32-microcontroller en de WS2812 LED-strip. De ESP32 is een krachtige microcontroller met ingebouwde Wi-Fi-mogelijkheden, waardoor draadloze communicatie en bediening mogelijk is.
De WS2812 LED-strip bestaat uit individueel adresseerbare RGB-LED's, waarmee je de kleur van elke LED onafhankelijk kunt instellen. Elke LED bevat een stuurcircuit en een RGB-LED in één enkele behuizing, wat de bedrading en aansturing van meerdere LED's vereenvoudigt.
Datasheet-details
| Fabrikant | Worldsemi |
|---|---|
| Onderdeelnummer | WS2812B |
| Logica/IO-spanning | 3,5–5,3 V |
| Voedingsspanning | 5 V |
| Uitgangsstroom (per kanaal) | 20 mA |
| Piekstroom (per kanaal) | 60 mA |
| PWM-frequentierichtlijn | 400 Hz |
| Ingangslogische drempels | 0,3 × VDD (laag), 0,7 × VDD (hoog) |
| Spanningsval / RDS(on) / verzadiging | 0,5 V |
| Thermische limieten | –40 tot +80 °C |
| Behuizing | 5050 SMD |
| Opmerkingen / varianten | Beschikbaar in verschillende lengtes en configuraties. |
- Zorg voor een correcte voedingsspanning om beschadiging van de LED's te voorkomen.
- Gebruik een gemeenschappelijke aarde tussen de ESP32 en de LED-strip.
- Houd datalijnen kort om signaalverslechtering te voorkomen.
- Overweeg een condensator (1000 µF) over de voeding te plaatsen voor stabiliteit.
- Gebruik een weerstand (470 Ω) op de datalijn voor signaalintegriteit.
Bedradingsinstructies
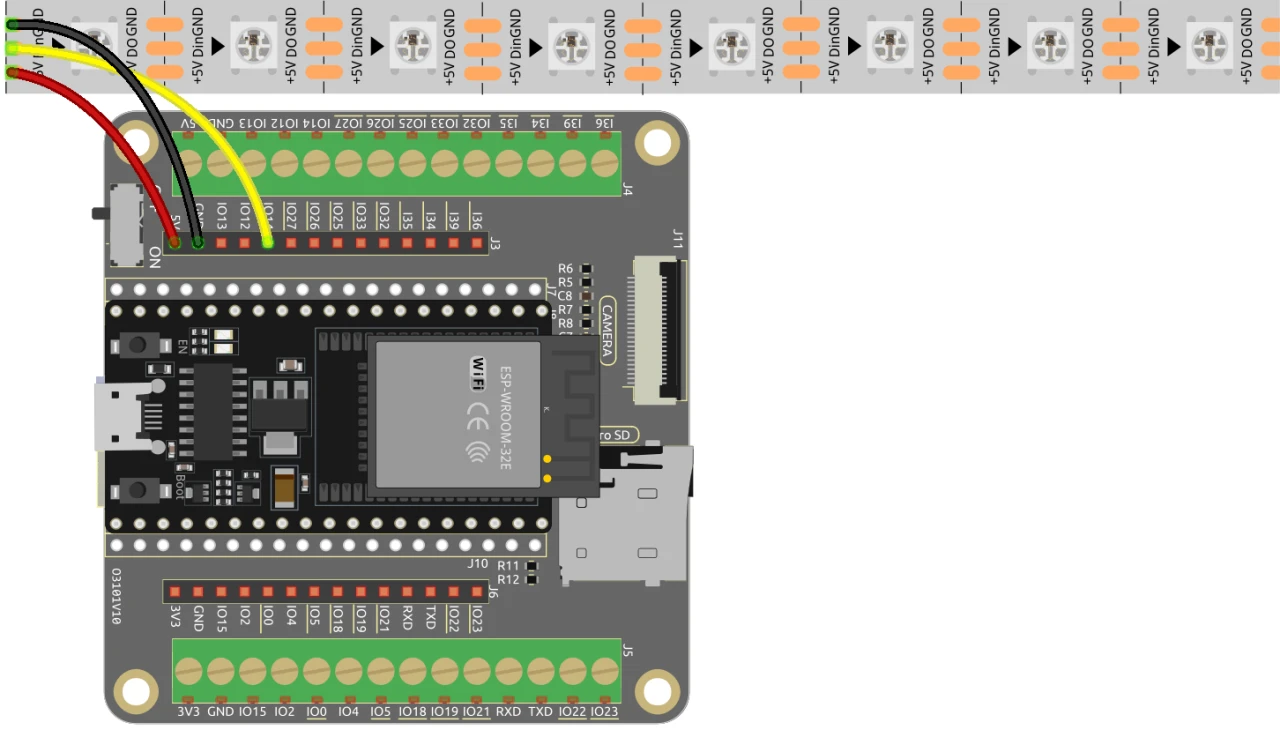
Om de ESP32 op de WS2812 LED-strip aan te sluiten, verbind je de componenten als volgt: Verbind eerst de 5V-pin van de LED-strip met de 5V-uitgang van de ESP32. Verbind vervolgens de aardingspin (GND) van de LED-strip met een GND-pin op de ESP32. Verbind tot slot de datapin van de LED-strip (meestal aangeduid als DI of Data In) met GPIO-pin 13 op de ESP32. Zorg ervoor dat alle verbindingen stevig zijn om een correcte werking te garanderen.
In de video worden alternatieve bedradingsmethoden kort genoemd, maar de hier beschreven opstelling is de aanbevolen configuratie voor optimale prestaties (in video op 03:00).
Codevoorbeelden & uitleg
De code begint met het opnemen van de benodigde bibliotheken voor het aansturen van de WS2812 LED-strip en het opzetten van de webserver. De LED-pin wordt gedefinieerd als LED_PIN en het aantal LED's in de strip wordt ingesteld met NUM_LEDS.
#define LED_PIN 13 // NeoPixel LED-strip
#define NUM_LEDS 8 // Aantal LED's
Adafruit_NeoPixel strip = Adafruit_NeoPixel(NUM_LEDS, LED_PIN, NEO_GRB + NEO_KHZ800);
Dit fragment initialiseert de NeoPixel-bibliotheek en stelt de LED-strip in op de opgegeven pin. Het Adafruit_NeoPixel-object, strip, is wat je gebruikt om de LED-kleuren te bedienen.
Vervolgens initialiseert de code Wi-Fi en stelt een webserver in om inkomende verzoeken te verwerken. De SSID en het wachtwoord voor het netwerk worden gedefinieerd, zodat de ESP32 verbinding kan maken met de Wi-Fi.
const char *ssid = "jouw_SSID";
const char *password = "jouw_WACHTWOORD";
WebServer server(80);
In dit fragment vervang je jouw_SSID en jouw_WACHTWOORD door je daadwerkelijke Wi-Fi-gegevens. Deze verbinding stelt de ESP32 in staat om te communiceren met apparaten op hetzelfde netwerk, waardoor afstandsbediening van de LED-strip mogelijk is.
De hoofdfunctie voor het wijzigen van de LED-kleur is setColor(), die door elke LED itereert en de kleur instelt op basis van de geselecteerde RGB-waarden.
void setColor() {
  for (int i = 0; i < NUM_LEDS; i++) {
    strip.setPixelColor(i, valueR, valueG, valueB); // Stel de kleur van de i-de LED in
    strip.show(); // Werk de LED-strip bij met de nieuwe kleuren
    delay(10); // Wacht 10 milliseconden
  }
}
Deze functie zorgt ervoor dat elke LED in de strip wordt bijgewerkt met de geselecteerde kleur. De vertraging zorgt ervoor dat de LED's soepel van kleur veranderen. Wanneer je interactie hebt met de webinterface, wordt deze functie aangeroepen om je kleurkeuzes weer te geven.
Demonstratie / Wat te verwachten
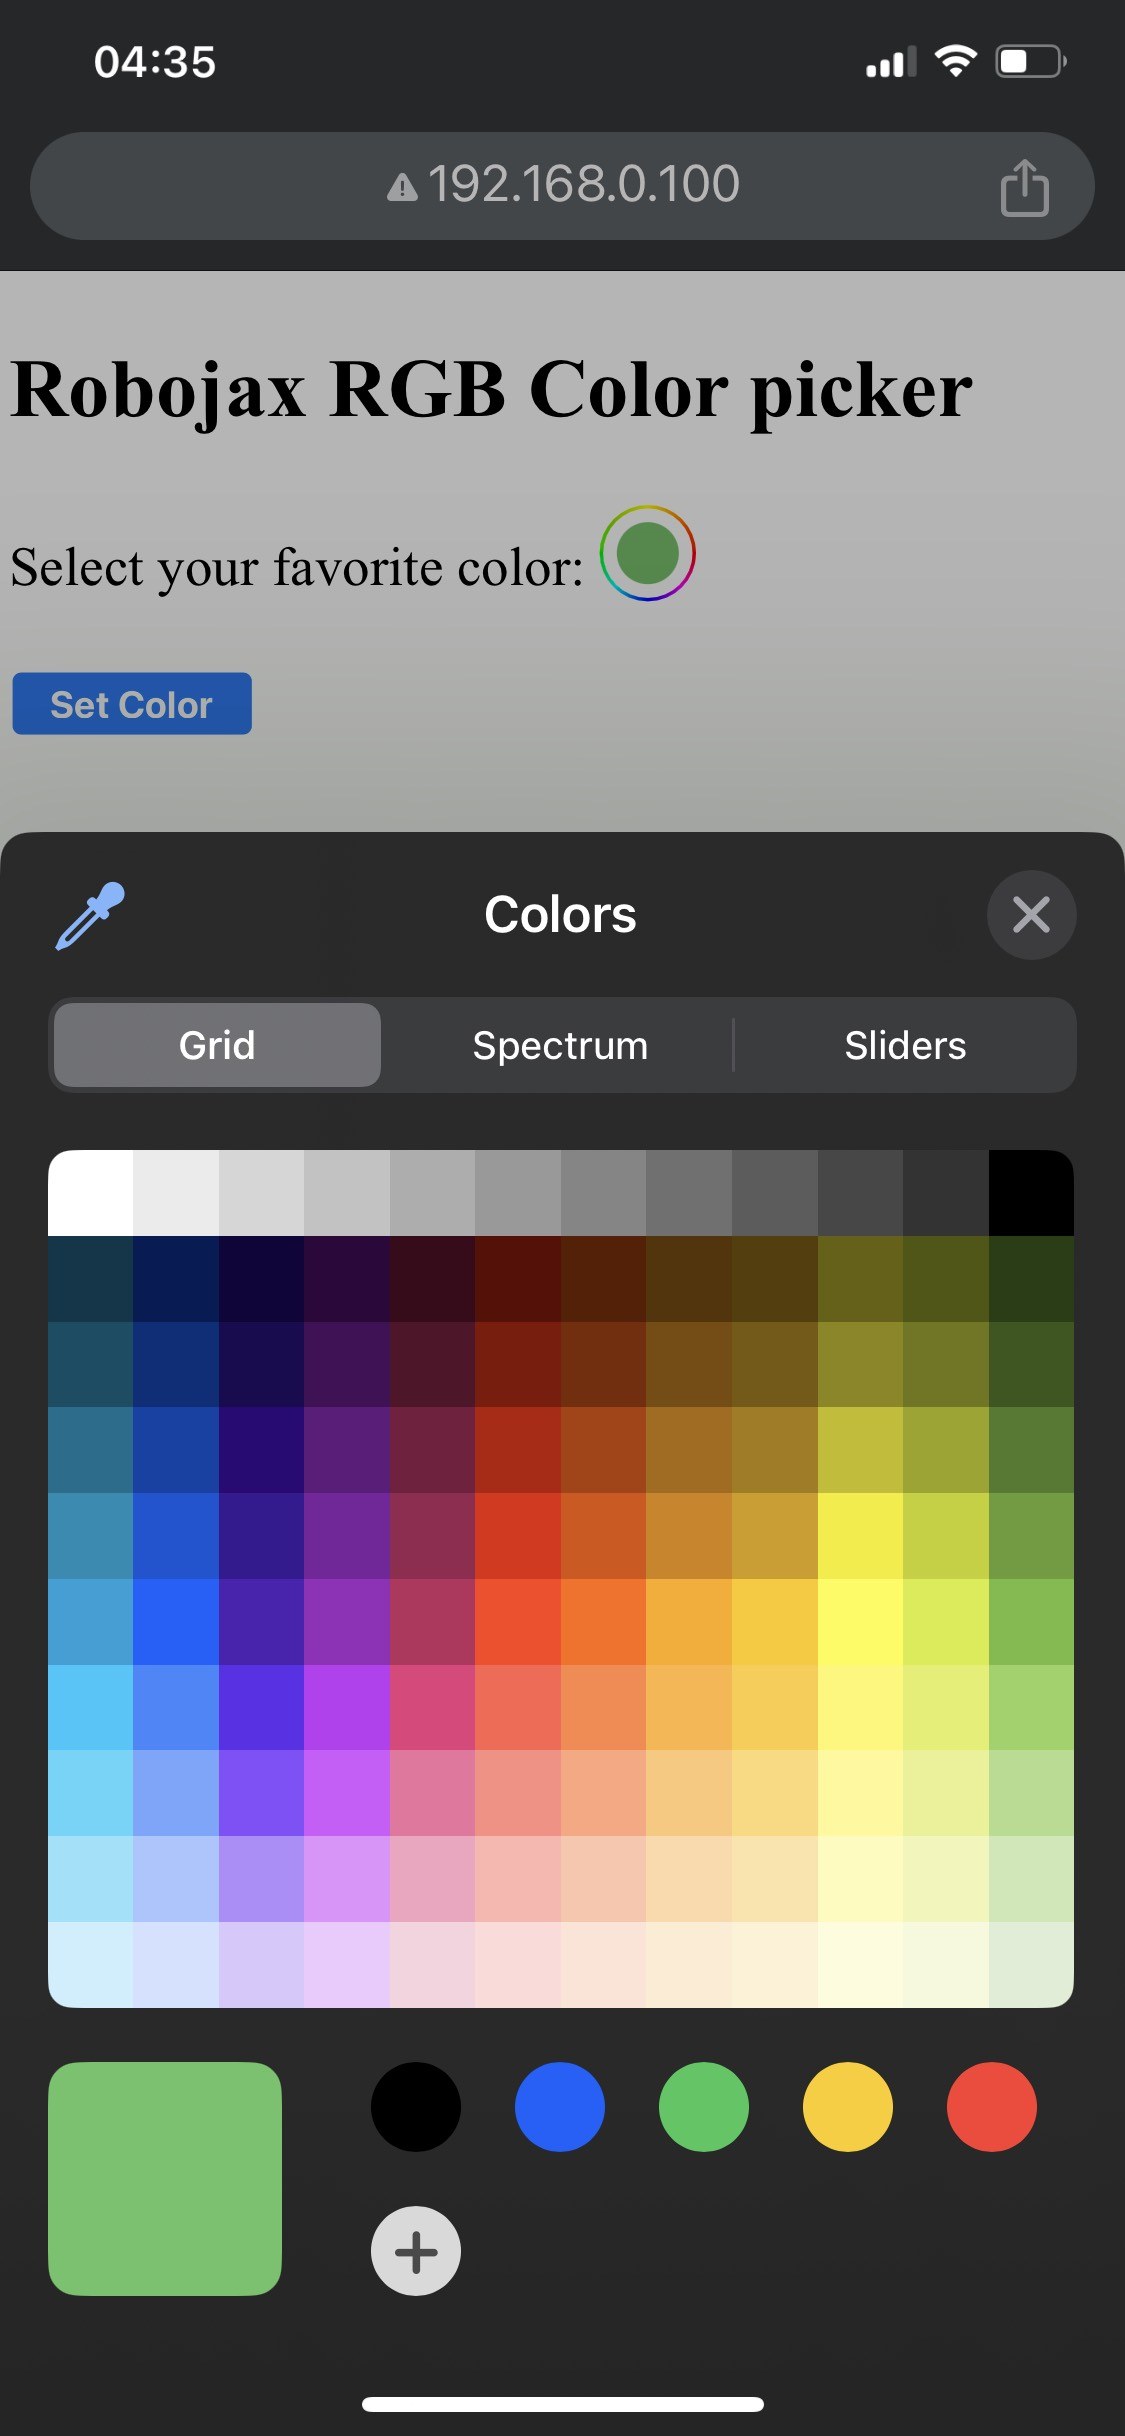

Wanneer de setup is voltooid, zou je via het IP-adres van de ESP32 toegang moeten hebben tot de webinterface. Je ziet dan een kleurkiezer waarmee je elke kleur kunt selecteren, die vervolgens naar de LED-strip wordt gestuurd. Als de ESP32 de Wi-Fi-verbinding verliest, knippert de strip met een waarschuwingskleur om het probleem aan te geven (in de video op 14:30).
Veelvoorkomende valkuilen zijn onjuiste bedrading, waardoor de LED's niet oplichten, of het gebruik van onjuiste SSID-/wachtwoordcombinaties waardoor de ESP32 geen verbinding kan maken met het netwerk. Controleer altijd je verbindingen en inloggegevens.
Video-tijdstempels
- 00:00 Start
- 2:01 Introductie van het project
- 3:09 Documentatie
- 3:47 RGB-kleur uitgelegd
- 7:47 Bedrading
- 8:40 Arduino-code voor WS2812 met WIFI uitgelegd
- 19:35 ESP32-board en COM-poort selecteren in Arduino IDE
- 21:17 LED-strip via wifi bedienen demo
Afbeeldingen
/*
 * Control RGB LED over wifi using ESP32
 *
 full video instrucions https://youtu.be/J_UFHk_T9aE
📚⬇️ Download and resource page https://robojax.com/RJT687
 * Written by Ahmad Shamshiri on Dec 18, 2023
 *
 * Watch video instruciton for this video:
 *
 * I have combined DHT library of Adafruit with ESP8266 WebServer both links
 * Adafruit DHT library on GitHub: https://github.com/adafruit/DHT-sensor-library
 * and
 * ESP8266 on GitHub : https://github.com/esp8266/Arduino
 *
   Copyright (c) 2015, Majenko Technologies
   All rights reserved.

   Redistribution and use in source and binary forms, with or without modification,
   are permitted provided that the following conditions are met:

 * * Redistributions of source code must retain the above copyright notice, this
     list of conditions and the following disclaimer.

 * * Redistributions in binary form must reproduce the above copyright notice, this
     list of conditions and the following disclaimer in the documentation and/or
     other materials provided with the distribution.

 * * Neither the name of Majenko Technologies nor the names of its
     contributors may be used to endorse or promote products derived from
     this software without specific prior written permission.

   THIS SOFTWARE IS PROVIDED BY THE COPYRIGHT HOLDERS AND CONTRIBUTORS "AS IS" AND
   ANY EXPRESS OR IMPLIED WARRANTIES, INCLUDING, BUT NOT LIMITED TO, THE IMPLIED
   WARRANTIES OF MERCHANTABILITY AND FITNESS FOR A PARTICULAR PURPOSE ARE
   DISCLAIMED. IN NO EVENT SHALL THE COPYRIGHT HOLDER OR CONTRIBUTORS BE LIABLE FOR
   ANY DIRECT, INDIRECT, INCIDENTAL, SPECIAL, EXEMPLARY, OR CONSEQUENTIAL DAMAGES
   (INCLUDING, BUT NOT LIMITED TO, PROCUREMENT OF SUBSTITUTE GOODS OR SERVICES;
   LOSS OF USE, DATA, OR PROFITS; OR BUSINESS INTERRUPTION) HOWEVER CAUSED AND ON
   ANY THEORY OF LIABILITY, WHETHER IN CONTRACT, STRICT LIABILITY, OR TORT
   (INCLUDING NEGLIGENCE OR OTHERWISE) ARISING IN ANY WAY OUT OF THE USE OF THIS
   SOFTWARE, EVEN IF ADVISED OF THE POSSIBILITY OF SUCH DAMAGE.
*/

#include <Adafruit_NeoPixel.h> // Include the Adafruit NeoPixel library

#define LED_PIN 13 // NeoPixel LED strip
#define NUM_LEDS 8 // Number of LEDs
// Create an instance of the Adafruit_NeoPixel class
Adafruit_NeoPixel strip = Adafruit_NeoPixel(NUM_LEDS, LED_PIN, NEO_GRB + NEO_KHZ800);


//initial color of LED strip
int valueR = 178;//from 0 to 255 for Red
int valueG = 27;//from 0 to 255 for Green
int valueB = 84;//from 0 to 255 for Blue

bool showSerialData = false;
String theColorR, theColorG, theColorB;
String theColor ="ff0000";

#include <WiFi.h>
#include <WiFiClient.h>
#include <WebServer.h>
#include <ESPmDNS.h>

const char *ssid = "dars";
const char *password = "hhhhhhhhhhh";

WebServer server(80);

void showColorPicker() {
  String page = "<!DOCTYPE html>\n";
  page +="<html>\n";
  page +="<body>\n";
  page +="<div style=\"zoom: 300%;\">\n";
  page +="<h2>Robojax RGB Color picker</h2>\n";
  page +="<p id=\"result\"></p>\n";
  page +="<form action=\"/color\">\n";
  page +="  <label for=\"favcolor\">Select your favorite color:</label>\n";
  page +="  <input type=\"color\" id=\"favcolor\" name=\"favcolor\" value=\"#";
  page += theColor;
  page +="\"><br><br>\n";
  page +="   <input type=\"submit\" value=\"Set Color\" />\n";
  page +="</form> \n</div>\n";
  page +="</body>\n";
  page +="</html>\n";

  server.send(200,  "text/html", page);


}

//from https://stackoverflow.com/questions/44683071/convert-string-as-hex-to-hexadecimal
uint64_t StrToHex(const char* str)
{
  return (uint64_t) strtoull(str, 0, 16);
}

void getColor(){

 // server.send(200, "text/plain", message);

  if(server.argName(0) == "favcolor")
  {
    String newColor = String(server.arg(0));//get the GET ardument 0 and convert it to string
    theColor = newColor.substring(1);//remove the # sybmot from the begining of color like #B2a48d
    theColorR = newColor.substring(1, 3);//extract B2 from  #B2a48d for example
    theColorG = newColor.substring(3, 5);//extract a4 from  #B2a48d for example
    theColorB = newColor.substring(5, 7);//extract 8d from  #B2a48d for example

    valueR = StrToHex(theColorR.c_str());//convert String to HEX for R
    valueG = StrToHex(theColorG.c_str());//convert String to HEX for G
    valueB = StrToHex(theColorB.c_str());//convert String to HEX for B
    if(showSerialData)
    {
      Serial.print("valueR: ");
      Serial.println(valueR);
      Serial.print("valueG: ");
      Serial.println(valueG);
      Serial.print("valueB: ");
      Serial.println(valueB );
    }

  }

  showColorPicker();//make sure the color picker is shown
  //server.send(200, "text/plain", message);

}


void setColor()
{
  for (int i = 0; i < NUM_LEDS; i++) {
    strip.setPixelColor(i, valueR, valueG, valueB); // Set the color of the i-th LED to red
    strip.show(); // Update the LED strip with the new colors
    delay(10); // Wait for 100 milliseconds
  }
}//

void noConnection()
{
   for (int i = 0; i < NUM_LEDS; i++) {
    strip.setPixelColor(i, 255, 45, 0); // Set the color of the i-th LED to red
    strip.show(); // Update the LED strip with the new colors
    delay(50); // Wait for 100 milliseconds
  }

  delay(200);
   for (int i = NUM_LEDS-1; i >=0; i--) {
    strip.setPixelColor(i, 0, 255, 180); // Set the color of the i-th LED to red
    strip.show(); // Update the LED strip with the new colors
    delay(50); // Wait for 100 milliseconds
  }
}

void handleNotFound() {
  String message = "File Not Found\n\n";
  message += "URI: ";
  message += server.uri();
  message += "\nMethod: ";
  message += (server.method() == HTTP_GET) ? "GET" : "POST";
  message += "\nArguments: ";
  message += server.args();
  message += "\n";

  for (uint8_t i = 0; i < server.args(); i++) {
    message += " " + server.argName(i) + ": " + server.arg(i) + "\n";
  }

  server.send(404, "text/plain", message);

}

void setup_wifi() {
  delay(10);
  // We start by connecting to a WiFi network
  WiFi.mode(WIFI_STA);
  WiFi.begin(ssid, password);
  Serial.println("");

  // Wait for connection
  while (WiFi.status() != WL_CONNECTED) {
    noConnection();
    delay(500);
    Serial.print(".");
  }

  Serial.println("");
  Serial.print("Connected to ");
  Serial.println(ssid);
  Serial.print("Open: http://");
  Serial.print(WiFi.localIP());
  Serial.println(" to read temperature");

  if (MDNS.begin("robojaxRGB")) {
    Serial.println("MDNS responder started");
  }

}

void setup(void) {

  Serial.begin(115200);

  strip.begin(); // Initialize the NeoPixel strip
  strip.show(); // Set initial color to black

  setup_wifi();

  server.on("/", showColorPicker);//show the main page with color picker
  //server.on("/color", setColor);//changes teh color on WS2812 RGB LED


  server.on("/color", HTTP_GET, getColor);


  server.on("/inline", []() {
    server.send(200, "text/plain", "this works as well");
  });
  server.onNotFound(handleNotFound);
  server.begin();
  Serial.println("HTTP server started");
}

void loop(void) {
  //Robojax.com
    while (WiFi.status() != WL_CONNECTED) {
      setup_wifi();
    }

  server.handleClient();
  //showColorPicker();
  setColor();
  delay(300);// change this to larger value (1000 or more) if you don't need very often reading
  // Robojax.com code for ESP32 and DHT11 DHT22
}
Common Course Links
Common Course Files
Hulpmiddelen en referenties
Nog geen middelen.
Bestanden📁
Geen bestanden beschikbaar.