Tutorial ESP32 54/55 - Mengatur Warna Strip LED WS2812 melalui Wifi | Kit Pembelajaran IoT ESP32 SunFounder
Dalam tutorial ini, kita akan mempelajari cara mengontrol warna strip LED RGB WS2812 menggunakan mikrokontroler ESP32 melalui Wi-Fi. Dengan memanfaatkan pemilih warna, Anda dapat memilih berbagai warna dari perangkat seluler atau desktop Anda dan mengirimkan informasi tersebut ke strip LED. Proyek ini menampilkan kemampuan ESP32, memungkinkan interaksi yang mulus dengan pencahayaan LED melalui antarmuka web.

Mikrokontroler ESP32 dilengkapi dengan Wi-Fi dan Bluetooth, menjadikannya pilihan serbaguna untuk aplikasi IoT. Dalam proyek ini, kita akan fokus pada fungsionalitas Wi-Fi untuk mengontrol strip LED. Pengguna akan dapat memilih warna secara dinamis, menciptakan pengalaman yang menarik secara visual. Untuk kejelasan tambahan tentang proyek ini, pastikan untuk menonton video di (dalam video pada 00:00).
Penjelasan Perangkat Keras
Komponen utama untuk proyek ini termasuk mikrokontroler ESP32 dan strip LED WS2812. ESP32 adalah mikrokontroler yang kuat dengan kemampuan Wi-Fi bawaan, memungkinkan komunikasi dan kontrol nirkabel.
Strip LED WS2812 terdiri dari LED RGB yang dapat dialamatkan secara individual, memungkinkan Anda untuk mengatur warna setiap LED secara independen. Setiap LED menggabungkan sirkuit kontrol dan LED RGB dalam satu paket, yang menyederhanakan pengkabelan dan kontrol banyak LED.
Detail Datasheet
| Produsen | Worldsemi |
|---|---|
| Nomor bagian | WS2812B |
| Tegangan logika/IO | 3,5–5,3 V |
| Tegangan suplai | 5 V |
| Arus keluaran (per saluran) | 20 mA |
| Arus puncak (per saluran) | 60 mA |
| Panduan frekuensi PWM | 400 Hz |
| Ambang logika input | 0,3 × VDD (rendah), 0,7 × VDD (tinggi) |
| Penurunan tegangan / RDS(on) / saturasi | 0,5 V |
| Batas termal | –40 hingga +80 °C |
| Kemasan | 5050 SMD |
| Catatan / varian | Tersedia dalam berbagai panjang dan konfigurasi. |
- Pastikan catu daya yang tepat untuk menghindari kerusakan pada LED.
- Gunakan ground bersama antara ESP32 dan strip LED.
- Jaga agar jalur data tetap pendek untuk mencegah degradasi sinyal.
- Pertimbangkan untuk menambahkan kapasitor (1000 µF) di seluruh catu daya untuk stabilitas.
- Gunakan resistor (470 Ω) pada jalur data untuk integritas sinyal.
Instruksi Pengkabelan
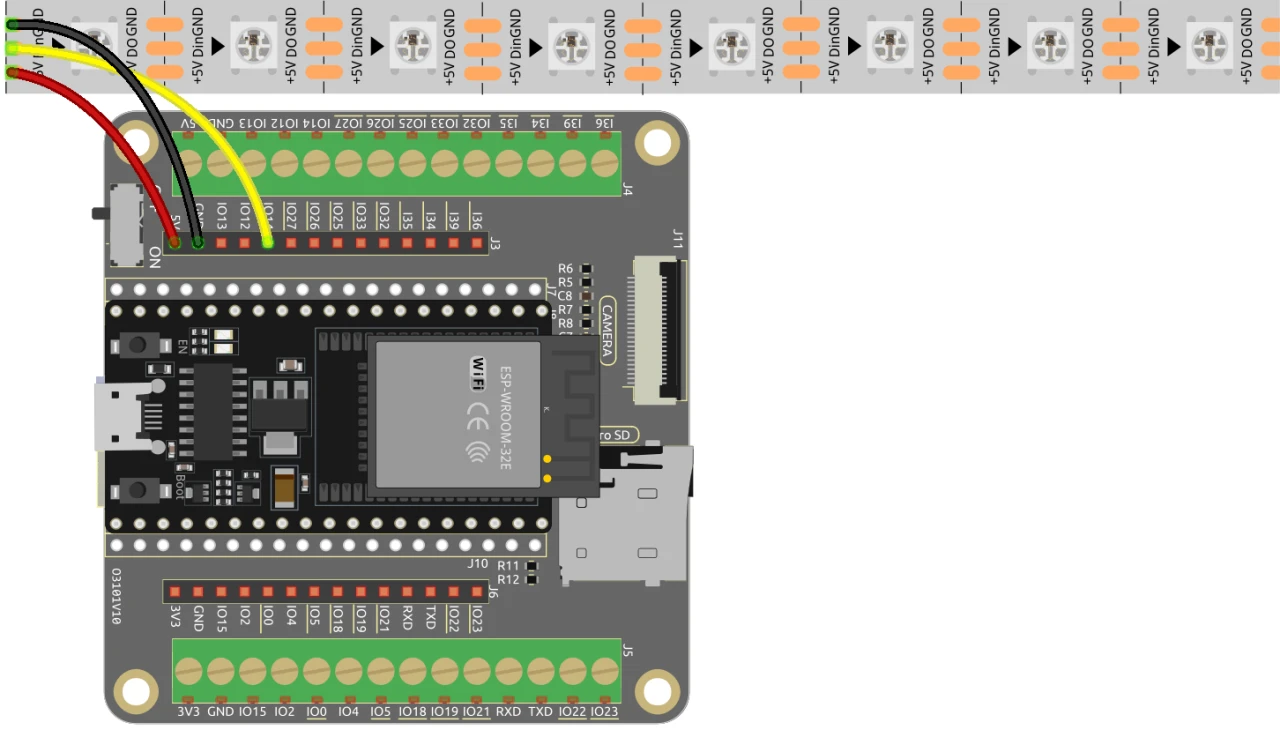
Untuk menghubungkan ESP32 ke strip LED WS2812, sambungkan komponen sebagai berikut: Pertama, sambungkan pin 5V strip LED ke output 5V ESP32. Selanjutnya, sambungkan pin ground (GND) strip LED ke pin GND pada ESP32. Terakhir, sambungkan pin data strip LED (biasanya diberi label DI atau Data In) ke pin GPIO 13 pada ESP32. Pastikan semua koneksi aman untuk memastikan fungsionalitas yang tepat.
Dalam video, metode pengkabelan alternatif disebutkan secara singkat, tetapi pengaturan yang dijelaskan di sini adalah konfigurasi yang direkomendasikan untuk kinerja optimal (dalam video pada 03:00).
Contoh Kode & Panduan
Kode dimulai dengan menyertakan pustaka yang diperlukan untuk mengontrol strip LED WS2812 dan menyiapkan server web. Pin LED didefinisikan sebagai LED_PIN dan jumlah LED di strip diatur dengan NUM_LEDS.
#define LED_PIN 13 // Strip LED NeoPixel
#define NUM_LEDS 8 // Jumlah LED
Adafruit_NeoPixel strip = Adafruit_NeoPixel(NUM_LEDS, LED_PIN, NEO_GRB + NEO_KHZ800);
Potongan ini menginisialisasi pustaka NeoPixel dan menyiapkan strip LED pada pin yang ditentukan. Objek Adafruit_NeoPixel, strip, adalah yang akan Anda gunakan untuk mengontrol warna LED.
Selanjutnya, kode menginisialisasi Wi-Fi dan menyiapkan server web untuk menangani permintaan masuk. SSID dan kata sandi untuk jaringan didefinisikan, memungkinkan ESP32 untuk terhubung ke Wi-Fi.
const char *ssid = "SSID_Anda";
const char *password = "KATA_SANDI_Anda";
WebServer server(80);
Dalam kutipan ini, ganti SSID_Anda dan KATA_SANDI_Anda dengan kredensial Wi-Fi Anda yang sebenarnya. Koneksi ini memungkinkan ESP32 untuk berkomunikasi dengan perangkat di jaringan yang sama, memungkinkan kontrol jarak jauh strip LED.
Fungsi utama untuk mengubah warna LED adalah setColor(), yang mengulangi setiap LED dan mengatur warnanya berdasarkan nilai RGB yang dipilih.
void setColor() {
  for (int i = 0; i < NUM_LEDS; i++) {
    strip.setPixelColor(i, valueR, valueG, valueB); // Mengatur warna LED ke-i
    strip.show(); // Memperbarui strip LED dengan warna baru
    delay(10); // Menunggu 10 milidetik
  }
}
Fungsi ini memastikan bahwa setiap LED di strip diperbarui dengan warna yang dipilih. Penundaan memungkinkan LED berubah warna dengan lancar. Saat Anda berinteraksi dengan antarmuka web, fungsi ini akan dipanggil untuk mencerminkan pilihan warna Anda.
Demonstrasi / Apa yang Diharapkan
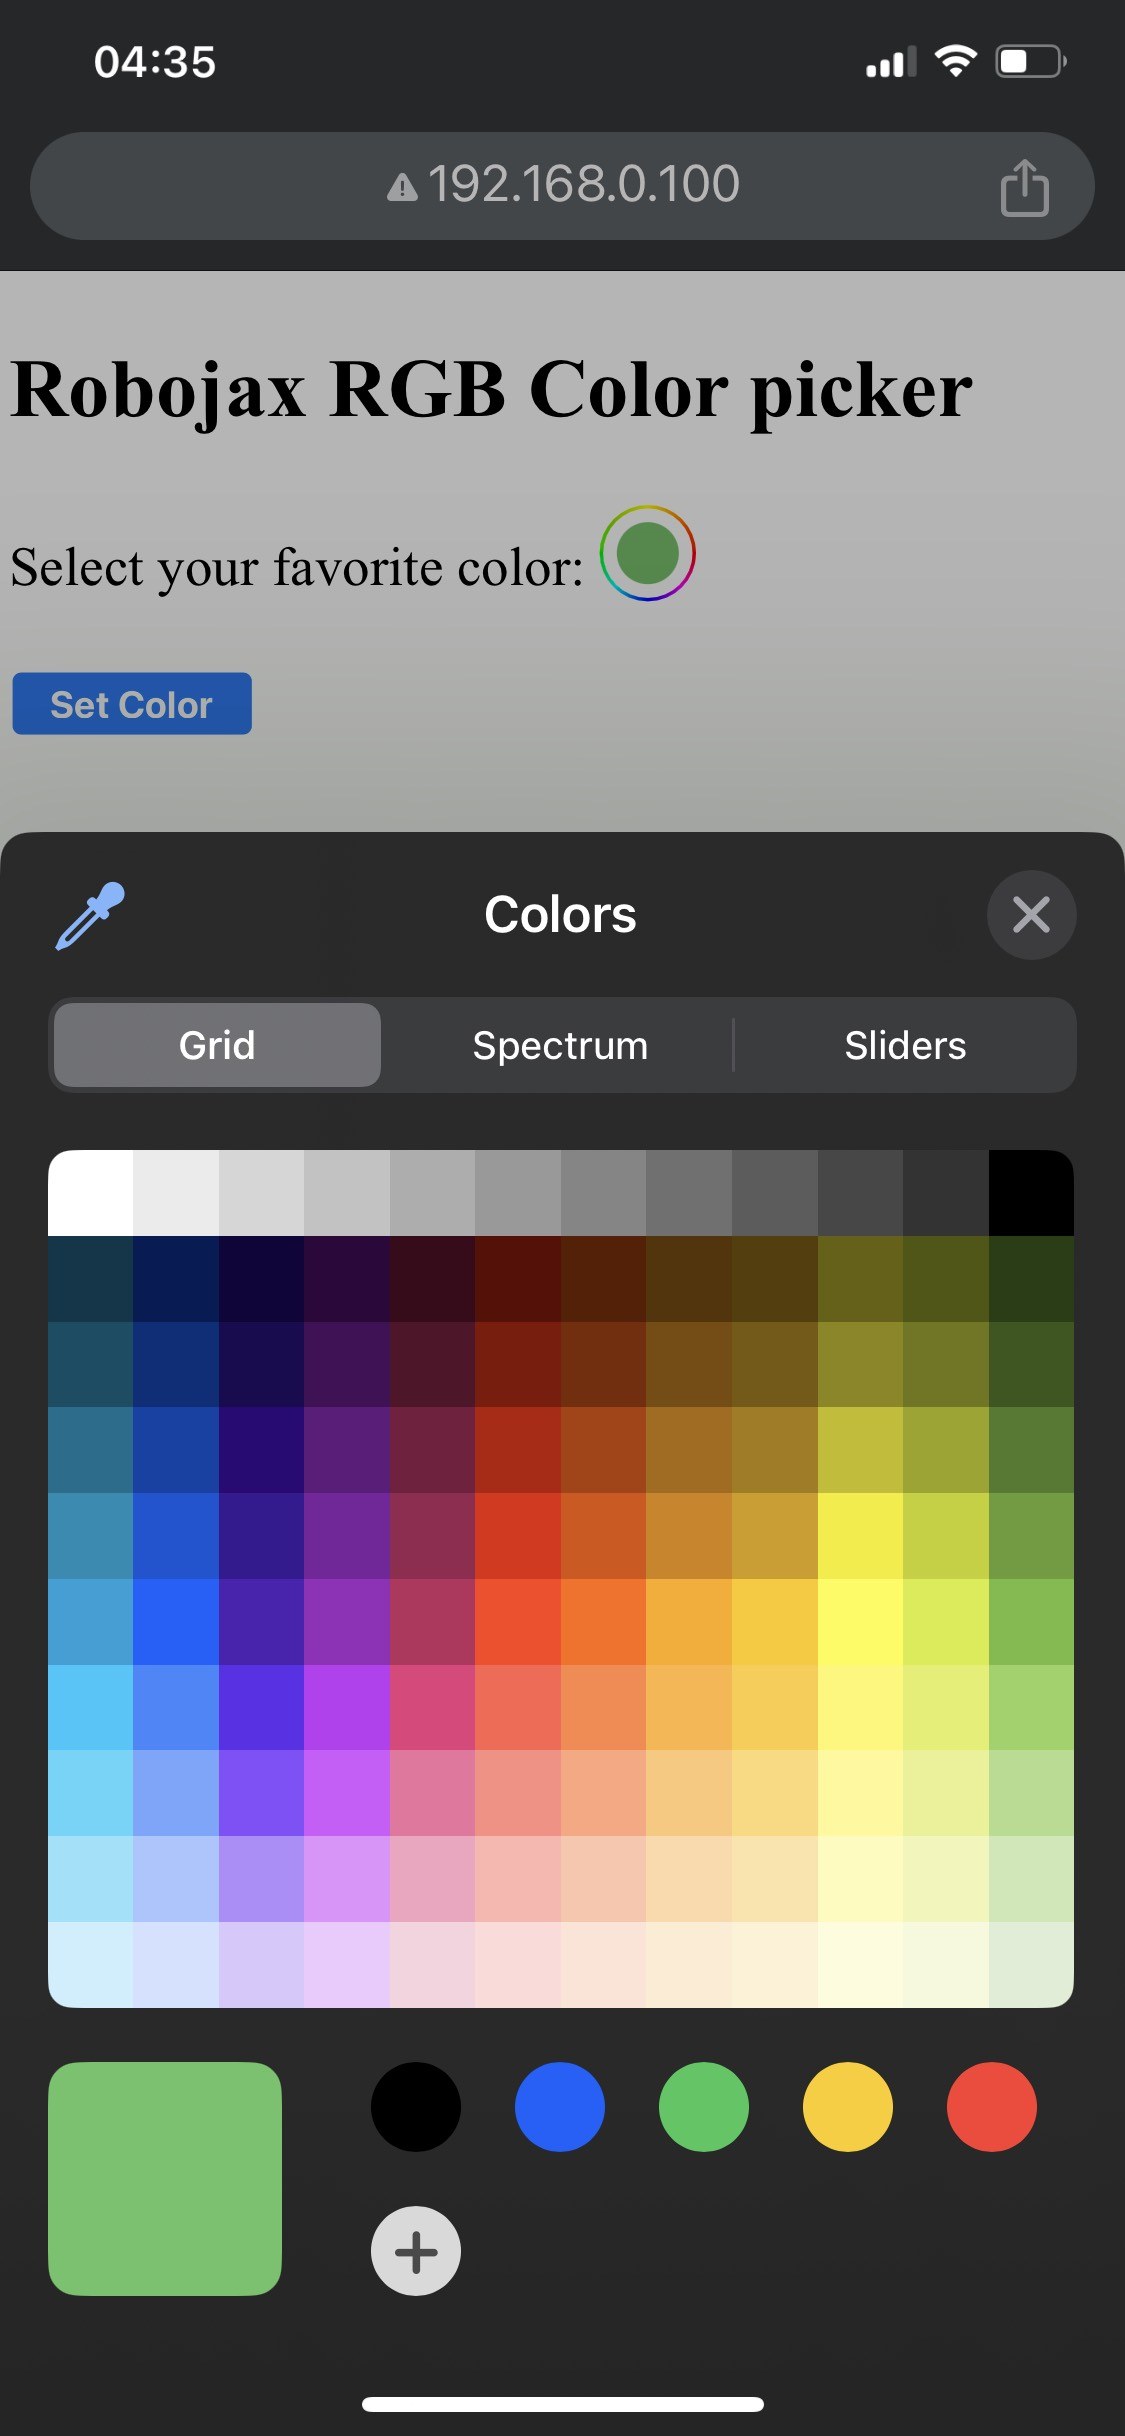

Setelah pengaturan selesai, Anda seharusnya dapat mengakses antarmuka web melalui alamat IP ESP32. Anda akan melihat pemilih warna yang memungkinkan Anda memilih warna apa pun, yang kemudian akan dikirim ke strip LED. Jika ESP32 kehilangan koneksi Wi-Fi, strip akan berkedip dengan warna peringatan, yang menunjukkan masalah tersebut (dalam video pada menit 14:30).
Kesalahan umum termasuk pemasangan kabel yang salah, yang dapat menyebabkan LED tidak menyala, atau menggunakan kombinasi SSID/kata sandi yang salah yang mencegah ESP32 terhubung ke jaringan. Selalu periksa ulang koneksi dan kredensial Anda.
Stempel Waktu Video
- 00:00 Mulai
- 2:01 Pengenalan proyek
- 3:09 Dokumen
- 3:47 Penjelasan warna RGB
- 7:47 Pemasangan kabel
- 8:40 Penjelasan kode Arduino untuk WS2812 dengan WIFI
- 19:35 Memilih papan ESP32 dan port COM di Arduino IDE
- 21:17 Demo mengendalikan Strip LED melalui wifi
Gambar
/*
 * Control RGB LED over wifi using ESP32
 *
 full video instrucions https://youtu.be/J_UFHk_T9aE
📚⬇️ Download and resource page https://robojax.com/RJT687
 * Written by Ahmad Shamshiri on Dec 18, 2023
 *
 * Watch video instruciton for this video:
 *
 * I have combined DHT library of Adafruit with ESP8266 WebServer both links
 * Adafruit DHT library on GitHub: https://github.com/adafruit/DHT-sensor-library
 * and
 * ESP8266 on GitHub : https://github.com/esp8266/Arduino
 *
   Copyright (c) 2015, Majenko Technologies
   All rights reserved.

   Redistribution and use in source and binary forms, with or without modification,
   are permitted provided that the following conditions are met:

 * * Redistributions of source code must retain the above copyright notice, this
     list of conditions and the following disclaimer.

 * * Redistributions in binary form must reproduce the above copyright notice, this
     list of conditions and the following disclaimer in the documentation and/or
     other materials provided with the distribution.

 * * Neither the name of Majenko Technologies nor the names of its
     contributors may be used to endorse or promote products derived from
     this software without specific prior written permission.

   THIS SOFTWARE IS PROVIDED BY THE COPYRIGHT HOLDERS AND CONTRIBUTORS "AS IS" AND
   ANY EXPRESS OR IMPLIED WARRANTIES, INCLUDING, BUT NOT LIMITED TO, THE IMPLIED
   WARRANTIES OF MERCHANTABILITY AND FITNESS FOR A PARTICULAR PURPOSE ARE
   DISCLAIMED. IN NO EVENT SHALL THE COPYRIGHT HOLDER OR CONTRIBUTORS BE LIABLE FOR
   ANY DIRECT, INDIRECT, INCIDENTAL, SPECIAL, EXEMPLARY, OR CONSEQUENTIAL DAMAGES
   (INCLUDING, BUT NOT LIMITED TO, PROCUREMENT OF SUBSTITUTE GOODS OR SERVICES;
   LOSS OF USE, DATA, OR PROFITS; OR BUSINESS INTERRUPTION) HOWEVER CAUSED AND ON
   ANY THEORY OF LIABILITY, WHETHER IN CONTRACT, STRICT LIABILITY, OR TORT
   (INCLUDING NEGLIGENCE OR OTHERWISE) ARISING IN ANY WAY OUT OF THE USE OF THIS
   SOFTWARE, EVEN IF ADVISED OF THE POSSIBILITY OF SUCH DAMAGE.
*/

#include <Adafruit_NeoPixel.h> // Include the Adafruit NeoPixel library

#define LED_PIN 13 // NeoPixel LED strip
#define NUM_LEDS 8 // Number of LEDs
// Create an instance of the Adafruit_NeoPixel class
Adafruit_NeoPixel strip = Adafruit_NeoPixel(NUM_LEDS, LED_PIN, NEO_GRB + NEO_KHZ800);


//initial color of LED strip
int valueR = 178;//from 0 to 255 for Red
int valueG = 27;//from 0 to 255 for Green
int valueB = 84;//from 0 to 255 for Blue

bool showSerialData = false;
String theColorR, theColorG, theColorB;
String theColor ="ff0000";

#include <WiFi.h>
#include <WiFiClient.h>
#include <WebServer.h>
#include <ESPmDNS.h>

const char *ssid = "dars";
const char *password = "hhhhhhhhhhh";

WebServer server(80);

void showColorPicker() {
  String page = "<!DOCTYPE html>\n";
  page +="<html>\n";
  page +="<body>\n";
  page +="<div style=\"zoom: 300%;\">\n";
  page +="<h2>Robojax RGB Color picker</h2>\n";
  page +="<p id=\"result\"></p>\n";
  page +="<form action=\"/color\">\n";
  page +="  <label for=\"favcolor\">Select your favorite color:</label>\n";
  page +="  <input type=\"color\" id=\"favcolor\" name=\"favcolor\" value=\"#";
  page += theColor;
  page +="\"><br><br>\n";
  page +="   <input type=\"submit\" value=\"Set Color\" />\n";
  page +="</form> \n</div>\n";
  page +="</body>\n";
  page +="</html>\n";

  server.send(200,  "text/html", page);


}

//from https://stackoverflow.com/questions/44683071/convert-string-as-hex-to-hexadecimal
uint64_t StrToHex(const char* str)
{
  return (uint64_t) strtoull(str, 0, 16);
}

void getColor(){

 // server.send(200, "text/plain", message);

  if(server.argName(0) == "favcolor")
  {
    String newColor = String(server.arg(0));//get the GET ardument 0 and convert it to string
    theColor = newColor.substring(1);//remove the # sybmot from the begining of color like #B2a48d
    theColorR = newColor.substring(1, 3);//extract B2 from  #B2a48d for example
    theColorG = newColor.substring(3, 5);//extract a4 from  #B2a48d for example
    theColorB = newColor.substring(5, 7);//extract 8d from  #B2a48d for example

    valueR = StrToHex(theColorR.c_str());//convert String to HEX for R
    valueG = StrToHex(theColorG.c_str());//convert String to HEX for G
    valueB = StrToHex(theColorB.c_str());//convert String to HEX for B
    if(showSerialData)
    {
      Serial.print("valueR: ");
      Serial.println(valueR);
      Serial.print("valueG: ");
      Serial.println(valueG);
      Serial.print("valueB: ");
      Serial.println(valueB );
    }

  }

  showColorPicker();//make sure the color picker is shown
  //server.send(200, "text/plain", message);

}


void setColor()
{
  for (int i = 0; i < NUM_LEDS; i++) {
    strip.setPixelColor(i, valueR, valueG, valueB); // Set the color of the i-th LED to red
    strip.show(); // Update the LED strip with the new colors
    delay(10); // Wait for 100 milliseconds
  }
}//

void noConnection()
{
   for (int i = 0; i < NUM_LEDS; i++) {
    strip.setPixelColor(i, 255, 45, 0); // Set the color of the i-th LED to red
    strip.show(); // Update the LED strip with the new colors
    delay(50); // Wait for 100 milliseconds
  }

  delay(200);
   for (int i = NUM_LEDS-1; i >=0; i--) {
    strip.setPixelColor(i, 0, 255, 180); // Set the color of the i-th LED to red
    strip.show(); // Update the LED strip with the new colors
    delay(50); // Wait for 100 milliseconds
  }
}

void handleNotFound() {
  String message = "File Not Found\n\n";
  message += "URI: ";
  message += server.uri();
  message += "\nMethod: ";
  message += (server.method() == HTTP_GET) ? "GET" : "POST";
  message += "\nArguments: ";
  message += server.args();
  message += "\n";

  for (uint8_t i = 0; i < server.args(); i++) {
    message += " " + server.argName(i) + ": " + server.arg(i) + "\n";
  }

  server.send(404, "text/plain", message);

}

void setup_wifi() {
  delay(10);
  // We start by connecting to a WiFi network
  WiFi.mode(WIFI_STA);
  WiFi.begin(ssid, password);
  Serial.println("");

  // Wait for connection
  while (WiFi.status() != WL_CONNECTED) {
    noConnection();
    delay(500);
    Serial.print(".");
  }

  Serial.println("");
  Serial.print("Connected to ");
  Serial.println(ssid);
  Serial.print("Open: http://");
  Serial.print(WiFi.localIP());
  Serial.println(" to read temperature");

  if (MDNS.begin("robojaxRGB")) {
    Serial.println("MDNS responder started");
  }

}

void setup(void) {

  Serial.begin(115200);

  strip.begin(); // Initialize the NeoPixel strip
  strip.show(); // Set initial color to black

  setup_wifi();

  server.on("/", showColorPicker);//show the main page with color picker
  //server.on("/color", setColor);//changes teh color on WS2812 RGB LED


  server.on("/color", HTTP_GET, getColor);


  server.on("/inline", []() {
    server.send(200, "text/plain", "this works as well");
  });
  server.onNotFound(handleNotFound);
  server.begin();
  Serial.println("HTTP server started");
}

void loop(void) {
  //Robojax.com
    while (WiFi.status() != WL_CONNECTED) {
      setup_wifi();
    }

  server.handleClient();
  //showColorPicker();
  setColor();
  delay(300);// change this to larger value (1000 or more) if you don't need very often reading
  // Robojax.com code for ESP32 and DHT11 DHT22
}
Common Course Links
Common Course Files
Sumber daya & referensi
Belum ada sumber daya.
Berkas📁
Tidak ada file tersedia.