บทช่วยสอน ESP32 52/55 - การซิงค์ระดับโลกของ WS2812 CheerLights ผ่าน MQTT พร้อมจอ LCD | ชุด IoT ESP32 ของ SunFounder
ในบทช่วยสอนนี้ เราจะสร้างโปรเจกต์ CheerLights โดยใช้ ESP32 ซึ่งจะซิงโครไนซ์สีทั่วโลกผ่าน MQTT โปรเจกต์นี้ไม่เพียงแต่จะเปลี่ยนสีตามอินพุตจากผู้ใช้รายอื่นเท่านั้น แต่ยังแสดงสีปัจจุบันและจำนวนครั้งที่มีการอัปเดตบนหน้าจอ LCD ด้วย ผลลัพธ์ที่ได้คือการสาธิตความสามารถของ IoT ที่สนุกสนาน ซึ่งแสดงให้เห็นว่าอุปกรณ์ต่างๆ สามารถโต้ตอบกันและเชื่อมต่อผู้ใช้ให้อยู่ใกล้กันแม้อยู่ห่างไกลกัน สำหรับคำอธิบายเพิ่มเติม โปรดดูวิดีโอที่ (ในวิดีโอที่ 00:00)
คำอธิบายฮาร์ดแวร์
ในการสร้างโปรเจกต์นี้ คุณจะต้องใช้ไมโครคอนโทรลเลอร์ ESP32, แถบ LED WS2812 และจอแสดงผล LCD ESP32 ทำหน้าที่เป็นสมองหลักของการทำงาน โดยใช้ความสามารถ Wi-Fi ในตัวเพื่อเชื่อมต่ออินเทอร์เน็ตและรับข้อความ MQTT ซึ่งช่วยให้สามารถอัปเดตสี LED แบบเรียลไทม์ตามอินพุตทั่วโลกจากผู้ใช้รายอื่น
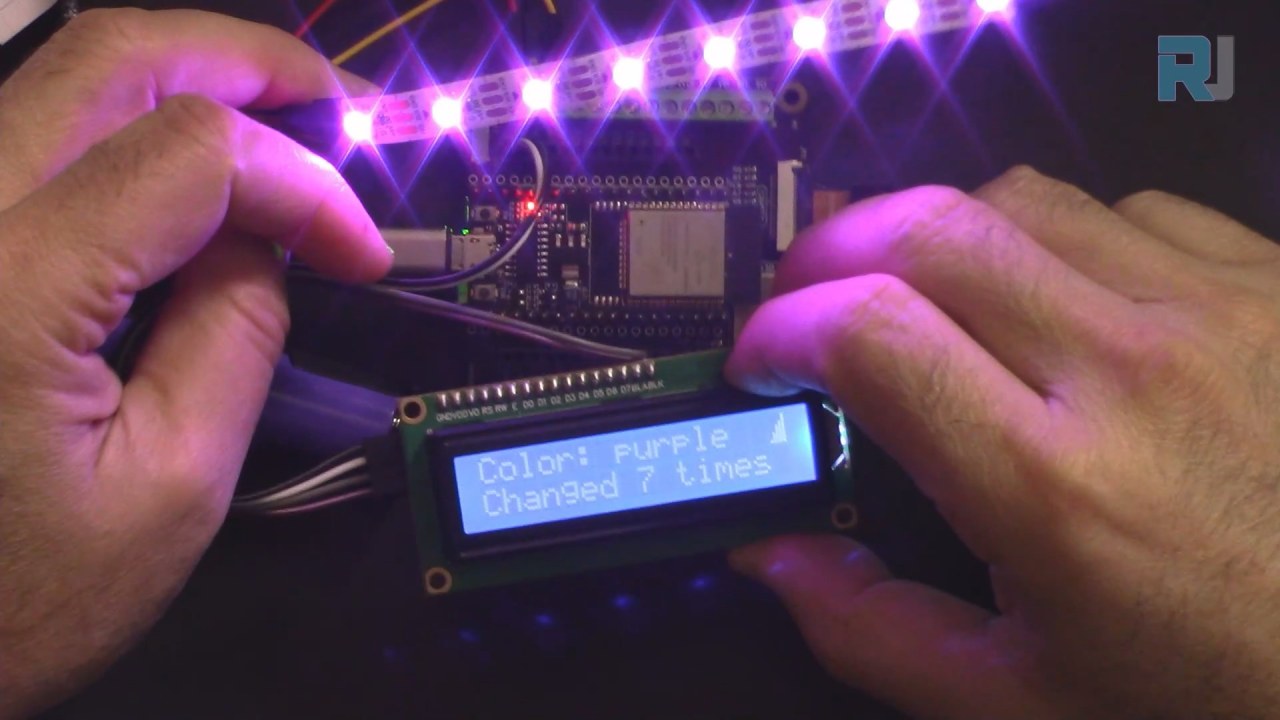
แถบ LED WS2812 เป็นตัวเลือกยอดนิยมสำหรับโปรเจกต์ที่ต้องใช้ LED RGB แบบกำหนดแอดเดรสได้ LED แต่ละดวงสามารถควบคุมได้อย่างอิสระ ทำให้สามารถแสดงสีได้หลากหลาย LCD จะแสดงการยืนยันด้วยภาพของสีปัจจุบันและจำนวนครั้งที่มีการเปลี่ยนแปลง ซึ่งช่วยเพิ่มการโต้ตอบกับผู้ใช้

รายละเอียดจาก Datasheet
| ผู้ผลิต | SunFounder |
|---|---|
| หมายเลขชิ้นส่วน | ESP32 |
| แรงดันไฟฟ้าลอจิก/IO | 3.3 V |
| แรงดันไฟฟ้าจ่าย | 5 V |
| กระแสเอาต์พุต (ต่อช่อง) | 20 mA |
| กระแสสูงสุด (ต่อช่อง) | 60 mA |
| คำแนะนำความถี่ PWM | 400 Hz |
| เกณฑ์แรงดันไฟฟ้าอินพุตลอจิก | 0.15 V (ต่ำ), 0.8 V (สูง) |
| แรงดันตก / RDS(on) / อิ่มตัว | 0.2 V |
| ขีดจำกัดความร้อน | 85 °C |
| แพ็กเกจ | โมดูล ESP32 |
| หมายเหตุ / รุ่นต่างๆ | มี Wi-Fi และ Bluetooth ในตัว |
- ตรวจสอบให้แน่ใจว่าจ่ายไฟให้ ESP32 (5 V) และแถบ WS2812 (5 V) อย่างเหมาะสม
- ใช้กราวด์ร่วมกันระหว่าง ESP32 และแถบ LED
- ใช้ MQTT broker ที่เหมาะสมสำหรับการซิงโครไนซ์สี
- ใส่ใจกับการเชื่อมต่อพินข้อมูลสำหรับ WS2812 (พิน 14 ตามโค้ด)
- ระมัดระวังจำนวน LED หากเกินขีดจำกัดกำลังไฟ จะต้องใช้แหล่งจ่ายไฟเพิ่มเติม
คำแนะนำการเดินสายไฟ


ในการเดินสายไฟส่วนประกอบต่างๆ ให้เริ่มต้นด้วยการเชื่อมต่อแถบ LED WS2812 เชื่อมต่อพินกราวด์ (โดยปกติเป็นสีดำ) ของแถบ LED เข้ากับพินกราวด์บน ESP32 จากนั้นเชื่อมต่อพิน VCC (โดยปกติเป็นสีแดง) ของแถบ LED เข้ากับเอาต์พุต 5V บน ESP32 สุดท้าย เชื่อมต่อพินข้อมูล (มักเป็นสีเหลือง) เข้ากับ GPIO พิน 14 บน ESP32
สำหรับ LCD ให้เชื่อมต่อพินกราวด์ (มักเป็นสีดำ) เข้ากับกราวด์บน ESP32 พิน VCC (โดยปกติเป็นสีแดง) ควรเชื่อมต่อกับเอาต์พุต 5V พิน SDA (โดยทั่วไปเป็นสีเทา) เชื่อมต่อกับ GPIO พิน 21 ในขณะที่พิน SCL (โดยปกติเป็นสีขาว) เชื่อมต่อกับ GPIO พิน 22 การตั้งค่านี้ช่วยให้ ESP32 สื่อสารกับ LCD และแสดงข้อมูลได้ตามต้องการ
ตัวอย่างโค้ดและคำอธิบาย
ในฟังก์ชัน setup เราจะเริ่มต้น LCD และเชื่อมต่อ Wi-Fi โค้ดด้านล่างแสดงวิธีการกำหนดไลบรารีที่จำเป็นและตั้งค่า LCD:
#include
#include
LiquidCrystal_I2C lcd(0x27, 16,2);  // กำหนดแอดเดรส LCD
void setup() {
  Serial.begin(115200);
  lcd.init(); // เริ่มต้นการทำงานของ LCD
  lcd.backlight(); // เปิดไฟแบ็คไลท์ของ LCD
}
การดำเนินการนี้จะเริ่มต้น LCD เพื่อใช้งาน ทำให้สามารถแสดงข้อความได้ ตัวอย่างถัดไปแสดงวิธีการเชื่อมต่อ Wi-Fi:
void setup_wifi() {
  WiFi.begin(ssid, password);
  while (WiFi.status() != WL_CONNECTED) {
    lcdConnect(); //สำหรับ LCD
    delay(500);
  }
  Serial.println("WiFi connected");
}
ฟังก์ชันนี้จะสร้างการเชื่อมต่อกับเครือข่าย Wi-Fi ที่ระบุ โดยแสดงข้อความบน LCD ระหว่างการเชื่อมต่อ สุดท้าย ตรรกะการเปลี่ยนสีจะจัดการในฟังก์ชัน callback:
void callback(char* topic, byte* message, unsigned int length) {
  String messageTemp;
  for (int i = 0; i < length; i++) {
    messageTemp += (char)message[i];
  }
  if (String(topic) == "cheerlights") {
    setColor(messageTemp);
  }
}
ฟังก์ชันนี้จะคอยฟังข้อความที่เข้ามาในหัวข้อ "cheerlights" และอัปเดตสีตามนั้น โค้ดเต็มจะแสดงอยู่ด้านล่างบทความ ดังนั้นโปรดตรวจสอบเพื่อดูการใช้งานที่สมบูรณ์
การสาธิต / สิ่งที่คาดหวัง
เมื่อโปรเจกต์เสร็จสมบูรณ์ คุณจะเห็นแถบ LED เปลี่ยนสีตามอินพุตจากฟีด MQTT ทั่วโลก LCD จะแสดงชื่อสีปัจจุบันและจำนวนครั้งที่มีการเปลี่ยนแปลง หากคุณตัดการเชื่อมต่ออินเทอร์เน็ต LCD จะแสดงข้อความ "Connecting..." จนกว่าจะเชื่อมต่อใหม่ได้ (ในวิดีโอที่ 12:30)
ข้อผิดพลาดทั่วไปที่พบ ได้แก่ การตรวจสอบให้แน่ใจว่าใช้พินที่ถูกต้องสำหรับการเชื่อมต่อข้อมูล และยืนยันว่าข้อมูลรับรอง Wi-Fi ถูกต้อง หาก SSID หรือรหัสผ่านไม่ถูกต้อง ESP32 จะไม่สามารถเชื่อมต่อได้ และ LCD จะยังคงแสดงข้อความกำลังเชื่อมต่ออยู่
ไทม์สแตมป์ในวิดีโอ
- 00:00 เริ่มต้น
- 1:59 แนะนำโปรเจกต์
- 6:16 อธิบายการเดินสายไฟ
- 8:13 อธิบายโค้ด Arduino
- 14:26 การเลือกบอร์ด ESP32 และพอร์ต COM ใน Arduino IDE
- 16:07 การสาธิต CheerLight พร้อมจอ LCD
ภาพ
/*********
This is the origianl code from Examples->iot_5_cheerlight of SunFounder
full video instrucions https://youtu.be/xEqmxMiF-E8
📚⬇️ Download and resource page https://robojax.com/RJT685

I have added LCD to display:
1-Color name
2-Count the number of times the color is updated
3-Showon LCD if wifi is connected
4-Show connecting if not connected or disconnected

Written by Ahmad Shamshiri
www.Robojax.com
Dec 29, 2023

  :ref: https://randomnerdtutorials.com/esp32-mqtt-publish-subscribe-arduino-ide/
  https://docs.sunfounder.com/projects/kepler-kit/en/latest/iotproject/5.mqtt_pub.html
*********/
#include <Wire.h>
#include <LiquidCrystal_I2C.h>

//SDA->21,SCL->22
LiquidCrystal_I2C lcd(0x27, 16,2);  // set the LCD address to 0x27 for a 16 chars and 2 line display

int colorCount = 0;
int lastColor=0;

byte connected[] = {
          B00001,
          B00001,
          B00011,
          B00111,
          B00111,
          B01111,
          B01111,
          B11111
};


#include <WiFi.h>
#include <PubSubClient.h>
//#include <Wire.h>
#include <Adafruit_NeoPixel.h>


// Replace the next variables with your SSID/Password combination
const char* ssid = "dars";
const char* password = "5152535455";

// Add your MQTT Broker address:
const char* mqtt_server = "mqtt.cheerlights.com";
const char* unique_identifier = "sunfounder-client-sdgvsasdda";

WiFiClient espClient;
PubSubClient client(espClient);
long lastMsg = 0;
int value = 0;


// Define the supported CheerLights colors and their RGB values
String colorName[] = {"red", "pink", "green", "blue", "cyan", "white", "warmwhite", "oldlace", "purple", "magenta", "yellow", "orange"};

int colorRGB[][3] = { 255,   0,   0,  // "red"
                      255, 192, 203,  // "pink"
                        0, 255,   0,  // "green"
                        0,   0, 255,  // "blue"
                        0, 255, 255,  // "cyan"
                      255, 255, 255,  // "white"
                      255, 223, 223,  // "warmwhite"
                      255, 223, 223,  // "oldlace"
                      128,   0, 128,  // "purple"
                      255,   0, 255,  // "magenta"
                      255, 255,   0,  // "yellow"
                      255, 165,   0}; // "orange"

// init rgb strip
#define LED_PIN 13
#define NUM_LEDS 8

Adafruit_NeoPixel pixels = Adafruit_NeoPixel(NUM_LEDS, LED_PIN, NEO_GRB + NEO_KHZ800);

void setup() {
  Serial.begin(115200);

  lcd.init();// initialize the lcd
  lcd.backlight(); // Turns on the LCD backlight.

  // wifi default settings
  setup_wifi();
  client.setServer(mqtt_server, 1883);
  client.setCallback(callback);

  // rgb strip begin
  pixels.begin();
  pixels.show();

}

void setup_wifi() {
  delay(10);
  // We start by connecting to a WiFi network
  Serial.println();
  Serial.print("Connecting to ");
  Serial.println(ssid);

  WiFi.begin(ssid, password);

  while (WiFi.status() != WL_CONNECTED) {
    lcdConnect();//for LCD
    delay(500);
    Serial.print(".");
  }

  Serial.println("");
  Serial.println("WiFi connected");
  Serial.println("IP address: ");
  Serial.println(WiFi.localIP());
}

void callback(char* topic, byte* message, unsigned int length) {
  Serial.print("Message arrived on topic: ");
  Serial.print(topic);
  Serial.print(". Message: ");
  String messageTemp;

  for (int i = 0; i < length; i++) {
    Serial.print((char)message[i]);
    messageTemp += (char)message[i];
  }
  Serial.println();

  // If a message is received on the topic, you will check this message.
  // Changes the output state according to the message
  if (String(topic) == "cheerlights") {
    Serial.print("Changing color to ");
    Serial.println(messageTemp);
    setColor(messageTemp);
  }
}

void reconnect() {
  // Loop until we're reconnected
  while (!client.connected()) {
  lcdConnect();
    Serial.print("Attempting MQTT connection...");
    // Attempt to connect
    if (client.connect(unique_identifier)) {
      Serial.println("connected");
      // Subscribe
      client.subscribe("cheerlights");
    } else {
      Serial.print("failed, rc=");
      Serial.print(client.state());
      Serial.println(" try again in 5 seconds");
      // Wait 5 seconds before retrying
      delay(5000);
    }
  }
}

void setColor(String color) {
  // Loop through the list of colors to find the matching color
  for (int colorIndex = 0; colorIndex < 12; colorIndex++) {
    if (color == colorName[colorIndex]) {
        lastColor = colorIndex;//remeber the last color
        colorCount++;//increment the count
      // Set the color of each NeoPixel on the strip
      for (int pixel = 0; pixel < NUM_LEDS; pixel++) {
        pixels.setPixelColor(pixel, pixels.Color (colorRGB [colorIndex][0], colorRGB [colorIndex][1], colorRGB [colorIndex][2]));
        delay(100);
      }
      pixels.show();
    }
  }
}

void lcdConnect()
{
    lcd.clear();
    lcd.setCursor(0, 0); //line 0
    lcd.print("Connecting...");
    lcd.setCursor(0, 1);
    lcd.print("SSID:"); //line 1
    lcd.print(ssid);
}

void loop() {
  lcd.clear();

  if (!client.connected()) {
    reconnect();
  }else{
    lcd.createChar(0, connected);
    lcd.setCursor(15, 0);
    lcd.write(byte(0));
  }
  client.loop();


  //first row
  lcd.setCursor(0, 0);
  lcd.print("Color: ");
  lcd.print(colorName[lastColor]);

  //second row
  lcd.setCursor(0, 1);
  lcd.print("Changed ");
  lcd.print(colorCount);
  lcd.print(" times");

  delay(1000);//we must have delay to able to read the display


}
Common Course Links
Common Course Files
แหล่งข้อมูลและเอกสารอ้างอิง
-
เอกสารESP32 Tutorial 52/55 - SunFounder doc page for CheerLightdocs.sunfounder.com
ไฟล์📁
ไม่มีไฟล์ที่พร้อมใช้งาน