د ESP32 ټیوټوریل 52/55 - WS2812 CheerLights MQTT نړیوال سنک د LCD سره | SunFounder ESP32 IoT کټ
په دې ټیوټوریل کې، موږ به د ESP32 په کارولو سره د CheerLights پروژه جوړه کړو، چې به د MQTT له لارې رنګونه په نړیواله کچه همغږي کړي. دا پروژه به نه یوازې د نورو کاروونکو د معلوماتو پر بنسټ رنګونه بدل کړي، بلکې اوسنی رنګ او د هغه د تازه کیدو شمېر به په LCD سکرین کې هم ښکاره کړي. پایله د IoT وړتیاوو یوه ساتیرۍ بیلګه ده، چې ښیي وسایل څنګه کولی شي له یو بل سره اړیکه ونیسي او کاروونکي د واټن په اوږدو کې سره وصل وساتي. د نورو روښانتیا لپاره، ویډیو وګورئ (په ویډیو کې په 00:00 کې).
هارډویر تشریح شوی
د دې پروژې د جوړولو لپاره، تاسو ته د ESP32 مایکروکنټرولر، د WS2812 LED پټه، او د LCD ښودنې ته اړتیا ده. ESP32 د عملیاتو د دماغ په توګه کار کوي، د خپلو جوړو شویو Wi-Fi وړتیاوو په کارولو سره انټرنیټ سره وصل کیږي او د MQTT پیغامونه ترلاسه کوي. دا د نورو کاروونکو د نړیوال معلوماتو پر بنسټ د LED رنګونو ته د ریښتیني وخت تازه کولو اجازه ورکوي.
د WS2812 LED پټه د هغو پروژو لپاره یوه مشهوره انتخاب ده چې د پتې وړ RGB LEDs ته اړتیا لري. هر LED په خپلواکه توګه کنټرول کیدی شي، چې د بډایه رنګ ښودنې اجازه ورکوي. LCD به د اوسني رنګ او د هغه د بدلون شمېرې بصری تایید چمتو کړي، چې د کاروونکي تعامل زیاتوي.

ډیټاشیټ تفصیلات
| جوړونکی | SunFounder |
|---|---|
| د پرزې شمېره | ESP32 |
| منطق/IO ولټاژ | 3.3 V |
| د برېښنا رسولو ولټاژ | 5 V |
| د تولید جریان (په هر چینل) | 20 mA |
| د لوړ جریان (په هر چینل) | 60 mA |
| د PWM فریکونسي لارښود | 400 Hz |
| د منطق داخلیدو حدونه | 0.15 V (ټیټ)، 0.8 V (لوړ) |
| د ولټاژ کمښت / RDS(on) / سنتریشن | 0.2 V |
| حرارتي حدونه | 85 °C |
| بسته بندي | ESP32 ماډل |
| یادښتونه / بڼې | جوړ شوی Wi-Fi او بلوتوت شامل دي |
- ESP32 (5 V) او WS2812 پټې (5 V) ته د مناسب برېښنا رسولو ډاډ ترلاسه کړئ.
- د ESP32 او LED پټې ترمنځ یو ګډ ځمکنی تار وکاروئ.
- د رنګ همغږۍ لپاره یو مناسب MQTT بروکر پلي کړئ.
- د WS2812 لپاره د ډیټا پن اړیکې ته پاملرنه وکړئ (د کوډ له مخې پن 14).
- د LEDs شمېر ته پام وکړئ؛ د برېښنا له حد څخه زیاتیدل اضافي برېښنا سرچینو ته اړتیا لري.
د تارونو د نښلولو لارښوونې


د اجزاو د تارونو د نښلولو لپاره، لومړی د WS2812 LED پټې سره وصل کړئ. د LED پټې ځمکنی پن (معمولا تور) د ESP32 پر ځمکني پن سره وصل کړئ. بیا، د LED پټې VCC پن (معمولا سور) د ESP32 پر 5V محصول سره وصل کړئ. په پای کې، د ډیټا پن (معمولا ژیړ) د ESP32 پر GPIO پن 14 سره وصل کړئ.
د LCD لپاره، ځمکنی پن (معمولا تور) د ESP32 پر ځمکني تار سره وصل کړئ. د VCC پن (معمولا سور) باید د 5V محصول سره وصل شي. د SDA پن (معمولا خړ) د GPIO پن 21 سره وصل کیږي، پداسې حال کې چې د SCL پن (معمولا سپین) د GPIO پن 22 سره وصل کیږي. دا ترتیب ESP32 ته اجازه ورکوي چې له LCD سره اړیکه ونیسي او اړین معلومات ښکاره کړي.
د کوډ بیلګې او تشریح
د setup فنکشن کې، موږ LCD پیل کوو او Wi-Fi سره وصل کیږو. لاندې کوډ ښیي چې څنګه اړین کتابتونونه تعریف کړو او LCD تنظیم کړو:
#include
#include
LiquidCrystal_I2C lcd(0x27, 16,2);  // د LCD پته وټاکئ
void setup() {
  Serial.begin(115200);
  lcd.init(); // LCD پیل کړئ
  lcd.backlight(); // د LCD شاته رڼا فعاله کړئ
}
دا LCD د کارونې لپاره پیل کوي، چې ورته اجازه ورکوي پیغامونه ښکاره کړي. راتلونکی اقتباس ښیي چې د Wi-Fi اړیکه څنګه رامینځته کیږي:
void setup_wifi() {
  WiFi.begin(ssid, password);
  while (WiFi.status() != WL_CONNECTED) {
    lcdConnect(); //د LCD لپاره
    delay(500);
  }
  Serial.println("WiFi وصل شو");
}
دا فنکشن مشخص شوي Wi-Fi شبکې سره اړیکه رامینځته کوي، پداسې حال کې چې د نښلولو پر مهال په LCD کې پیغام ښکاره کوي. په پای کې، د رنګ بدلون منطق د callback فنکشن کې اداره کیږي:
void callback(char* topic, byte* message, unsigned int length) {
  String messageTemp;
  for (int i = 0; i < length; i++) {
    messageTemp += (char)message[i];
  }
  if (String(topic) == "cheerlights") {
    setColor(messageTemp);
  }
}
دا فنکشن د "cheerlights" موضوع باندې راتلونکو پیغامونو ته غوږ نیسي او رنګ د هغې مطابق تازه کوي. بشپړ کوډ د مقالې لاندې بار کیږي، نو ډاډ ترلاسه کړئ چې د بشپړ پلي کولو لپاره یې وګورئ.
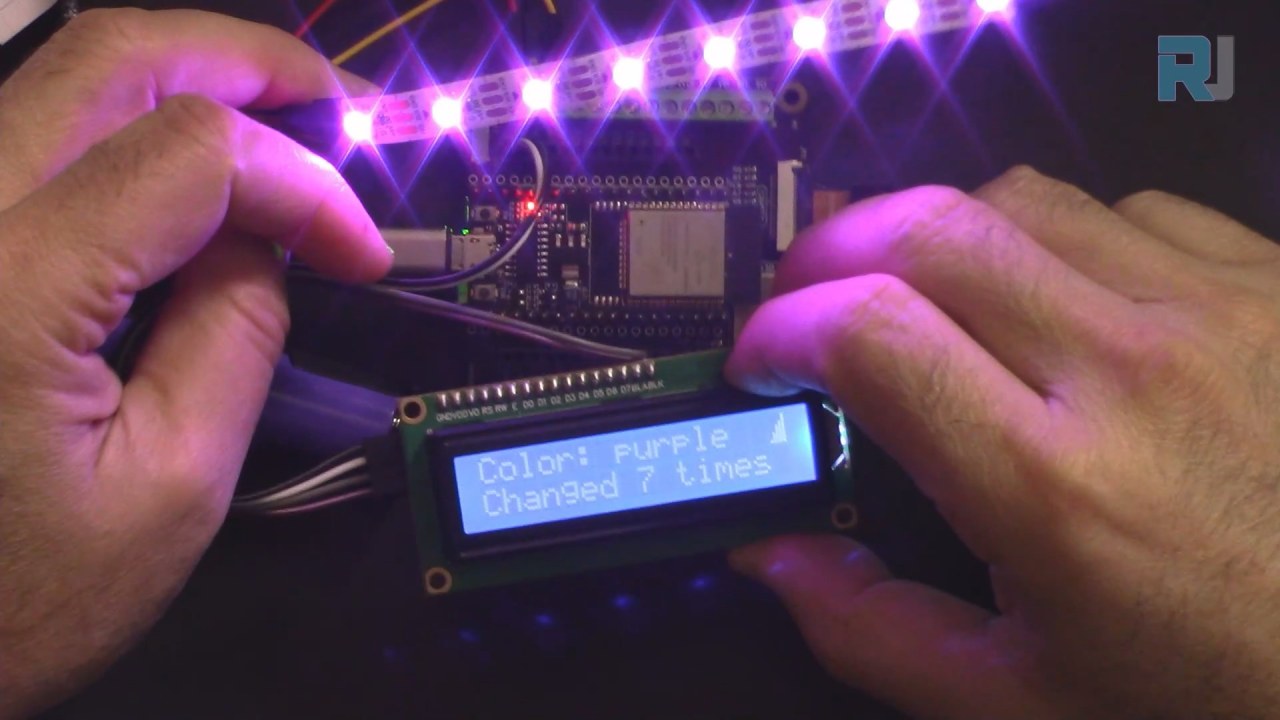
ښودنه / څه تمه وکړو
د پروژې له بشپړیدو وروسته، تاسو کولی شئ تمه وکړئ چې LED پټه د نړیوال MQTT فیډ څخه د معلوماتو پر بنسټ رنګونه بدل کړي. LCD به اوسنی رنګ نوم او د هغه د بدلون شمېره ښکاره کړي. که تاسو انټرنیټ پرې کړئ، LCD به "اړیکه نیول..." ښکاره کړي تر هغه چې اړیکه بیا رامینځته شي (په ویډیو کې په 12:30 کې).
عام ستونزې د ډیټا اړیکو لپاره د سم پنونو کارولو ډاډ ترلاسه کول او د Wi-Fi اسنادو دقت تصدیق کول شامل دي. که د SSID یا پاسورډ کې کوم توپیر وي، ESP32 به وصل نشي، او LCD به د اړیکې پیغام ښکاره کولو ته دوام ورکړي.
د ویډیو وخت نښې
- 00:00 پیل
- 1:59 د پروژې پېژندنه
- 6:16 د تارونو اړیکه تشریح شوې
- 8:13 د آردوینو کوډ تشریح شوی
- 14:26 د ESP32 بورډ او COM پورټ په آردوینو IDE کې غوره کول
- 16:07 د LCD سره د چیرلایټ ننداره
Images
/*********
This is the origianl code from Examples->iot_5_cheerlight of SunFounder
full video instrucions https://youtu.be/xEqmxMiF-E8
📚⬇️ Download and resource page https://robojax.com/RJT685

I have added LCD to display:
1-Color name
2-Count the number of times the color is updated
3-Showon LCD if wifi is connected
4-Show connecting if not connected or disconnected

Written by Ahmad Shamshiri
www.Robojax.com
Dec 29, 2023

  :ref: https://randomnerdtutorials.com/esp32-mqtt-publish-subscribe-arduino-ide/
  https://docs.sunfounder.com/projects/kepler-kit/en/latest/iotproject/5.mqtt_pub.html
*********/
#include <Wire.h>
#include <LiquidCrystal_I2C.h>

//SDA->21,SCL->22
LiquidCrystal_I2C lcd(0x27, 16,2);  // set the LCD address to 0x27 for a 16 chars and 2 line display

int colorCount = 0;
int lastColor=0;

byte connected[] = {
          B00001,
          B00001,
          B00011,
          B00111,
          B00111,
          B01111,
          B01111,
          B11111
};


#include <WiFi.h>
#include <PubSubClient.h>
//#include <Wire.h>
#include <Adafruit_NeoPixel.h>


// Replace the next variables with your SSID/Password combination
const char* ssid = "dars";
const char* password = "5152535455";

// Add your MQTT Broker address:
const char* mqtt_server = "mqtt.cheerlights.com";
const char* unique_identifier = "sunfounder-client-sdgvsasdda";

WiFiClient espClient;
PubSubClient client(espClient);
long lastMsg = 0;
int value = 0;


// Define the supported CheerLights colors and their RGB values
String colorName[] = {"red", "pink", "green", "blue", "cyan", "white", "warmwhite", "oldlace", "purple", "magenta", "yellow", "orange"};

int colorRGB[][3] = { 255,   0,   0,  // "red"
                      255, 192, 203,  // "pink"
                        0, 255,   0,  // "green"
                        0,   0, 255,  // "blue"
                        0, 255, 255,  // "cyan"
                      255, 255, 255,  // "white"
                      255, 223, 223,  // "warmwhite"
                      255, 223, 223,  // "oldlace"
                      128,   0, 128,  // "purple"
                      255,   0, 255,  // "magenta"
                      255, 255,   0,  // "yellow"
                      255, 165,   0}; // "orange"

// init rgb strip
#define LED_PIN 13
#define NUM_LEDS 8

Adafruit_NeoPixel pixels = Adafruit_NeoPixel(NUM_LEDS, LED_PIN, NEO_GRB + NEO_KHZ800);

void setup() {
  Serial.begin(115200);

  lcd.init();// initialize the lcd
  lcd.backlight(); // Turns on the LCD backlight.

  // wifi default settings
  setup_wifi();
  client.setServer(mqtt_server, 1883);
  client.setCallback(callback);

  // rgb strip begin
  pixels.begin();
  pixels.show();

}

void setup_wifi() {
  delay(10);
  // We start by connecting to a WiFi network
  Serial.println();
  Serial.print("Connecting to ");
  Serial.println(ssid);

  WiFi.begin(ssid, password);

  while (WiFi.status() != WL_CONNECTED) {
    lcdConnect();//for LCD
    delay(500);
    Serial.print(".");
  }

  Serial.println("");
  Serial.println("WiFi connected");
  Serial.println("IP address: ");
  Serial.println(WiFi.localIP());
}

void callback(char* topic, byte* message, unsigned int length) {
  Serial.print("Message arrived on topic: ");
  Serial.print(topic);
  Serial.print(". Message: ");
  String messageTemp;

  for (int i = 0; i < length; i++) {
    Serial.print((char)message[i]);
    messageTemp += (char)message[i];
  }
  Serial.println();

  // If a message is received on the topic, you will check this message.
  // Changes the output state according to the message
  if (String(topic) == "cheerlights") {
    Serial.print("Changing color to ");
    Serial.println(messageTemp);
    setColor(messageTemp);
  }
}

void reconnect() {
  // Loop until we're reconnected
  while (!client.connected()) {
  lcdConnect();
    Serial.print("Attempting MQTT connection...");
    // Attempt to connect
    if (client.connect(unique_identifier)) {
      Serial.println("connected");
      // Subscribe
      client.subscribe("cheerlights");
    } else {
      Serial.print("failed, rc=");
      Serial.print(client.state());
      Serial.println(" try again in 5 seconds");
      // Wait 5 seconds before retrying
      delay(5000);
    }
  }
}

void setColor(String color) {
  // Loop through the list of colors to find the matching color
  for (int colorIndex = 0; colorIndex < 12; colorIndex++) {
    if (color == colorName[colorIndex]) {
        lastColor = colorIndex;//remeber the last color
        colorCount++;//increment the count
      // Set the color of each NeoPixel on the strip
      for (int pixel = 0; pixel < NUM_LEDS; pixel++) {
        pixels.setPixelColor(pixel, pixels.Color (colorRGB [colorIndex][0], colorRGB [colorIndex][1], colorRGB [colorIndex][2]));
        delay(100);
      }
      pixels.show();
    }
  }
}

void lcdConnect()
{
    lcd.clear();
    lcd.setCursor(0, 0); //line 0
    lcd.print("Connecting...");
    lcd.setCursor(0, 1);
    lcd.print("SSID:"); //line 1
    lcd.print(ssid);
}

void loop() {
  lcd.clear();

  if (!client.connected()) {
    reconnect();
  }else{
    lcd.createChar(0, connected);
    lcd.setCursor(15, 0);
    lcd.write(byte(0));
  }
  client.loop();


  //first row
  lcd.setCursor(0, 0);
  lcd.print("Color: ");
  lcd.print(colorName[lastColor]);

  //second row
  lcd.setCursor(0, 1);
  lcd.print("Changed ");
  lcd.print(colorCount);
  lcd.print(" times");

  delay(1000);//we must have delay to able to read the display


}
Common Course Links
Common Course Files
Resources & references
-
DocumentationESP32 Tutorial 52/55- SunFounder doc page for CheerLightdocs.sunfounder.com
Files📁
No files available.