ESP32 টিউটোরিয়াল ৫২/৫৫ - WS2812 CheerLights MQTT গ্লোবাল সিঙ্ক সহ LCD | SunFounder ESP32 IoT কিট
এই টিউটোরিয়ালে, আমরা ESP32 ব্যবহার করে একটি CheerLights প্রজেক্ট তৈরি করব, যা MQTT-এর মাধ্যমে বিশ্বব্যাপী রং সিঙ্ক্রোনাইজ করবে। এই প্রজেক্টটি শুধু অন্যান্য ব্যবহারকারীদের ইনপুটের ভিত্তিতে রং পরিবর্তন করবে না, বরং একটি LCD স্ক্রিনে বর্তমান রং এবং এটি কতবার আপডেট হয়েছে তাও প্রদর্শন করবে। ফলাফল হলো IoT ক্ষমতার একটি মজার প্রদর্শনী, যা দেখায় যে কীভাবে ডিভাইসগুলি যোগাযোগ করতে পারে এবং দূরত্ব জুড়ে ব্যবহারকারীদের সংযুক্ত রাখতে পারে। অতিরিক্ত স্পষ্টতার জন্য, ভিডিওটি দেখুন (ভিডিওতে 00:00 মিনিটে)।
হার্ডওয়্যার ব্যাখ্যা
এই প্রজেক্টটি তৈরি করতে, আপনার একটি ESP32 মাইক্রোকন্ট্রোলার, একটি WS2812 LED স্ট্রিপ এবং একটি LCD ডিসপ্লে প্রয়োজন হবে। ESP32 অপারেশনের মস্তিষ্ক হিসেবে কাজ করে, এর বিল্ট-ইন Wi-Fi ক্ষমতা ব্যবহার করে ইন্টারনেটে সংযোগ স্থাপন করে এবং MQTT বার্তা গ্রহণ করে। এটি অন্যান্য ব্যবহারকারীদের বৈশ্বিক ইনপুটের ভিত্তিতে LED রঙের রিয়েল-টাইম আপডেটের অনুমতি দেয়।
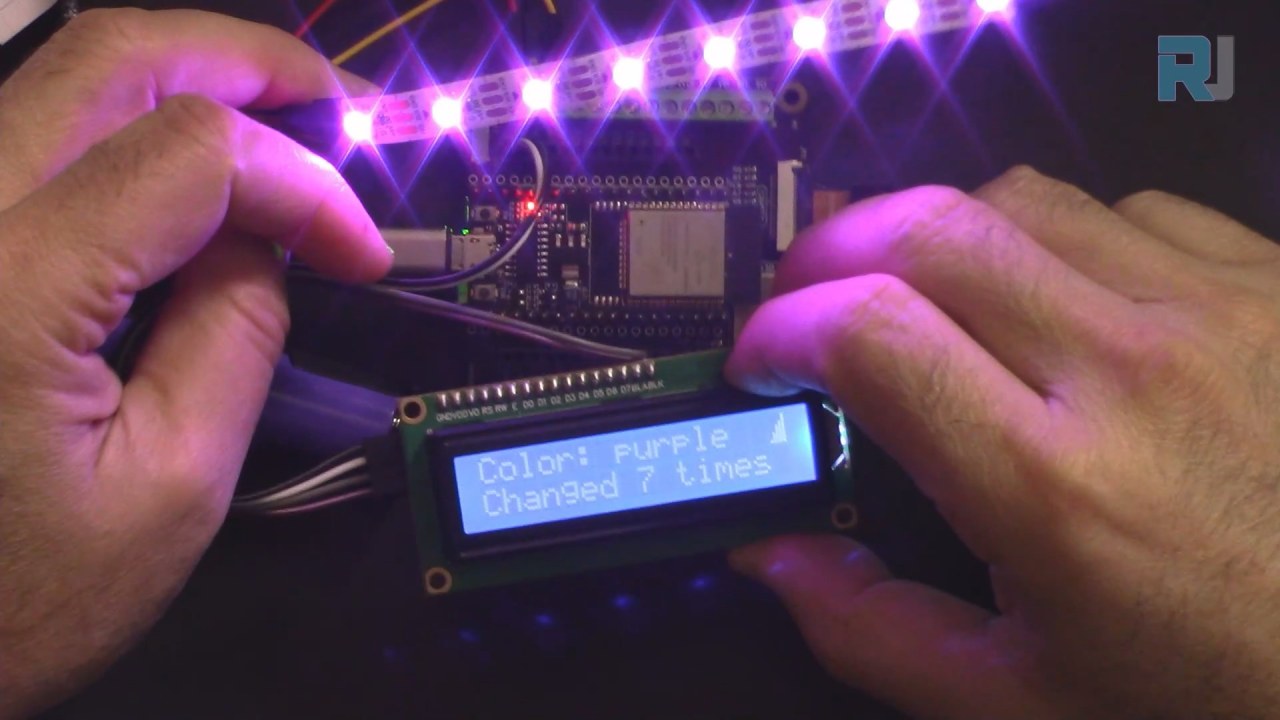
WS2812 LED স্ট্রিপটি অ্যাড্রেসযোগ্য RGB LED প্রয়োজন এমন প্রজেক্টগুলির জন্য একটি জনপ্রিয় পছন্দ। প্রতিটি LED স্বাধীনভাবে নিয়ন্ত্রণ করা যায়, যা সমৃদ্ধ রঙের প্রদর্শনী সক্ষম করে। LCD বর্তমান রঙ এবং এটি কতবার পরিবর্তিত হয়েছে তার একটি ভিজ্যুয়াল নিশ্চিতকরণ প্রদান করবে, যা ব্যবহারকারীর মিথস্ক্রিয়া বাড়িয়ে তুলবে।

ডেটাশিট বিবরণ
| প্রস্তুতকারক | SunFounder |
|---|---|
| পার্ট নম্বর | ESP32 |
| লজিক/আইও ভোল্টেজ | 3.3 V |
| সাপ্লাই ভোল্টেজ | 5 V |
| আউটপুট কারেন্ট (প্রতি চ্যানেলে) | 20 mA |
| পিক কারেন্ট (প্রতি চ্যানেলে) | 60 mA |
| PWM ফ্রিকোয়েন্সি নির্দেশিকা | 400 Hz |
| ইনপুট লজিক থ্রেশহোল্ড | 0.15 V (নিম্ন), 0.8 V (উচ্চ) |
| ভোল্টেজ ড্রপ / RDS(on) / স্যাচুরেশন | 0.2 V |
| থার্মাল সীমা | 85 °C |
| প্যাকেজ | ESP32 মডিউল |
| নোট / ভেরিয়েন্ট | বিল্ট-ইন Wi-Fi এবং ব্লুটুথ অন্তর্ভুক্ত |
- ESP32 (5 V) এবং WS2812 স্ট্রিপে (5 V) সঠিক পাওয়ার সাপ্লাই নিশ্চিত করুন।
- ESP32 এবং LED স্ট্রিপের মধ্যে একটি সাধারণ গ্রাউন্ড ব্যবহার করুন।
- রং সিঙ্ক্রোনাইজেশনের জন্য একটি সঠিক MQTT ব্রোকার প্রয়োগ করুন।
- WS2812-এর ডেটা পিন সংযোগের দিকে মনোযোগ দিন (কোড অনুযায়ী পিন 14)।
- LED সংখ্যার ব্যাপারে সতর্ক থাকুন; পাওয়ার সীমা অতিক্রম করলে অতিরিক্ত পাওয়ার সোর্স প্রয়োজন।
ওয়্যারিং নির্দেশাবলী


কম্পোনেন্টগুলি ওয়্যার করতে, প্রথমে WS2812 LED স্ট্রিপটি সংযুক্ত করে শুরু করুন। LED স্ট্রিপের গ্রাউন্ড পিনটি (সাধারণত কালো) ESP32-এর গ্রাউন্ড পিনের সাথে সংযুক্ত করুন। এরপর, LED স্ট্রিপের VCC পিনটি (সাধারণত লাল) ESP32-এর 5V আউটপুটের সাথে সংযুক্ত করুন। অবশেষে, ডেটা পিনটি (প্রায়শই হলুদ) ESP32-এর GPIO পিন 14-এর সাথে সংযুক্ত করুন।
LCD-এর জন্য, গ্রাউন্ড পিনটি (প্রায়শই কালো) ESP32-এর গ্রাউন্ডের সাথে সংযুক্ত করুন। VCC পিনটি (সাধারণত লাল) 5V আউটপুটের সাথে সংযুক্ত করা উচিত। SDA পিনটি (সাধারণত ধূসর) GPIO পিন 21-এর সাথে সংযুক্ত হয়, যখন SCL পিনটি (সাধারণত সাদা) GPIO পিন 22-এর সাথে সংযুক্ত হয়। এই সেটআপটি ESP32-কে LCD-এর সাথে যোগাযোগ করতে এবং প্রয়োজন অনুযায়ী তথ্য প্রদর্শন করতে দেয়।
কোড উদাহরণ ও ওয়াকথ্রু
সেটআপ ফাংশনে, আমরা LCD আরম্ভ করি এবং Wi-Fi-তে সংযোগ করি। নীচের কোডটি প্রয়োজনীয় লাইব্রেরিগুলি সংজ্ঞায়িত করা এবং LCD সেট আপ করার পদ্ধতি প্রদর্শন করে:
#include
#include
LiquidCrystal_I2C lcd(0x27, 16,2);  // LCD ঠিকানা সেট করুন
void setup() {
  Serial.begin(115200);
  lcd.init(); // lcd আরম্ভ করুন
  lcd.backlight(); // LCD ব্যাকলাইট চালু করে।
}
এটি ব্যবহারের জন্য LCD আরম্ভ করে, যা এটিকে বার্তা প্রদর্শন করতে দেয়। পরবর্তী অংশটি দেখায় কিভাবে Wi-Fi সংযোগ স্থাপন করা হয়:
void setup_wifi() {
  WiFi.begin(ssid, password);
  while (WiFi.status() != WL_CONNECTED) {
    lcdConnect(); //LCD-এর জন্য
    delay(500);
  }
  Serial.println("WiFi সংযুক্ত");
}
এই ফাংশনটি নির্দিষ্ট Wi-Fi নেটওয়ার্কে একটি সংযোগ স্থাপন করে, সংযোগের সময় LCD-তে একটি বার্তা প্রদর্শন করে। অবশেষে, রং পরিবর্তনের লজিকটি কলব্যাক ফাংশনে পরিচালিত হয়:
void callback(char* topic, byte* message, unsigned int length) {
  String messageTemp;
  for (int i = 0; i < length; i++) {
    messageTemp += (char)message[i];
  }
  if (String(topic) == "cheerlights") {
    setColor(messageTemp);
  }
}
এই ফাংশনটি "cheerlights" টপিকে আগত বার্তাগুলি শোনে এবং সেই অনুযায়ী রং আপডেট করে। সম্পূর্ণ কোডটি নিবন্ধের নীচে লোড হয়, তাই সম্পূর্ণ বাস্তবায়নের জন্য এটি পর্যালোচনা করতে ভুলবেন না।
প্রদর্শনী / কী আশা করবেন
প্রজেক্টটি সম্পন্ন করার পরে, আপনি আশা করতে পারেন যে LED স্ট্রিপটি একটি বৈশ্বিক MQTT ফিড থেকে ইনপুটের ভিত্তিতে রং পরিবর্তন করবে। LCD বর্তমান রঙের নাম এবং এটি কতবার পরিবর্তিত হয়েছে তা প্রদর্শন করবে। আপনি যদি ইন্টারনেট সংযোগ বিচ্ছিন্ন করেন, তাহলে LCD পুনরায় সংযোগ স্থাপন না হওয়া পর্যন্ত "সংযোগ হচ্ছে..." নির্দেশ করবে (ভিডিওতে 12:30 মিনিটে)।
সাধারণ সমস্যাগুলির মধ্যে রয়েছে ডেটা সংযোগের জন্য সঠিক পিন ব্যবহার করা নিশ্চিত করা এবং Wi-Fi ক্রেডেনশিয়াল সঠিক কিনা যাচাই করা। SSID বা পাসওয়ার্ডে কোনো অসঙ্গতি থাকলে, ESP32 সংযোগ করতে ব্যর্থ হবে এবং LCD সংযোগ বার্তা প্রদর্শন করতে থাকবে।
ভিডিও টাইমস্ট্যাম্প
- 00:00 শুরু
- 1:59 প্রকল্পের ভূমিকা
- 6:16 ওয়্যারিং ব্যাখ্যা
- 8:13 আরডুইনো কোড ব্যাখ্যা
- 14:26 আরডুইনো আইডিই-তে ESP32 বোর্ড এবং COM পোর্ট নির্বাচন
- 16:07 এলসিডি সহ চিয়ারলাইট প্রদর্শন
ছবি
/*********
This is the origianl code from Examples->iot_5_cheerlight of SunFounder
full video instrucions https://youtu.be/xEqmxMiF-E8
📚⬇️ Download and resource page https://robojax.com/RJT685

I have added LCD to display:
1-Color name
2-Count the number of times the color is updated
3-Showon LCD if wifi is connected
4-Show connecting if not connected or disconnected

Written by Ahmad Shamshiri
www.Robojax.com
Dec 29, 2023

  :ref: https://randomnerdtutorials.com/esp32-mqtt-publish-subscribe-arduino-ide/
  https://docs.sunfounder.com/projects/kepler-kit/en/latest/iotproject/5.mqtt_pub.html
*********/
#include <Wire.h>
#include <LiquidCrystal_I2C.h>

//SDA->21,SCL->22
LiquidCrystal_I2C lcd(0x27, 16,2);  // set the LCD address to 0x27 for a 16 chars and 2 line display

int colorCount = 0;
int lastColor=0;

byte connected[] = {
          B00001,
          B00001,
          B00011,
          B00111,
          B00111,
          B01111,
          B01111,
          B11111
};


#include <WiFi.h>
#include <PubSubClient.h>
//#include <Wire.h>
#include <Adafruit_NeoPixel.h>


// Replace the next variables with your SSID/Password combination
const char* ssid = "dars";
const char* password = "5152535455";

// Add your MQTT Broker address:
const char* mqtt_server = "mqtt.cheerlights.com";
const char* unique_identifier = "sunfounder-client-sdgvsasdda";

WiFiClient espClient;
PubSubClient client(espClient);
long lastMsg = 0;
int value = 0;


// Define the supported CheerLights colors and their RGB values
String colorName[] = {"red", "pink", "green", "blue", "cyan", "white", "warmwhite", "oldlace", "purple", "magenta", "yellow", "orange"};

int colorRGB[][3] = { 255,   0,   0,  // "red"
                      255, 192, 203,  // "pink"
                        0, 255,   0,  // "green"
                        0,   0, 255,  // "blue"
                        0, 255, 255,  // "cyan"
                      255, 255, 255,  // "white"
                      255, 223, 223,  // "warmwhite"
                      255, 223, 223,  // "oldlace"
                      128,   0, 128,  // "purple"
                      255,   0, 255,  // "magenta"
                      255, 255,   0,  // "yellow"
                      255, 165,   0}; // "orange"

// init rgb strip
#define LED_PIN 13
#define NUM_LEDS 8

Adafruit_NeoPixel pixels = Adafruit_NeoPixel(NUM_LEDS, LED_PIN, NEO_GRB + NEO_KHZ800);

void setup() {
  Serial.begin(115200);

  lcd.init();// initialize the lcd
  lcd.backlight(); // Turns on the LCD backlight.

  // wifi default settings
  setup_wifi();
  client.setServer(mqtt_server, 1883);
  client.setCallback(callback);

  // rgb strip begin
  pixels.begin();
  pixels.show();

}

void setup_wifi() {
  delay(10);
  // We start by connecting to a WiFi network
  Serial.println();
  Serial.print("Connecting to ");
  Serial.println(ssid);

  WiFi.begin(ssid, password);

  while (WiFi.status() != WL_CONNECTED) {
    lcdConnect();//for LCD
    delay(500);
    Serial.print(".");
  }

  Serial.println("");
  Serial.println("WiFi connected");
  Serial.println("IP address: ");
  Serial.println(WiFi.localIP());
}

void callback(char* topic, byte* message, unsigned int length) {
  Serial.print("Message arrived on topic: ");
  Serial.print(topic);
  Serial.print(". Message: ");
  String messageTemp;

  for (int i = 0; i < length; i++) {
    Serial.print((char)message[i]);
    messageTemp += (char)message[i];
  }
  Serial.println();

  // If a message is received on the topic, you will check this message.
  // Changes the output state according to the message
  if (String(topic) == "cheerlights") {
    Serial.print("Changing color to ");
    Serial.println(messageTemp);
    setColor(messageTemp);
  }
}

void reconnect() {
  // Loop until we're reconnected
  while (!client.connected()) {
  lcdConnect();
    Serial.print("Attempting MQTT connection...");
    // Attempt to connect
    if (client.connect(unique_identifier)) {
      Serial.println("connected");
      // Subscribe
      client.subscribe("cheerlights");
    } else {
      Serial.print("failed, rc=");
      Serial.print(client.state());
      Serial.println(" try again in 5 seconds");
      // Wait 5 seconds before retrying
      delay(5000);
    }
  }
}

void setColor(String color) {
  // Loop through the list of colors to find the matching color
  for (int colorIndex = 0; colorIndex < 12; colorIndex++) {
    if (color == colorName[colorIndex]) {
        lastColor = colorIndex;//remeber the last color
        colorCount++;//increment the count
      // Set the color of each NeoPixel on the strip
      for (int pixel = 0; pixel < NUM_LEDS; pixel++) {
        pixels.setPixelColor(pixel, pixels.Color (colorRGB [colorIndex][0], colorRGB [colorIndex][1], colorRGB [colorIndex][2]));
        delay(100);
      }
      pixels.show();
    }
  }
}

void lcdConnect()
{
    lcd.clear();
    lcd.setCursor(0, 0); //line 0
    lcd.print("Connecting...");
    lcd.setCursor(0, 1);
    lcd.print("SSID:"); //line 1
    lcd.print(ssid);
}

void loop() {
  lcd.clear();

  if (!client.connected()) {
    reconnect();
  }else{
    lcd.createChar(0, connected);
    lcd.setCursor(15, 0);
    lcd.write(byte(0));
  }
  client.loop();


  //first row
  lcd.setCursor(0, 0);
  lcd.print("Color: ");
  lcd.print(colorName[lastColor]);

  //second row
  lcd.setCursor(0, 1);
  lcd.print("Changed ");
  lcd.print(colorCount);
  lcd.print(" times");

  delay(1000);//we must have delay to able to read the display


}
Common Course Links
Common Course Files
সম্পদ ও রেফারেন্সসমূহ
-
ডকুমেন্টেশনESP32 Tutorial 52/55- SunFounder doc page for CheerLightdocs.sunfounder.com
ফাইলসমূহ📁
কোনো ফাইল উপলব্ধ নেই।