ESP32 ટ્યુટોરિયલ 49/55 - Adafruit IoT નો ઉપયોગ કરીને ઇન્ટરનેટ પર DC મોટર નિયંત્રિત કરો | SunFounder ની ESP32 કિટ
આ ટ્યુટોરિયલમાં, આપણે ESP32 અને Adafruit IO MQTT સેવાનો ઉપયોગ કરીને ઇન્ટરનેટ દ્વારા DC મોટરને કેવી રીતે નિયંત્રિત કરવી તે શોધીશું. DC મોટરની ઝડપ અને દિશાને દૂરસ્થ રીતે નિયંત્રિત કરી શકાય છે, જે ઇન્ટરનેટ કનેક્શન સાથે ગમે ત્યાંથી કાર્યક્ષમ નિયંત્રણ માટે પરવાનગી આપે છે. આ પ્રોજેક્ટ ESP32 માઇક્રોકંટ્રોલરની ક્ષમતાઓ દર્શાવે છે, જેમાં બિલ્ટ-ઇન Wi-Fi છે, જે તેને ઇન્ટરનેટ ઓફ થિંગ્સ (IoT) એપ્લિકેશનો માટે આદર્શ બનાવે છે.

આપણે એક સિસ્ટમ લાગુ કરીશું જ્યાં મોટરને શરૂ કરી શકાય, બંધ કરી શકાય, અને તેની ઝડપને Adafruit IO સાથે જોડાયેલા વેબ ઇન્ટરફેસ દ્વારા સમાયોજિત કરી શકાય. વપરાશકર્તાઓ મોટર નિયંત્રણ માટે ચોક્કસ વિષયો પર સબ્સ્ક્રાઇબ કરી શકે છે અને તે મુજબ પરિમાણોને સમાયોજિત કરી શકે છે. પ્રક્રિયાને વધુ સારી રીતે સમજવા માટે, આ ટ્યુટોરિયલ સાથેના વિડિયોને ચોક્કસપણે તપાસો (વિડિયોમાં 00:00 પર).
હાર્ડવેર સમજાવ્યું
આ પ્રોજેક્ટ માટે, આપણે ESP32 માઇક્રોકંટ્રોલરનો ઉપયોગ કરીશું, જે આપણી સિસ્ટમનું હૃદય છે. ESP32 Wi-Fi સંચાર સંભાળવામાં સક્ષમ છે, જે તેને આપણી IoT એપ્લિકેશન માટે યોગ્ય બનાવે છે. તે Adafruit IO પ્લેટફોર્મ સાથે જોડાય છે, જે આપણને MQTT પ્રોટોકોલ દ્વારા સંદેશા મોકલવા અને પ્રાપ્ત કરવાની મંજૂરી આપે છે.
વધુમાં, આપણે L293D મોટર ડ્રાઇવરનો ઉપયોગ કરીશું, જે DC મોટરને નિયંત્રિત કરવા માટે આવશ્યક છે. L293D બે DC મોટર ચલાવી શકે છે અને પલ્સ વિડ્થ મોડ્યુલેશન (PWM) દ્વારા દિશા અને ઝડપ બંનેના નિયંત્રણ માટે પરવાનગી આપે છે. તે અનિવાર્યપણે ESP32 અને મોટર વચ્ચે ઇન્ટરફેસ તરીકે કાર્ય કરે છે, મોટર દ્વારા જરૂરી ઉચ્ચ પ્રવાહનું સંચાલન કરે છે જ્યારે ESP32 ને કોઈપણ સંભવિત નુકસાનકારક બેક-ઇએમએફ સિગ્નલોથી અલગ કરે છે.
ડેટાશીટ વિગતો
| ઉત્પાદક | ટેક્સાસ ઇન્સ્ટ્રુમેન્ટ્સ |
|---|---|
| ભાગ નંબર | L293D |
| લોજિક/IO વોલ્ટેજ | 4.5 - 36 V |
| સપ્લાય વોલ્ટેજ | 4.5 - 36 V |
| આઉટપુટ પ્રવાહ (પ્રતિ ચેનલ) | 600 mA |
| પીક પ્રવાહ (પ્રતિ ચેનલ) | 1.2 A |
| PWM આવર્તન માર્ગદર્શન | 10 kHz (સામાન્ય) |
| ઇનપુટ લોજિક થ્રેશોલ્ડ | 0.8 V (ઉચ્ચ), 2.0 V (નીચું) |
| વોલ્ટેજ ડ્રોપ / RDS(on) / સંતૃપ્તિ | 1.5 V મહત્તમ |
| થર્મલ મર્યાદાઓ | 150 °C |
| પેકેજ | DIP-16 |
| નોંધો / વેરિઅન્ટ્સ | ચતુર્ગુણ ઉચ્ચ-પ્રવાહ અર્ધ-H ડ્રાઇવર |
- સતત કામગીરી માટે યોગ્ય હીટ સિંકિંગની ખાતરી કરો.
- મોટરની ઝડપને અસરકારક રીતે નિયંત્રિત કરવા માટે PWM નો ઉપયોગ કરો.
- નુકસાન અટકાવવા માટે ઇનપુટ વોલ્ટેજ મર્યાદાઓનું અવલોકન કરો.
- બધા ઘટકો વચ્ચે યોગ્ય ગ્રાઉન્ડ કનેક્શન તપાસો.
- બેક-ઇએમએફથી સાવચેત રહો; જરૂર પડ્યે ડાયોડનો ઉપયોગ કરો.
- વાયરિંગ બે વાર તપાસો કારણ કે ધ્રુવીયતા મોટરની દિશાને અસર કરી શકે છે.
- સંપૂર્ણ કામગીરી પહેલાં નીચા વોલ્ટેજ સાથે પરીક્ષણ કરો.
- લાંબા સમય સુધી ઉપયોગ દરમિયાન ઓવરહિટીંગ માટે ધ્યાન રાખો.
- જો ઉપયોગ થાય તો યાંત્રિક સ્વિચને ડિબાઉન્સ કરવાની ખાતરી કરો.
- ખાતરી કરો કે ESP32 મોટરના પ્રવાહ દ્વારા ઓવરલોડ ન થાય.
વાયરિંગ સૂચનાઓ
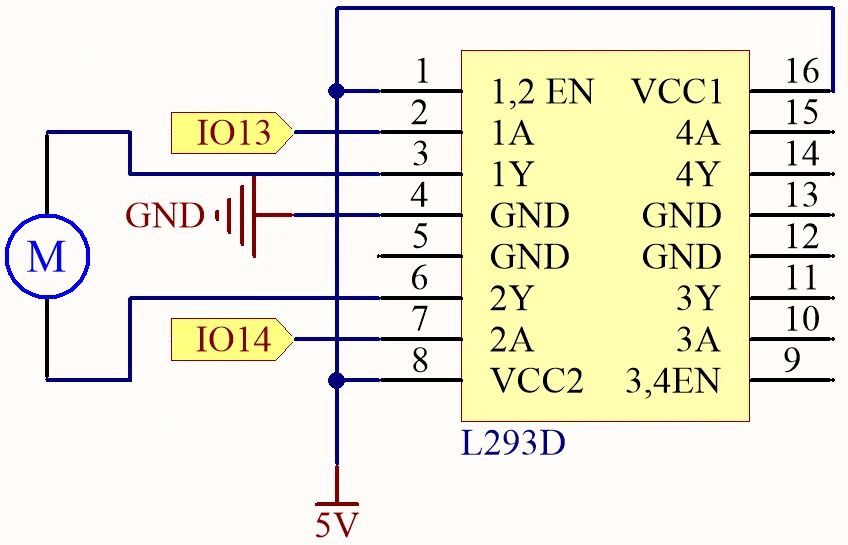
પાવર સપ્લાયને જોડીને શરૂ કરો. તમારા બાહ્ય પાવર સ્ત્રોતના હકારાત્મક ટર્મિનલને L293D ના VCC પિન (પિન 8) સાથે અને ગ્રાઉન્ડને GND પિન (પિન 4) સાથે જોડો. જો જરૂરી હોય તો ESP32 ને અલગથી પાવર કરવાની ખાતરી કરો, સામાન્ય રીતે માઇક્રો USB કનેક્શન દ્વારા.
આગળ, મોટરને L293D સાથે જોડો. મોટરનો એક ટર્મિનલ આઉટપુટ પિન 3 (L293D ની પિન 2) સાથે અને બીજો ટર્મિનલ આઉટપુટ પિન 6 (L293D ની પિન 7) સાથે જોડાયેલો હોવો જોઈએ. નિયંત્રણ સિગ્નલો માટે, ESP32 ની પિન 13 ને ઇનપુટ પિન 2 (L293D ની પિન 1) સાથે અને પિન 14 ને ઇનપુટ પિન 7 (L293D ની પિન 2) સાથે જોડો. ડ્રાઇવરને સક્રિય કરવા માટે એનેબલ પિન (પિન 1) પણ 5V સપ્લાય સાથે જોડાયેલી હોવી જોઈએ. છેલ્લે, સામાન્ય સંદર્ભ માટે ESP32 ગ્રાઉન્ડ L293D ગ્રાઉન્ડ સાથે જોડાયેલું છે તેની ખાતરી કરો.
કોડ ઉદાહરણો અને વોકથ્રુ
પ્રદાન કરેલ કોડ જરૂરી લાઇબ્રેરીઓને પ્રારંભ કરે છે અને Wi-Fi અને MQTT ક્લાયંટ સેટ કરે છે. મુખ્ય ઓળખકર્તાઓમાં motorSpeed, motorDirection, અને motorStart શામેલ છે, જે Adafruit IO થી પ્રાપ્ત આદેશોના આધારે મોટરની કામગીરીનું સંચાલન કરે છે.
bool debug = false;
#define motor1A 13
#define motor2A 14
int motorSpeed = 0;
int motorDirection = 1;
int motorStart = 1;
આ અંશમાં, મોટર પિન ઝડપ, દિશા અને મોટરની શરૂ/બંધ સ્થિતિને નિયંત્રિત કરવા માટે પ્રારંભિક ચલો સાથે વ્યાખ્યાયિત કરવામાં આવી છે. ચલ motorSpeed Adafruit IO થી ઇનપુટના આધારે સમાયોજિત કરવામાં આવશે.
void setup() {
  Serial.begin(115200);
  WiFi.begin(WLAN_SSID, WLAN_PASS);
  delay(2000);
  while (WiFi.status() != WL_CONNECTED) {
    delay(500);
  }
}
સેટઅપ ફંક્શનમાં, સીરીયલ સંચાર શરૂ કરવામાં આવે છે, અને ESP32 ઉલ્લેખિત Wi-Fi નેટવર્ક સાથે જોડાય છે. આ કનેક્શન MQTT સંચારને સક્ષમ કરવા માટે નિર્ણાયક છે.
void loop() {
  MQTT_connect();
  mqtt.processPackets(500);
  runMotor();
}
આ લૂપ ફંક્શન MQTT કનેક્શન સ્થાપિત કરે છે અને પ્રાપ્ત નવીનતમ આદેશોના આધારે મોટરને નિયંત્રિત કરવા માટે આવતા પેકેટોની પ્રક્રિયા કરે છે. વર્તમાન સેટિંગ્સને મોટર પર લાગુ કરવા માટે ફંક્શન runMotor() કહેવામાં આવે છે.
પ્રદર્શન / શું અપેક્ષા રાખવી
જ્યારે સેટઅપ પૂર્ણ થાય અને કોડ અપલોડ થાય, ત્યારે તમે Adafruit IO ડેશબોર્ડ દ્વારા મોટરને નિયંત્રિત કરી શકશો. તમે સ્લાઇડરનો ઉપયોગ કરીને મોટરની ઝડપ ગોઠવી શકો છો અને ટૉગલ સ્વિચ વડે તેની દિશા બદલી શકો છો. જો બધું યોગ્ય રીતે વાયર કરેલું હોય, તો મોટર આ આદેશોને રીઅલ-ટાઇમમાં પ્રતિસાદ આપશે, જે સિસ્ટમની ઓછી લેટન્સી દર્શાવે છે (વિડિયોમાં 00:00 પર).
સામાન્ય સમસ્યાઓમાં ખોટા વાયરિંગને કારણે મોટરની દિશા ઊલટી થવી શામેલ છે, તેથી જો મોટર અપેક્ષા મુજબ વર્તે નહીં તો કનેક્શન બે વાર તપાસો. વધુમાં, ખાતરી કરો કે તમારા MQTT વિષયો Adafruit IO માં કોડ સાથે મેળ ખાય તે રીતે યોગ્ય રીતે સેટ કરેલા છે.
વિડિયો ટાઇમસ્ટેમ્પ્સ
- 00:00 શરૂઆત
- 2:21 પ્રોજેક્ટનો પરિચય
- 4:20 DC મોટર કેવી રીતે નિયંત્રિત થાય છે
- 6:39 L293D મોટર ડ્રાઇવર
- 11:42 MQTT શું છે?
- 15:03 Adafruit IO સેટઅપ
- 19:17 વાયરિંગ સમજાવ્યું
- 22:42 કોડ સમજાવ્યો
- 35:28 પ્રોજેક્ટ પ્રદર્શન
Images
/***********************************************************************
 This is Arduino sketch for ESP32 to DC Motor using MQTT service of Adafruit
 Watch video instruction https://youtu.be/OUgyPXNYg3g
 📚⬇️ Download and resource page https://robojax.com/RJT673
 Written By Ahamd Shamshiri
 on Feb 18, 2024

  Adafruit MQTT Library ESP32 Adafruit IO SSL/TLS example


/// ref: https://www.electronicwings.com/esp32/esp32-mqtt-client
*/
bool debug = false;
#define motor1A 13
#define motor2A 14

// PWM settings
const int freq = 500; // PWM frequency: 500 Hz
const int resolution = 8; // PWM resolution: 8 bits
const int channelA = 0; // PWM channel for motor1A: 0
const int channelB = 1; // PWM channel for motor2A: 1

char* dir[]={"CCW", "CW"};

int motorSpeed =0;
int motorDirection =1;
int motorStart = 1;
int dutyCycle =0;

#include <WiFi.h>
#include "WiFiClientSecure.h"
#include "Adafruit_MQTT.h"
#include "Adafruit_MQTT_Client.h"

/************************* WiFi Access Point *********************************/


#define WLAN_SSID "Book"
#define WLAN_PASS "88888888"

/************************* Adafruit.io Setup *********************************/

#define AIO_SERVER "io.adafruit.com"

// Using port 8883 for MQTTS
#define AIO_SERVERPORT 8883

// Adafruit IO Account Configuration
// (to obtain these values, visit https://io.adafruit.com and click on Active Key)
// #define AIO_USERNAME "YOUR_ADAFRUIT_IO_USERNAME"
// #define AIO_KEY      "YOUR_ADAFRUIT_IO_KEY"

#define AIO_USERNAME "robojax"
#define AIO_KEY "aio_jHpm60SEsWUdU5x472FViZjWzsY9"

/************ Global State (you don't need to change this!) ******************/

// WiFiFlientSecure for SSL/TLS support
WiFiClientSecure client;

// Setup the MQTT client class by passing in the WiFi client and MQTT server and login details.
Adafruit_MQTT_Client mqtt(&client, AIO_SERVER, AIO_SERVERPORT, AIO_USERNAME, AIO_KEY);


// io.adafruit.com root CA
const char* adafruitio_root_ca = \
      "-----BEGIN CERTIFICATE-----\n"
      "MIIEjTCCA3WgAwIBAgIQDQd4KhM/xvmlcpbhMf/ReTANBgkqhkiG9w0BAQsFADBh\n"
      "MQswCQYDVQQGEwJVUzEVMBMGA1UEChMMRGlnaUNlcnQgSW5jMRkwFwYDVQQLExB3\n"
      "d3cuZGlnaWNlcnQuY29tMSAwHgYDVQQDExdEaWdpQ2VydCBHbG9iYWwgUm9vdCBH\n"
      "MjAeFw0xNzExMDIxMjIzMzdaFw0yNzExMDIxMjIzMzdaMGAxCzAJBgNVBAYTAlVT\n"
      "MRUwEwYDVQQKEwxEaWdpQ2VydCBJbmMxGTAXBgNVBAsTEHd3dy5kaWdpY2VydC5j\n"
      "b20xHzAdBgNVBAMTFkdlb1RydXN0IFRMUyBSU0EgQ0EgRzEwggEiMA0GCSqGSIb3\n"
      "DQEBAQUAA4IBDwAwggEKAoIBAQC+F+jsvikKy/65LWEx/TMkCDIuWegh1Ngwvm4Q\n"
      "yISgP7oU5d79eoySG3vOhC3w/3jEMuipoH1fBtp7m0tTpsYbAhch4XA7rfuD6whU\n"
      "gajeErLVxoiWMPkC/DnUvbgi74BJmdBiuGHQSd7LwsuXpTEGG9fYXcbTVN5SATYq\n"
      "DfbexbYxTMwVJWoVb6lrBEgM3gBBqiiAiy800xu1Nq07JdCIQkBsNpFtZbIZhsDS\n"
      "fzlGWP4wEmBQ3O67c+ZXkFr2DcrXBEtHam80Gp2SNhou2U5U7UesDL/xgLK6/0d7\n"
      "6TnEVMSUVJkZ8VeZr+IUIlvoLrtjLbqugb0T3OYXW+CQU0kBAgMBAAGjggFAMIIB\n"
      "PDAdBgNVHQ4EFgQUlE/UXYvkpOKmgP792PkA76O+AlcwHwYDVR0jBBgwFoAUTiJU\n"
      "IBiV5uNu5g/6+rkS7QYXjzkwDgYDVR0PAQH/BAQDAgGGMB0GA1UdJQQWMBQGCCsG\n"
      "AQUFBwMBBggrBgEFBQcDAjASBgNVHRMBAf8ECDAGAQH/AgEAMDQGCCsGAQUFBwEB\n"
      "BCgwJjAkBggrBgEFBQcwAYYYaHR0cDovL29jc3AuZGlnaWNlcnQuY29tMEIGA1Ud\n"
      "HwQ7MDkwN6A1oDOGMWh0dHA6Ly9jcmwzLmRpZ2ljZXJ0LmNvbS9EaWdpQ2VydEds\n"
      "b2JhbFJvb3RHMi5jcmwwPQYDVR0gBDYwNDAyBgRVHSAAMCowKAYIKwYBBQUHAgEW\n"
      "HGh0dHBzOi8vd3d3LmRpZ2ljZXJ0LmNvbS9DUFMwDQYJKoZIhvcNAQELBQADggEB\n"
      "AIIcBDqC6cWpyGUSXAjjAcYwsK4iiGF7KweG97i1RJz1kwZhRoo6orU1JtBYnjzB\n"
      "c4+/sXmnHJk3mlPyL1xuIAt9sMeC7+vreRIF5wFBC0MCN5sbHwhNN1JzKbifNeP5\n"
      "ozpZdQFmkCo+neBiKR6HqIA+LMTMCMMuv2khGGuPHmtDze4GmEGZtYLyF8EQpa5Y\n"
      "jPuV6k2Cr/N3XxFpT3hRpt/3usU/Zb9wfKPtWpoznZ4/44c1p9rzFcZYrWkj3A+7\n"
      "TNBJE0GmP2fhXhP1D/XVfIW/h0yCJGEiV9Glm/uGOa3DXHlmbAcxSyCRraG+ZBkA\n"
      "7h4SeM6Y8l/7MBRpPCz6l8Y=\n"
      "-----END CERTIFICATE-----\n";

/****************************** Feeds ***************************************/

// Setup a feed called 'test' for publishing and 'test2' for subscription.
// Notice MQTT paths for AIO follow the form: <username>/feeds/<feedname>
Adafruit_MQTT_Subscribe MOTOR_SPEED = Adafruit_MQTT_Subscribe(&mqtt, AIO_USERNAME "/feeds/motor.speed");
Adafruit_MQTT_Subscribe MOTOR_DIRECTION = Adafruit_MQTT_Subscribe(&mqtt, AIO_USERNAME "/feeds/motor.direction");
Adafruit_MQTT_Subscribe MOTOR_START = Adafruit_MQTT_Subscribe(&mqtt, AIO_USERNAME "/feeds/motor.start");


/*************************** Sketch Code ************************************/


void setup() {
  // Set up PWM
  ledcSetup(channelA, freq, resolution);
  ledcSetup(channelB, freq, resolution);

  // Attach PWM channels to GPIO pins
  ledcAttachPin(motor1A, channelA);
  ledcAttachPin(motor2A, channelB);

  Serial.begin(115200);
  delay(10);

  Serial.println(F("DC Motor over MQTT EXample"));

  // Connect to WiFi access point.
  Serial.println();
  Serial.println();
  Serial.print("Connecting to ");
  Serial.println(WLAN_SSID);

  delay(1000);

  WiFi.begin(WLAN_SSID, WLAN_PASS);
  delay(2000);

  while (WiFi.status() != WL_CONNECTED) {
    delay(500);
    Serial.print(".");
  }
  Serial.println();

  Serial.println("WiFi connected");
  Serial.println("IP address: ");
  Serial.println(WiFi.localIP());

  // Set Adafruit IO's root CA
  client.setCACert(adafruitio_root_ca);

  // register callback for feed
  MOTOR_SPEED.setCallback(MOTOR_SPEED_Callback);
  // Setup MQTT subscription for time feed.
  mqtt.subscribe(&MOTOR_SPEED);

  // register callback for feed
  MOTOR_DIRECTION.setCallback(MOTOR_DIRECTION_Callback);
  // Setup MQTT subscription for time feed.
  mqtt.subscribe(&MOTOR_DIRECTION);

  // register callback for feed
  MOTOR_START.setCallback(MOTOR_START_Callback);
  // Setup MQTT subscription for time feed.
  mqtt.subscribe(&MOTOR_START);

}

// uint32_t x=0;


void loop() {

  // Ensure the connection to the MQTT server is alive (this will make the first
  // connection and automatically reconnect when disconnected).  See the MQTT_connect
  // function definition further below.
  MQTT_connect();


  // Serial.print("Speed: ");
  // Serial.print (motorSpeed);
  // Serial.print(" Dir: ");
  // Serial.print (dir[motorDirection]);
  // Serial.print(" Sart: ");
  // Serial.println(motorStart);

  // Serial.print("DutyCycle: ");
  // Serial.println(dutyCycle);

  // wait 0.5 seconds for subscription messages
  mqtt.processPackets(500);

   runMotor();//very important
  // wait a couple seconds to avoid rate limit
  //delay(2000);
}

void MOTOR_SPEED_Callback(char* message, uint16_t len) {
  char messageBuffer[40];
  //snprintf(messageBuffer, sizeof(messageBuffer), "Color status is :: %s, len :: %u", message, len);
  //Serial.println(messageBuffer);
  Serial.println(message);
  String inString = message;//sotre the message to String

  motorSpeed  =  inString.toInt();//convert the message to Integer
  if(motorSpeed >100 || motorSpeed < 0)
  {
    motorSpeed = 0;
  }
  dutyCycle = map (motorSpeed, 0, 100, 0, 255);

}


void MOTOR_DIRECTION_Callback(char* message, uint16_t len) {
  char messageBuffer[40];
  //snprintf(messageBuffer, sizeof(messageBuffer), "Color status is :: %s, len :: %u", message, len);
  //Serial.println(messageBuffer);
  Serial.println(message);
  String inString = message;//sotre the message to String

  motorDirection  =  inString.toInt();//convert the message to Integer


}


void MOTOR_START_Callback(char* message, uint16_t len) {
  char messageBuffer[40];
  //snprintf(messageBuffer, sizeof(messageBuffer), "Color status is :: %s, len :: %u", message, len);
  //Serial.println(messageBuffer);
  Serial.println(message);

  String inString = message;//sotre the message to String

  motorStart  =  inString.toInt();//convert the message to Integer


}


void runMotor()
{

  if(motorStart ==1)
  {
      if(debug)
      {
        Serial.print("Motor running:");
        Serial.print(dir[motorDirection]);
        Serial.print(" at ");
        Serial.print(motorSpeed);
        Serial.println("%");
      }
    if(motorDirection)
    {
      ledcWrite(channelA, dutyCycle);
      ledcWrite(channelB, 0);
      delay(50);
    }else{

      ledcWrite(channelA, 0);
      ledcWrite(channelB, dutyCycle);
      delay(50);
    }
  }else{
    if(debug)
    {
      Serial.println("***Motor Stopped***");
    }
      ledcWrite(channelA, 0);
      ledcWrite(channelB, 0);
  }

}//runMotor() end

// Function to connect and reconnect as necessary to the MQTT server.
// Should be called in the loop function and it will take care if connecting.
void MQTT_connect() {
  int8_t ret;
  // Stop if already connected.
  if (mqtt.connected()) {
    return;
  }
  Serial.print("Connecting to MQTT... ");
  uint8_t retries = 3;
  while ((ret = mqtt.connect()) != 0) {  // connect will return 0 for connected
    Serial.println(mqtt.connectErrorString(ret));
    Serial.println("Retrying MQTT connection in 5 seconds...");
    mqtt.disconnect();
    delay(5000);  // wait 5 seconds
    retries--;
    if (retries == 0) {
      // basically die and wait for WDT to reset me
      while (1)
        ;
    }
  }
  Serial.println("MQTT Connected!");
}
Common Course Links
Common Course Files
Resources & references
No resources yet.
Files📁
No files available.