ESP32 ٹیوٹوریل 50/55 - دنیا میں کہیں سے بھی RGB LED کو کنٹرول کریں | SunFounder کا ESP32 کٹ
اس ٹیوٹوریل میں، ہم سیکھیں گے کہ ESP32 مائیکروکنٹرولر کا استعمال کرتے ہوئے Wi-Fi پر RGB LED کے رنگ کو کیسے کنٹرول کیا جائے، MQTT پروٹوکول اور Adafruit IO سروس کا فائدہ اٹھاتے ہوئے۔ یہ سیٹ اپ آپ کو دنیا میں کہیں سے بھی RGB LED کا رنگ تبدیل کرنے کی اجازت دیتا ہے، جو IoT ٹیکنالوجی کا ایک عملی اطلاق فراہم کرتا ہے۔ ہم یہ بھی دریافت کریں گے کہ مطلوبہ رنگ منتخب کرنے کے لیے سلائیڈرز اور کلر پکر کیسے استعمال کریں۔
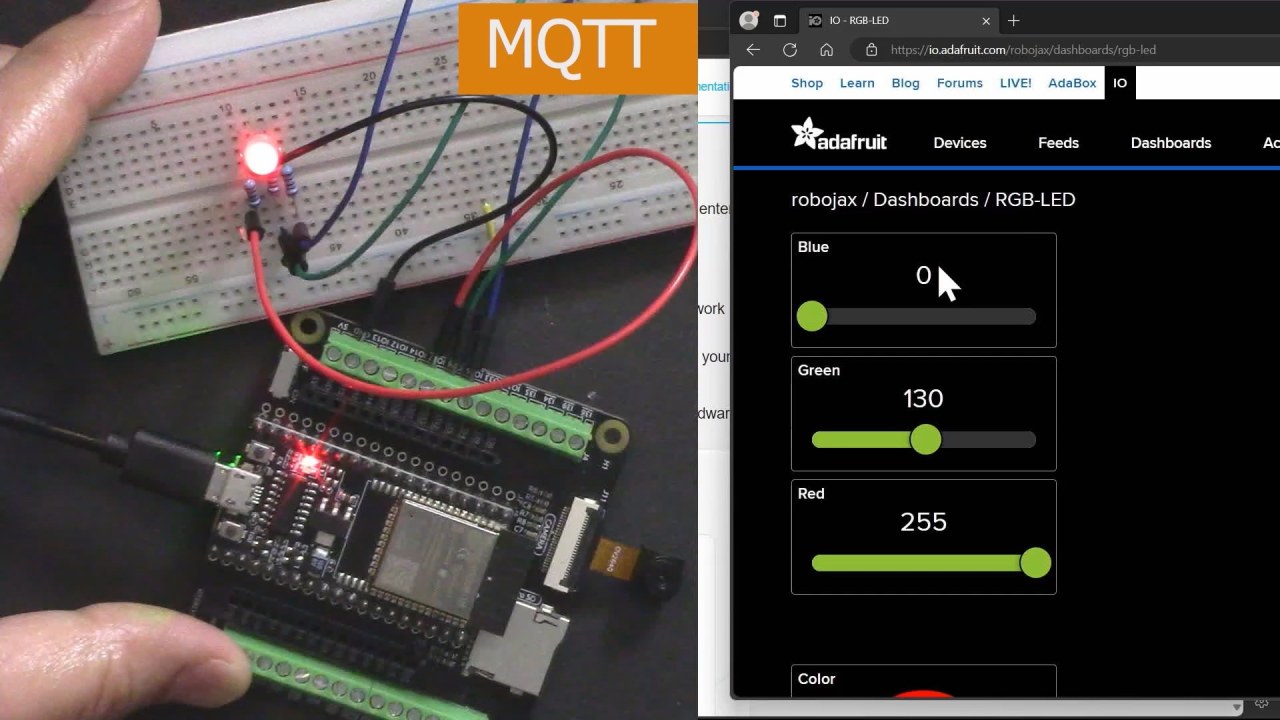
ESP32 ایک طاقتور مائیکروکنٹرولر ہے جس میں بلٹ ان Wi-Fi اور بلوٹوتھ صلاحیتیں ہیں، جو اسے IoT پروجیکٹس کے لیے مثالی بناتی ہیں۔ اس تعمیر میں، ہم ESP32 سے ایک RGB LED منسلک کریں گے اور Adafruit کے فراہم کردہ MQTT بروکر کے ذریعے اس کے رنگ کو کنٹرول کریں گے۔ ٹیوٹوریل آپ کو ہارڈویئر سیٹ اپ، وائرنگ ہدایات، اور ہر چیز کو بغیر کسی رکاوٹ کے کام کرنے کے لیے ضروری کوڈ کے ذریعے رہنمائی کرے گا (ویڈیو میں 00:00 پر)۔
ہارڈویئر کی وضاحت
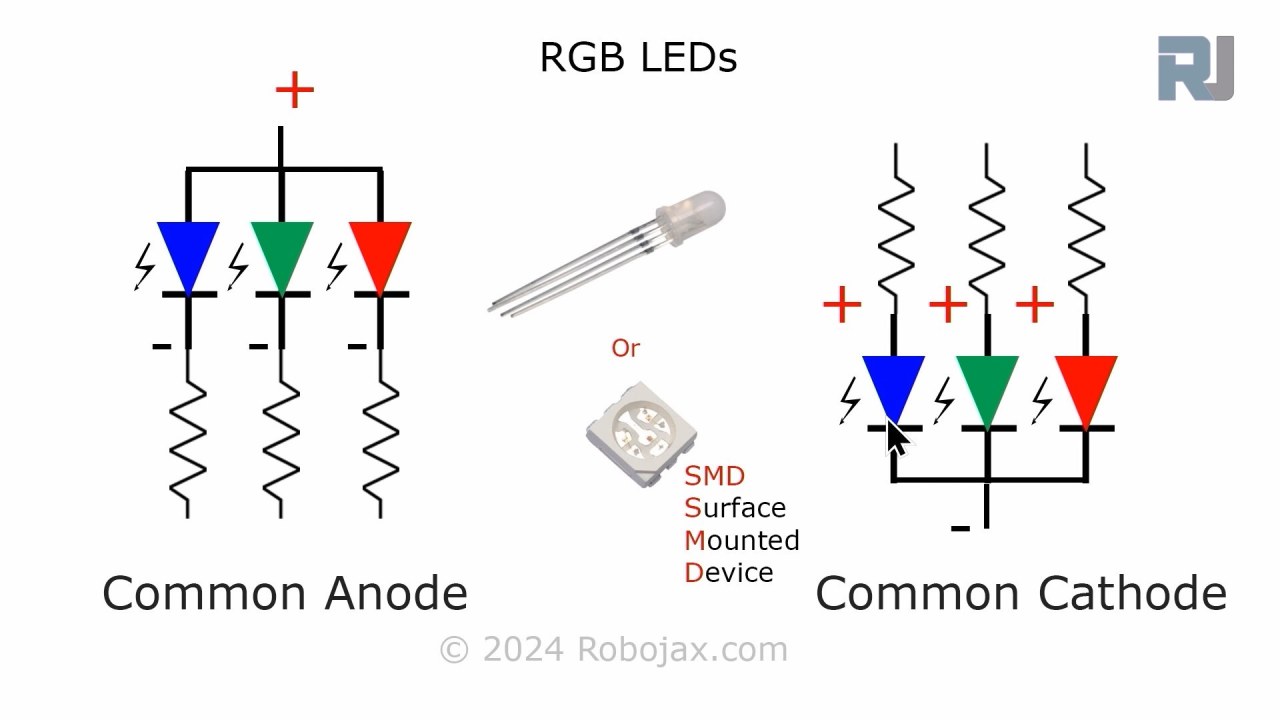
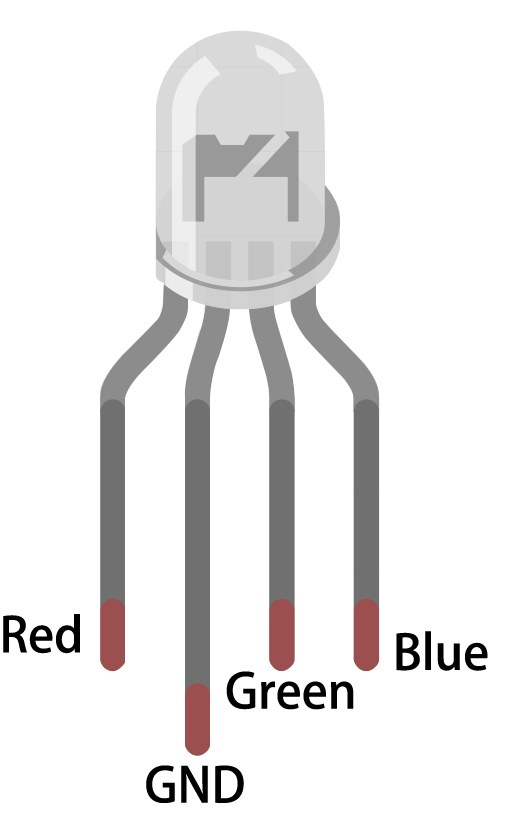
اس پروجیکٹ کے لیے، بنیادی اجزاء جو ہم استعمال کریں گے وہ ESP32 مائیکروکنٹرولر اور RGB LED ہیں۔ ESP32 Wi-Fi نیٹ ورکس سے منسلک ہونے کی صلاحیت رکھتا ہے، جس سے یہ Adafruit IO سروس کے ساتھ بات چیت کر سکتا ہے۔ RGB LED میں تین انفرادی LEDs (سرخ، سبز، اور نیلا) شامل ہیں جنہیں ملا کر رنگوں کی ایک وسیع رینج بنائی جا سکتی ہے۔
RGB LED عام اینوڈ یا عام کیتھوڈ اصول پر کام کرتا ہے، جس کا مطلب ہے کہ انفرادی LEDs کا اینوڈ (مثبت) یا کیتھوڈ (منفی) ان کے کام کرنے کے لیے مناسب طریقے سے منسلک ہونا چاہیے۔ ہر رنگ کو پلس وڈتھ ماڈیولیشن (PWM) کا استعمال کرتے ہوئے کنٹرول کیا جا سکتا ہے، جو ڈیوٹی سائیکل کو مختلف کرکے ہر LED کی چمک کو ایڈجسٹ کرتا ہے۔

ڈیٹاشیٹ کی تفصیلات
| مینوفیکچرر | سن فاؤنڈر |
|---|---|
| پارٹ نمبر | RGB LED |
| فارورڈ وولٹیج (VF) | 2.0–3.4 V |
| فارورڈ کرنٹ (IF) | 20 ایم اے |
| پیک ویو لینتھ (nm) | سرخ: 620، سبز: 525، نیلا: 465 |
| پیکیج | معیاری 4-پن |
| نوٹس / مختلف شکلیں | عام اینوڈ یا عام کیتھوڈ اختیارات دستیاب ہیں |
- کرنٹ محدود کرنے کے لیے ہر LED رنگ کے لیے 220 اوہم ریزسٹر استعمال کریں۔
- عام اینوڈ یا کیتھوڈ کنفیگریشن کے لیے درست وائرنگ کو یقینی بنائیں۔
- براؤن آؤٹ سے بچنے کے لیے ESP32 کی پاور سپلائی چیک کریں۔
- ہموار رنگ کی تبدیلیوں کے لیے PWM فریکوئنسی کو حدود میں رکھیں۔
- Adafruit IO سروس سے منسلک ہونے کے لیے Wi-Fi اسناد درست ہیں اس بات کو یقینی بنائیں۔
وائرنگ ہدایات
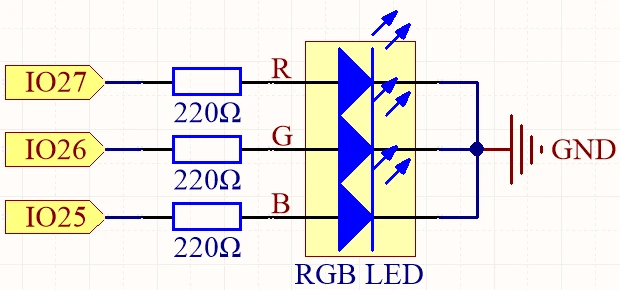
RGB LED کو ESP32 سے وائر کرنے کے لیے، سب سے پہلے RGB LED پر پنوں کی شناخت کریں۔ سب سے لمبا پن عام پن ہے۔ عام اینوڈ کنفیگریشن کے لیے، اس پن کو مثبت وولٹیج سپلائی (3.3V) سے منسلک کریں۔ باقی تین پن سرخ، سبز، اور نیلے LEDs کے مطابق ہیں۔ سرخ پن کو GPIO 27، سبز پن کو GPIO 26، اور نیلے پن کو GPIO 25 سے منسلک کریں۔ ان میں سے ہر کنکشن LEDs کے ذریعے بہنے والے کرنٹ کو محدود کرنے کے لیے 220 اوہم ریزسٹر کے ذریعے بنایا جانا چاہیے۔
اگلا، ESP32 کی گراؤنڈ (GND) کو اپنے سرکٹ کی گراؤنڈ لائن سے منسلک کریں۔ یقینی بنائیں کہ وائرنگ محفوظ ہے تاکہ کسی بھی وقفے وقفے سے کنکشن سے بچا جا سکے۔ اگر عام کیتھوڈ RGB LED استعمال کر رہے ہیں، تو عام پن کو گراؤنڈ سے منسلک کریں اور انفرادی رنگ کے پنوں کو ریزسٹرز کے ذریعے مثبت سپلائی سے منسلک کریں۔ سرکٹ کو پاور کرنے سے پہلے تمام کنکشنز کو دوبارہ چیک کریں۔
کوڈ مثالیں اور واک تھرو
Arduino کوڈ میں، ہم سرخ، سبز، اور نیلے LEDs کے لیے پنوں کی وضاحت شناخت کنندگان redPin، greenPin، اور bluePin کا استعمال کرتے ہوئے شروع کرتے ہیں۔ مزید برآں، ہم ہر رنگ کے لیے PWM چینلز کی وضاحت redChannel، greenChannel، اور blueChannel کا استعمال کرتے ہوئے کرتے ہیں۔ PWM فریکوئنسی 5000 ہرٹز پر 8-بٹ ریزولوشن کے ساتھ سیٹ کی گئی ہے۔
const int redPin = 27;
const int greenPin = 26;
const int bluePin = 25;

const int redChannel = 0;
const int greenChannel = 1;
const int blueChannel = 2;
setup() فنکشن میں، ہم PWM چینلز کو ابتدائی شکل دیتے ہیں اور متعلقہ پنوں کو منسلک کرتے ہیں۔ ہم تعریف شدہ اسناد کا استعمال کرتے ہوئے Wi-Fi نیٹ ورک سے بھی منسلک ہوتے ہیں اور Adafruit IO کے ساتھ مواصلت کے لیے MQTT کلائنٹ سیٹ اپ کرتے ہیں۔
void setup() {
  ledcSetup(redChannel, freq, resolution);
  ledcAttachPin(redPin, redChannel);
  // WiFi سے منسلک ہوں
  WiFi.begin(WLAN_SSID, WLAN_PASS);
}
مرکزی لوپ MQTT کنکشن چیک کرتا ہے اور آنے والے پیغامات پر کارروائی کرتا ہے۔ یہ موجودہ RGB اقدار کو سیریل مانیٹر پر بھی پرنٹ کرتا ہے۔ LED کا رنگ MQTT سبسکرپشنز کے ذریعے موصول ہونے والی اقدار کی بنیاد پر اپ ڈیٹ کیا جاتا ہے۔
void loop() {
  MQTT_connect();
  mqtt.processPackets(500);
  setColor();
}
مکمل کوڈ کی مزید تفصیلات کے لیے، براہ کرم مضمون کے نیچے لوڈ کردہ مکمل کوڈ کا حوالہ دیں۔
مظاہرہ / کیا توقع کریں
ایک بار جب سب کچھ سیٹ ہو جائے اور کوڈ اپ لوڈ ہو جائے، تو آپ کو RGB LED کو Adafruit IO ڈیش بورڈ کے ذریعے کی گئی رنگین تبدیلیوں کا جواب دیتے ہوئے دیکھنا چاہیے۔ جیسے ہی آپ سرخ، سبز اور نیلے رنگ کے سلائیڈرز کو ایڈجسٹ کریں گے، LED کو اسی کے مطابق اپنا رنگ تبدیل کرنا چاہیے۔ اگر آپ کو کوئی مسئلہ درپیش ہو، تو یقینی بنائیں کہ Wi-Fi کنکشن مستحکم ہے اور MQTT ٹاپک کے نام کوڈ میں بیان کردہ ناموں سے مماثل ہیں (ویڈیو میں 17:30 پر)۔
عام غلطیوں میں غلط وائرنگ، مماثل نہ ہونے والے ٹاپک نام، اور درست Wi-Fi اسناد سیٹ کرنا بھول جانا شامل ہیں۔ اگر LED روشن نہ ہو، تو ریزسٹر کنکشنز کو دوبارہ چیک کریں اور یقینی بنائیں کہ ESP32 صحیح طریقے سے پاور ہو رہا ہے۔
ویڈیو ٹائم اسٹیمپس
- 00:00 آغاز
- 2:23 پروجیکٹ کا تعارف
- 4:43 MQTT کیا ہے
- 7:55 Adafruit IO سیٹ اپ
- 14:09 وائرنگ کی وضاحت
- 16:07 کوڈ کی وضاحت
- 27:03 Arduino IDE پر ESP32 بورڈ اور COM پورٹ کا انتخاب
- 29:12 پروجیکٹ کا مظاہرہ
- 31:25 RGB LED کیا ہے؟
- 35:26 RGB رنگ
تصاویر
/***********************************************************************
 This is Arduino sketch for ESP32 to control RGB LED using MQTT service of Adafruit
 video instruction https://youtu.be/-9q1GfGsnr0
 📚⬇️ Download and resource page https://robojax.com/RJT672
 Written By Ahamd Shamshiri
 on Feb 18, 2024

  Adafruit MQTT Library ESP32 Adafruit IO SSL/TLS example


/// ref: https://www.electronicwings.com/esp32/esp32-mqtt-client
*/
// Define RGB LED pins
const int redPin = 27;
const int greenPin = 26;
const int bluePin = 25;

// Define PWM channels
const int redChannel = 0;
const int greenChannel = 1;
const int blueChannel = 2;

// Define PWM frequency and resolution
const int freq = 5000;
const int resolution = 8;
int colorR, colorG, colorB;

#include <WiFi.h>
#include "WiFiClientSecure.h"
#include "Adafruit_MQTT.h"
#include "Adafruit_MQTT_Client.h"

/************************* WiFi Access Point *********************************/


#define WLAN_SSID "Book"
#define WLAN_PASS "888-888"

/************************* Adafruit.io Setup *********************************/

#define AIO_SERVER "io.adafruit.com"

// Using port 8883 for MQTTS
#define AIO_SERVERPORT 8883

// Adafruit IO Account Configuration
// (to obtain these values, visit https://io.adafruit.com and click on Active Key)
// #define AIO_USERNAME "YOUR_ADAFRUIT_IO_USERNAME"
// #define AIO_KEY      "YOUR_ADAFRUIT_IO_KEY"

#define AIO_USERNAME "robojax"
#define AIO_KEY "aio_NBQQ75Rn7liRNcRn5uGUBMsBYmjD"

/************ Global State (you don't need to change this!) ******************/

// WiFiFlientSecure for SSL/TLS support
WiFiClientSecure client;

// Setup the MQTT client class by passing in the WiFi client and MQTT server and login details.
Adafruit_MQTT_Client mqtt(&client, AIO_SERVER, AIO_SERVERPORT, AIO_USERNAME, AIO_KEY);


// io.adafruit.com root CA
const char* adafruitio_root_ca = \
      "-----BEGIN CERTIFICATE-----\n"
      "MIIEjTCCA3WgAwIBAgIQDQd4KhM/xvmlcpbhMf/ReTANBgkqhkiG9w0BAQsFADBh\n"
      "MQswCQYDVQQGEwJVUzEVMBMGA1UEChMMRGlnaUNlcnQgSW5jMRkwFwYDVQQLExB3\n"
      "d3cuZGlnaWNlcnQuY29tMSAwHgYDVQQDExdEaWdpQ2VydCBHbG9iYWwgUm9vdCBH\n"
      "MjAeFw0xNzExMDIxMjIzMzdaFw0yNzExMDIxMjIzMzdaMGAxCzAJBgNVBAYTAlVT\n"
      "MRUwEwYDVQQKEwxEaWdpQ2VydCBJbmMxGTAXBgNVBAsTEHd3dy5kaWdpY2VydC5j\n"
      "b20xHzAdBgNVBAMTFkdlb1RydXN0IFRMUyBSU0EgQ0EgRzEwggEiMA0GCSqGSIb3\n"
      "DQEBAQUAA4IBDwAwggEKAoIBAQC+F+jsvikKy/65LWEx/TMkCDIuWegh1Ngwvm4Q\n"
      "yISgP7oU5d79eoySG3vOhC3w/3jEMuipoH1fBtp7m0tTpsYbAhch4XA7rfuD6whU\n"
      "gajeErLVxoiWMPkC/DnUvbgi74BJmdBiuGHQSd7LwsuXpTEGG9fYXcbTVN5SATYq\n"
      "DfbexbYxTMwVJWoVb6lrBEgM3gBBqiiAiy800xu1Nq07JdCIQkBsNpFtZbIZhsDS\n"
      "fzlGWP4wEmBQ3O67c+ZXkFr2DcrXBEtHam80Gp2SNhou2U5U7UesDL/xgLK6/0d7\n"
      "6TnEVMSUVJkZ8VeZr+IUIlvoLrtjLbqugb0T3OYXW+CQU0kBAgMBAAGjggFAMIIB\n"
      "PDAdBgNVHQ4EFgQUlE/UXYvkpOKmgP792PkA76O+AlcwHwYDVR0jBBgwFoAUTiJU\n"
      "IBiV5uNu5g/6+rkS7QYXjzkwDgYDVR0PAQH/BAQDAgGGMB0GA1UdJQQWMBQGCCsG\n"
      "AQUFBwMBBggrBgEFBQcDAjASBgNVHRMBAf8ECDAGAQH/AgEAMDQGCCsGAQUFBwEB\n"
      "BCgwJjAkBggrBgEFBQcwAYYYaHR0cDovL29jc3AuZGlnaWNlcnQuY29tMEIGA1Ud\n"
      "HwQ7MDkwN6A1oDOGMWh0dHA6Ly9jcmwzLmRpZ2ljZXJ0LmNvbS9EaWdpQ2VydEds\n"
      "b2JhbFJvb3RHMi5jcmwwPQYDVR0gBDYwNDAyBgRVHSAAMCowKAYIKwYBBQUHAgEW\n"
      "HGh0dHBzOi8vd3d3LmRpZ2ljZXJ0LmNvbS9DUFMwDQYJKoZIhvcNAQELBQADggEB\n"
      "AIIcBDqC6cWpyGUSXAjjAcYwsK4iiGF7KweG97i1RJz1kwZhRoo6orU1JtBYnjzB\n"
      "c4+/sXmnHJk3mlPyL1xuIAt9sMeC7+vreRIF5wFBC0MCN5sbHwhNN1JzKbifNeP5\n"
      "ozpZdQFmkCo+neBiKR6HqIA+LMTMCMMuv2khGGuPHmtDze4GmEGZtYLyF8EQpa5Y\n"
      "jPuV6k2Cr/N3XxFpT3hRpt/3usU/Zb9wfKPtWpoznZ4/44c1p9rzFcZYrWkj3A+7\n"
      "TNBJE0GmP2fhXhP1D/XVfIW/h0yCJGEiV9Glm/uGOa3DXHlmbAcxSyCRraG+ZBkA\n"
      "7h4SeM6Y8l/7MBRpPCz6l8Y=\n"
      "-----END CERTIFICATE-----\n";

/****************************** Feeds ***************************************/

// Setup a feed called 'test' for publishing and 'test2' for subscription.
// Notice MQTT paths for AIO follow the form: <username>/feeds/<feedname>
Adafruit_MQTT_Subscribe COLOR_R = Adafruit_MQTT_Subscribe(&mqtt, AIO_USERNAME "/feeds/rgb-led-color.red");
Adafruit_MQTT_Subscribe COLOR_G = Adafruit_MQTT_Subscribe(&mqtt, AIO_USERNAME "/feeds/rgb-led-color.green");
Adafruit_MQTT_Subscribe COLOR_B = Adafruit_MQTT_Subscribe(&mqtt, AIO_USERNAME "/feeds/rgb-led-color.blue");
Adafruit_MQTT_Subscribe COLOR_RGB = Adafruit_MQTT_Subscribe(&mqtt, AIO_USERNAME "/feeds/color-picker");


/*************************** Sketch Code ************************************/


void setup() {
  // Set up PWM channels
  ledcSetup(redChannel, freq, resolution);
  ledcSetup(greenChannel, freq, resolution);
  ledcSetup(blueChannel, freq, resolution);

  // Attach pins to corresponding PWM channels
  ledcAttachPin(redPin, redChannel);
  ledcAttachPin(greenPin, greenChannel);
  ledcAttachPin(bluePin, blueChannel);

  Serial.begin(115200);
  delay(10);

  Serial.println(F("Adafruit IO MQTTS (SSL/TLS) Example"));

  // Connect to WiFi access point.
  Serial.println();
  Serial.println();
  Serial.print("Connecting to ");
  Serial.println(WLAN_SSID);

  delay(1000);

  WiFi.begin(WLAN_SSID, WLAN_PASS);
  delay(2000);

  while (WiFi.status() != WL_CONNECTED) {
    delay(500);
    Serial.print(".");
  }
  Serial.println();

  Serial.println("WiFi connected");
  Serial.println("IP address: ");
  Serial.println(WiFi.localIP());

  // Set Adafruit IO's root CA
  client.setCACert(adafruitio_root_ca);

  // register callback for feed
  COLOR_R.setCallback(color_R_Callback);
  // Setup MQTT subscription for time feed.
  mqtt.subscribe(&COLOR_R);

    // register callback for feed
  COLOR_G.setCallback(color_G_Callback);
  // Setup MQTT subscription for time feed.
  mqtt.subscribe(&COLOR_G);

    // register callback for feed
  COLOR_B.setCallback(color_B_Callback);
  // Setup MQTT subscription for time feed.
  mqtt.subscribe(&COLOR_B);

    // register callback for feed
  COLOR_RGB.setCallback(color_RGB_Callback);
  // Setup MQTT subscription for time feed.
  mqtt.subscribe(&COLOR_RGB);


}

// uint32_t x=0;


void loop() {

  // Ensure the connection to the MQTT server is alive (this will make the first
  // connection and automatically reconnect when disconnected).  See the MQTT_connect
  // function definition further below.
  MQTT_connect();

  Serial.print("R: ");
  Serial.print (colorR);
  Serial.print(" G: ");
  Serial.print (colorG);
  Serial.print(" B: ");
  Serial.println(colorB);

  // wait 0.5 seconds for subscription messages
  mqtt.processPackets(500);
  setColor();

  // wait a couple seconds to avoid rate limit
  //delay(2000);
}

void color_R_Callback(char* message, uint16_t len) {
  char messageBuffer[40];
  //snprintf(messageBuffer, sizeof(messageBuffer), "Color status is :: %s, len :: %u", message, len);
  //Serial.println(messageBuffer);
  Serial.println(message);
  String inString = message;//sotre the message to String

  colorR  =  inString.toInt();//convert the message to Integer
  if(colorR >255 || colorR < 0)
  {
    colorR = 0;
  }

}

void color_G_Callback(char* message, uint16_t len) {
  char messageBuffer[40];
  //snprintf(messageBuffer, sizeof(messageBuffer), "Color status is :: %s, len :: %u", message, len);
  //Serial.println(messageBuffer);
  Serial.println(message);
  String inString = message;//sotre the message to String

  colorG  =  inString.toInt();//convert the message to Integer
  if(colorG >255 || colorG < 0)
  {
    colorG = 0;
  }

}

void color_B_Callback(char* message, uint16_t len) {
  char messageBuffer[40];
  //snprintf(messageBuffer, sizeof(messageBuffer), "Color status is :: %s, len :: %u", message, len);
  //Serial.println(messageBuffer);
  Serial.println(message);
  String inString = message;//sotre the message to String

  colorB  =  inString.toInt();//convert the message to Integer
  if(colorB >255 || colorB < 0)
  {
    colorB = 0;
  }

}

void color_RGB_Callback(char* message, uint16_t len) {
  char messageBuffer[40];
  //snprintf(messageBuffer, sizeof(messageBuffer), "Color status is :: %s, len :: %u", message, len);
  //Serial.println(messageBuffer);
  Serial.println(message);
  String newColor = String( message);//
  if(newColor.length() == 7)
  {

    String theColorR = newColor.substring(1, 3);//extract B2 from  #B2a48d for example
    String theColorG = newColor.substring(3, 5);//extract a4 from  #B2a48d for example
    String theColorB = newColor.substring(5, 7);//extract 8d from  #B2a48d for example

    colorR = StrToHex(theColorR.c_str());//convert String to HEX for R
    colorG = StrToHex(theColorG.c_str());//convert String to HEX for G
    colorB = StrToHex(theColorB.c_str());//convert String to HEX for B


  }


}

//from https://stackoverflow.com/questions/44683071/convert-string-as-hex-to-hexadecimal
uint64_t StrToHex(const char* str)
{
  return (uint64_t) strtoull(str, 0, 16);
}

void setColor() {
  // For common-anode RGB LEDs, use 255 minus the color value
  ledcWrite(redChannel, colorR);
  ledcWrite(greenChannel, colorG);
  ledcWrite(blueChannel, colorB);
}


// Function to connect and reconnect as necessary to the MQTT server.
// Should be called in the loop function and it will take care if connecting.
void MQTT_connect() {
  int8_t ret;
  // Stop if already connected.
  if (mqtt.connected()) {
    return;
  }
  Serial.print("Connecting to MQTT... ");
  uint8_t retries = 3;
  while ((ret = mqtt.connect()) != 0) {  // connect will return 0 for connected
    Serial.println(mqtt.connectErrorString(ret));
    Serial.println("Retrying MQTT connection in 5 seconds...");
    mqtt.disconnect();
    delay(5000);  // wait 5 seconds
    retries--;
    if (retries == 0) {
      // basically die and wait for WDT to reset me
      while (1)
        ;
    }
  }
  Serial.println("MQTT Connected!");
}
Common Course Links
Common Course Files
آپ کو جن چیزوں کی ضرورت ہو سکتی ہے
-
علی ایکسپریسESP32-S3 N16R8 on AliExpresss.click.aliexpress.com
وسائل اور حوالہ جات
ابھی تک کوئی وسائل نہیں۔
فائلیں📁
ڈیٹا شیٹ (پی ڈی ایف)
-
ESP32 C3 Datasheet English
esp32-c3_datasheet_en[1].pdf0.86 MB