Lektion 21/31: Verwendung der Infrarot-Fernbedienung mit Arduino | SunFounder Robojax
Einführung
In dieser Lektion erkunden wir die faszinierende Welt der Infrarot-Kommunikation (IR), indem wir ein Projekt aufbauen, das Signale einer Standard-Fernbedienung mit einem Arduino decodiert. Dieses Projekt ermöglicht es Ihnen zu erkennen, welche Taste auf einer IR-Fernbedienung gedrückt wird, und entsprechende Aktionen auszulösen, wie zum Beispiel das Einschalten eines Summers. Die Fähigkeit, mit IR-Fernbedienungen zu kommunizieren, eröffnet eine breite Palette praktischer Anwendungen, von einfacher Hausautomation bis hin zu individuellen Steuerungssystemen.
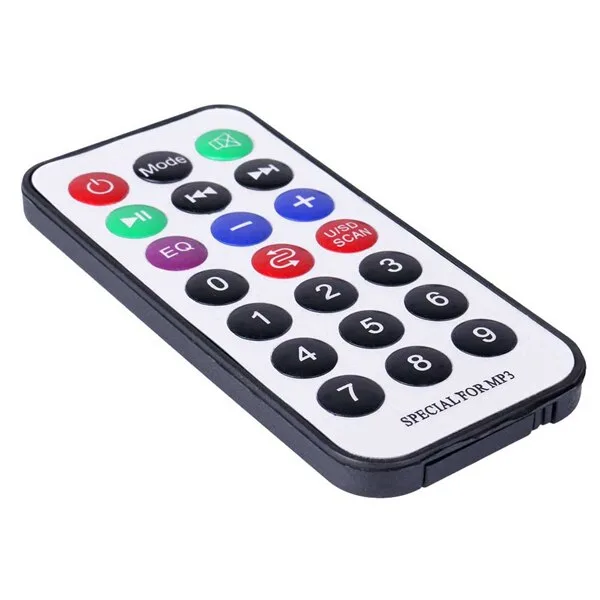
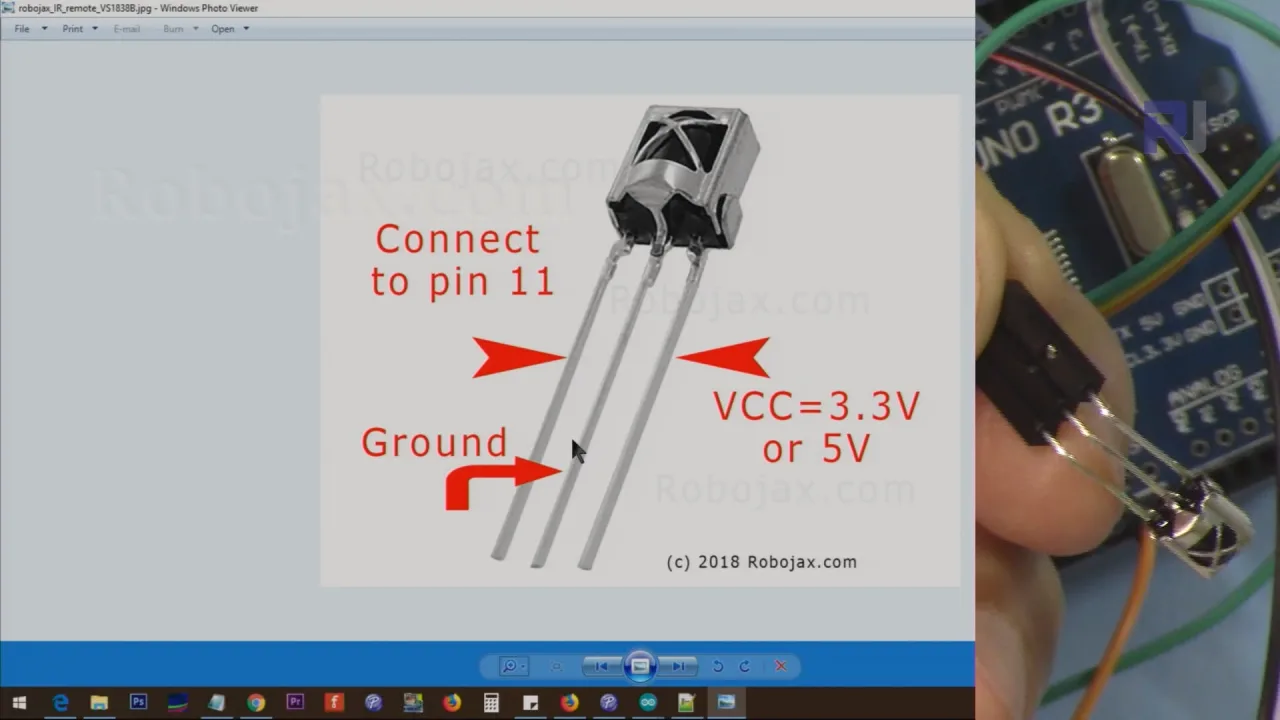
Hier sind einige inspirierende Ideen, was Sie mit dieser Technologie bauen können:
- Universelle Fernbedienungs-Ersatzlösung: Erstellen Sie eine individuelle Fernbedienung für Ihren Fernseher, Ihre Audioanlage oder andere IR-gesteuerte Geräte.
- Hausautomation: Steuern Sie Lichter, Ventilatoren oder andere Geräte durch Drücken einer Taste auf einer Standard-Fernbedienung.
- Interaktive Projekte: Bauen Sie ein Sicherheitssystem, das einen Alarm auslöst, wenn eine bestimmte Taste gedrückt wird.
- Robotiksteuerung: Verwenden Sie eine IR-Fernbedienung, um die Bewegung und Aktionen eines Roboters drahtlos zu steuern.
- Barrierefreiheitshilfen: Entwickeln Sie eine einfache Fernbedienung mit großen Tasten für Personen mit eingeschränkter Mobilität.
Hardware & Komponenten
Dieses Projekt basiert auf einigen einfachen Komponenten, die alle typischerweise in Starter-Kits wie dem SunFounder 3-in-1-Kit enthalten sind. Sie benötigen:
- Ein Arduino-Board (z. B. Uno)
- Ein IR-Empfängermodul (z. B. TSOP38238 oder ähnlich)
- Eine Standard-IR-Fernbedienung (mit einer CR2025-Batterie)
- Einen passiven Summer
- Jumper-Kabel und ein Breadboard
Verdrahtungsanleitung
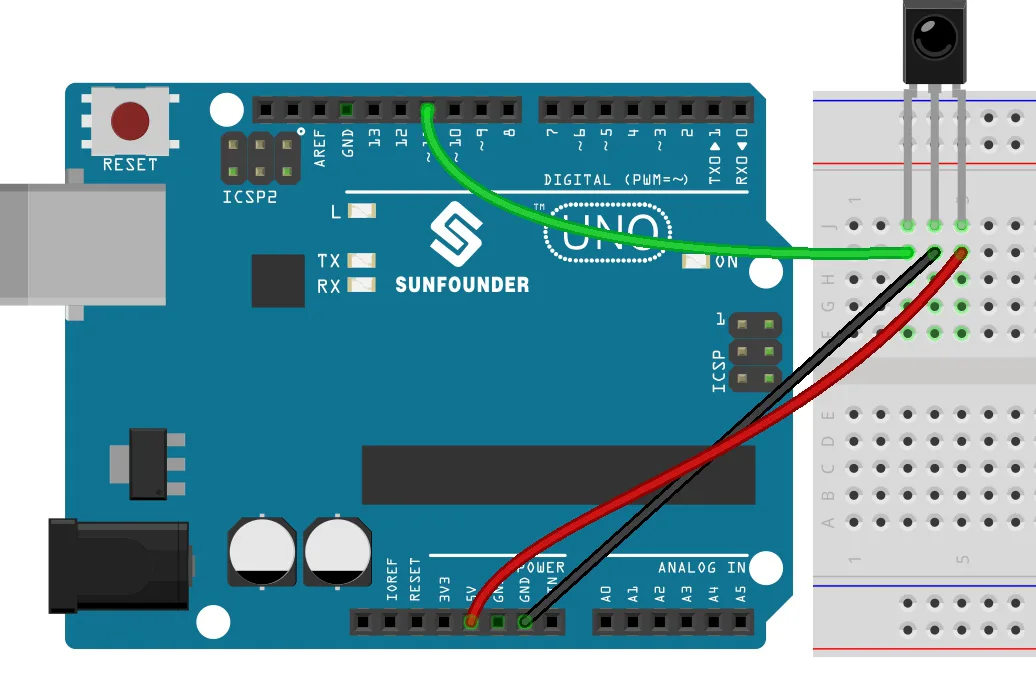
Hier ist das einfache Verdrahtungsdiagramm für dieses Projekt. Der IR-Empfänger ist die Schlüsselkomponente. Wenn Sie auf die gekrümmte Oberfläche des Empfängers schauen, ist die Pin-Anordnung wie folgt:
- Rechter Pin: Verbinden Sie ihn mit dem 5V-Pin am Arduino.
- Mittlerer Pin: Verbinden Sie ihn mit dem GND-Pin am Arduino.
- Linker Pin (Signal): Verbinden Sie ihn mit dem digitalen Pin 11 am Arduino.
Zusätzlich, für den Aktions-Teil des Projekts, verbinden Sie das positive (längere) Bein des Summers mit dem digitalen Pin 2 und das andere Bein mit GND.
Code-Erklärung
Dieses Projekt verwendet die IRremote-Bibliothek, um die komplexe Aufgabe der Decodierung der Infrarotsignale zu bewältigen. Der Code ist so strukturiert, dass er zuerst die spezifischen Codes Ihrer Fernbedienung lernt und sie dann verwendet, um Aktionen auszulösen. Lassen Sie uns die benutzerkonfigurierbaren Teile aufschlüsseln.
Zuerst definieren wir den Pin, an den das Signalkabel des IR-Empfängers angeschlossen ist. Dies ist eine entscheidende Konfiguration, die Sie mit Ihrer physischen Verdrahtung abgleichen müssen.
const int IR_RECEIVE_PIN = 11; // Definieren Sie die Pinnummer für den IR-SensorIn der setup()-Funktion wird der IR-Empfänger mit dem gerade definierten Pin initialisiert. Dies teilt der Bibliothek mit, auf diesem Pin auf Signale zu lauschen.
IrReceiver.begin(IR_RECEIVE_PIN, ENABLE_LED_FEEDBACK); // Starten Sie den IR-EmpfängerDer Kern der Aktionslogik befindet sich in der loop(). Der Code prüft, ob eine Taste gedrückt wurde, und decodiert sie. Die Funktion decodeKeyValue() ist eine benutzerdefinierte Funktion, die den rohen hexadezimalen Code von der Fernbedienung in eine lesbare Zeichenfolge wie "POWER" oder "MUTE" übersetzt. Dies ist der Teil, den Sie an Ihre spezifische Fernbedienung anpassen werden. Der Beispielcode definiert einen buzzerPin und schaltet ihn nur ein, wenn die "POWER"-Taste gedrückt wird.
const int buzzerPin = 2; // Definieren Sie den Pin für den Summer
// ... innerhalb der loop()
if (decodedValue == "POWER") {
    digitalWrite(buzzerPin, HIGH); // Schalten Sie den Summer ein
} else {
    digitalWrite(buzzerPin, LOW); // Schalten Sie den Summer aus
}
So verwenden Sie es: Die Funktion decodeKeyValue() ist der Schlüssel zur Anpassung dieses Projekts. Um sie mit Ihrer eigenen Fernbedienung zu verwenden, müssen Sie zuerst den Code mit geöffnetem Serial Monitor ausführen. Drücken Sie jede Taste auf Ihrer Fernbedienung und notieren Sie den hexadezimalen Wert, der für jede Taste ausgegeben wird. Aktualisieren Sie dann die switch-Anweisung in der Funktion decodeKeyValue(), um diese Werte aussagekräftigen Namen zuzuordnen. Sie können diese Namen dann in Ihren if-Anweisungen verwenden, um verschiedene Aktionen auszulösen, genau wie das Beispiel es für die "POWER"-Taste tut.
Live-Projekt & Demonstration
Sobald der Code hochgeladen ist, öffnen Sie den Serial Monitor mit einer Baudrate von 9600. Richten Sie Ihre Fernbedienung auf den IR-Empfänger und drücken Sie eine Taste. Der Serial Monitor zeigt den entsprechenden Tastennamen an (z. B. "POWER", "MUTE"). Um die Aktion in Aktion zu sehen, drücken Sie die "POWER"-Taste. Sie werden hören, wie der Summer einschaltet. Das Drücken einer anderen Taste, wie z. B. "MUTE", schaltet den Summer aus. Dies demonstriert ein einfaches, aber leistungsstarkes Konzept: die Verwendung einer Fernbedienung zur Auslösung digitaler Ausgänge auf Ihrem Arduino.
Kapitel
- [00:00] Einführung in die Infrarot-Fernbedienung mit Arduino
- [01:25] Überblick über den IR-Empfänger und -Sender
- [02:24] Verständnis des IR-Empfängermoduls und der Verkabelung
- [03:31] Installation der IRremote-Bibliothek
- [04:22] Öffnen und Erklären des Dekodierungscodes
- [07:29] Hochladen des Codes und Testen der Fernbedienungstasten
- [08:41] Hinzufügen einer Aktion: Steuerung eines Summers
- [10:37] Vorschau auf kommende IR-Projekte
Bilder
/*
Lesson 21/31: Decoding Infrared from remote
Get this code and watch video Download and resource page https://robojax.com/RJT604
YouTube video https://www.youtube.com/watch?v=EAlqaVy8fYY

*/
#include <IRremote.h>

const int IR_RECEIVE_PIN = 11;  // Define the pin number for the IR Sensor
String lastDecodedValue = "";  // Variable to store the last decoded value

void setup() {
  Serial.begin(9600);                                     // Start serial communication at 9600 baud rate
  IrReceiver.begin(IR_RECEIVE_PIN, ENABLE_LED_FEEDBACK);  // Start the IR receiver
}

void loop() {
  if (IrReceiver.decode()) {
    String decodedValue = decodeKeyValue(IrReceiver.decodedIRData.command);
    if (decodedValue != "ERROR") {
      Serial.println(decodedValue);
      delay(100);
    }
    IrReceiver.resume();  // Enable receiving of the next value
  }
}

String decodeKeyValue(long result)
{
  switch(result){
    case 0x16:
      return "0";
    case 0xC:
      return "1";
    case 0x18:
      return "2";
    case 0x5E:
      return "3";
    case 0x8:
      return "4";
    case 0x1C:
      return "5";
    case 0x5A:
      return "6";
    case 0x42:
      return "7";
    case 0x52:
      return "8";
    case 0x4A:
      return "9";
    case 0x9:
      return "+";
    case 0x15:
      return "-";
    case 0x7:
      return "EQ";
    case 0xD:
      return "U/SD";
    case 0x19:
      return "CYCLE";
    case 0x44:
      return "PLAY/PAUSE";
    case 0x43:
      return "FORWARD";
    case 0x40:
      return "BACKWARD";
    case 0x45:
      return "POWER";
    case 0x47:
      return "MUTE";
    case 0x46:
      return "MODE";
    case 0x0:
      return "ERROR";
    default :
      return "ERROR";
    }
}
Common Course Links
Common Course Files
Dinge, die Sie vielleicht brauchen
-
Amazon
-
eBay
Ressourcen & Referenzen
Noch keine Ressourcen vorhanden.
Dateien📁
Arduino-Bibliotheken (zip)
-
SunFounder 3-in-1 Smart Car Lernkit Quellcode
3in1-kit-main-v2.zip12.80 MB




![*NEW!* Compatible with Arduino UNO R4 WiFi [ABX00087] - Renesas RA4M1 / ESP32-S3](https://i.ebayimg.com/images/g/xpEAAOSwmCFmTed8/s-l225.jpg)