Home Automation: How to use 7 Program 0.1s to 9999 minutes Relay Timer Drok XY-LJ02
Home Automation: How to use 7 Program 0.1s to 9999 minutes Relay Timer Drok XY-LJ02
All main components of the module is explained. The module is tested with different load and voltages.
Main Specifications
- Minimum time set: 0.1 second
- Maximum time set: 9999 minutes
- Maximum time set: 166.65 hours
- Sleep mode: after 5 minutes
- Power supply 6V to 24V (max 30V)
Chapters of this video
- 01:49 Hardware Explained
- 05:21 Wiring Explained
- 07:03 General settings
- 10:41 P1 explained
- 12:18 P2 explained
- 13:15 P3 explained
- 14:21 P4 explained
- 15:30 P5 explained
- 17:03 P6 explained
- 18:29 P7 explained
UART:9600,8,1
|
CMD |
Function |
|
read |
Read system parameters |
|
OP:xxxx OP:xxx.x OP:xx.xx OP:x.x.x.x |
1s 0.1s 0.01s 1 min |
|
CL:xxxx CL:xxx.x CL:xx.xx CL:x.x.x.x |
1s 0.1s 0.01s 1 min |
|
LP:xxxx |
Settings Cycles |
|
on |
Relay enable |
|
off |
Relay disable |
|
PX |
Set the working mode (P1~P7) |
Where to buy this from?
-Search eBay (no affiliation) Here-Search Amazon Canada (no affiliation) Here
-Search Amazon USA (no affiliation) Here
-Search AliExpress (no affiliation) Here
-Search Banggood (no affiliation) Here
Browser Screenshot Gallery
Click on the images below:
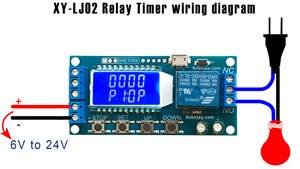
XY-LJ02 Wiring
Click on image to enlarge
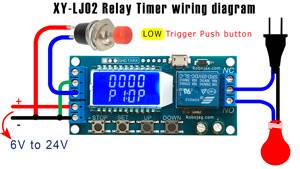
XY-LJ02 Wiring: Low Trigger with Push button
Click on image to enlarge
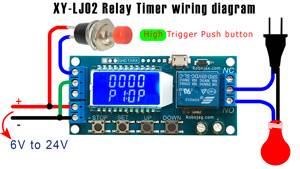
XY-LJ02 Wiring: HIGH Trigger with Push button
Click on image to enlarge
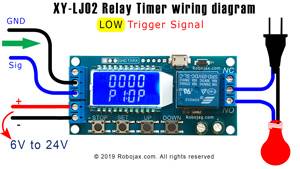
XY-LJ02 Wiring: Low Trigger with signal
Click on image to enlarge
XY-LJ02 Wiring: High Trigger with signal
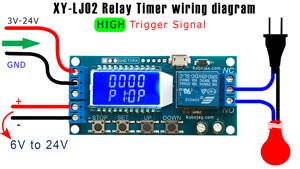
Click on image to enlarge
Datasheet of Components used in this module
- Datasheet: XL1509 DC Buck Converter (pdf)
- RAM Mapping 32x4 LCD Controller for I/O MCU (web page)
- Datasheet: N76E003AT20 Microcontroller (web page)
- Datasheet: 4 PIN DIP PHOTOTRANSISTOR PHOTOCOUPLER (pdf)
- Robojax Crash Course on Arduino: Learn Arduino in 30 Minutes (code and video)
- ----
- Robojax Arduino Course on Udemy
- Get Early Access to my videos via Patreon
