

Control 4 DC motor using L293D DC motor sheidl for Arduino
Control 4 DC motor using L293D DC motor sheidl for Arduino

Using this L293D motor shield, we can control 4 DC motor operating from 4.5V to 36V with 600mA current per channel.
To use this motor sheield, you need to install the library by following the instructions below.
Code learn and use L293D chip without shield Is here
Installign the library
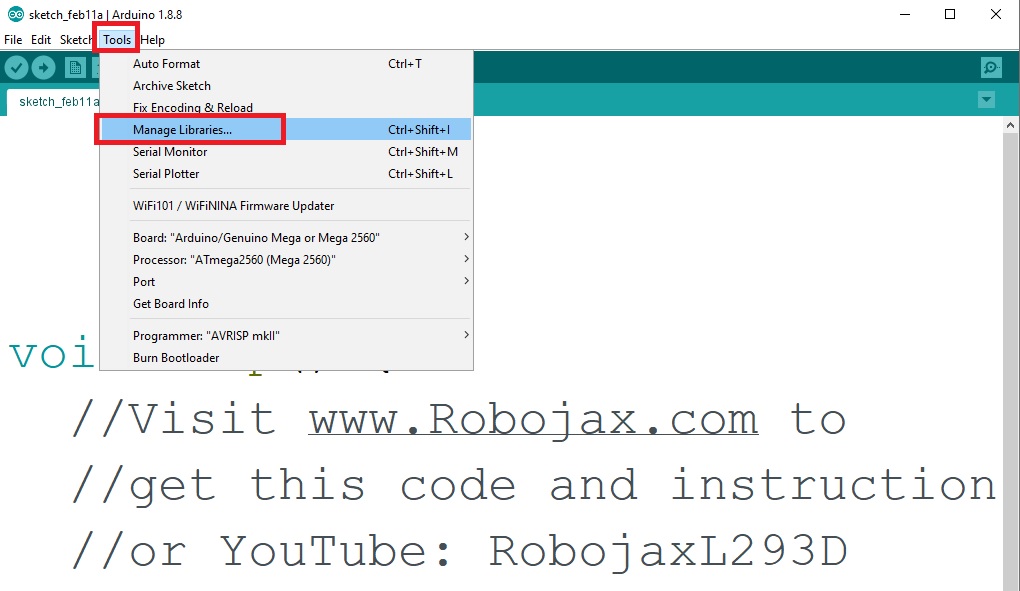
1-Open your Arduino IDE (Arduino program). you can get it from www.arduino.cc2-Click on "Tools" and then click on "Manage libraries"
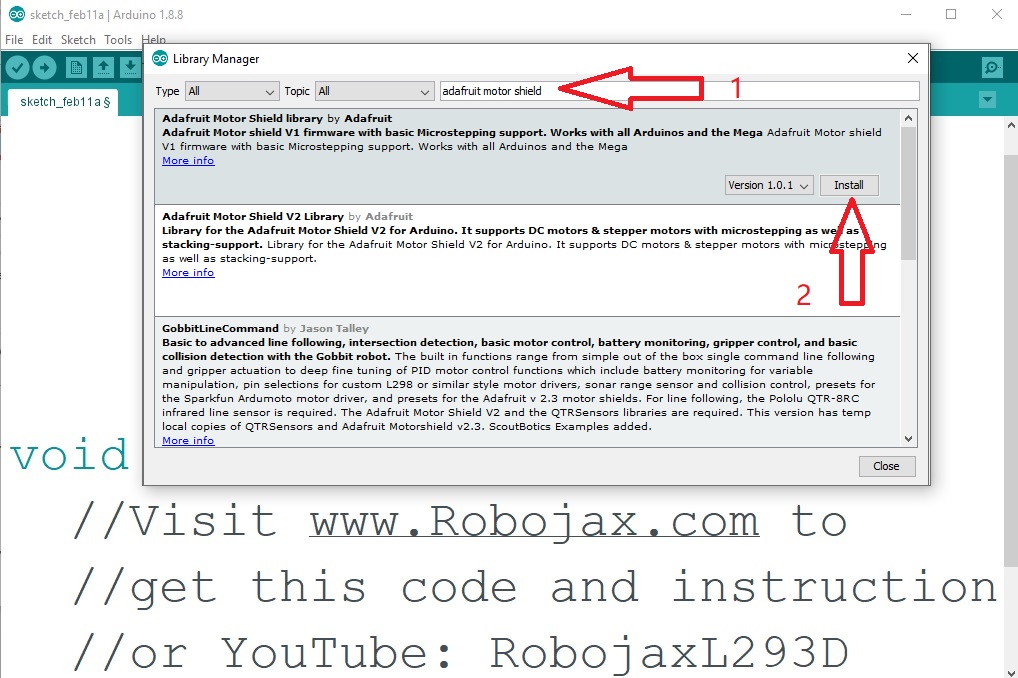
3-Then wait until the screen is ready for typing, then type "Adafruit Motor Shield" and you will see "Adafruit Motor Shield library" by "Adafruit" and click on "install" as shown in screen shot bellow
L293D Motor Sheild Wiring for 4 motors
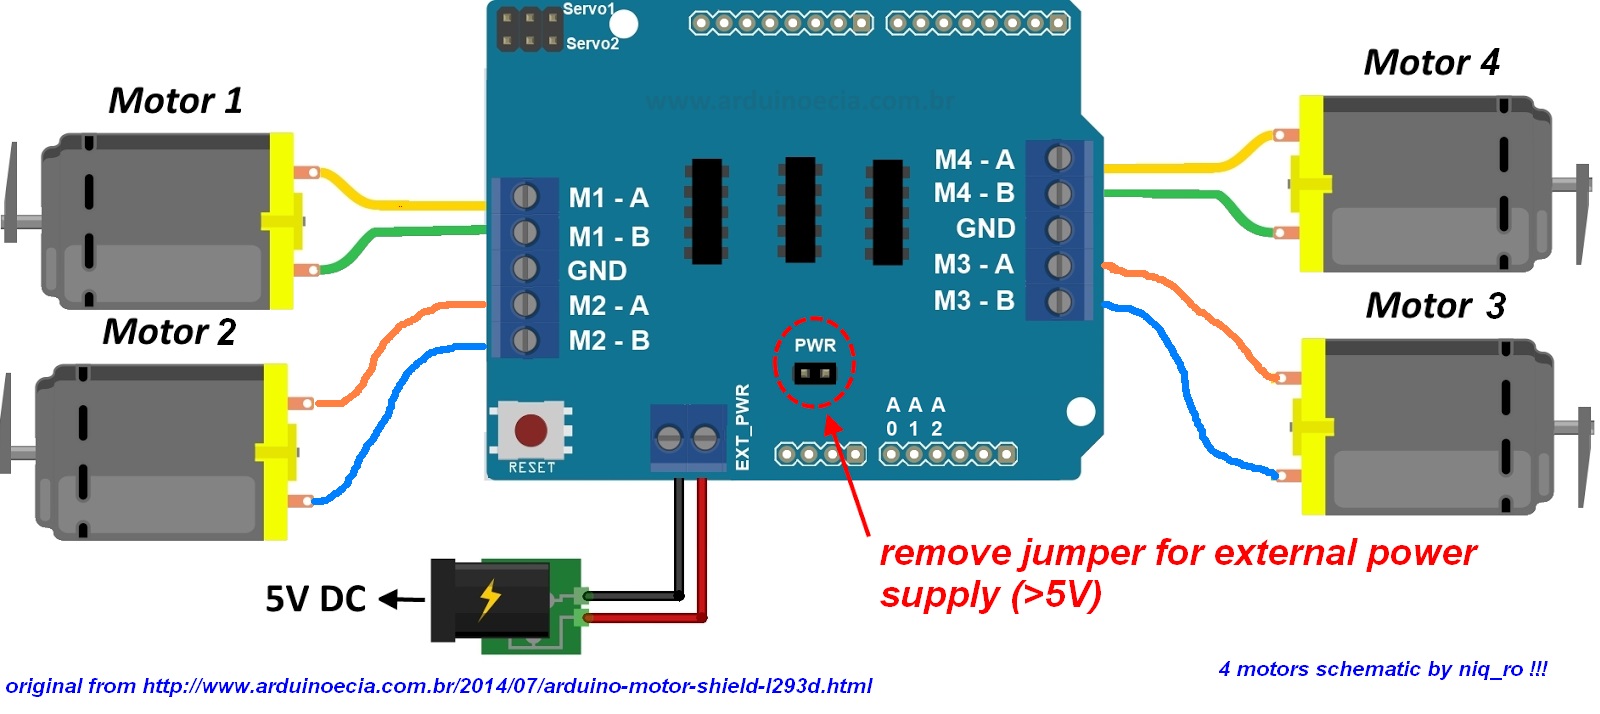
Click on image to enlarge
Resources for this sketch
- Introduction to DS1307 Code and Video
- L293D Library (from Robojax.com)
- Adafruit Motor Shield L293D Library (from GitHub)
- L293x Quadruple Half-H Drivers datasheet(pdf)
- 74HC595 8-Bit Shift Registers With 3-State Output Registers datasheet(pdf)
- L293D Motor Shield Manual
- SunFounder Motor Shield Wiki
- Robojax Arduino Course on Udemy
- Get Early Access to my videos via Patreon
 /*
 *
 *   L293D motor shield library

    Original  Adafruit-Motor-Shield-library
 Library URL: https://github.com/adafruit/Adafruit-Motor-Shield-library
 *
 * This code is to control 4 DC motor in both CW and CCW direction
 * I have modified the code to allow you better understand how to control DC mototor

 * learn how to use L293D chip without the shield https://youtu.be/akQoGNUzhHI
 *  *
 * Written by Ahmad Shamshiri on Feb 11, 2021 in Ajax, Ontario, Canada
 * www.Robojax.com
 *
  *
 * This code is "AS IS" without warranty or liability. Free to be used as long as you keep this note intact.*
 * This code has been download from Robojax.com
    This program is free software: you can redistribute it and/or modify
    it under the terms of the GNU General Public License as published by
    the Free Software Foundation, either version 3 of the License, or
    (at your option) any later version.

    This program is distributed in the hope that it will be useful,
    but WITHOUT ANY WARRANTY; without even the implied warranty of
    MERCHANTABILITY or FITNESS FOR A PARTICULAR PURPOSE.  See the
    GNU General Public License for more details.

    You should have received a copy of the GNU General Public License
    along with this program.  If not, see <https://www.gnu.org/licenses/>.

*/
#include <AFMotor.h>

AF_DCMotor m1(1);//define motor 1 as m1
AF_DCMotor m2(2);//define motor 2 as m2
AF_DCMotor m3(3);//define motor 3 as m3
AF_DCMotor m4(4);//define motor 4 as m4


void setup() {
  Serial.begin(9600);           // set up Serial library at 9600 bps
  Serial.println("Robojax Motor test!");

  // initial state of motor turn on motor
  m1.setSpeed(0);//motor 1 is turned off to turn on change 0, to 255
  m2.setSpeed(0);//motor 2 is turned off
  m3.setSpeed(0);//motor 3 is turned off
  m4.setSpeed(0); //motor 4 is turned off
}

void loop() {
  uint8_t i;

  Serial.println("Motor 1 FORWARD 100% speed");
  m1.run(FORWARD);
  m1.setSpeed(speed(100));
  Serial.println("m4 FORWARD 100%");
 m4.run(FORWARD);
 m4.setSpeed(speed(100));
  delay(3000);


  m1.run(RELEASE);
  Serial.println("M1 RELEASE");
 m4.run(RELEASE);
  Serial.println("m4 RELEASE");
  delay(3000);


  Serial.println("M1 BACKWARD 80%");
  m1.run(BACKWARD );
  m1.setSpeed(speed(80));
  Serial.println("m4 BACKWARD 60%");
 m4.run(BACKWARD );
 m4.setSpeed(speed(60));


  delay(3000);


 delay(3000);
  m1.run(RELEASE);
  Serial.println("M1 RELEASE");
  m4.run(RELEASE);
  Serial.println("m4 RELEASE");
  delay(3000);
  Serial.println("=============");
}

/*
 * get pereentage value  0 to 100% and
 * conversts it to 0 to 255 which is motor speed used by Arduino
 * written by Ahmad Shamshiri on Feb 12, 2021
 */
int speed(int b)
{
  return map(b, 0, 100, 0, 255);
}