
Other Arduino Codes and Videos by Robojax
This code is to use Arduino as timer to control relay with potentiometer. You can set from 0 to any number of seconds. There is virtually no limit.

Fig. 1 Schematic diagram for Robojax Relay Timer V 1.0
To have finer control over time setting. Specially time above 100 seconds, use two potentiometers with values 1:10 (one is 10 times larger than the other.) For fexample for coarse control use 100kΩ variable resistor and for fine control use 10kΩ and connect them as shown in Fig. 2.
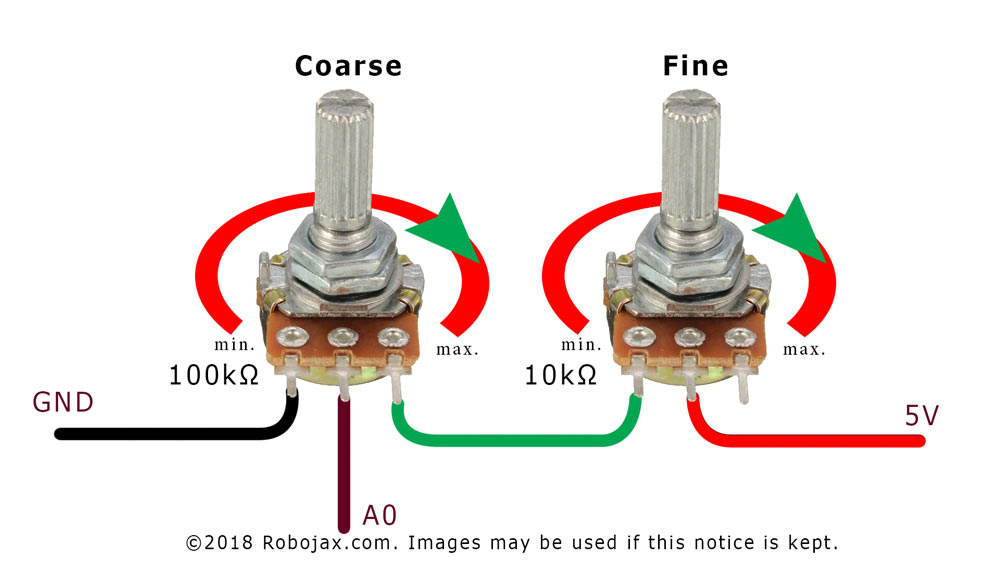
Fig. 2 Wiring of Fine and coarse control for two potentiometers
/*
 * Arduino code for Relay timer with potentiometer
 * this Arduino sketch makes it possible to control a relay with the set time
 * which is set by the potentiometer
* Watch video instruction for this code: https://youtu.be/6DGQhQgr7Ak
*
 * Written by Ahmad Shamshiri for Robojax.com on Sunday Oct 11, 2018
 * at 15:29 in Ajax, Ontario, Canada
  *
 * This code is "AS IS" without warranty or liability. Free to be used as long as you keep this note intact.*
 * This code has been download from Robojax.com
    This program is free software: you can redistribute it and/or modify
    it under the terms of the GNU General Public License as published by
    the Free Software Foundation, either version 3 of the License, or
    (at your option) any later version.

    This program is distributed in the hope that it will be useful,
    but WITHOUT ANY WARRANTY; without even the implied warranty of
    MERCHANTABILITY or FITNESS FOR A PARTICULAR PURPOSE.  See the
    GNU General Public License for more details.

    You should have received a copy of the GNU General Public License
    along with this program.  If not, see <https://www.gnu.org/licenses/>.
 */

#define relayPin 8 // the pin relay is connected
#define potPin  A0 // the pin potentiometer is connected
#define resetPin 3 // the pin where rest switch is connected
#define startPin 2 // the pin where start switch is connected

#define relayType 'L' // Relay trigger type. L for low and H for high

//because the time below is in millisecond, 1000ms=1 second, 1000x60=60000 is 1 minuets. 60x60x1000=3600000 is 1 hour
const long maxTime = 30000;// maximum timer time in milliseconds. for one minute =60000, 1 hours =3600000
const long minTime = 3000; // miniimum timer time in milliseconds

// do not change anything bellow here
long duration;
int potValue;
long rememTime;
int relayState =0;

void setup() {
  pinMode(relayPin, OUTPUT);// define relayPin  as output
  pinMode(resetPin, INPUT_PULLUP);// define input pin with pullup (watch video)
  pinMode(startPin, INPUT_PULLUP);// define input pin with pullup (watch video)
  attachInterrupt(digitalPinToInterrupt(resetPin), reset, LOW);

  Serial.begin(9600);// initialize serial monitor with 9600 baud
  if(relayType == 'L')
  {
    digitalWrite(relayPin, HIGH);// turn the relay OFF and keep it OFF
      Serial.println("Robojax.com Relay Timer");
      Serial.println("Relay Type: LOW Trigger");
  }else{
    digitalWrite(relayPin, LOW);// turn the relay OFF and keep it OFF
      Serial.println("Robojax.com Relay Timer");
      Serial.println("Relay Type: HIGH Trigger");
  }
}

void loop() {
  potValue = analogRead(potPin)/10;// reads the value of the potentiometer (value between 0 and 1023)

  duration = map(potValue, 0, 102, minTime, maxTime);// convert A0 value to time set at minTime and maxTime

    if(digitalRead(startPin) ==LOW)
    {
     rememTime = millis();
     relayState = 1;
     controlRelay();// send command to turn the relay ON
    }
   if(  (millis()- rememTime) > duration )
   {
    relayState = 0;
    controlRelay();
   }
      Serial.print("Time: ");
      Serial.print(duration/1000);
      Serial.println(" Seconds");
 delay(200); // wait for 200 milliseconds
}// loop end


/*
 *
 * @brief Turns the relay ON or OFF
 * @param none
 * @return no return value
 */

 void controlRelay()
 {
  if(relayType == 'L')
  {
     if(relayState == 1)
     {
    digitalWrite(relayPin, LOW);// Turn ON relay
      Serial.print("LT-Relay ON for ");
      Serial.print(duration/1000);// display in seconds
      Serial.println(" Seconds");
     }else{
    digitalWrite(relayPin, HIGH); // turn OFF
      Serial.println("====Relay is OFF");
     }

  }else{
     if(relayState == 1)
     {
      digitalWrite(relayPin, HIGH);
      Serial.print("HT-Relay ON for ");
      Serial.print(duration/1000);// display in seconds
      Serial.println(" Seconds");
     }else{
      digitalWrite(relayPin, LOW);
      Serial.println("==Relay OFF");
     }
  }

}//controlRelay end


void reset()
{
  duration =0;
   if(relayType == 'L')
  {
    digitalWrite(relayPin, HIGH);// turn OFF High trigger relay
  }else{
    digitalWrite(relayPin, LOW);// turn OFF Low trigger relay

  }
  Serial.println("Relay OFF");

}//reset()

If you found this tutorial helpful, please support me so I can continue creating content like this. support me via PayPal 