
How to use seven segment LED display with Arduino
How to use seven segment LED display with Arduino
Arduino code to display digits on common anode and common cathode LED display. The code has been explained in the video.
_800.jpg)
Main Circuit shown in video tutorial
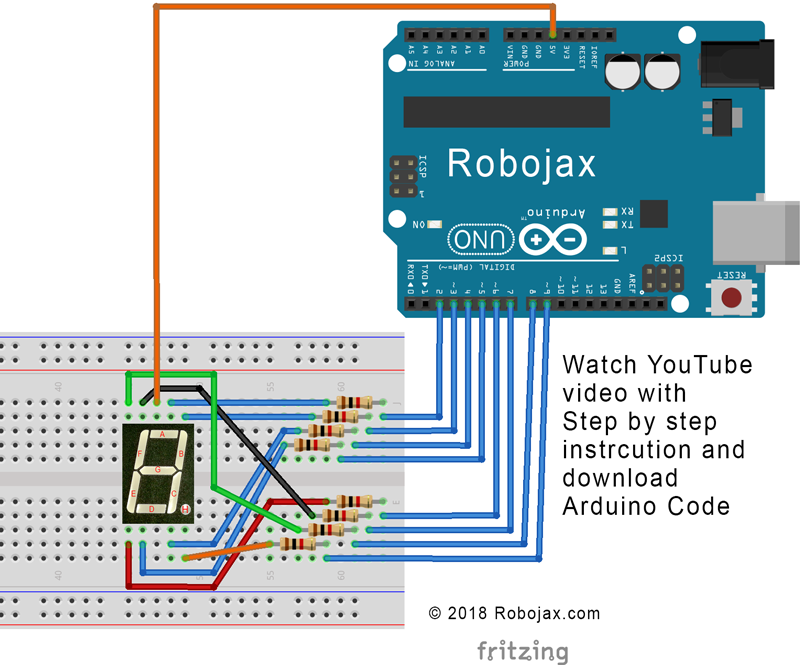
Main Circuit shown in video tutorial
._800jpg.jpg)
5611BH LED display
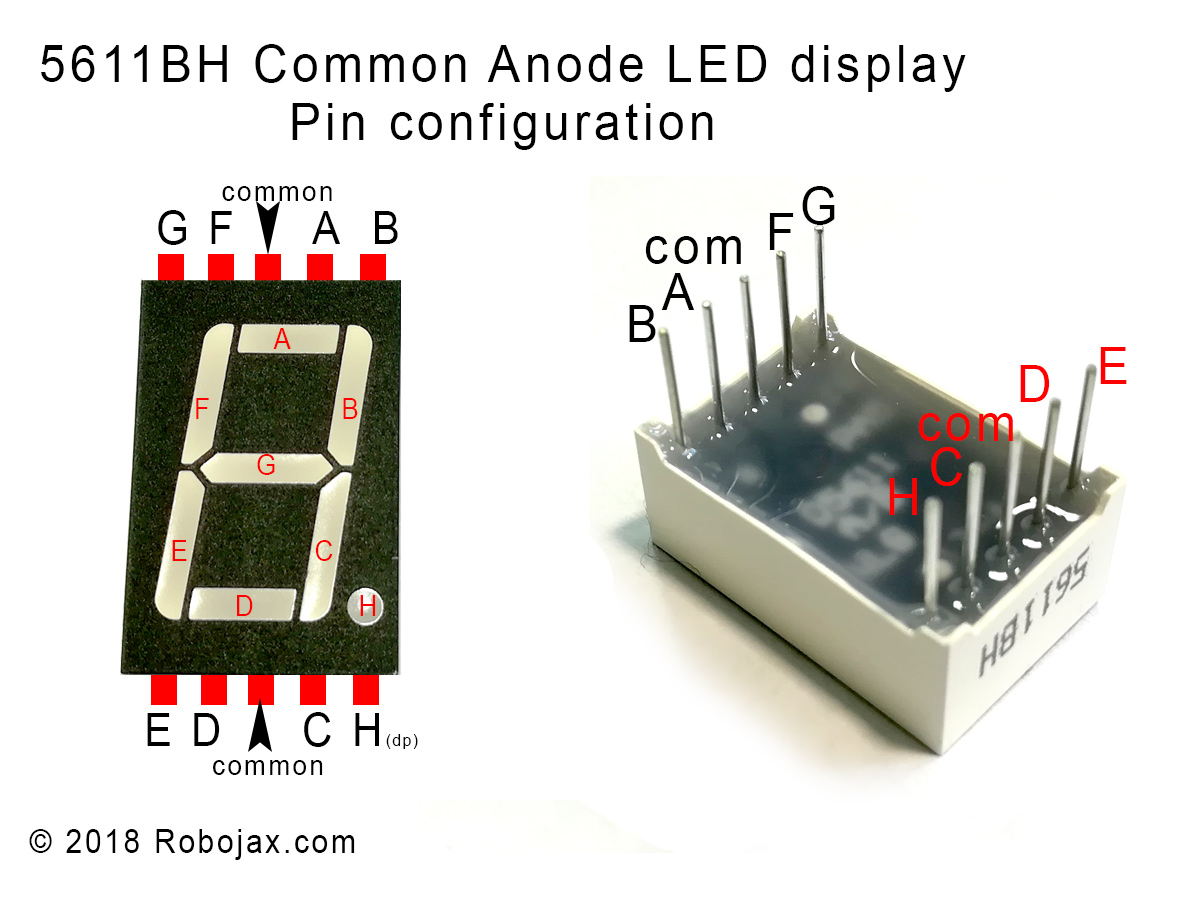
5611BH Pin configuration
Resources for this Arduino sketch
Arduino code to update I2C address on VL53L0X
 /*
 * Display number on seven segment display with Arduino
 *
 * Written by Ahmad Shamshiri for Robojax.com
 * on December 07, 2018 at 22:34 in Ajax, Ontario, Canada

watch video instruction for this code: https://youtu.be/f3GqRMQ8jYs
Get this code and other Arduono codes from Robojax.com
 *
  * This code is "AS IS" without warranty or liability. Free to be used as long as you keep this note intact.*
 * This code has been download from Robojax.com
    This program is free software: you can redistribute it and/or modify
    it under the terms of the GNU General Public License as published by
    the Free Software Foundation, either version 3 of the License, or
    (at your option) any later version.

    This program is distributed in the hope that it will be useful,
    but WITHOUT ANY WARRANTY; without even the implied warranty of
    MERCHANTABILITY or FITNESS FOR A PARTICULAR PURPOSE.  See the
    GNU General Public License for more details.

    You should have received a copy of the GNU General Public License
    along with this program.  If not, see <https://www.gnu.org/licenses/>.
 */


#define type 1 // 0 for common cathode and 1 for common acode

const int displayPins[7] = {2,3,4,5,6,7,8}; // define pins
const int dicimalPoint = 9;// decimal point

// array for seven segment LED values. Do not change.
//This is used for both common anode and common cathode
byte displayLEDs[10][7] = {
        { 0,0,0,0,0,0,1 },  // = 0
        { 1,0,0,1,1,1,1 },  // = 1
        { 0,0,1,0,0,1,0 },  // = 2
        { 0,0,0,0,1,1,0 },  // = 3
        { 1,0,0,1,1,0,0 },  // = 4
        { 0,1,0,0,1,0,0 },  // = 5
        { 0,1,0,0,0,0,0 },  // = 6
        { 0,0,0,1,1,1,1 },  // = 7
        { 0,0,0,0,0,0,0 },  // = 8
        { 0,0,0,0,1,0,0 }   // = 9
        };
/*
 *
 * @brief wites digit to display
 * @param digit (integer)
 * @return no return value
 * Written by Ahmad Shamshiri on Friday Dec 07, 2018 for Robojax.com
 */
void writeDigit(int digit) {
  // Robojax Seven Segment Display for Arduino
  Serial.print(digit);
  Serial.print(" ");

   int digitValue;
  for (int i=0; i < 7; i++)
  {

      digitalWrite(displayPins[i], convertHighLow(displayLEDs[digit][i]));// write the HGIH or LOW (depending on the type) to output pin
      Serial.print(convertHighLow(displayLEDs[digit][i]));// print the result to the Serial monitor

  }// for i
}//writeDigit ends here

/*
 *
 * @brief converts HIGH and LOW based on the "type" variable value
 * if type is 1, converts the "V" to LOW, or returns it as it is if type if 0 (zero)
 * @param v (integer)
 * @return the convertedValue
 * Written by Ahmad Shamshiri (Robojax.com) on Friday Dec 08, 2018 for Robojax.com
 */
int convertHighLow(int v)
{
  int convertedValue;
    if(type ==0)
    {
      convertedValue = 1 - v;// if common anode, change the HIGH to LOW and LOW to HIGH
    }else{
      convertedValue = v;// if common cathode, keep it the same
    }

    return convertedValue;
}

void setup() {
  // Robojax Seven Segment Display for Arduino
  for(int d=0; d<8; d++)
  {
    pinMode(displayPins[d], OUTPUT);// set pin as output

  }
   pinMode(dicimalPoint,OUTPUT);// define a pin for decimal pint
   digitalWrite(dicimalPoint,HIGH);// turn decimal point OFF. Set to LOW if common Anode and HIGH for common cathode

  Serial.begin(9600);// initialize serial monitor with 9600 baud
}// setup ends here


void loop() {
  // Robojax Seven Segment Display for Arduino
 for (int i=0; i<=9 ; i++) {
   writeDigit(i);
   Serial.println("=====");
   delay(1000);
  }
  digitalWrite(dicimalPoint,LOW);// turn decimal point ON
  delay(3000);
  writeDigit(4);
   delay(3000);

}// loop ends here