How to setup MH-Tinny Attiny88 Development board with Arduino IDE
This this video how to start ESP32 Camera and get video over WiFi.
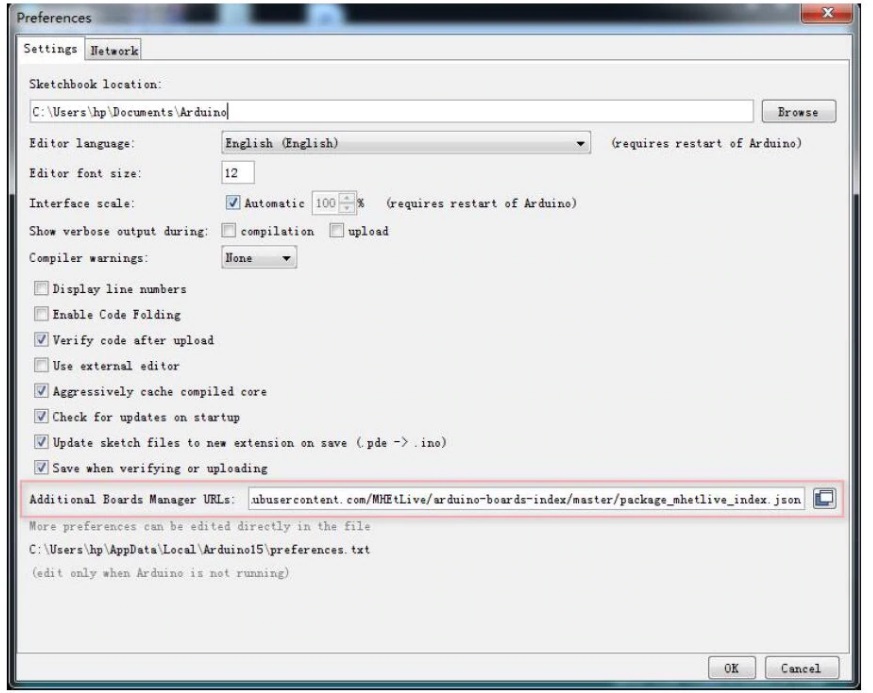
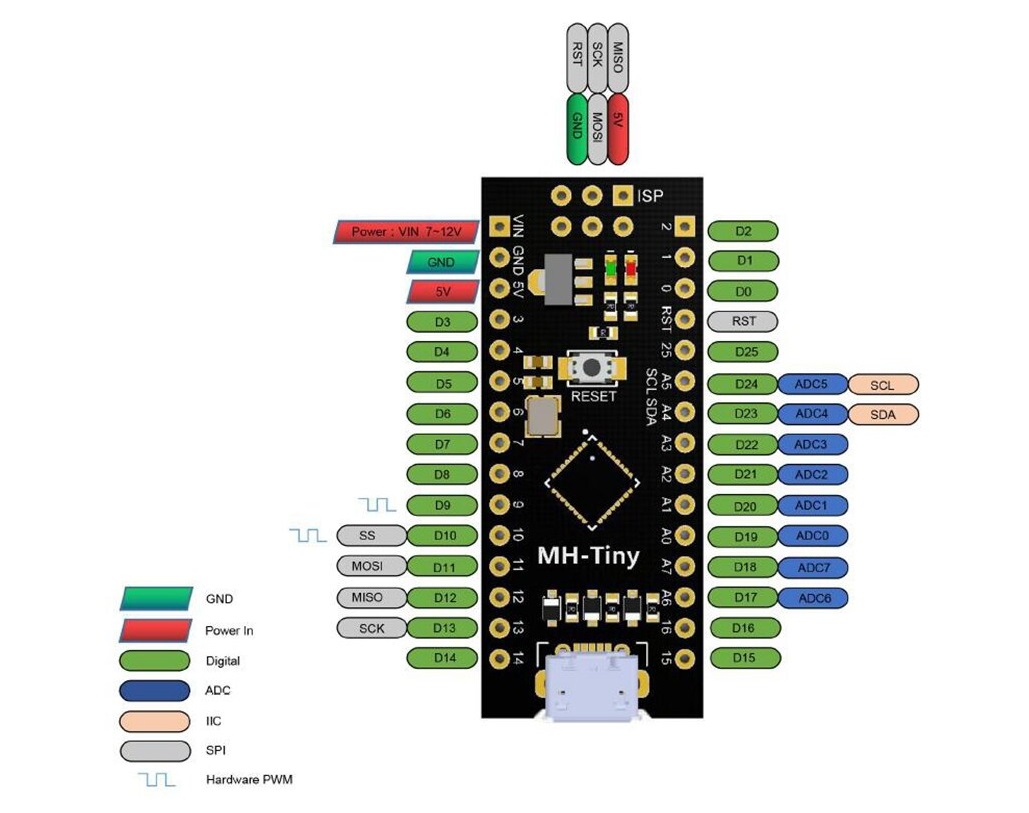
Pin out of MH-Tiny Attiny88
Installation Instructions
First download the appropriate Arduino package at the Arduino.cc website: Arduino IDE
If using Arduino 1.6.6 or higher and windows - you will need to download and install the drivers manually. Download, unzip and run “Install Drivers” (on 32bit systems) or “DPInst64” (on 64bit systems). The driver files are located here: Additional Board
Install or Unzip the Arduino application.
Run the Arduino application.
In the Arduino application go to the “File” menu and select “Preferences”,In the box labeled “Additional Boards Manager URLs” enter:
https://raw.githubusercontent.com/MHEtLive/arduino-boards-index/master/p
ackage_mhetlive_index.json and click OK;
The link to use in the "preferences" of Arduino IDE for ESP32 board
https://dl.espressif.com/dl/package_esp32_index.json
Go to the “Tools” menu and then the “Board” submenu - select “Boards Manager” and then from the type drop down select “Contributed”:
Select the “MH-ET LIVE Boards” package and click the “Install” button.
You'll see the download progress on the bottom bar of the “Boards Manager” window, when complete it will show “Installed” next to that item on the list.
WINDOWS USERS: When complete the install with pop up a Driver Install Wizard window, please click “Next” on this Window to install the drivers for MH-ET LIVE
Boards (If you already have them installed, this installer will update them and install any that are missing).
With the install complete, close the “Boards Manager” window and select the MH-ET LIVE Boards “MH-ET LIVE Tiny88(16.0Mhz)” from the Tools→Boards menu.
Choose the example that comes with the Arduino IDE: Select the development board as MH-ET LIVE Tiny88 in the toolbar, open the program in File >>Example >> Basic>>Blink, change the port 13 in the program to 0. Port, compile and download into the MH-ET LIVE Tiny88(16.0Mhz) according to the abovemethod, it can be seen that the onboard LED light flashes according to the
frequency specified by the program. (note: When downloading the program, do not connect the module first, wait for the prompt to insert the module after compiling, then plug it in and wait for the automatic download to complete).
If you found this tutorial helpful, please support me so I can continue creating content like this. support me via PayPal