
4 channel Solid State Relay with Arduino
How to use 4 channel Solid State Relay with Arduino To control 4 A bulb or load
This video and code will help you turn ON or turn OFF 4 Solid State Relay (SSR) using Arduino..
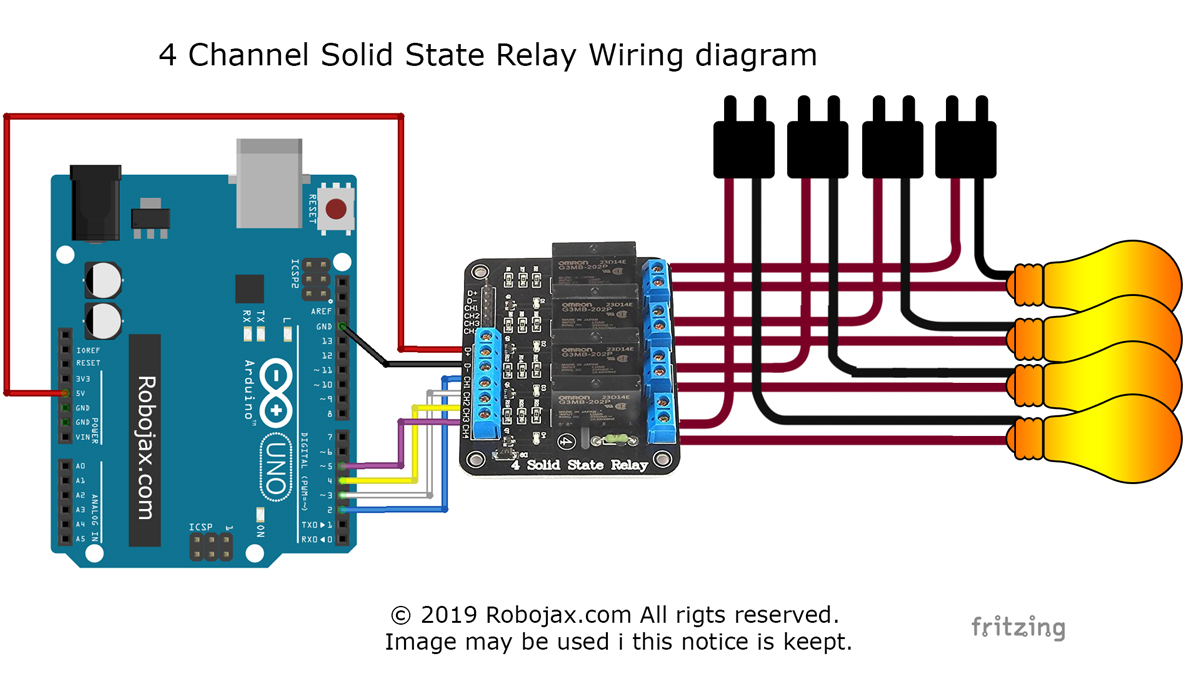
Wiring Diagram for 4 channel SSR
Resources for this sketch and video
- How to use Breadboard(video)
- Leran Arduino in 30 Minuetes (video)
- My Arduino Course on Udemy
- Get Early Acess to my videos via Patreon
 /*
 * This is code to control 4 channel Solid State Relay (SSR) module using Arduino
 * Written by Ahmad Shamshiri for Robojax.com
 * on January 11, 2019 at 21:03 in Ajax, Ontario, Canada

  Watch instruction video for this code: https://youTu.be/Rfaz5qOLKYQ

 * This code is "AS IS" without warranty or liability. Free to be used as long as you keep this note intact.*
 * This code has been download from Robojax.com
    This program is free software: you can redistribute it and/or modify
    it under the terms of the GNU General Public License as published by
    the Free Software Foundation, either version 3 of the License, or
    (at your option) any later version.

    This program is distributed in the hope that it will be useful,
    but WITHOUT ANY WARRANTY; without even the implied warranty of
    MERCHANTABILITY or FITNESS FOR A PARTICULAR PURPOSE.  See the
    GNU General Public License for more details.

    You should have received a copy of the GNU General Public License
    along with this program.  If not, see <https://www.gnu.org/licenses/>.
 */


int ssr[]={2,3,4,5}; // Arduino pin numbers used for SSR
int triggerType = HIGH;// type LOW if low trigger and HIGH if high trigger SSR is used
int wait = 2000;// delay time

int ssrON, ssrOFF;// used for two different SSR trigger type. Do not change

void setup() {

    Serial.begin(9600);// prepare Serial monitor
    // set  pins as output
    if(triggerType)
    {
      ssrON = HIGH;
      ssrOFF = LOW;
    }else{
      ssrON = LOW;
      ssrOFF = HIGH;
    }
 for(int i=0; i < 4; i++)
 {
    pinMode(ssr[i], OUTPUT);// sent i(th) pin as output
    digitalWrite(ssr[i], ssrOFF); // Turn the SSR OFF
 }

    Serial.println("Robojax 4 SSR ");


}

void loop() {

  // this is just demo
 for(int i=0; i < 4; i++)
 {
      contrlSSR(i+1, ssrON, 2000); // turn SSRs one by one ON
 }// for loop


 for(int i=0; i < 4; i++)
 {
      contrlSSR(i+1, ssrOFF, 1000);  // turn SSRs one by one OFF
 }// for loop


   contrlSSR(1, ssrON, 2000);  // turn SSR1 ON for 2 seconds
   contrlSSR(2, ssrON, 3000);// turn SSR2 ON for 3 seconds
   contrlSSR(4, ssrON, 2000);// turn SSR4 ON for 2 seconds

   contrlSSR(1, ssrOFF, 0); // turn ssr1 OFF
   contrlSSR(4, ssrOFF, 0);// turn ssr4 OFF
   contrlSSR(2, ssrOFF, 0);// turn ssr12 OFF

   delay(2000);
    Serial.println("====== loop done ==");

}// loop


/*

 *  contrlSSR turns OFF or ON SSR
 *  Jan 11, 2019
 * @param  is integer, SSR number starts with 1
 * @param control should be ssrON or ssrOFF
 * @param wait is a number in millisecond.

 *
 */
void contrlSSR(int number, int control, int wait)
{
  if(control == HIGH)
  {
     Serial.print("SSR "); Serial.print(number);Serial.println(" ON");
      digitalWrite(ssr[number-1], ssrON); // Turn the SSR ON
      delay(wait);
  }else{
     Serial.print("SSR "); Serial.print(number);Serial.println(" OFF");
      digitalWrite(ssr[number-1], ssrOFF); // Turn the SSR OFF
      delay(wait);
  }
}